Machine learning (ML) has quickly become integral to many businesses. Its rapid adoption across almost every industry is because it is a force multiplier: new data can be learned from and understood as it arrives, while historical data can be revisited with new tools and practices. As your ML deployment grows to cover new use cases and integrate more data, you need to make sure that keeping your ML models updated, training with new data, and testing revised and retrained models does not become a burden to your tech teams.
This tutorial shows you how to build a continuous integration (CI) pipeline to automate your ML workflow. It demonstrates breaking down your workflow so that each stage can be triggered when your ML code changes, with an example project that includes building, training, testing, and packaging a model using an automated workflow. It also explores how you can use cloud-hosted GPU resources to accelerate your ML workflows — without the need for on-site hardware.
In the follow-up tutorial, we’ll cover setting up a continuous delivery (CD) pipeline for your ML model, including automating and scheduling deployment as well as monitoring and retraining your ML system.
What is CI, and what can it do for your ML models and workflows?
ML workflows consist of a number of moving parts — including the data platforms and analytics systems that gather data, the data pipelines that take that data and store it within your systems, and the people or processes that then clean that data and prepare it for use. From there, your ML models are trained and retrained on your data until they provide useful output that can be verified by domain experts. It’s a living system that mixes human and artificial intelligence, each enhancing the other’s contribution.
An effective ML system depends on good MLOps practices. These are derived from proven DevOps practices that have become a cornerstone of software development. The quality of your models, and the outcomes they produce, depend on the speed at which you can train and retrain them and the quality of the data you feed them. Both of these processes can be greatly enhanced by implementing CI/CD pipelines to manage your ML workflow.
CircleCI is a CI/CD platform that is well suited for automating ML workflows and solves the most common challenges facing ML developers. This flexible platform lets you build fully bespoke pipelines that can perform almost any task in either managed, cloud-hosted execution environments running the OS and software of your choice or on your own local hardware using self-hosted runners. It’s powered by Git, so your CI/CD pipelines integrate with your existing tools — just add a CircleCI configuration file to your project, and you can start automating.
Our example use case scenario: a TensorFlow image recognition ML workflow
This tutorial is about building CI/CD pipelines to automate ML tasks — not how to build an ML model — so we’ll keep it simple and use the example ML workflow provided by TensorFlow. This code builds a model using Keras and example data from MNIST that identifies images, tests the model, and then packages it. In part 2 of this tutorial, we will build a workflow that deploys it to TensorFlow Serving for use, tests it, and retrains it.
The tools you use and your ML workflows will be unique to your use case, but the CI/CD practices demonstrated here will work with whatever ML system you are building. No matter which ML platform you’re running or how complex your system is, it can be broken down into steps and automated using CircleCI.
Our example ML workflow and CircleCI pipeline
If you want to dive right into the example code, see the repository for this tutorial. This repository contains the instructions and scripts required to manually configure and run the ML workflows, as well as a CircleCI configuration that automates the processes:
- The ml directory contains an example ML workflow split across several Python scripts.
- These scripts rely on a .env file with the deployment server details in the root project directory. An example is provided.
- The tools directory contains Bash scripts for setting up the environment to run the ML workflow, testing the workflows locally, and configuring a TensorFlow Serving server.
- Finally, the .circleci directory contains the CircleCI
config.ymlthat defines the CircleCI pipelines that will call the ML scripts.
Prerequisites and installation
To build the automated ML pipeline for this tutorial, you will need the following:
- A CircleCI account and project.
- See the CircleCI quickstart guide to learn how to get up and running with both.
- You can fork the example repository for this tutorial from your own GitHub account and use it as the basis for your CircleCI project.
- A CircleCI self-hosted runner.
- This can be a local machine or set up as part of an auto-scaling deployment for larger workloads.
- The code in the example repository for this tutorial has been tested on Ubuntu 22.04.
- You can also use CircleCI’s managed cloud compute resources (including GPUs).
- A server with SSH access for storing your trained and packaged models.
- Your models will be uploaded here for storage and, later, publishing to TensorFlow Serving (covered in part 2 of this tutorial).
- Your runner should be able to reach this machine on the network.
Python dependencies
The ML scripts in this example are all written in Python.
On your runner, you will need Python, pip, and Python venv. On Ubuntu, run the following terminal command to install these:
sudo apt install python3 python3-pip python3-venv
Manually testing the ML scripts
If you want to run the scripts in the ml directory locally to test them, you can install a virtual environment and the required Python packages by following the instructions in the Test this project locally section of the README. Note that the scripts in this repository expect you to execute all commands from the project’s root directory.
Building your ML workflow
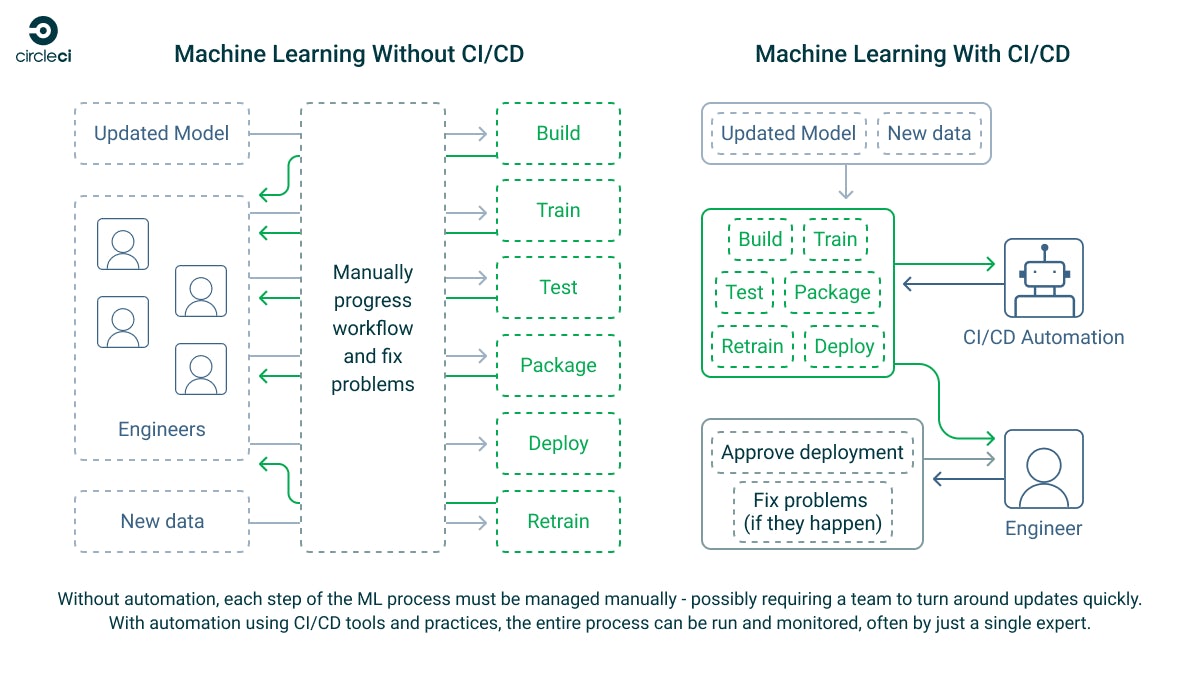
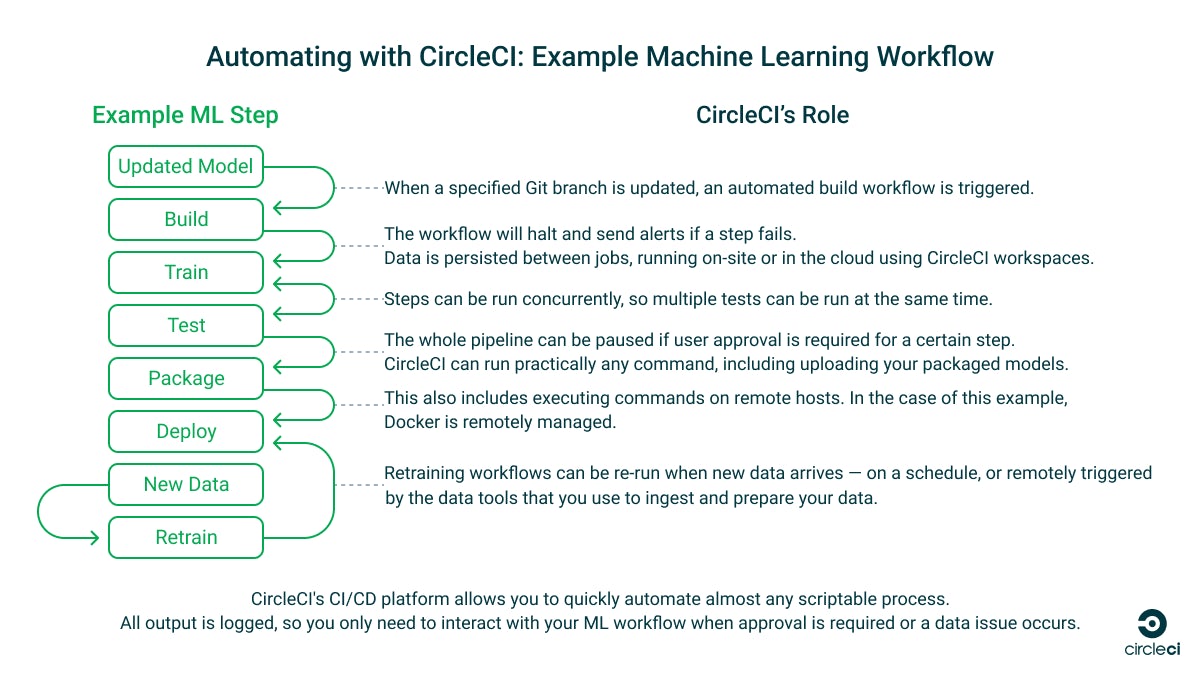
The key to automating your ML workflow is to break it down into steps. This allows you to call each step in sequence, or run them in parallel if they do not rely on each other, and monitor the result of each. If something fails, you can automatically roll back or retrain and notify the responsible team member so that they can respond.
The TensorFlow example that this tutorial is based on was originally written as a single Python script. It has been broken down into the separate scripts below for automation.
1. Prepare your data
This is a vital step that should be included in every ML workflow: you must understand your data before you work on it and make sure that it is clear of anomalies before it is used.
An ML model is not effective unless you can verify that it is actually working. If you do not have some cleaned data that you already understand to test it against, you have no way of knowing how accurate it is. Additionally, make sure that you have a source of reliable data to use when training or retraining your models.
2. Build
Building an ML model is a multi-step process that involves collecting, validating, and understanding your data and then building a program that can analyze and create insights from it.
In our example, the build phase imports and prepares some demo data, ready to train an existing Keras sequential model in the next step. In a real-world scenario, you’d supply your own data.
The Python code for this step is in ml/1_build.py.
3. Train
In this step, carefully prepared, highly accurate data with known outcomes is fed into the model so that it can start learning. This uses the training data from the build phase.
It is best practice to be as verbose as possible in your scripts. Print out as much useful information as you can, as anything that is output to the console will be visible in the logs in CircleCI’s web interface, allowing for easy monitoring and debugging.
The Python code for this step is in ml/2_train.py.
4. Test
As the training data used in the example ML workflow is already well understood, we can tell if the trained model is accurate by comparing its output with the already known outcomes.
In our scripts, we do this by comparing the testing data created in 1_build.py. If the accuracy is inadequate, an exception is thrown that halts the CI/CD pipeline and alerts the owner.
The Python code for this step is in ml/3_test.py.
5. Package
The packaging step prepares the trained model for use in a separate environment — exporting it in a standard format and making it portable so that it can be deployed for use elsewhere. It then uploads it to a package staging location for future use.
This example uploads the files to a remote server using SSH. If you are running your ML pipelines entirely in the cloud and do not want to grant them access to your internal network assets, you can use the AWS S3 orb for this purpose to store your ML artifacts where both CircleCI’s cloud compute resources and your own infrastructure can access them.
The Python code for this step is in ml/4_package.py.
Automating ML model builds with CircleCI CI/CD
Once you’ve broken down your ML process and created the scripts to run your workflow (or copied the ones in this example), you can publish it to GitHub and then import it as a CircleCI project.
The CircleCI configuration file
The CircleCI configuration file is located at the path .circleci/config.yml. It defines the commands, jobs, steps, and workflows that make up the automated ML system. Below is an explanation of the features demonstrated in the example CircleCI configuration, which contains a full working automated ML system that you can test and build on.
In the configuration file, the check-python command demonstrates how to run a terminal command in the CircleCI execution environment. If this command fails, the job and workflow that call it will also fail, sending the error to CircleCI and notifying the owner:
commands:
    check-python:
        steps:
        - run:
            command: python3 --version
            name: Check Python version
Commands can be reused multiple times within jobs and can also call their own one-off steps. Below, the install-build job prepares the environment for running the other ML scripts. It checks out the project code, checks that Python is installed by using the previously defined check-python command, and then runs the create-env command to create the required configuration files. From there, it runs its own set of commands to install Python dependencies and then runs the first build step in the ML pipeline.
jobs:
install-build:
    # For running on CircleCI's self-hosted runners - details taken from environment variables
    machine: true
    resource_class: RUNNER_NAMESPACE/RUNNER_RESOURCE_CLASS # Update this to reflect your self-hosted runner resource class details
    steps:
    - checkout # Check out the code in the project directory
    - check-python # Invoke command "check-python"
    - create-env
    - run:
        command: sh ./tools/install.sh
        name: Run script to install dependencies
    - run:
        command: python3 ./ml/1_build.py
        name: Build the model
    - persist_to_workspace:
        # Workspaces let you persist data between jobs - saving time on re-downloading or recreating assets https://circleci.com/docs/workspaces/
        # Must be an absolute path or relative path from working_directory. This is a directory on the container that is
        # taken to be the root directory of the workspace.
        root: .
        # Must be relative path from root
        paths:
            - venv
            - ml
            - .env
            - tools
Workflows are made up of jobs that can run sequentially or concurrently. The build-deploy workflow runs the install-build, train, test, and package jobs and demonstrates how to use a branch filter to run the workflow only when commits are made to the main branch. It also shows how the requires option can be used to ensure that jobs execute in order and how multiple job names can be required by a subsequent job, allowing for them to be executed concurrently.
workflows:
    # This workflow does a full build from scratch and deploys the model
    build-deploy:
        jobs:
        - install-build:
            filters:
                branches:
                only:
                    - main # Only run the job when the main branch is updated
        - train:
            requires: # Only run the job when the preceding step in the ML process has been completed so that they are run sequentially
                - install-build
        # To demonstrate how to run two tests concurrently, we'll run the same test twice under different names - if either required test fails, the next job that requires them (in this case, package) will not run - https://circleci.com/docs/workflows/#concurrent-job-execution
        - test:
            name: test-1
            requires:
                - train
        - test:
            name: test-2
            requires:
                - train
        - package:
            requires:
                - test-1
                - test-2
You can either create the file yourself at the path .circleci/config.yml or create one in the web console when you import your project into CircleCI (with the added advantages of linting and schema validation). If you are editing your CircleCI configuration locally, it’s advised to use the CircleCI command line tools to validate your configuration before you commit your changes. VS Code users can also validate their config directly in their IDE using the CircleCI VS Code extension.
Take a look at the full working example CircleCI configuration, including all of the required commands, jobs, and workflows.
Creating a CircleCI self-hosted runner
The CircleCI pipeline example provided with this tutorial executes everything on a CircleCI self-hosted runner. This is often preferred in production, as it means that your privileged data stays on your network. You will need to configure your self-hosted runner and provide the details in the .circleci/config.yaml configuration file.
After you’ve configured your self-hosted runner, you must set the correct RUNNER_NAMESPACE and RUNNER_RESOURCE_CLASS in all locations in the .circleci/config.yml file.
machine: true
resource_class: RUNNER_NAMESPACE/RUNNER_RESOURCE_CLASS # Update this to reflect your self-hosted runner resource class details
You can also define different execution environments for different jobs, which is especially useful when using CircleCI’s cloud GPUs for compute-heavy jobs. In this tutorial, we use a single environment to keep things simple.
Configuring environment variables in CircleCI
You’ll notice that there are variables used in the configuration file (prefixed with a $ symbol). You will need to set the following environment variables in CircleCI, which will be used in these locations to generate the .env file Python uses to obtain your secrets on the runner when the pipeline is executed:
DEPLOY_SERVER_HOSTNAME
DEPLOY_SERVER_USERNAME
DEPLOY_SERVER_PASSWORD
DEPLOY_SERVER_PATH
Secrets like credentials and API keys should never be committed to source control. Environment variables are injected when a CircleCI pipeline is run so that you can create configuration files on the fly and avoid committing secrets.
Note that to keep things simple for this example, we’re using SSH password authentication. In production, you should use certificate authentication and restrict users so that they can only access the resources they require. For even better security, consider storing your secrets in a centralized vault and retrieving them when they are required.
In the example configuration, the .env file is created using the following CircleCI command:
commands:
    create-env:
        steps:
        - run:
            # Environment variables must be configured in a CircleCI project or context
            command: |
                cat \<<- EOF > .env
                DEPLOY_SERVER_HOSTNAME=$DEPLOY_SERVER_HOSTNAME
                DEPLOY_SERVER_USERNAME=$DEPLOY_SERVER_USERNAME
                DEPLOY_SERVER_PASSWORD=$DEPLOY_SERVER_PASSWORD
                DEPLOY_SERVER_PATH=$DEPLOY_SERVER_PATH
                EOF
            name: Create .env file containing secrets
See this example of what your generated .env file should look like.
Persisting data between jobs
Jobs can be executed in different environments. As such, data does not persist between them by default. CircleCI supports data persistence between jobs using workspaces. In the jobs defined in the example configuration, data at the paths venv, ml, .env, and tools is persisted to a workspace when it is modified:
  - persist_to_workspace:
    # Workspaces let you persist data between jobs - saving time on re-downloading or recreating assets https://circleci.com/docs/workspaces/
    # Must be an absolute path or relative path from working_directory. This is a directory on the container that is
    # taken to be the root directory of the workspace.
    root: .
    # Must be relative path from root
    paths:
        - venv
        - ml
        - .env
        - tools
That data is then reloaded when needed by attaching the job to the existing workspace:
- attach_workspace:
    # Must be absolute path or relative path from working_directory
    at: .
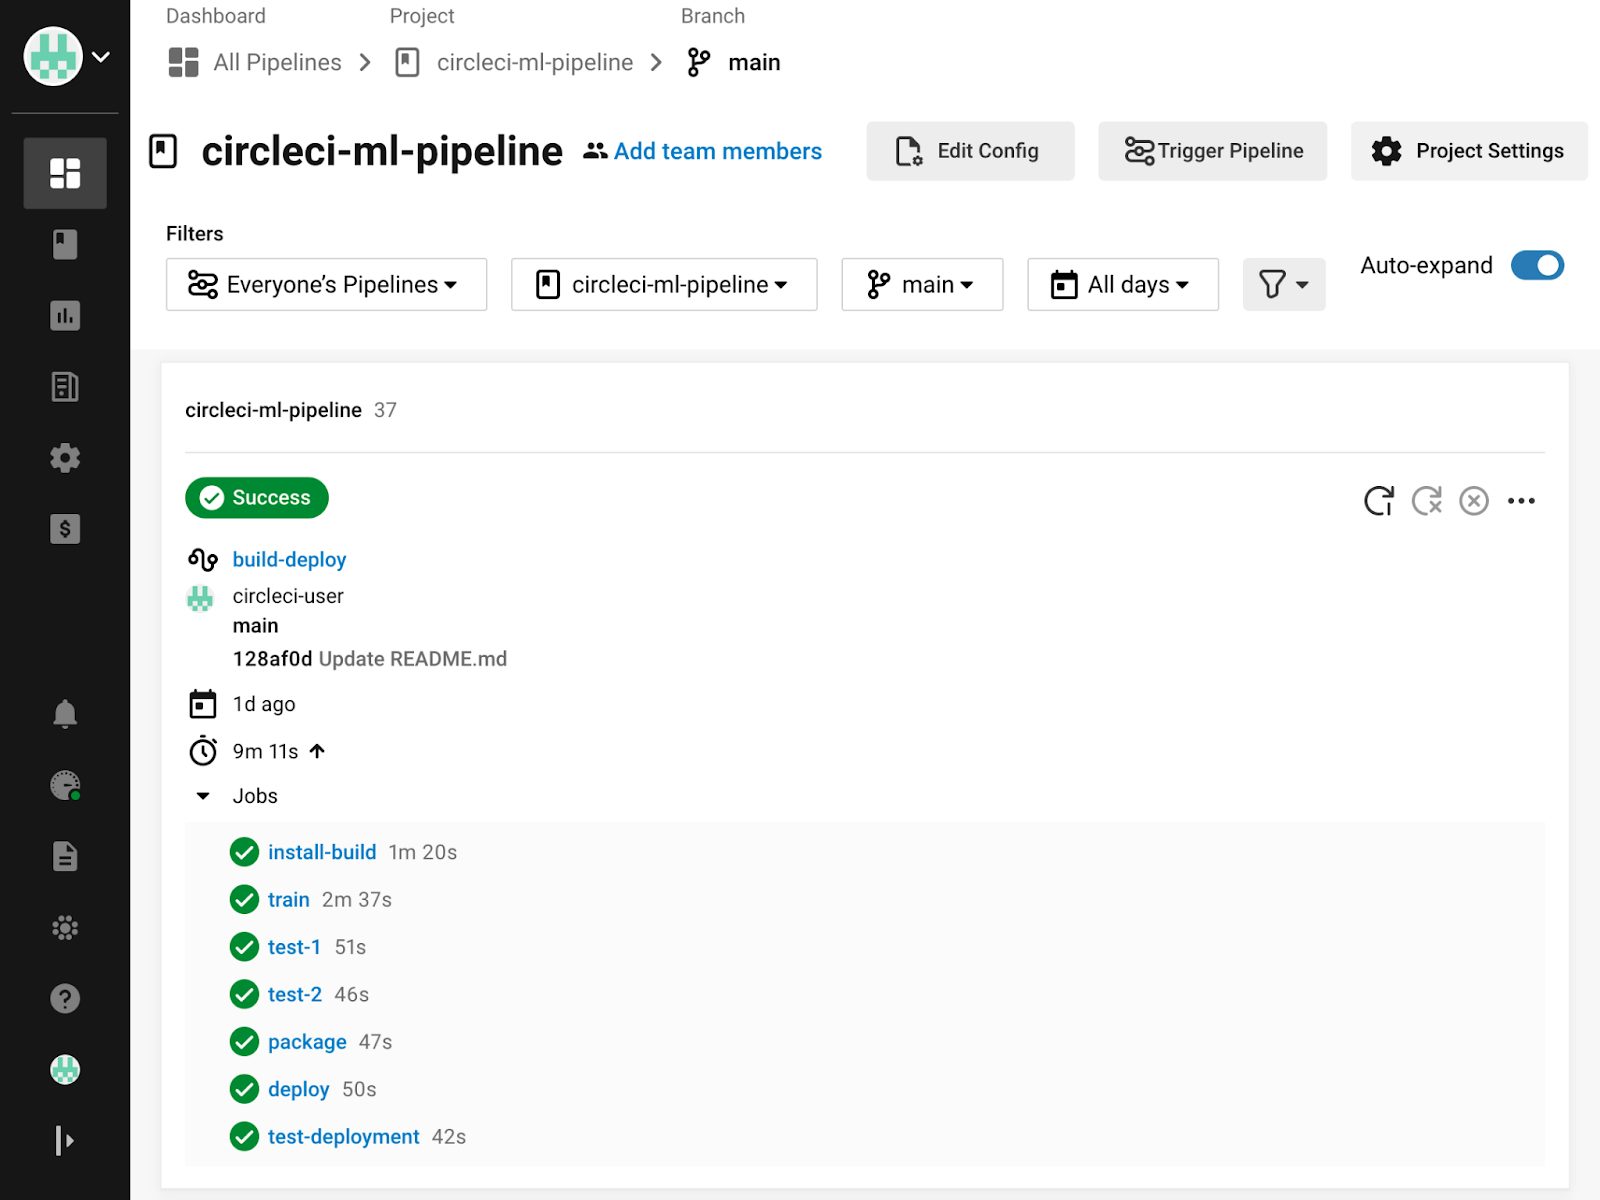
Confirming a CircleCI workflow has run successfully
When code is committed to a Git branch or a [scheduled pipeline] is triggered, CircleCI reads the configuration file and determines whether any workflows should run.
As a CircleCI workflow runs, all console output is shown in the CircleCI web console. Each step, job, and workflow will report its status and notify the owner on failure. If an approval is required, the job will pause until approval is given, and jobs can be rerun from the point of failure once a problem is corrected.
We’ll cover more about monitoring CircleCI pipelines in the next part of this tutorial.
Running your CI/CD workflows in the cloud using CircleCI’s managed cloud compute resources
This example has so far used a self-hosted runner to execute commands in a local environment. This is advantageous when dealing with privileged data that you do not want to leave your network but requires that you have your own local machines for the task.
You can run ML tasks (or any CI/CD task) directly on CircleCI’s managed compute resources by specifying a Docker, Linux VM (virtual machine), macOS, Windows, GPU, or Arm execution environment in your CircleCI configuration. You can also use your own Docker images with authenticated pulls. Hosted environments are run on CircleCI’s managed cloud compute, so you don’t need your own hardware — your workflows will be run on demand with automatically provisioned compute resources.
For example, to execute your jobs in a pre-built Python Docker container, you would replace the machine and resource_class options in the job with the following configuration code:
docker:
    - image: cimg/python:3.11.4
When using cloud compute, you will need to provide the execution environment access to your data. This can be done by using SSH tunneling, configuring a VPN, or using CircleCi’s orbs to access resources stored on public clouds such as AWS, Google Cloud Platform, or Azure. One common use case is to share ML models and data in an AWS S3 bucket, which can be authenticated and accessed by on-site infrastructure and CircleCI using OIDC.
Workspaces can also be used to transfer local data to cloud workloads. With minimal additional configuration, CircleCI workflows can run jobs that are configured to run on local runners or CircleCI’s managed cloud compute, with data persisted between them.
Using GPU resources for ML tasks in the cloud and locally
Along with specifying the CPU and memory available to your CircleCI cloud compute using resource classes, you can also run your ML tasks in cloud-hosted GPU execution environments. To use GPU resources in CircleCI, specify a GPU-enabled machine image in your configuration:
machine:
  image: ubuntu-2004-cuda-11.4:202110-01
If you have large data processing requirements that make the cost of using cloud resources prohibitive, you can use your own self-hosted runners with your own physical GPUs.
Once you have an environment with GPU resources available, and if your ML platform supports it, you can configure your ML package to utilize them. See this guide on how to do this with TensorFlow. GPUs make short work of compute-intensive applications and are therefore extremely well suited for processing ML models.
Automating your ML workflows with CI/CD is a cost-effective way to improve your data analysis outcomes
With more storage and processing power — both on-site and in the cloud — available to store and learn from the ever-increasing amount of available data, ML has become accessible to organizations of any size. Leaving this data to go stale and not leveraging the latest ML tools and practices is wasting the investment you have made in your digital infrastructure.
CircleCI’s CI/CD platform is not limited to building and testing software. In addition to ML tasks, it can be used to automate almost any scriptable process, with an expressive configuration-as-code system for building and deploying automated pipelines. To jump right in and start building your own MLOps workflows, sign up for CircleCI at no cost, and get up to 6,000 minutes of free usage per month.
In the next part of this tutorial, we’ll show you how you can set up a continuous delivery pipeline to automate ML model deployment, monitoring, and retraining with CircleCI. To follow along, visit CD for machine learning: Deploy, monitor, retrain.