The latest full-stack applications require a backend service. That is especially true when the frontend service depends on the backend service to render data. In many cases, it can be difficult to replicate the setup of the backend services so that you can test the application.
This tutorial will show you how to use Nock, and an HTTP server mocking and expectations library for Node.js, to mock HTTP requests from an API so that you can test endpoints without actually calling them. You’ll learn how to set up an automated continuous integration pipeline for your API tests to make the testing process faster and more efficient.
With the integration of Nock into your testing suite and the automation of your tests through a continuous integration pipeline, you can simulate API responses, manage test environments easily, and ensure that your application reacts correctly under different scenarios without the overhead of managing real external service dependencies.
What is Nock?
Nock is an HTTP server mocking and expectations library. You can use this library to test frontend modules that are performing HTTP requests. You can test in isolation because Nock lets you dictate what our API responses will be.
In this tutorial we will use an existing API todo application to test how it reacts to the backend APIs using Nock. Because this is a hosted application, you can focus just on the tests and not on developing the application itself.
Prerequisites
To get the most from following the steps in this tutorial, you will need:
- Basic knowledge of JavaScript.
- Basic knowledge of HTTP requests and testing them.
- Node.js (version >= 18) installed on your system
- A CircleCI account.
- A GitHub account.
Our tutorials are platform-agnostic, but use CircleCI as an example. If you don’t have a CircleCI account, sign up for a free one here.
The first step in this tutorial is to clone the test repository from GitHub.
Once you clone the repository, there is no need to set up the application. You can simply follow the tutorial while verifying the steps taken in the file todo.spec.js. This file is located in the application root of the cloned repository.
Why use mock testing?
A simple client-server architecture web application has both a backend and a frontend service. The frontend service contains the presentation logic of the application, and in most cases acts as the user interface. When a user performs an action, the client sends a request to the backend application. Throughout this tutorial I will refer to the backend application as a server.
Mock testing makes the process of running tests faster because you can eliminate dependencies on external systems and servers. Essentially, you “mock up” the backend application. Another benefit of using mocked dependencies is that you can test without causing a strain on external system resources like databases.
Note: Mock testing should always be used with other types of testing to provide the best test coverage. Good testing can increase confidence in the release process.
Testing an API HTTP architecture
The first sample test should check how long it takes to make a request to an actual back end of a todo application. The request will give you an idea of how much time mocking can save, especially in the case of running tests that mock the back end.
For a user, the application creates, displays, and fetches all the todo items. This test checks the time it takes to return all the todo items that have already been created.
describe("todo-app-barkend mocked tests", () => {
  it("can get todos", async () => {
    const response = await getTodoItems.getAllTodos();
    console.log(response);
  });
});
The result shows the amount of time it took to execute the simple test and return the results. Because you are calling a real database you will return all the results, not just the ones you need.
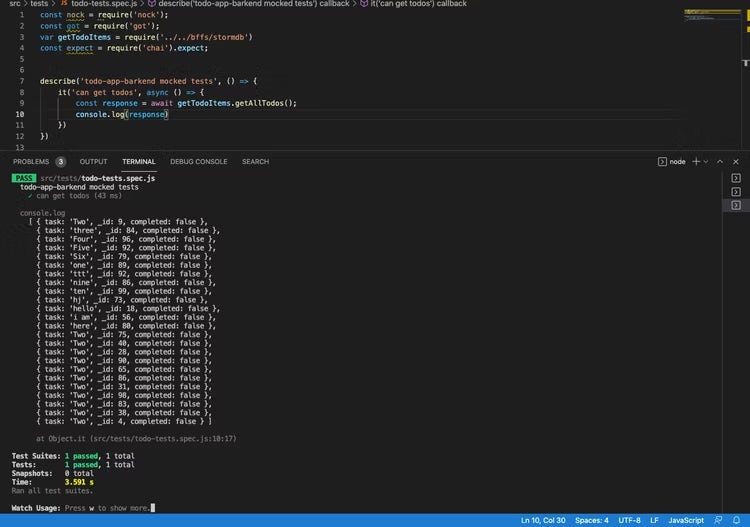
It takes about 3.591 seconds to retrieve all the items that have been added. When running tests, it would take about 3.591 seconds to retrieve the items every time you want to assert something in the response. That adds up to a lot of overhead and time constraints when running your tests.
Test execution architecture without mocks
Here is a diagram that shows the simplified architecture of how this test runs without any kind of intervention from a mocked service.
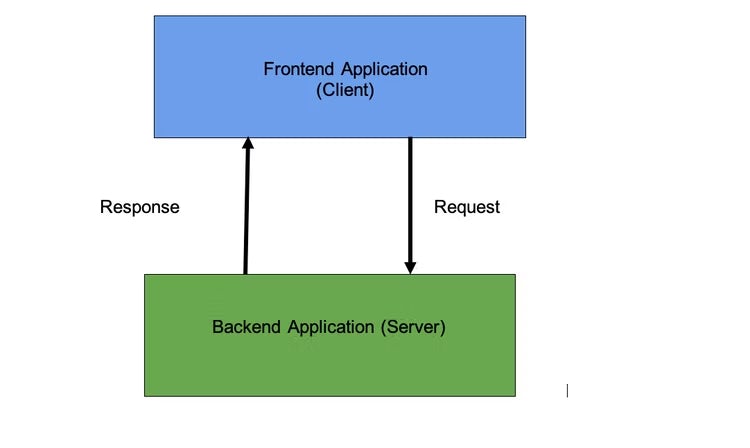
Testing this architecture by setting up a test database to ensure that you get responses can be a headache. Instead, you can isolate all the backend dependencies and focus only on the frontend application. Then use the Nock mock service to intercept requests to the API backend and return custom responses.
Mocked test execution architecture
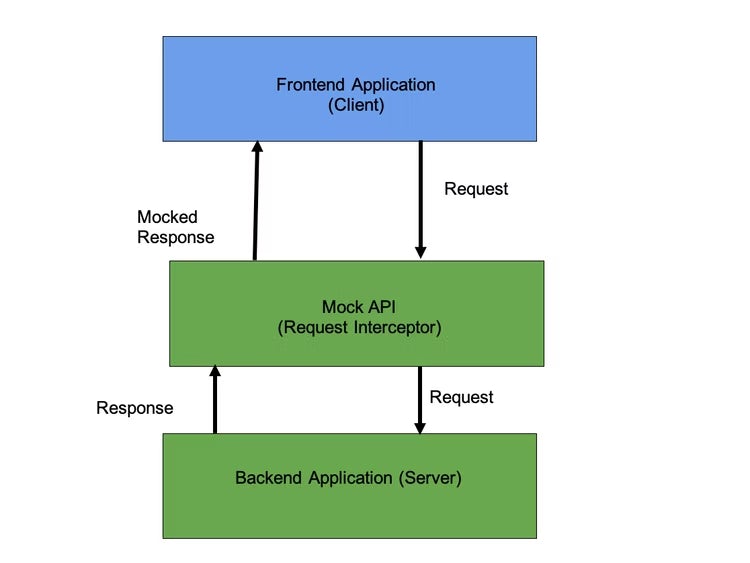
This architecture diagram shows that what is returned is not from the API, but a custom response.
You can override the mock API responses and hit the endpoints directly, if you need to. In this section, I will guide you through using the Nock library to test how to mock API services and even override the mocked calls.
Testing with Nock
Just like in the architectural diagram, Nock sits in between the backend application and the frontend application and intercepts any request being tested. Instead of calling the backend service to test the application, you provide a set of known responses that simulate (mock) the application.
In this test, you will rewrite your earlier test mocking the API request that returns the responses for todo items. The test is in the cloned repository in the file todo.spec.js.
it("can get todos", async () => {
  const todoObject = {
    todos: [
      { task: "Two", _id: 9, completed: false },
      { task: "three", _id: 84, completed: false },
    ],
  };
  nock("https://todo-app-barkend-b18308c4c059.herokuapp.com/todos/")
    .get("/")
    .reply(200, todoObject);
  const res = await got("https://todo-app-barkend-b18308c4c059.herokuapp.com/todos/");
  expect(res.body).to.eq(JSON.stringify(todoObject));
  expect(res.statusCode).to.equal(200);
});
Nock intercepts any GET requests that are routed to the /todos/ endpoint. Instead of the test using the response from the API, Nock returns the response that was defined using the nock() method.
Note: Heroku free tier dynos sleep after 30 minutes of no activity. If the test fails, the dynos could be inactive and you may need to re-run the test.
When you check the run times for the test you should find that it is quicker to run the test using the mocked service than testing the real service. The mocked service runs in about 1.58 seconds. That is much better than the earlier request without a mocked service, which ran for about 3.59 seconds.

Running the new test shows clearly that mocked requests run faster, which can save your team significant time. That is especially true when multiple tests require calling the backend.
Note: While Nock mocks out the API requests, it needs to perform HTTP requests on the endpoints when the tests are executing to ensure that the endpoints are present. Therefore the tests will fail if the endpoints being mocked are not available, or if the specified routes on the tests are not valid.
Bypassing Nock HTTP mocks
While mocked endpoints are useful to help you understand how your application interacts with the backend services, you may need to bypass the mocked requests in your tests. When you need to verify that you get proper responses from the endpoints when making HTTP requests to the backend service, you must bypass mocking.
The next sample test uses the Nock enableNetConnect method to define links that can be bypassed when mocking our tests. A good example would be to enable connection to the localhost URL and mock with the hosted URL just to verify that everything is working correctly. You can find this test in the cloned repository in the file todo.spec.js.
it("can create todos - enabled backend", async () => {
  var options = {
    headers: {
      "content-type": "application/json",
    },
    body: JSON.stringify({
      task: "Cook Lunch",
    }),
  };

  nock.enableNetConnect(/(todo-app-barkend-b18308c4c059)\.herokuapp.com/);
  const res = await got.post("https://todo-app-barkend-b18308c4c059.herokuapp.com/todos/", options);
  expect(JSON.parse(res.body)).to.have.property("task", "Cook Lunch");
});
The backend test for creating todo items specifies the regex for the URL to be bypassed. It then makes a later request to that URL. The second request is to make sure that the application actually creates a todo item when you make a request to the remote URL.
Clearing mocks and blocks
It is important to clear mocks after running each test. You will also want to enable any blocked HTTP requests. Clearing mocks and blocks keeps them from interfering with later tests, and allows the other tests to make HTTP requests.
To clear mocks after running tests, enter this code in the afterEach section of the tests:
afterEach(() => {
  nock.cleanAll();
  nock.enableNetConnect();
});
Writing the CI pipeline configuration
Next, we will set up a continuous integration pipeline to automate our test suite and trigger it on every change to our application code. Start by adding the CircleCI configuration to your local project. Create a folder named .circleci in the root directory. Inside the folder, create a config.yml file. Now add configuration details:
version: 2.1
jobs:
  build:
    working_directory: ~/repo
    docker:
      - image: cimg/node:21.4.0
    steps:
      - checkout
      - run:
          name: install dependencies
          command: npm install
      - save_cache:
          key: dependency-cache-{{ checksum "package-lock.json" }}
          paths:
            - ./node_modules
      - run:
          name: run api mock tests
          command: npm test
      - store_artifacts:
          path: ~/repo/api-testing-using-nock
In this configuration, CircleCI uses a Node Docker image pulled from the environment and then updates the npm package manager. The next stage restores the cache (if it exists) and updates the application dependencies when a change has been detected with save-cache. Finally, it runs the api-testing-using-nock tests and stores the cached items in the artifacts api-testing-using-nock directory.
The next step will be to push all your changes to GitHub. Review push your project to GitHub for guidance.
Verifying CircleCI pipeline success
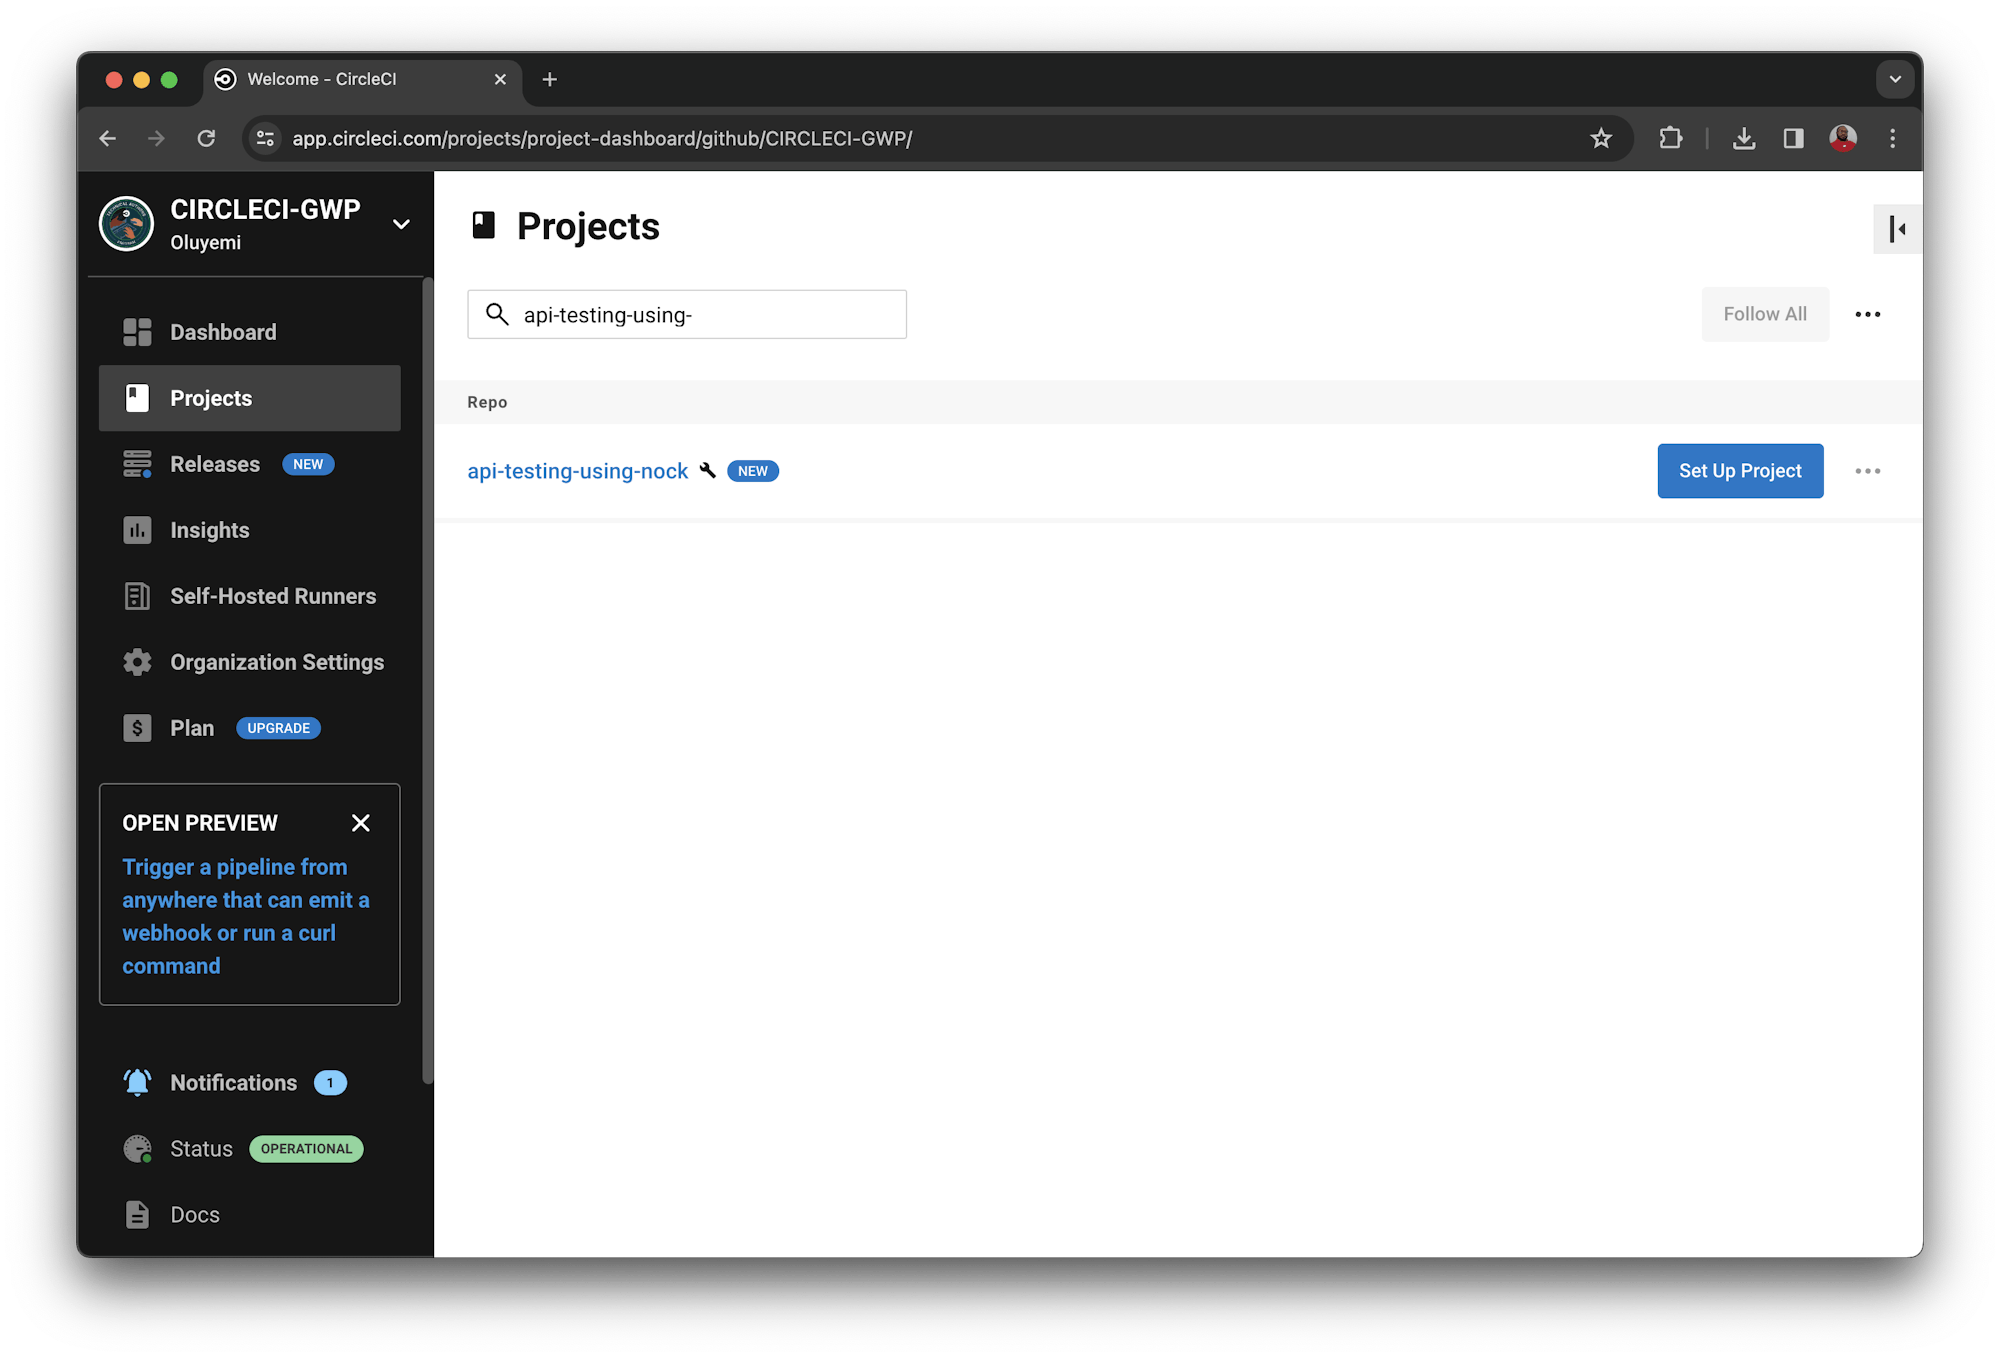
Log into CircleCI and go to the Projects page. All the GitHub repositories associated with your GitHub username or your organization are listed. The specific repository that you want to set up in CircleCI for this tutorial is api-testing-using-nock.
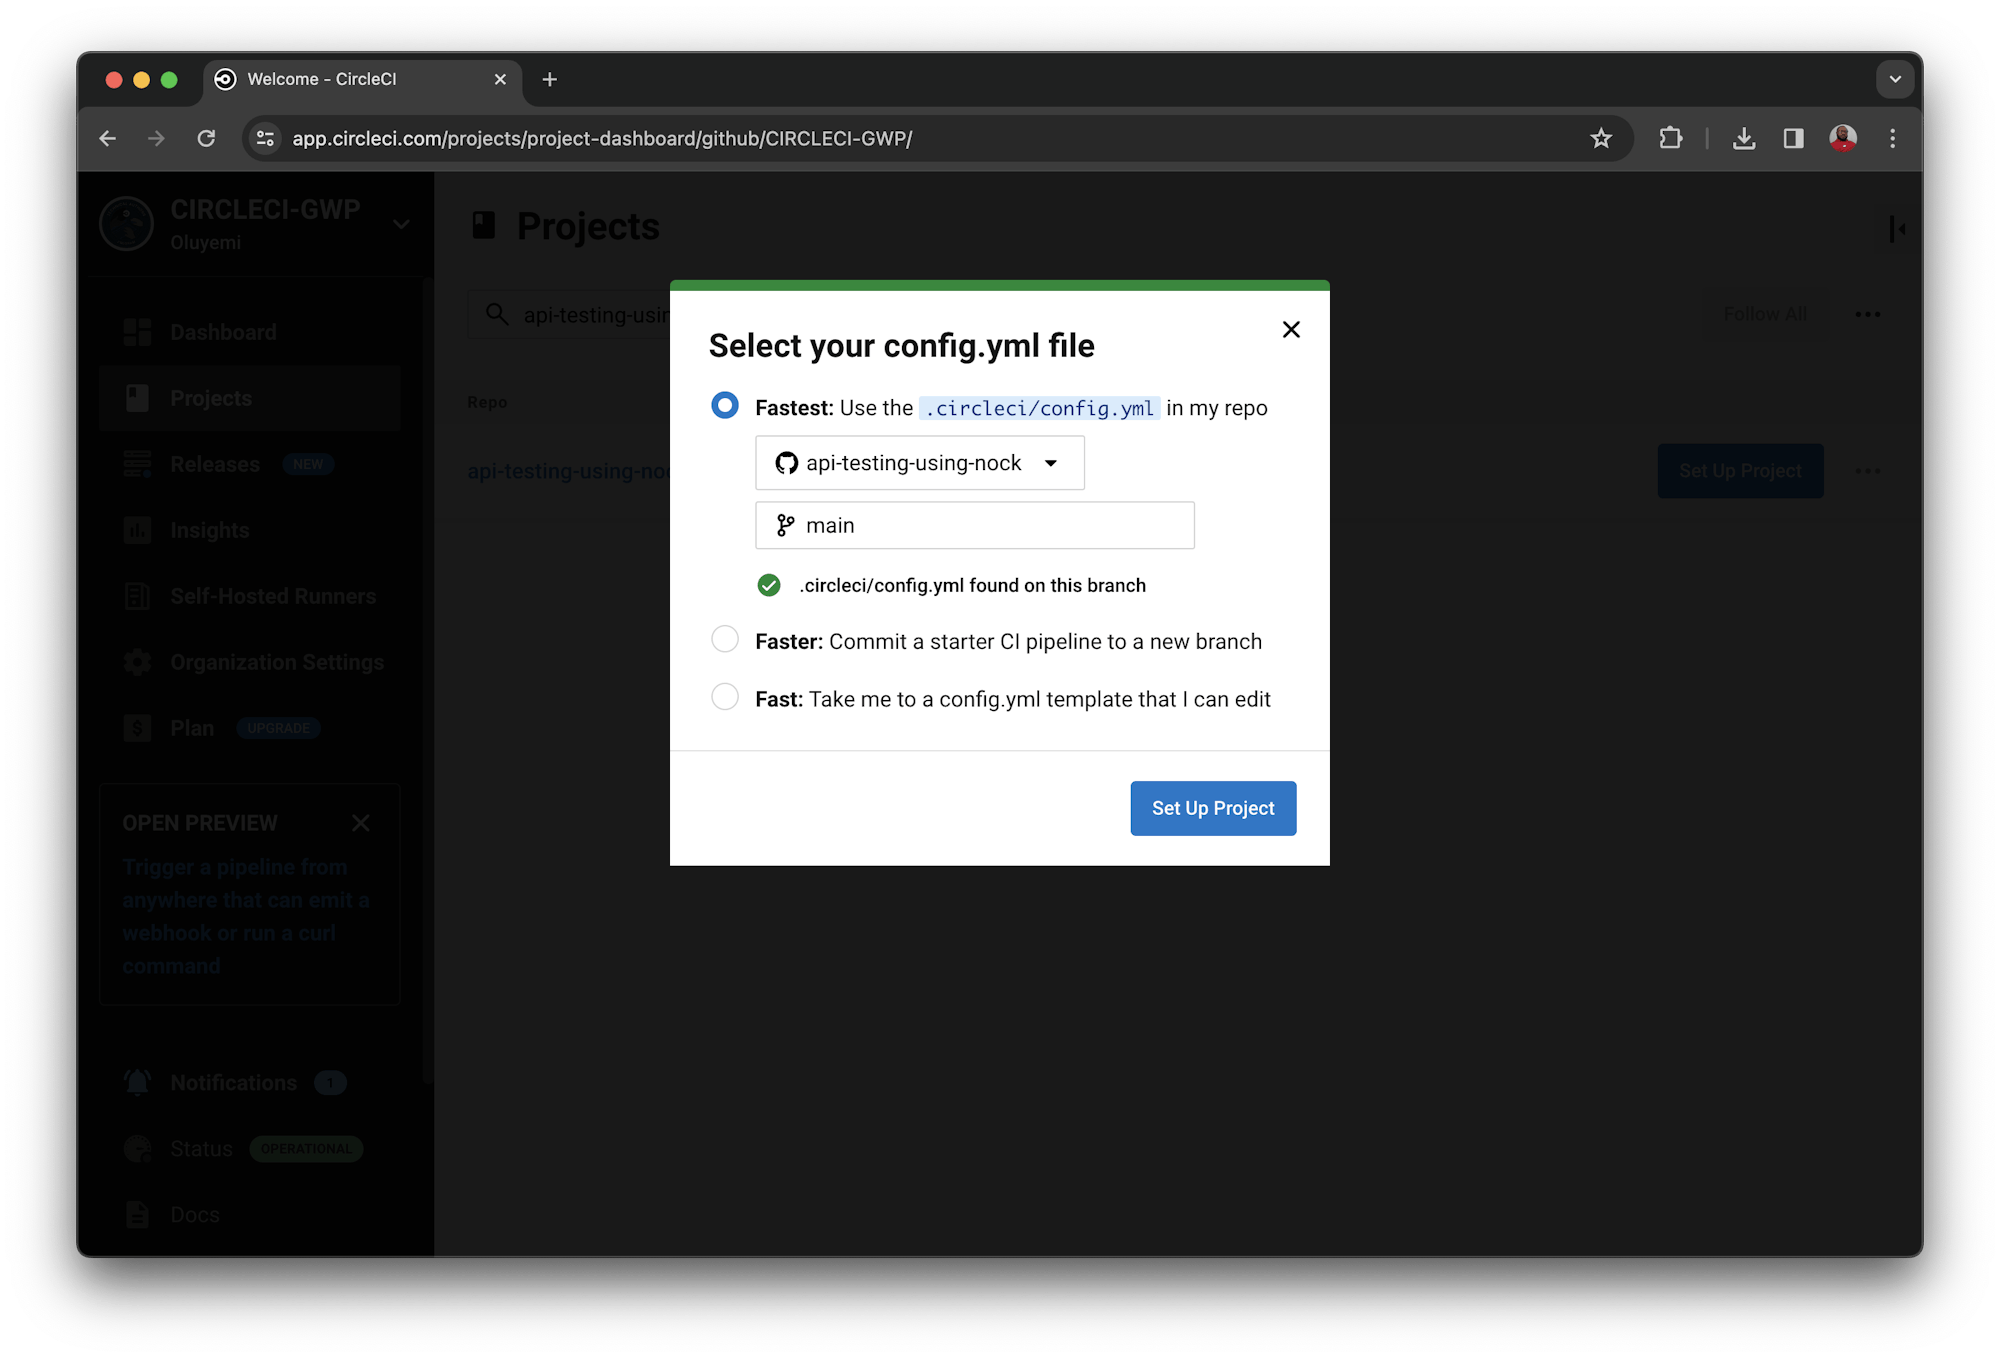
On the Projects dashboard, locate the repository and click the Set Up Project button.
When prompted, enter the branch where your configuration file is and click Set Up Project.
Your CircleCI pipeline should kick in and run the tests automatically. To observe the pipeline execution, go to the CircleCI dashboard and click the project name: (api-testing-using-nock).
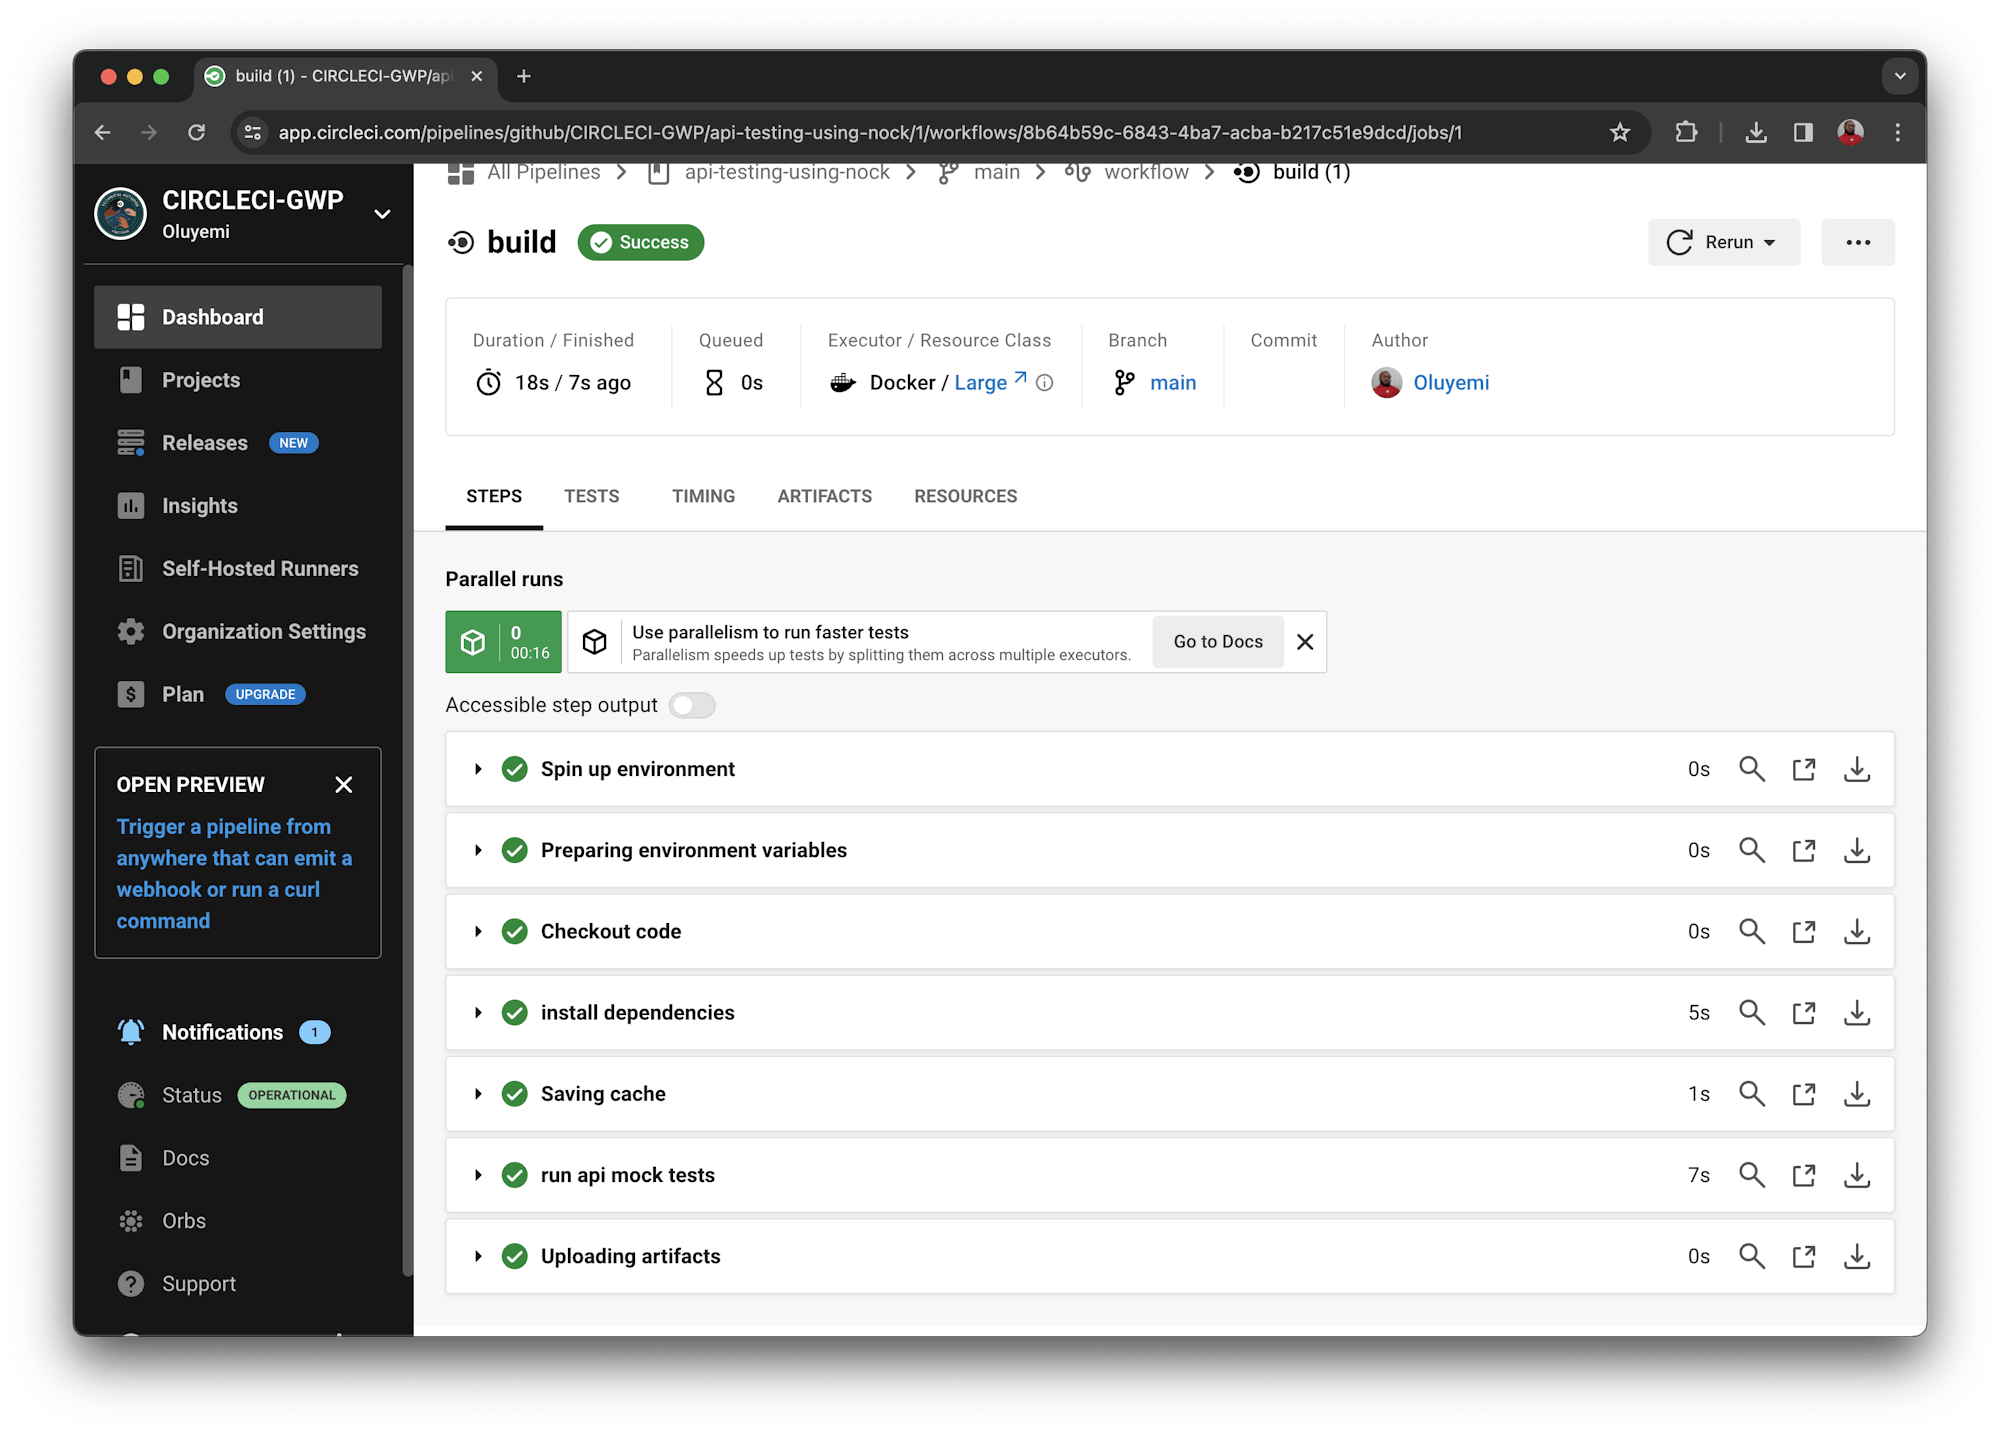
To review the build status, select the build from the CircleCI dashboard. You will be able to review the status of every step as defined in your CircleCI configuration file.
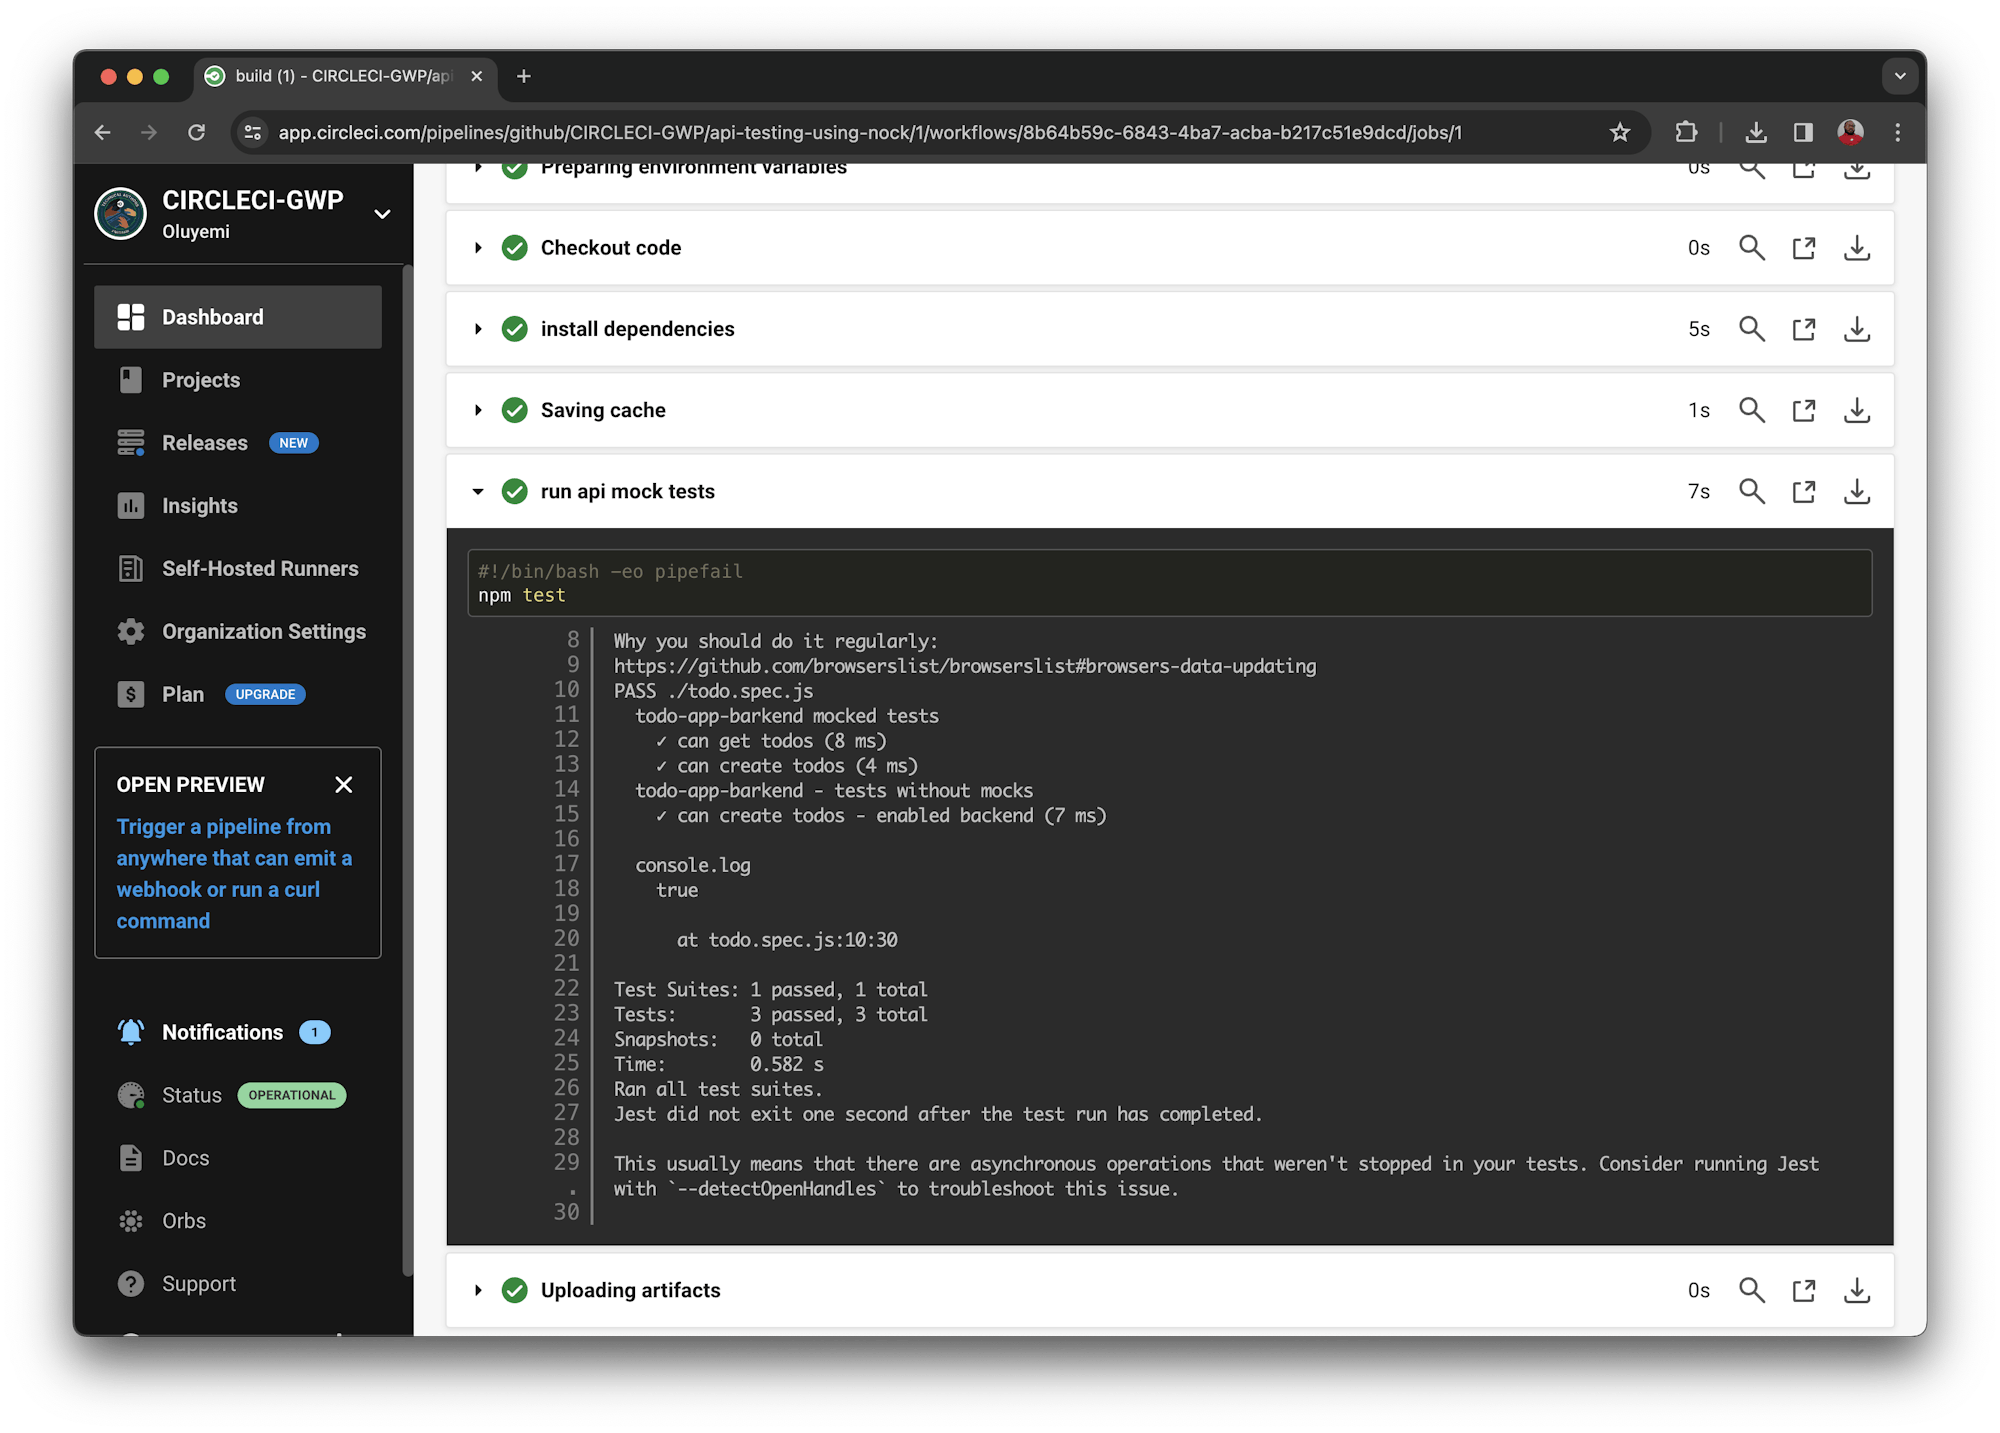
Fantastic! You have a green build.
Conclusion
In this tutorial you have learned what API mocking is and how useful it can be. You used Nock to mock HTTP requests in your tests and learned how mocking can reduce the time it takes for tests to execute. You have learned how to test just the behavior of the application in isolation, without involving external dependencies, and how to automate your test suite with CI/CD.
You practiced running tests with mocks and learned the value of clearing mocks and when to do so. With this knowledge, you and your team are in a better position to test APIs without calling them for responses. Happy (faster) testing!
Waweru Mwaura is a software engineer and a life-long learner who specializes in quality engineering. He is an author at Packt and enjoys reading about engineering, finance, and technology. You can read more about him on his web profile.