

This post, written by guest writer Fikayo Adepoju, was originally published on The New Stack here.
GraphQL is quickly becoming a preferred alternative to the traditional REST architecture API developers have been using for many years. It gives front-end developers the ability to query only what they need through a single endpoint. Because of its numerous benefits, back-end developers are adapting industry-standard strategies to ensure they build fluent and scalable APIs in GraphQL.
One of those standards is having a well-tested GraphQL API. In this post, we will take a look at how to test GraphQL APIs and automate the testing process with CircleCI.
Prerequisites
To follow along with this post, you will need the following already set up:
- Basic knowledge of GraphQL
- Node.js installed on your system (you can confirm this by running the node -v command on your terminal to print out the version of Node.js installed)
- Git installed on your system (you can confirm this by running the git command on your terminal; this should print out available git commands)
- A GitHub account
- A CircleCI account
Creating the GraphQL server
Our first task is to set up a simple GraphQL server using Node.js. Create a folder for the project by running the following command:
mkdir testing-graphql
Now go into the project root by running this:
cd testing-graphql
Then run the following command to quickly set up your package.json file:
npm init -y
This will quickly scaffold a basic package.json file.
To set up our GraphQL server, we will need the following packages:
- express: to create our ExpressJS node application
- graphql: the GraphQL npm package for Node.js
- express-graphql: ExpressJS middleware for GraphQL
Run the following command to install these packages:
npm install --save express graphql express-graphql
Once these packages are installed we can then start building the application.
We will build an API similar to that used by a blog that publishes posts from multiple users.
Defining the GraphQL schema
Let’s begin putting together the application by first defining our GraphQL schema. At the root of your project, create a folder named src; this is where all of our application logic will be located. Within the src folder, create a file named schema.js and place the following code in it:
/* src/schema.js */

const { buildSchema } = require("graphql");

const schema = buildSchema(`
    type Query {
        users: [User!]!,
        user(id: Int!): User!
    }

    type User {
        id: ID!
        name: String!
        email: String
        posts: [Post!]
    }

    type Post {
        id: ID!
        title: String!
        published: Boolean!
        link: String
        author: User!
    }
`);

module.exports = schema;
In the file above, we define two custom types: User and Post. These represent the blog user and their posts, respectively.
We also defined our Query type to have two queries. The users query returns an array of users and the user query returns a single user whose id matches the argument.
Finally, we export the schema on the last line.
Mocking data
Since this is not a production application, we will not be using a real database for our data. Instead, we will be creating a mock of the MongoDB database using the mongodb-memory-server. This will allow us to create and use an in-memory instance of MongoDB. In production, you would want to set up an actual MongoDB instance or use a MongoDB service like Mlab.
Let’s install the required packages by running the following command:
npm install --save mongodb mongodb-memory-server
Once the packages are done installing, the next step is to create a file to hold our mock data.
Within the src folder, create a file with the name data.js and place the following code in it:
/* src/data.js */

const Users = [
  {
    id: 1,
    name: "Fikayo Adepoju",
    email: "fik4christ@yahoo.com",
    posts: [
      {
        id: 1,
        title: "Creating an Emoji Game with Vue, Auth0, and Google Vision API",
        published: true,
        link:
          "https://auth0.com/blog/creating-an-emoji-game-with-vue-auth0-and-google-vision-api/",
        author: 1
      },
      {
        id: 2,
        title: "Electron Tutorial: Building Modern Desktop Apps with Vue.js",
        published: true,
        link:
          "https://auth0.com/blog/electron-tutorial-building-modern-desktop-apps-with-vue-js/",
        author: 1
      },
      {
        id: 3,
        title: "State Management with Vuex: a Practical Tutorial",
        published: true,
        link:
          "https://auth0.com/blog/state-management-with-vuex-a-practical-tutorial/",
        author: 1
      }
    ]
  },
  {
    id: 2,
    name: "John Doe",
    email: "john@company.com",
    posts: [
      {
        id: 4,
        title: "Build a CI powered RESTful API with Laravel",
        published: true,
        link:
          "https://circleci.com/blog/build-a-ci-powered-restful-api-with-laravel/",
        author: 2
      },
      {
        id: 5,
        title: "Automate your Nuxt.js app deployment",
        published: true,
        link: "https://circleci.com/blog/automate-your-nuxt-js-app-deployment/",
        author: 2
      }
    ]
  },
  {
    id: 3,
    name: "Jane Paul",
    email: "jane@company.com",
    posts: []
  }
];

module.exports = {
  Users
};
The file above exports an object, which contains an array of user data. Each user object also contains an array of that user’s posts. This is the data for bootstrapping our in-memory MongoDB instance.
The next step in mocking our data is setting up our database instance using the mongodb-memory-server package. Create a file named database.js also in the src folder and place the following code in it:
/* src/database.js */

const { MongoMemoryServer } = require("mongodb-memory-server");
const { MongoClient } = require("mongodb");
const data = require("./data");

let database = null;

const mongo = new MongoMemoryServer();

async function startDatabase() {
  const mongoDBURL = await mongo.getConnectionString();
  const connection = await MongoClient.connect(mongoDBURL, {
    useNewUrlParser: true,
  });

  //Seed Database
  if (!database) {
    database = connection.db();
    await database.collection("users").insertMany(data.Users);
  }

  return database;
}

async function stopDatabase() {
  await mongo.stop();
}

module.exports = {
  startDatabase,
  stopDatabase,
};
In the file above, we export a startDatabase function that sets up our in-memory MongoDB database.
It checks if an instance of the database already exists. If it doesn’t, it bootstraps it with a users collection and seeds the collection with the Users array we defined earlier in our data.js file.
Defining our resolvers
The next task is to define the resolvers to our queries. Remember we defined the two queries users and user to return an array of users and a single user, respectively.
Within the src folder, create a file named resolvers.js and place the following code in it:
/* src/resolvers.js */

const resolvers = {
  users: async (_, context) => {
    const { db } = await context();
    return db
      .collection("users")
      .find()
      .toArray();
  },
  user: async ({ id }, context) => {
    const { db } = await context();
    return db.collection("users").findOne({ id });
  }

};

module.exports = resolvers;
In the file above, we export an object containing two resolvers — one for each of our queries. We also use the context object, which we will set up later on.
Preparing the application for tests
You might be asking at this point, “Why are we setting up tests when we haven’t even wired up our GraphQL server to start up and receive requests?”
The answer to that is as follows. Most developers set up the server application and listen for connections in the same file; this file is the entry point of the application as seen below.
//Setup server
const express = require("express");

const app = express()

/* More server Logic */

//Listen on a port

const port = process.env.PORT || "4000";

app.listen(port);

console.log(`🚀 Server ready at http://localhost:${port}/graphql`);
But, in order to test our GraphQL endpoints, the server setup logic and the part where we listen on a port needs to be in separate files. One file holds our server logic and exports the server app, and another file boots up our application.
This way, we can import our server into our test files and run the appropriate tests on it.
Before we create these files, go ahead and install the graphql-playground-middleware-express module, which helps us set up a classy playground for testing our GraphQL endpoints:
npm install graphql-playground-middleware-express
Now, let’s create these files for our GraphQL server. Within the src folder, create a file named server.js and place the following code in it:
/* src/server.js */

const express = require("express");
const graphqlHTTP = require("express-graphql");
const schema = require("./schema");
const resolvers = require("./resolvers");
const { startDatabase } = require("./database");
const expressPlayground = require("graphql-playground-middleware-express")
  .default;

// Create a context for holding contextual data (db info in this case)
const context = async () => {
  const db = await startDatabase();

  return { db };
};

const app = express();

app.use(
  "/graphql",
  graphqlHTTP({
    schema,
    rootValue: resolvers,
    context,
  })
);

//Graphql Playground route
app.get("/playground", expressPlayground({ endpoint: "/graphql" }));

module.exports = app;
In the file above, we set up our Node.js application, our GraphQL context to contain an instance of our in-memory database, our server GraphQL endpoint, and GraphQL playground endpoint. We then export our app.
The next step is to create the file to boot up the server. Create a file named index.js and place the following code in it:
/* src/index.js */

const app = require("./server");

const port = process.env.PORT || "4000";

app.listen(port);

console.log(`🚀 Server ready at http://localhost:${port}/graphql`);
In the file above, we set up the startup script by importing our server and listening on a port.
Our application is now ready to function. Let’s add a start script to package.json to run the application:
/* package.json */
…..
“scripts” : {
  “start” : “node src/index.js”
}
Now let’s take the app for a spin by running the following command:
npm run start
After running this command, you will see the success message logged to your console. To test that the server is running, navigate to http://localhost:4000/playground to open up the playground.
In the query window of the playground, run the following query:
{
    users {
      name
      email
      posts {
            title
            published
      }
     }
}
This should give you the output shown below:
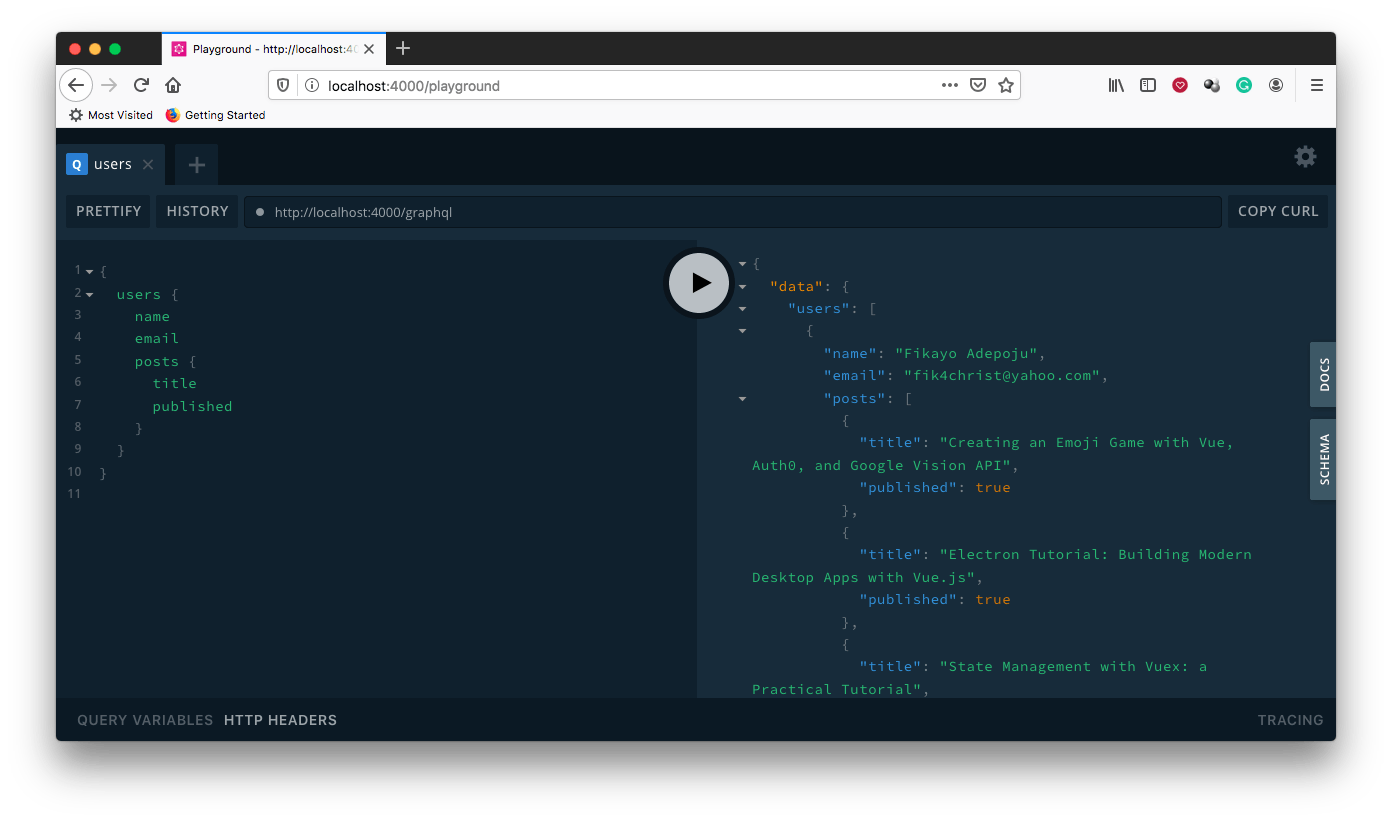
Great!
Now we have visual and functional confirmation that our GraphQL server is working as expected.
We are not here because we want to test our endpoints manually through the playground, though. No, no, no. We are here for automated testing and that’s what we are going to enable in the next section. Before then, make sure to push this project to a GitHub repo. Set up a .gitignore file to ignore the node_modules folder before pushing your code to your repo.
Setting up the test script
We want to add tests to our application and include a test script that runs all of our tests whenever we push code to our repo. Pretty neat, right? Let’s go ahead and set that up.
First, we need a testing framework. The framework we will be using in this post is Jest.
Why Jest? Because it’s easy to set up (almost requires no setup at all) and has a fluent, comprehensible API.
We also need a library for testing HTTP endpoints, and for this we will be using the Supertest npm library. Supertest is an easy-to-use HTTP testing library that works seamlessly with any testing framework.
We will be combining the Jest testing framework with the supertest HTTP testing library to test our GraphQL server.
Let’s install these two libraries as development dependencies to get started:
npm install --save-dev jest supertest
Once these libraries are done installing we can begin writing our tests.
Jest tests can be grouped in a special folder named __tests__ (double underscores on each side), so create this folder at the root of your project.
Create a sample test in this folder by creating a file named sample.js and add the following test to it:
/* __tests__/sample.js */
test("A sample test", () => {
  expect(2).toBe(2);
});
Next, install Jest globally by running this command:
npm install jest --global
Now run the jest command at the root of your project. This should run the test and output the success messages onto the console.
Now we have confirmed that Jest is running fine.
We will be creating another test suite to test our queries. This will test the users query and check that it returns the appropriate status code, data type, and number of users.
Create a file named queries.js inside the __tests__ folder and place in the following code:
/* __tests__/queries.js */
const app = require("../src/server");
const supertest = require("supertest");
const { stopDatabase } = require("../src/database");

const request = supertest(app);

afterAll(async () => {
  await stopDatabase();
});

test("fetch users", async (done) => {

  request
    .post("/graphql")
    .send({
      query: "{ users{ id, name} }",
    })
    .set("Accept", "application/json")
    .expect("Content-Type", /json/)
    .expect(200)
    .end(function (err, res) {
      if (err) return done(err);
      expect(res.body).toBeInstanceOf(Object);
      expect(res.body.data.users.length).toEqual(3);
      done();
    });
});
In the file above, we imported our server and used it to set up a request object with Supertest. This allows Supertest to internally bind the server to a port.
We then query our /graphql endpoint with some query data by sending a POST request to it. Once we get a response, we use Jest to check that the appropriate status code, data type of the data (an array of users is expected), and the exact number of users we seeded in our database is returned.
Now, let’s set up the test script to run our tests. Just below the start script in package.json, create another script named test to run the jest command as shown below:
...
“scripts”: {
  “start”: “node src/index.js”
  “test”: “jest”
}
If you already have a test script, defined by running npm install --save-dev jest supertest, edit it to what we have above.
Now you can run the following command to run the test we just added:
npm run test
You should see a screen similar to the one below in your console.

Now let’s automate this test process.
Automating our tests with CircleCI
To begin our test automation, we need to build a continuous integration pipeline that CircleCI will run.
The pipeline will do the following:
- Check out our repository
- Install the required dependencies
- Run all of our tests
To do this, we need to write our pipeline script for CircleCI to pick up, build, and run our pipeline.
Create a folder named .circleci at the root of your project and create a file named config.yml inside it.
Now paste the following code inside:
version: 2.1
jobs:
  build:
    working_directory: ~/repo
    docker:
      - image: circleci/node:10.16.3
    steps:
      - checkout
      - run:
          name: update-npm
          command: "sudo npm install -g npm@5"
      - run:
          name: install-packages
          command: npm install
      - run:
          name: test
          command: npm run test
The script above imports a Docker image suitable for Node.js applications, checks out our code from the repo, installs the required packages, and runs our test script.
Now commit your code and push it to your repo.
Next, head over to your CircleCI dashboard and add the project in the Add Project section.
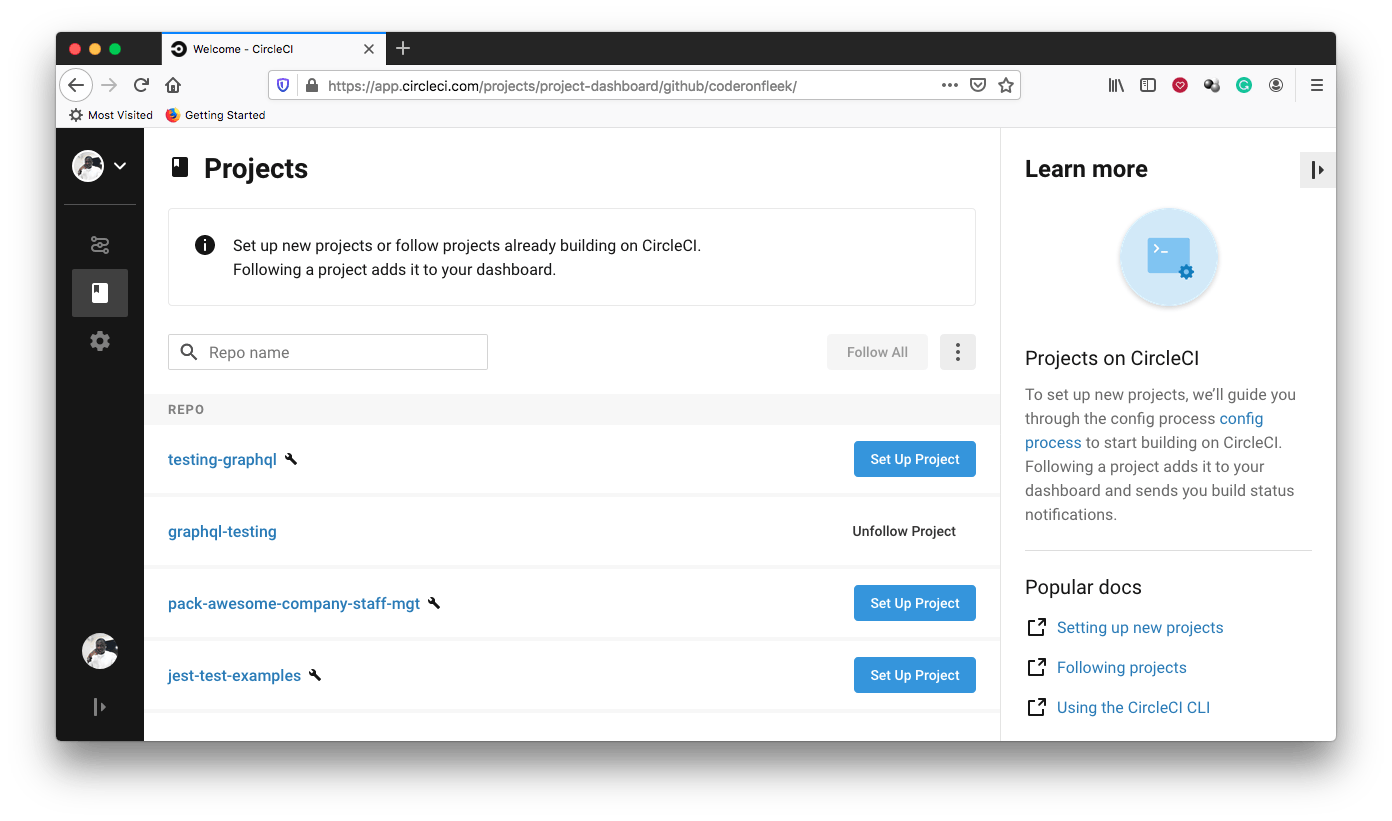
Next to your project (in this case testing-graphql), click Set Up Project.
This should bring you to a page similar to the one below.

Now click Start Building.
This will bring up a dialog asking if you want to create a new branch of the project and have it contain the suggested pipeline configuration displayed, or if you want to add it manually.
Click Add Manually so that CircleCI picks up the config.yml file you just pushed to your repository.
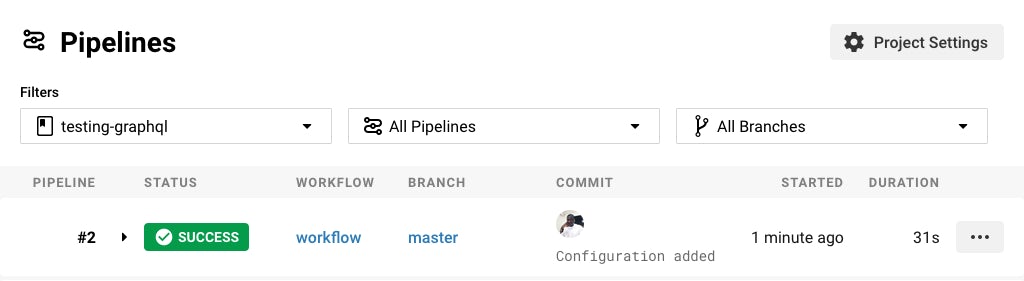
Another dialog then pops up asking you if you have added a configuration file, or you would like to download one. Click Start Building to confirm that you’re good to go. This will trigger CircleCI to run your pipeline with the configuration file in your project.
If all of your tests run successfully, you will see a screen similar to the one below.
Now click into the build process to see how the pipeline ran and confirm that the tests passed successfully. You will see a screen similar to the one below.
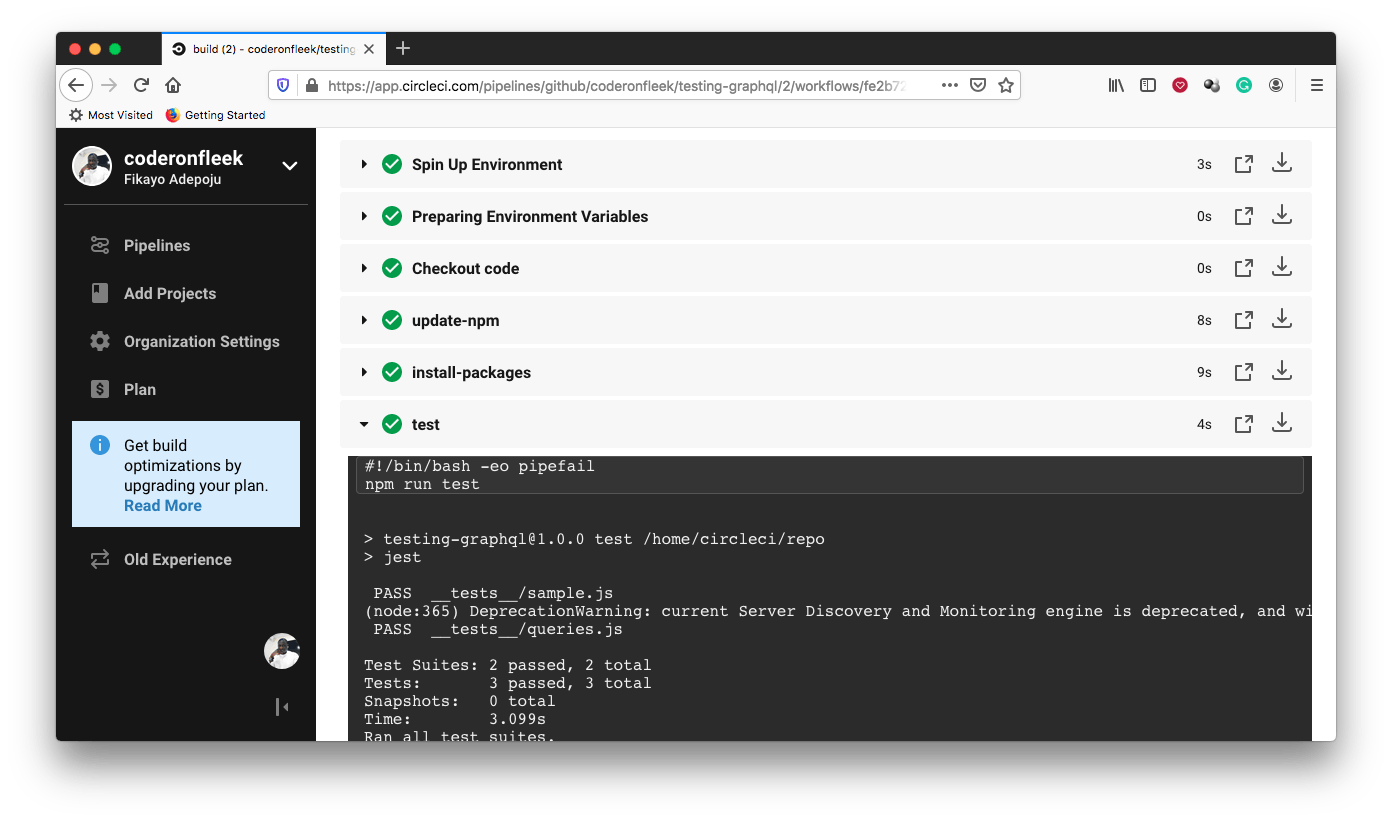
Awesome!
Add another test to your queries.js file with the code below. This test checks for an events query that does not exist on our server to see if the appropriate status code is returned:
test("query that does not exist", async () => {
  const response = await request
    .post("/graphql")
    .send({
      query: "{ events{ id, name} }",
    })
    .set("Accept", "application/json");

  expect(response.status).toBe(400);
});
Save the file, commit your code, and push to the repo once again to see your pipeline run.
Conclusion
GraphQL makes life easy for both front-end and back-end developers, as it provides a very flexible API to query. Ensuring that these APIs are well-tested keeps the quality intact and brings peace of mind to the developers – knowing that any code being pushed is verified before deployment.
Happy Coding!
Fikayo Adepoju is a LinkedIn Learning (Lynda.com) Author, Full-stack developer, technical writer, and tech content creator proficient in Web and Mobile technologies and DevOps with over 10 years experience developing scalable distributed applications. With over 40 articles written for CircleCI, Twilio, Auth0, and The New Stack blogs, and also on his personal Medium page, he loves to share his knowledge to as many developers as would benefit from it. You can also check out his video courses on Udemy.


