

With over 14,000 stars on GitHub, Adonis.js is one of the top Node.js web frameworks on the Node.js website. Adonis.js’ reputation as a dependable framework for building web applications has made it a major player in the Node.js community. Its sleek and concise API makes it very developer-friendly, easily scalable and highly performant.
In this tutorial, we will build a simple API with Adonis.js and automate its deployment to Heroku with continuous deployment (CD).
Prerequisites
To follow this tutorial, a few things are required:
- Basic knowledge of JavaScript
- Node.js installed on your system (>= 14.0)
- An Heroku account
- A CircleCI account
- A GitHub account
Our tutorials are platform-agnostic, but use CircleCI as an example. If you don’t have a CircleCI account, sign up for a free one here.
With all these installed and set up, let’s begin the tutorial.
Creating an Adonis.js API project
The API project will be built with AdonisJS 5. To begin, run this command:
npm init adonis-ts-app@latest my-adonis-api-heroku
You will be prompted to Select the project structure. Choose api and accept the default options for others.
You should get output like this:
     _       _             _         _ ____
    / \   __| | ___  _ __ (_)___    | / ___|
   / _ \ / _` |/ _ \| '_ \| / __|_  | \___ \
  / ___ \ (_| | (_) | | | | \__ \ |_| |___) |
 /_/   \_\__,_|\___/|_| |_|_|___/\___/|____/

CUSTOMIZE PROJECT
❯ Select the project structure · api
❯ Enter the project name · my-adonis-api-heroku
❯ Setup eslint? (y/N) · false

RUNNING TASKS
❯ Scaffold project 26 ms
❯ Install dependencies 37 s
❯ Configure installed packages 14 s

[ success ]  Project created successfully

╭─────────────────────────────────────────────────╮
│    Run following commands to get started        │
│─────────────────────────────────────────────────│
│                                                 │
│    ❯ cd my-adonis-api-heroku                    │
│    ❯ node ace serve --watch                     │
│                                                 │
╰─────────────────────────────────────────────────╯
This scaffolds an Adonis.js project that is structured only for building API endpoints, not web pages. The project will be placed in my-adonis-api-heroku. Once the scaffolding process is done, go into the root of the project (cd my-adonis-api-heroku ) and run:
node ace serve --watch
This will launch a local server at http://localhost:3333, which you can access via your browser or by using curl on your CLI. Hitting this root endpoint will return this JSON data:
{ "hello": "world" }
Setting up database for local development
Before you start writing API code, you will need a local development database to work with. You will use AdonisJS Lucid, an SQL ORM that supports PostgreSQL, MySQL, MSSQL, SQLite and others.
To install Lucid, stop the running app with CTRL + C. Run this command:
npm install @adonisjs/lucid
Once the installation is done, configure the database by running:
node ace invoke @adonisjs/lucid
Choose SQLite from the list of options and select In the Terminal for the instructions. Adonis will configure the database and store its configuration inside the config.database.ts file.
...

sqlite: {
    client: 'sqlite',
    connection: {
    filename: Application.tmpPath('db.sqlite3'),
    },
    pool: {
    afterCreate: (conn, cb) => {
        conn.run('PRAGMA foreign_keys=true', cb)
    }
    },
    migrations: {
    naturalSort: true,
    },
    useNullAsDefault: true,
    healthCheck: false,
    debug: false,
},
In the environment configuration file at the root of the project (.env), there is more configuration for the database to use.
PORT=3333
HOST=127.0.0.1
NODE_ENV=development
APP_KEY=PZcwnLRwPn5GUMhXe-Nc94CUPnNlKEI7
DRIVE_DISK=local
DB_CONNECTION=sqlite
DB_HOST=127.0.0.1
DB_PORT=3306
DB_USER=root
DB_PASSWORD=
DB_DATABASE=adonis
HASH_DRIVER=bcrypt
This configuration defines the database connection to use (DB_CONNECTION) and assigns the database name (DB_DATABASE). The connection here is set to sqlite, and the database name is set to adonis. That part is good to go.
Next, run the migrations needed to set up our database schema. Adonis.js uses migrations to set up and update the database schema programmatically to easily replicate the schema on different environments. Migrations maintain consistency across development teams and deployment environments.
node ace make:migration users
This command creates a new file called database/migrations/xxxx_users.ts. Open the file and paste this content into it:
import BaseSchema from "@ioc:Adonis/Lucid/Schema";

export default class extends BaseSchema {
  protected tableName = "users";

  public async up() {
    this.schema.createTable(this.tableName, (table) => {
      table.increments("id");
      table.string("username", 80).notNullable().unique();
      table.string("email", 254).notNullable().unique();
      table.string("password", 60).notNullable();
      /**
       * Uses timestamptz for PostgreSQL and DATETIME2 for MSSQL
       */
      table.timestamp("created_at", { useTz: true });
      table.timestamp("updated_at", { useTz: true });
    });
  }

  public async down() {
    this.schema.dropTable(this.tableName);
  }
}
Run the migration and create the database table using:
node ace migration:run
You will get output like this:
[ info ]  Upgrading migrations version from "1" to "2"
❯ migrated database/migrations/1696658232595_users

Migrated in 85 ms
Everything is set up to work with your SQLite database. Next, you will write code for a simple User API for creating and fetching user records.
Creating the API’s user model
To begin developing the User API, you need to define the User model. To do so, run:
node ace make:model User
Open the app/Models/User.ts file and enter:
import { DateTime } from "luxon";
import { BaseModel, column, beforeSave } from "@ioc:Adonis/Lucid/Orm";
import Hash from "@ioc:Adonis/Core/Hash";

export default class User extends BaseModel {
  @column({ isPrimary: true })
  public id: number;

  @column()
  public username: string;

  @column()
  public email: string;

  @column({ serializeAs: null })
  public password: string;

  @column.dateTime({ autoCreate: true })
  public createdAt: DateTime;

  @column.dateTime({ autoCreate: true, autoUpdate: true })
  public updatedAt: DateTime;

  @beforeSave()
  public static async hashPassword(user: User) {
    if (user.$dirty.password) {
      user.password = await Hash.make(user.password);
    }
  }
}
This code creates a User model. The model extends the BaseModel class with the appropriate column using the columns decorator and specified datatypes for each. The is adds a hashPassword hook that ensures that plain text passwords are encrypted before they are saved to the database upon user creation.
Creating the API user controller
Your next task is to create a User controller. Adonis.js is a model view controller (MVC) framework, so you need controllers to handle API requests.
You are going to do some validation within the controller methods. Adonisjs supports parsing and validation out of the box, so there is no need to install any 3rd party packages.
Create a new controller by running this command:
node ace make:controller User
This command creates a new folder named Http in ./app/Controllers and then creates a new file UsersController.ts within it. Inside the newly created controller, replace the code in the file with this code:
import type { HttpContextContract } from "@ioc:Adonis/Core/HttpContext";

import User from "App/Models/User";
import { schema, rules } from "@ioc:Adonis/Core/Validator";

export default class UsersController {
  protected tableName = "users";

  public async create({ request, response }: HttpContextContract) {
    const newUserSchema = schema.create({
      username: schema.string([
        rules.unique({
          column: "username",
          table: this.tableName,
        }),
        rules.required(),
      ]),
      email: schema.string([
        rules.unique({
          column: "email",
          table: this.tableName,
        }),
        rules.required(),
      ]),
      password: schema.string([rules.required()]),
    });

    try {
      const payload = await request.validate({
        schema: newUserSchema,
      });

      const user = new User();
      user.username = payload.username;
      user.email = payload.email;
      user.password = payload.password;

      let create_user = await user.save();

      let return_body = {
        success: true,
        details: create_user,
        message: "User Successully created",
      };

      response.send(return_body);
    } catch (error) {
      console.log(error.toString());
      return response.status(500).send({
        success: false,
        message: error.messages,
      });
    }
  } //create

  public async fetch({ request, response }: HttpContextContract) {
    try {
      const users = await User.query();

      response.send(users);
    } catch (error) {
      return response.status(500).send({
        success: false,
        message: error.toString(),
      });
    }
  } //fetch
}
This code creates two controller functions (create and fetch) that create a new user and fetch a list of users. The create function creates a newSchema() method to validate the request data to ensure that every compulsory item for creating a new user is present. The code also sets up error messages for the validation.
Registering routes on the API
Now you can register your routes as the final step to developing the API. Open the file ./start/routes.js and replace the code in it with this:
import Route from "@ioc:Adonis/Core/Route";

Route.get("/", async () => {
  return { hello: "world" };
});

//User api routes
Route.group(() => {
  Route.post("user", "UsersController.create");

  Route.get("users", "UsersController.fetch");
}).prefix("api");
This code registers the /user and /users routes that map to the create and fetch functions of the UserController. It prefixes these two endpoints with /api to add some route namespacing.
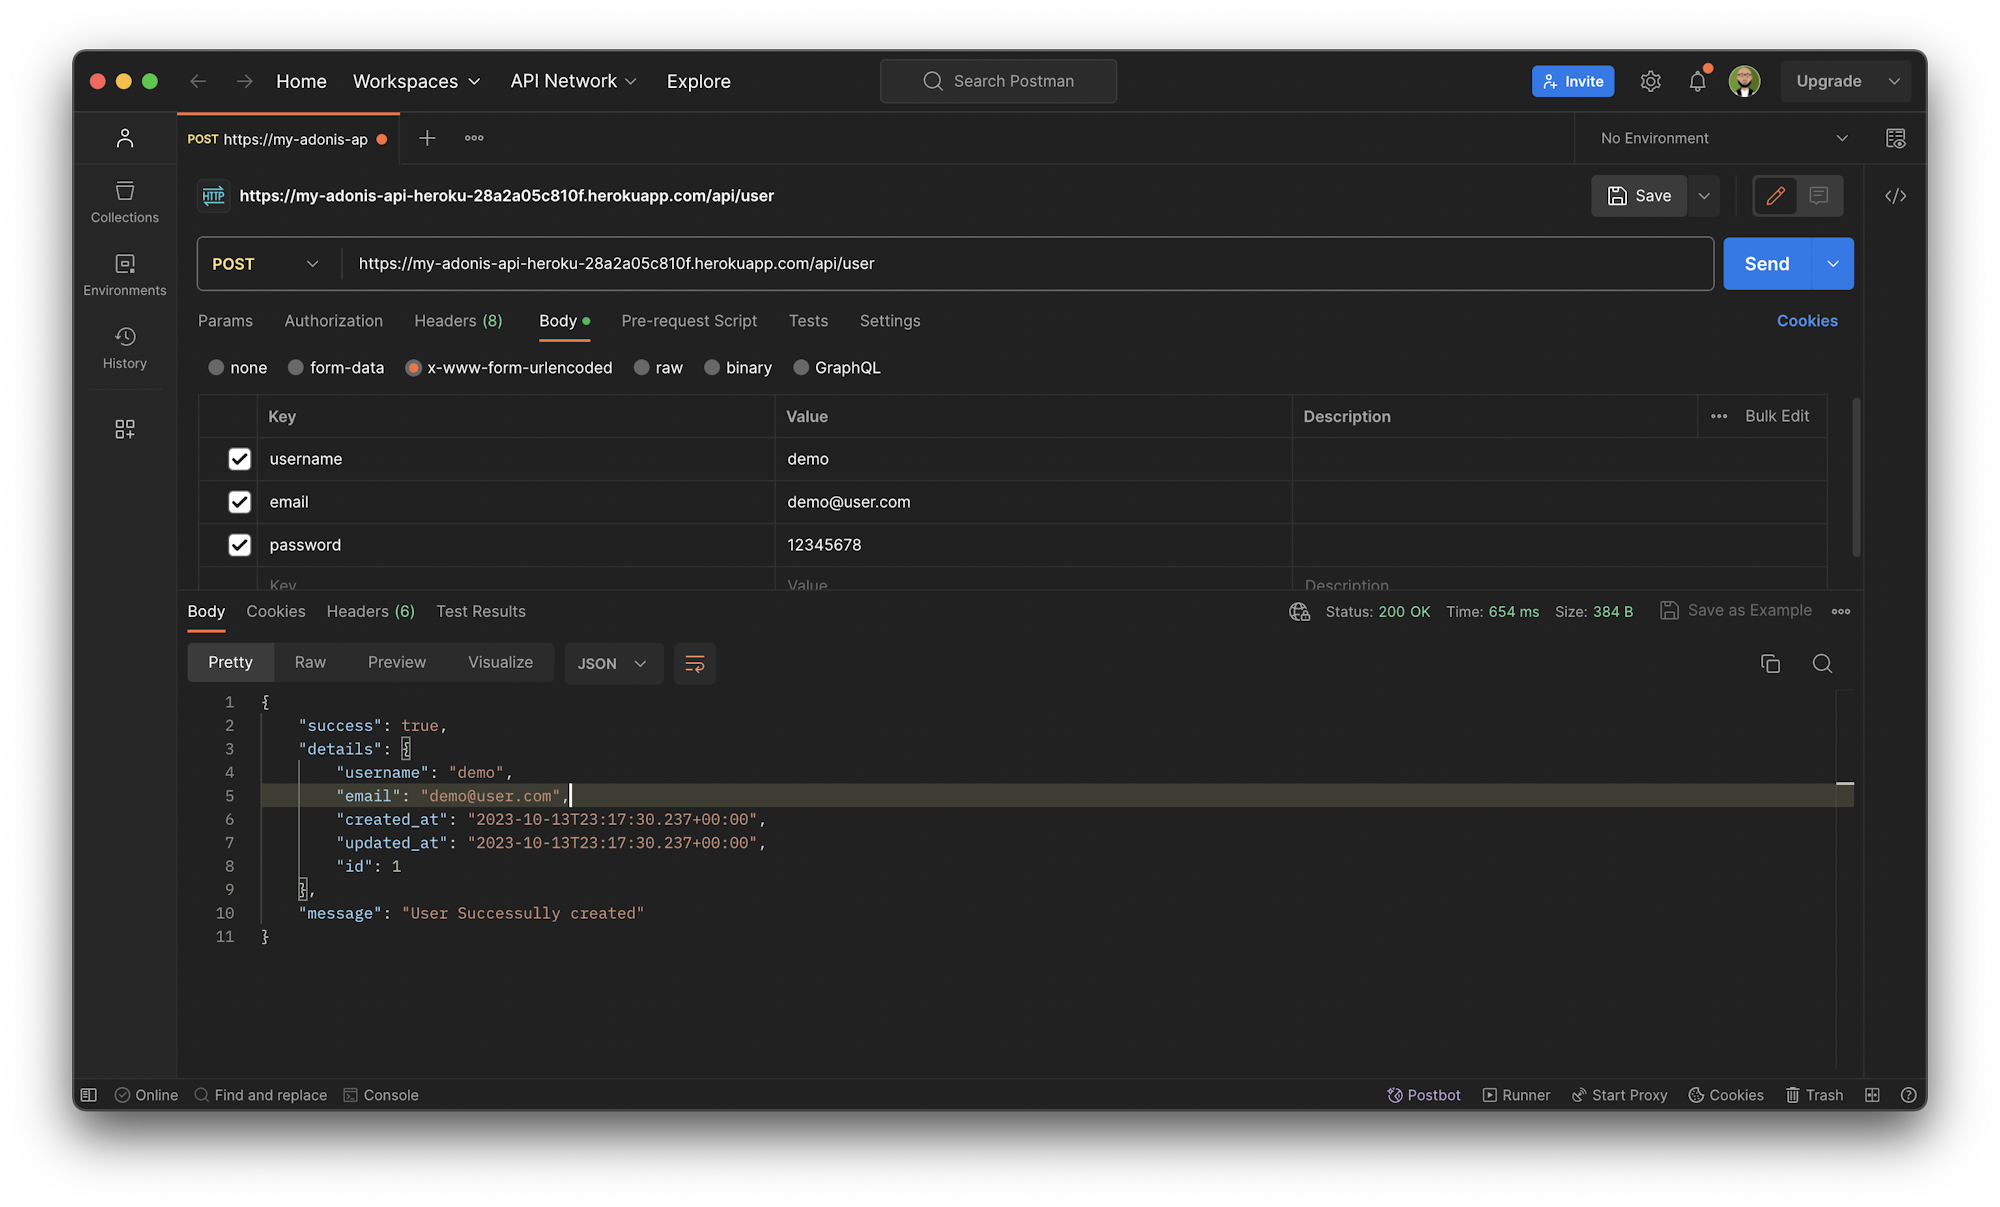
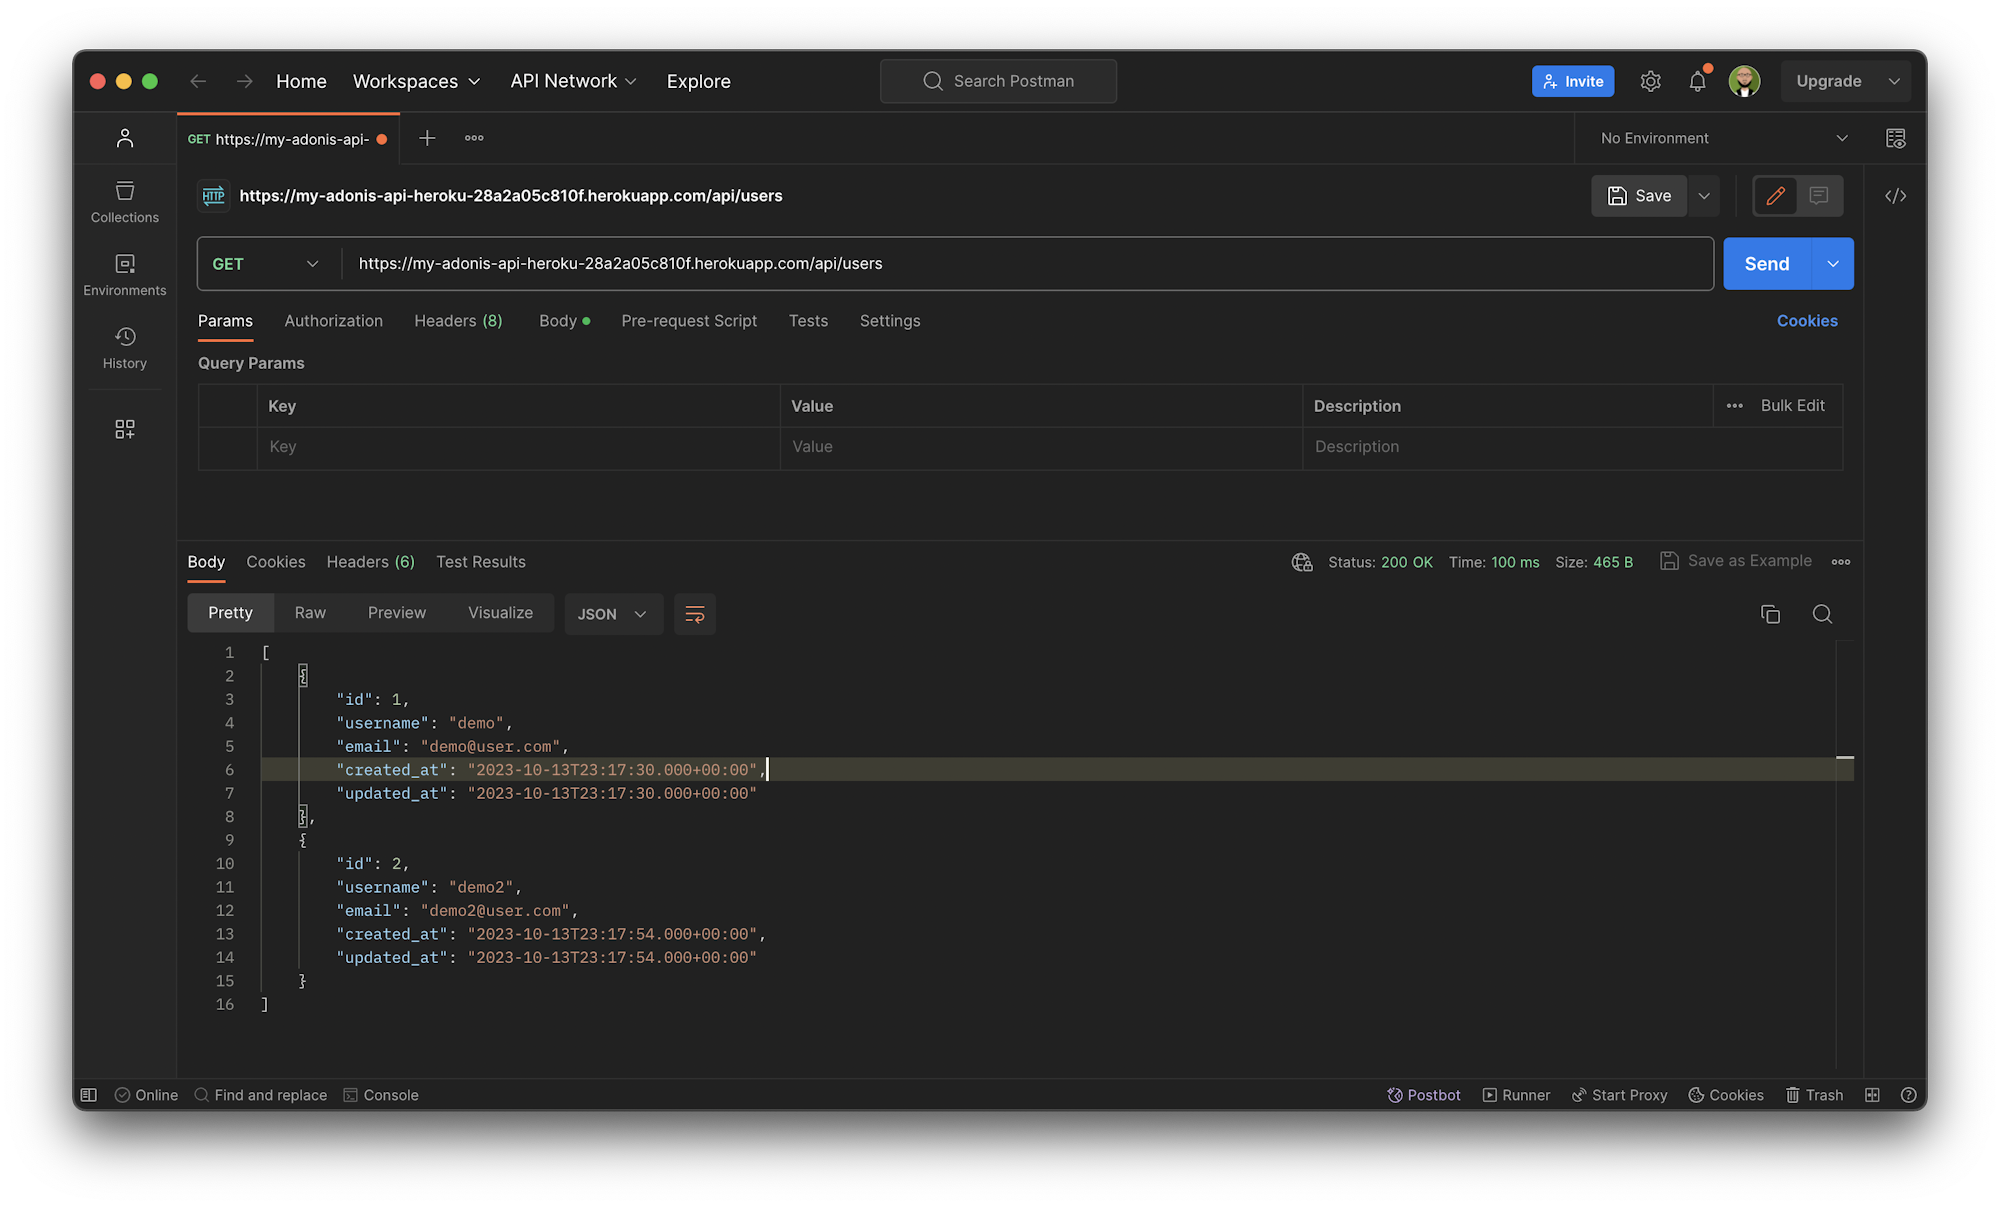
Testing the endpoints in Postman
Now you can put the API to the test by calling your endpoints. You will use Postman to test the endpoints. First, install the Bcrypt password hashing algorithm by running:
npm install --save phc-bcrypt
Make sure that your app is running. If it is not, run node ace serve --watch to start it up again.
These are the tests for user creation and fetching users:
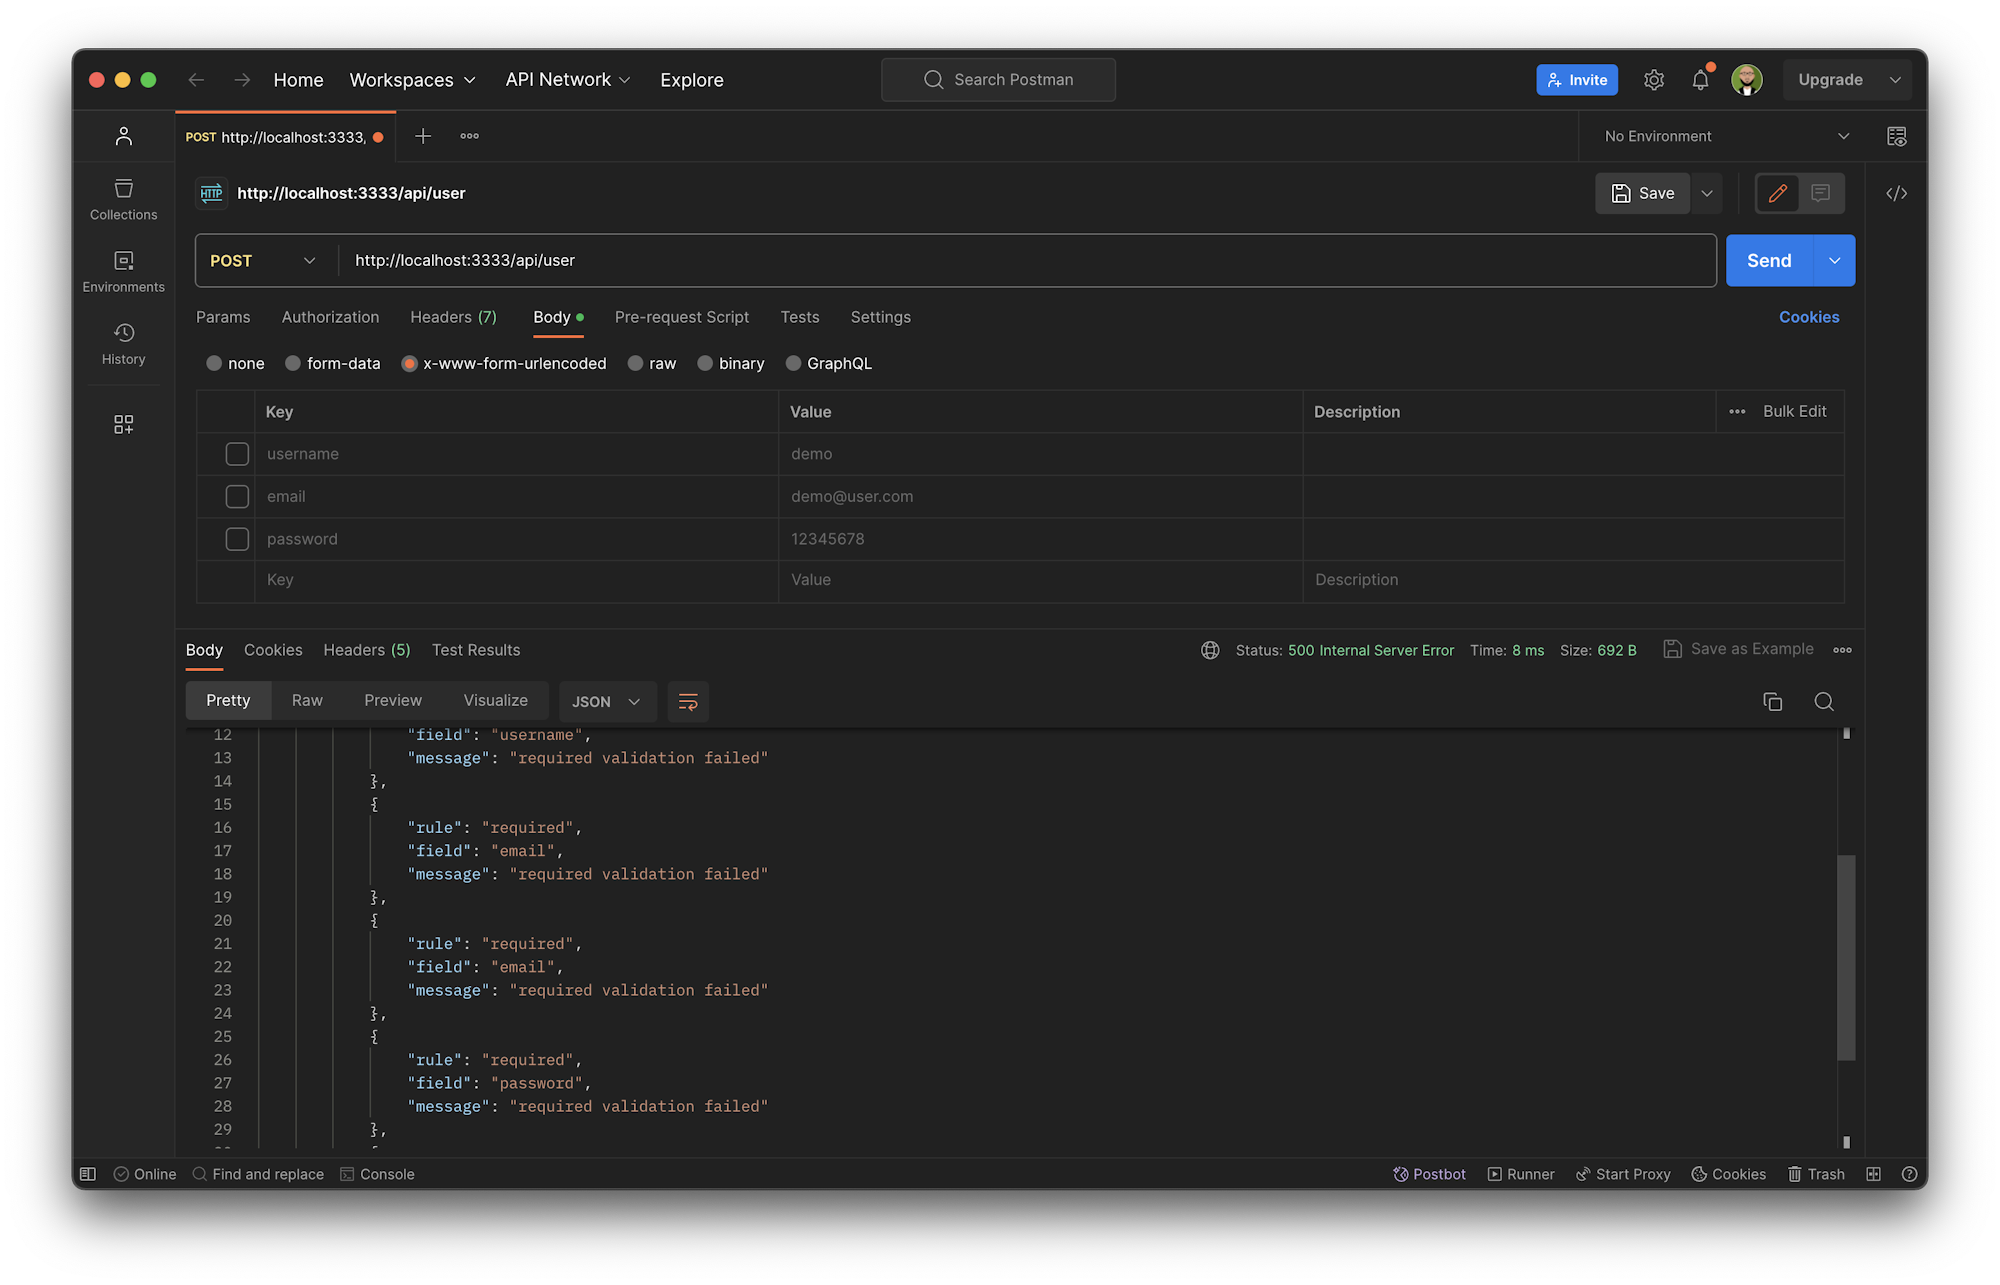
- User Creation - Validation failed
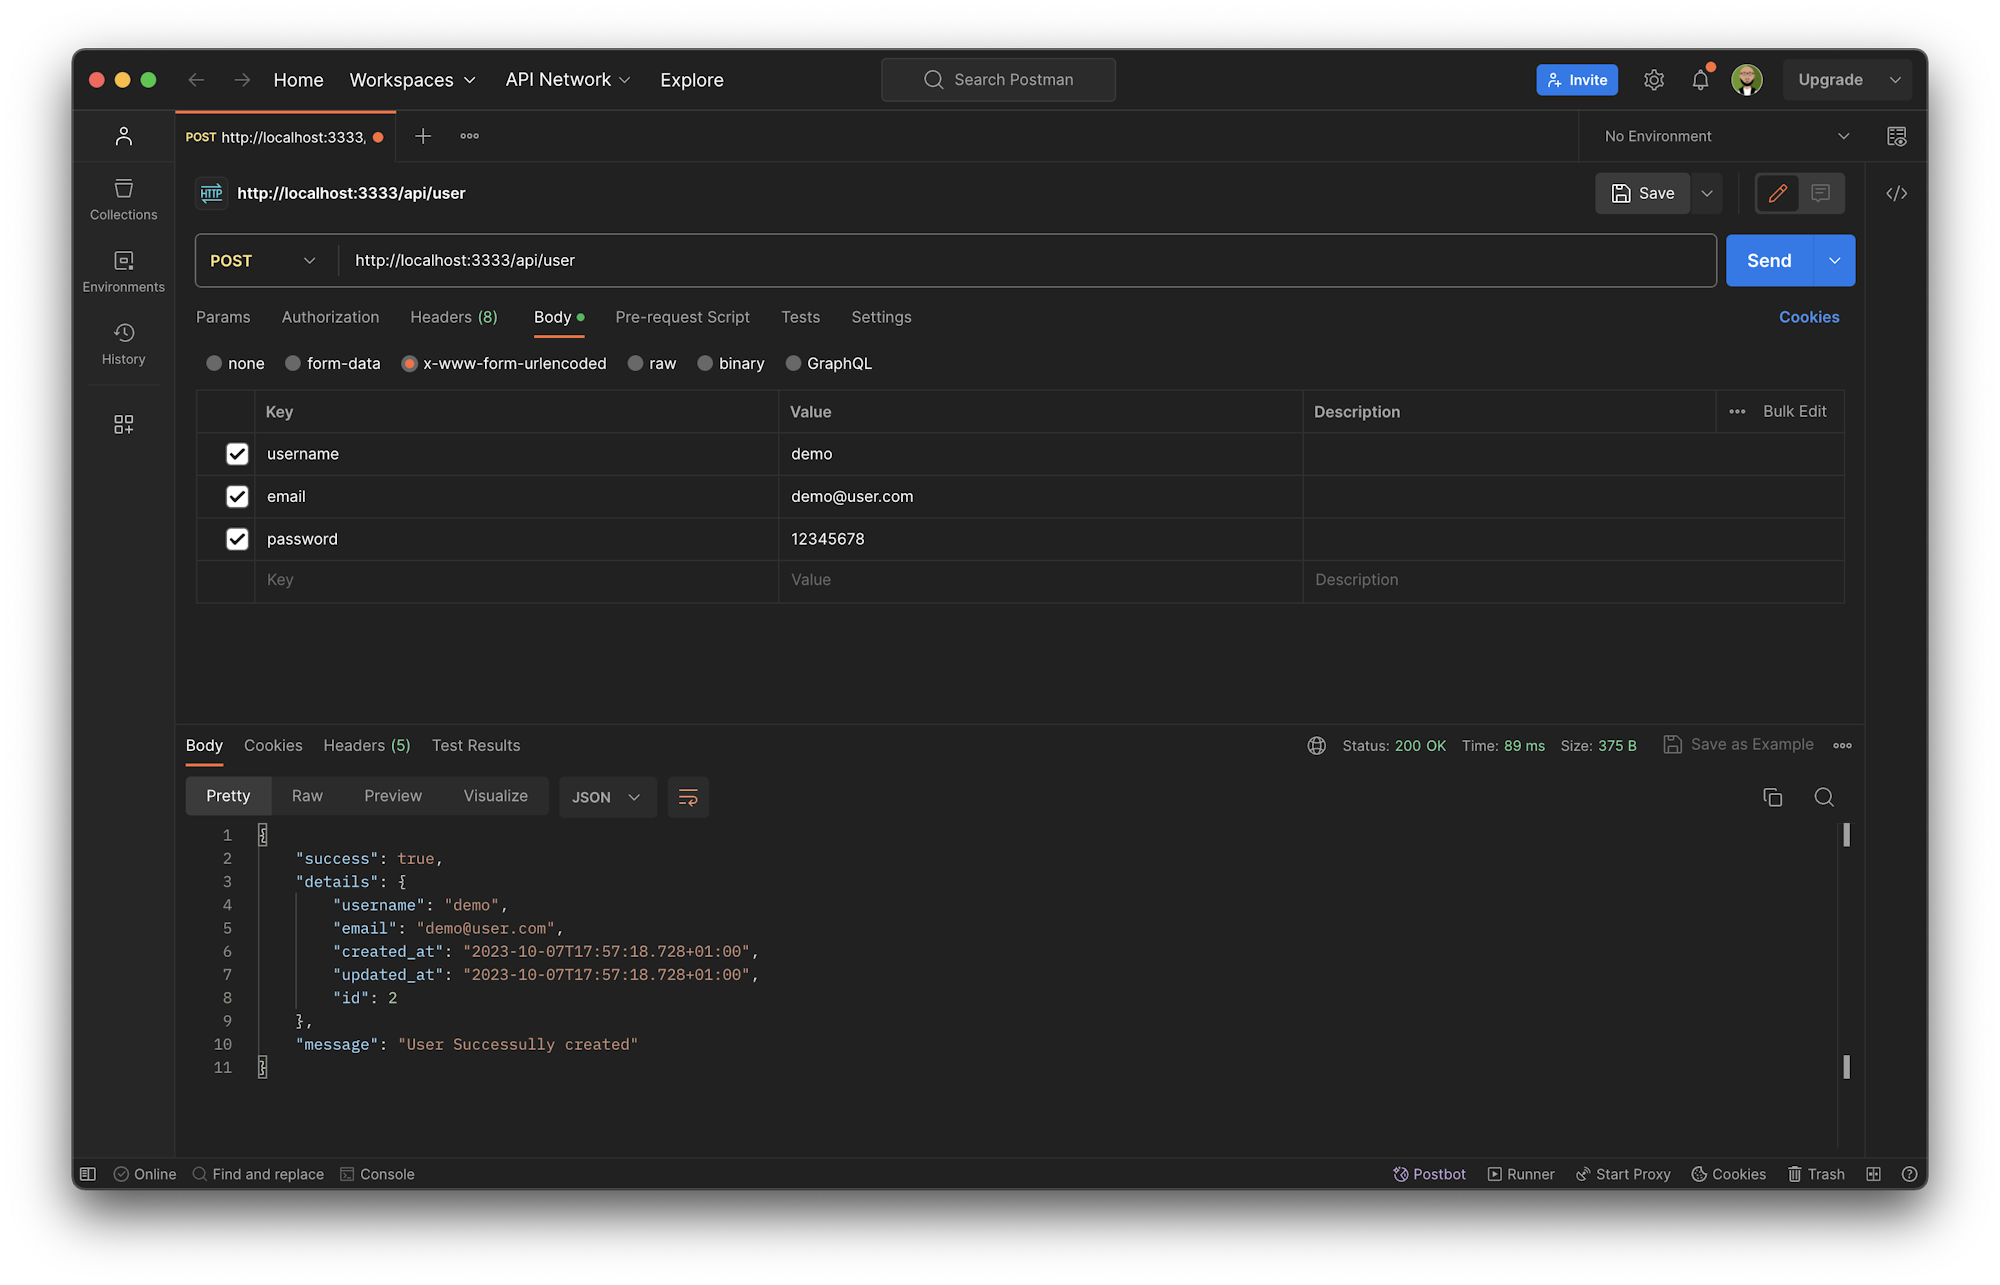
- User Creation - Successful
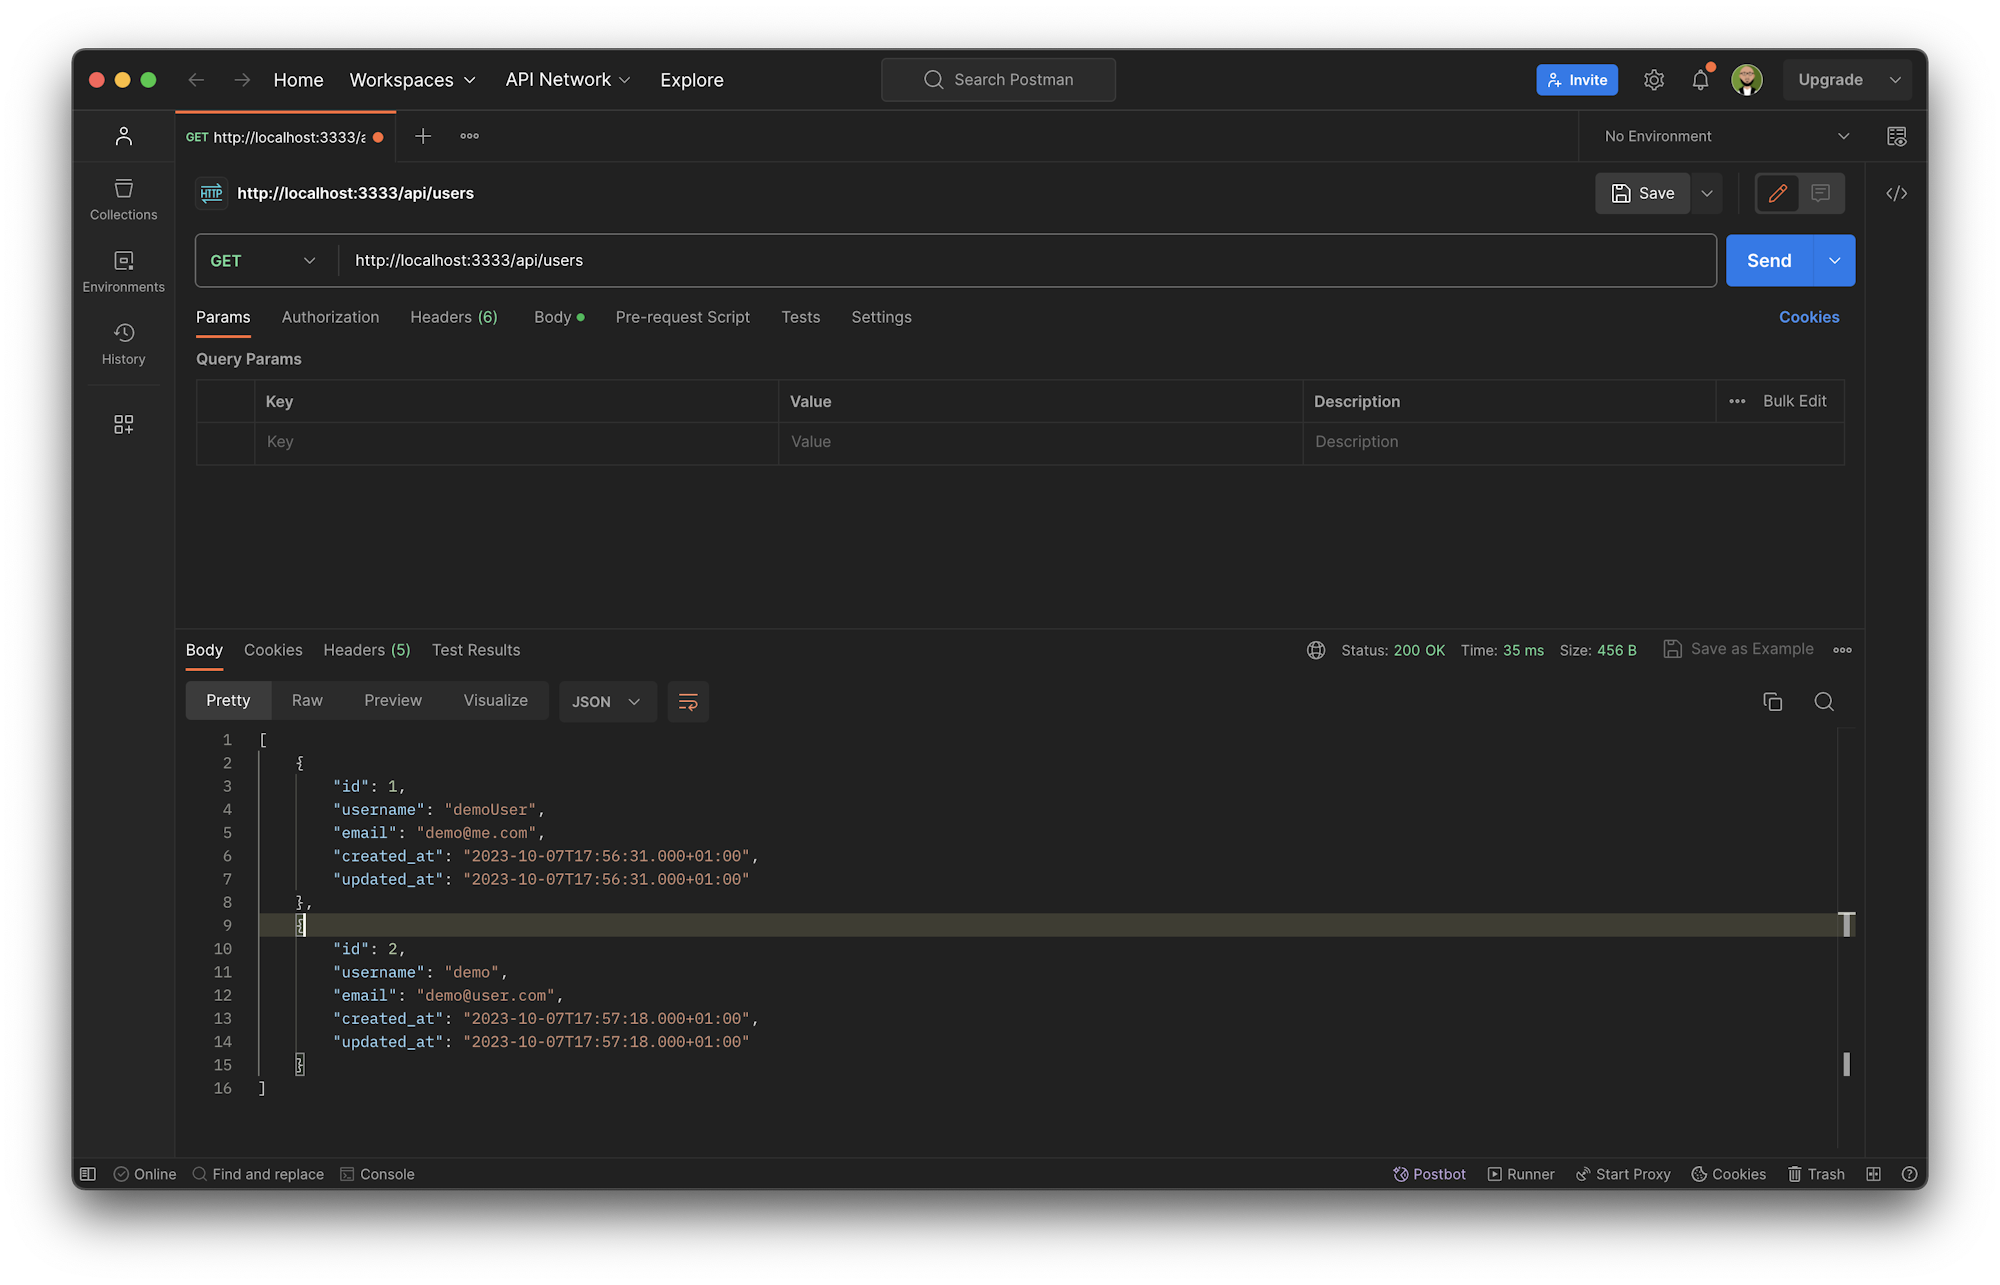
- User Fetch
User Creation - Validation failed
User Creation - Successful
User Fetch
Setting up Heroku and MySQL for production deployment
Everything you have done so far works perfectly on your local machine, but the aim of this tutorial is getting your API hosted on a production environment and automating the deployment process. So, instead of running your API on your machine, you will host it on the Heroku platform. Also, instead of using SQLite, you will use MySQL, which is a more robust relational database management system that works well for production environments.
You also want to make sure that when you are running on your local machine, SQLite is used, and when running in production, your code automatically switches to MySQL.
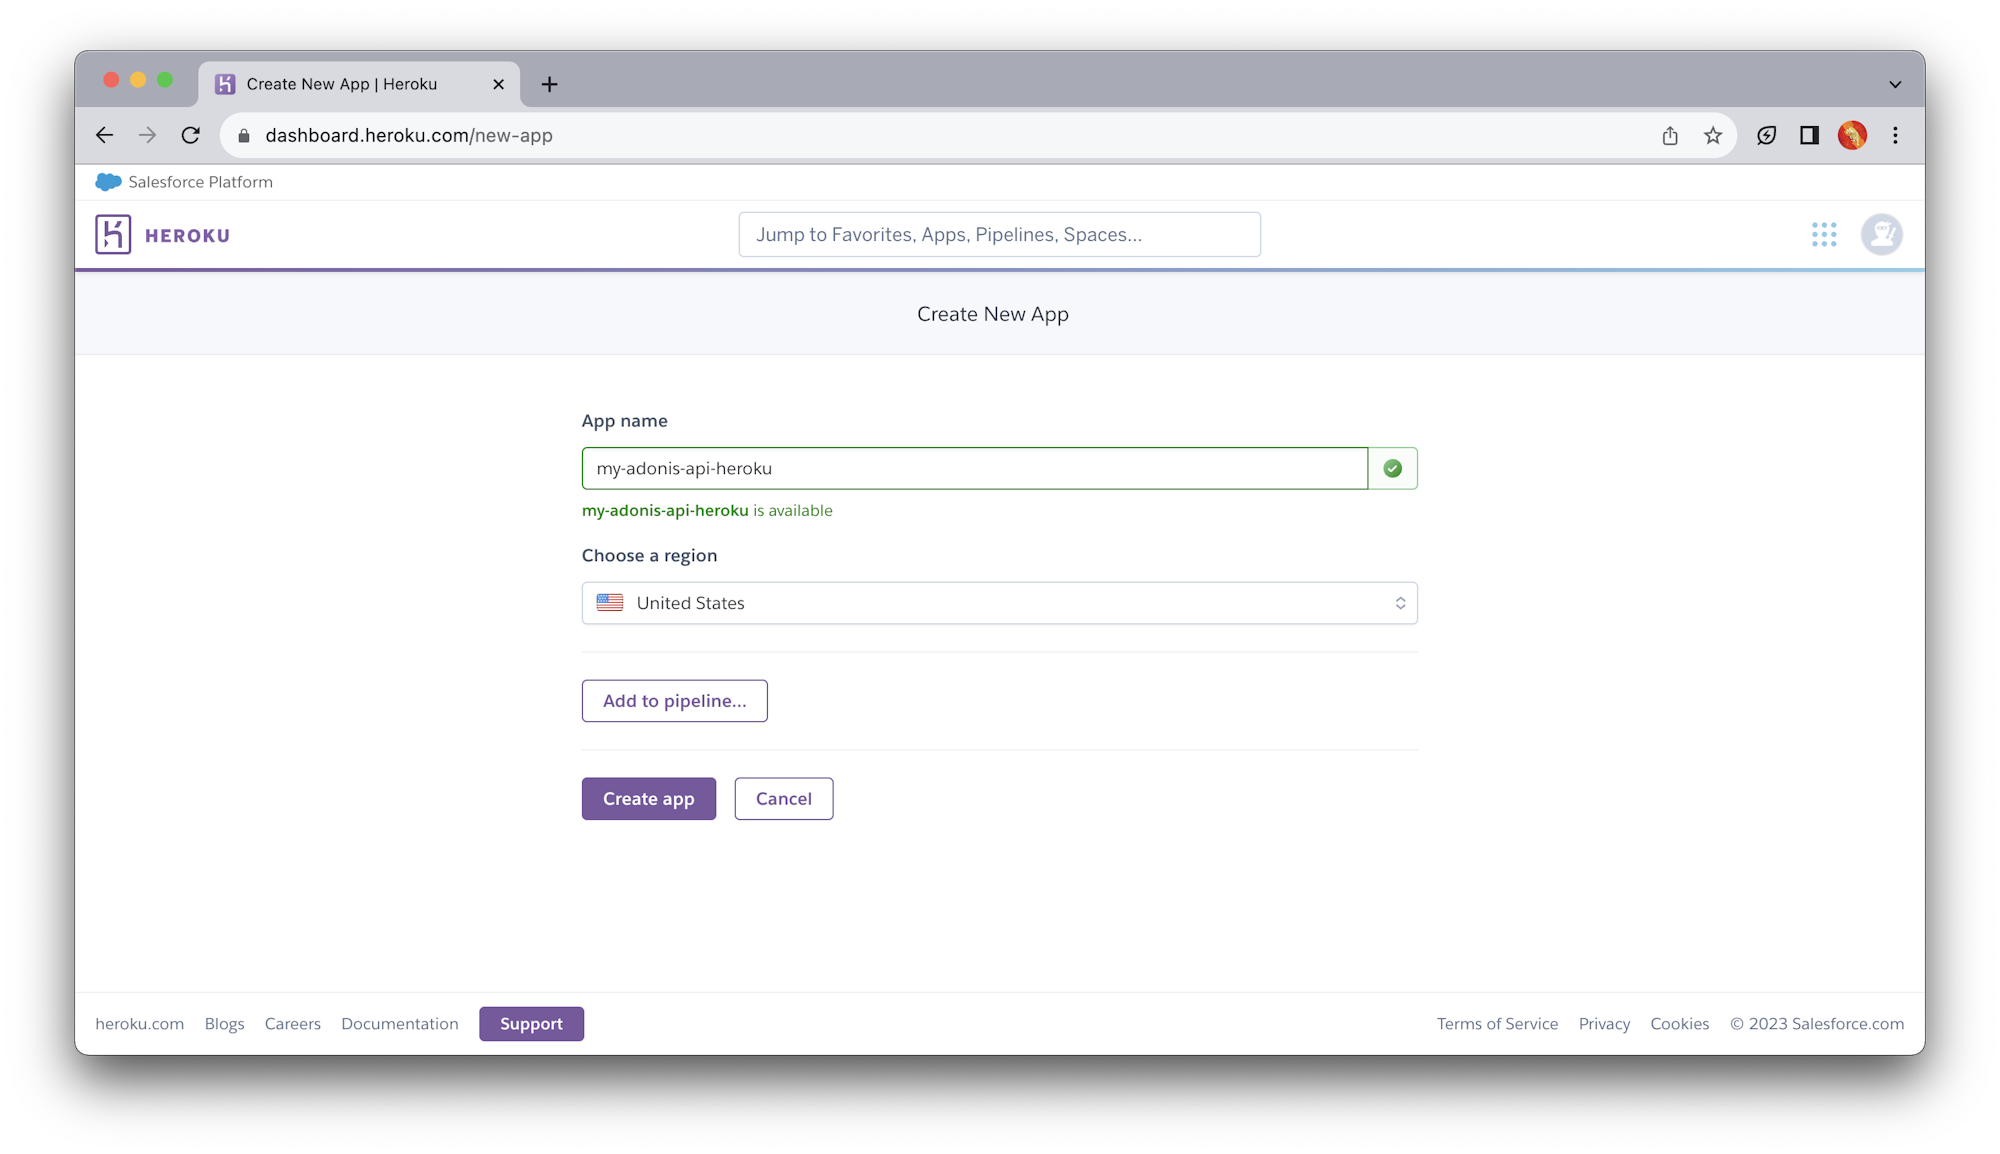
To host the API on Heroku, you need to create a Heroku app. Log into your Heroku account and create a new application.
Next, create a remote MySQL instance. Luckily, you have the ability to access add-ons on Heroku. One of those add-ons is a MySQL instance via jawsDB.
Note: To have add-ons on your Heroku applications, you need to set up billing on Heroku. Make sure to add a billable card on your account settings.
To add a MySQL add-on, go to the Resources tab of your application and search for MySQL.
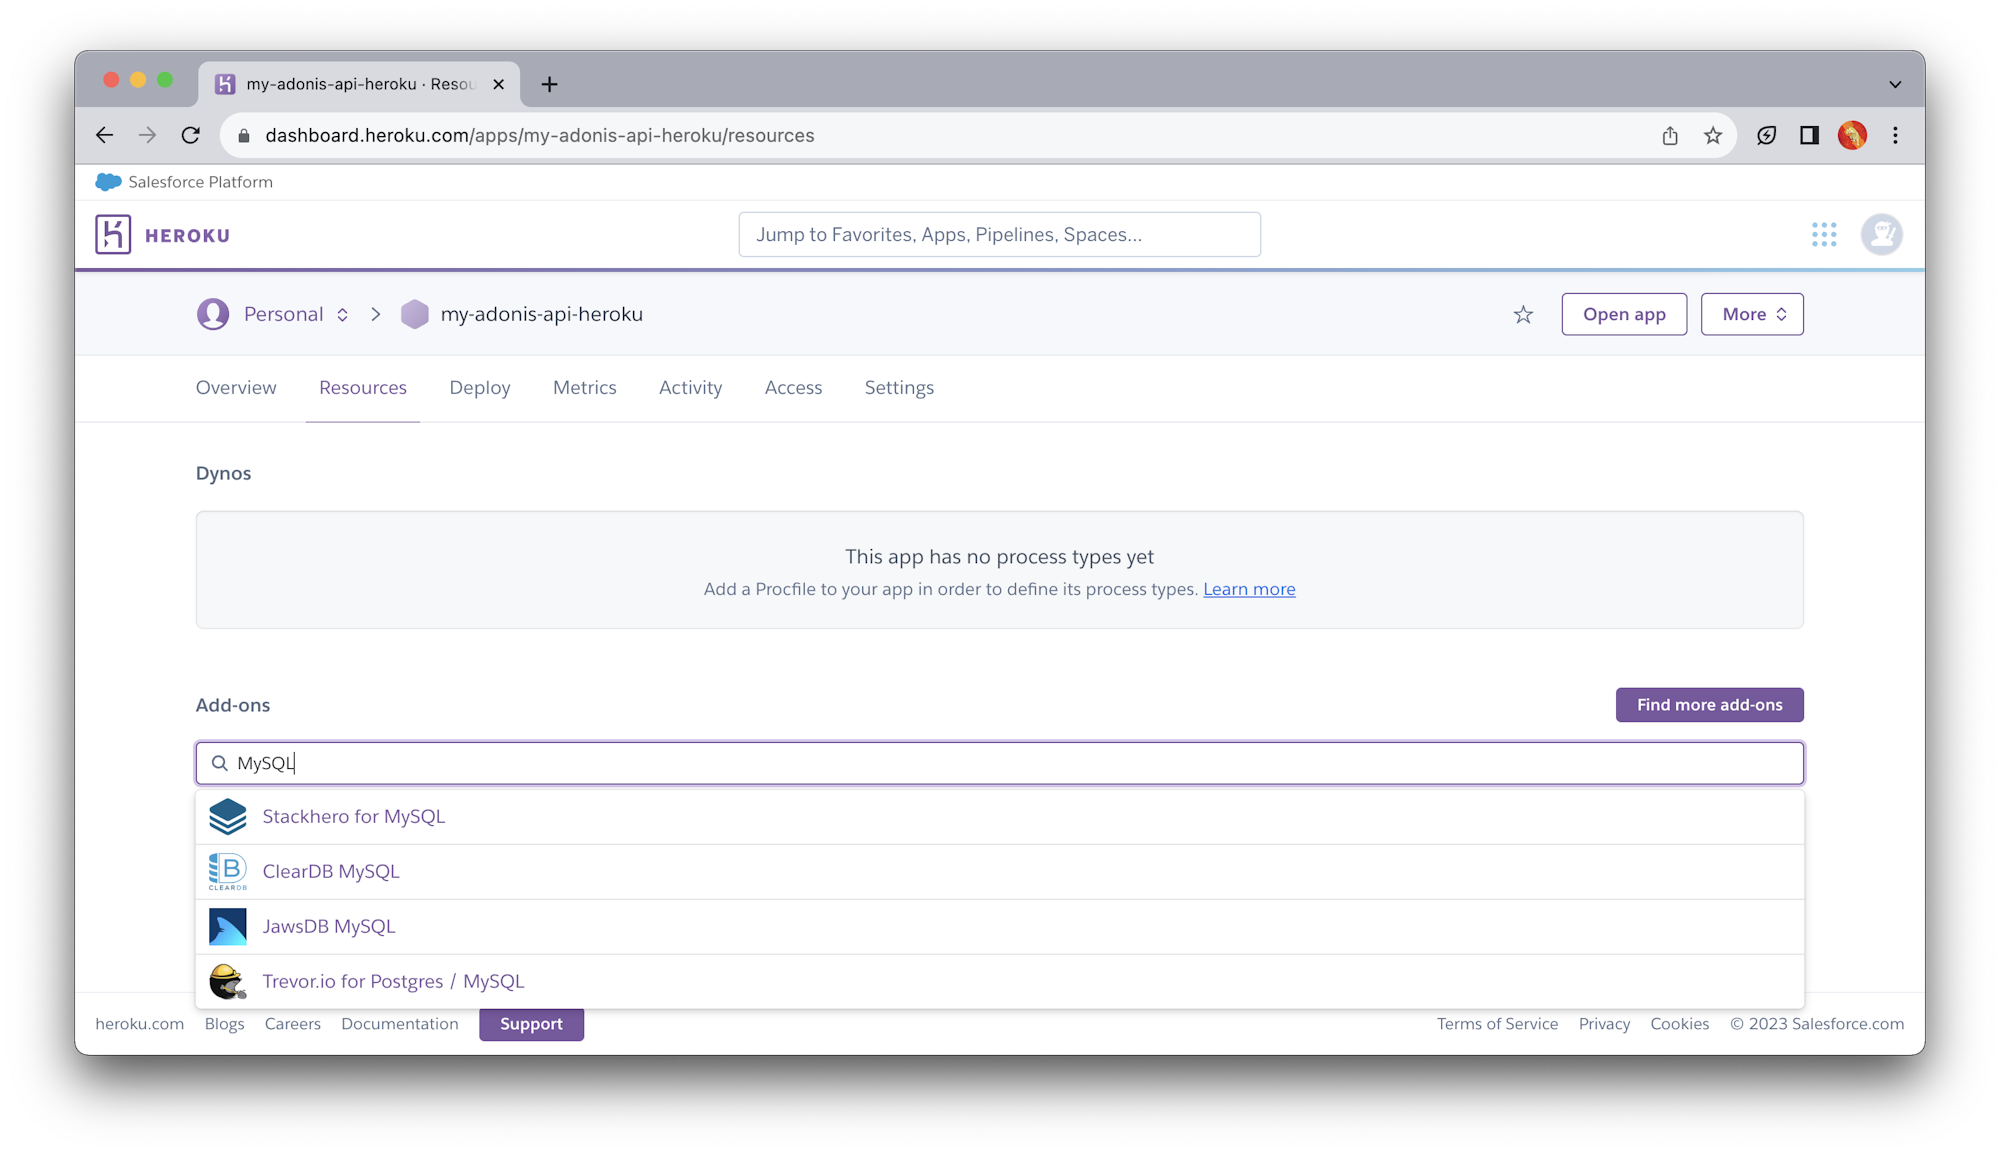
Select the jawsDB option to set up the MySQL instance. On the add-on pop-up, choose the free kitefin shared plan.
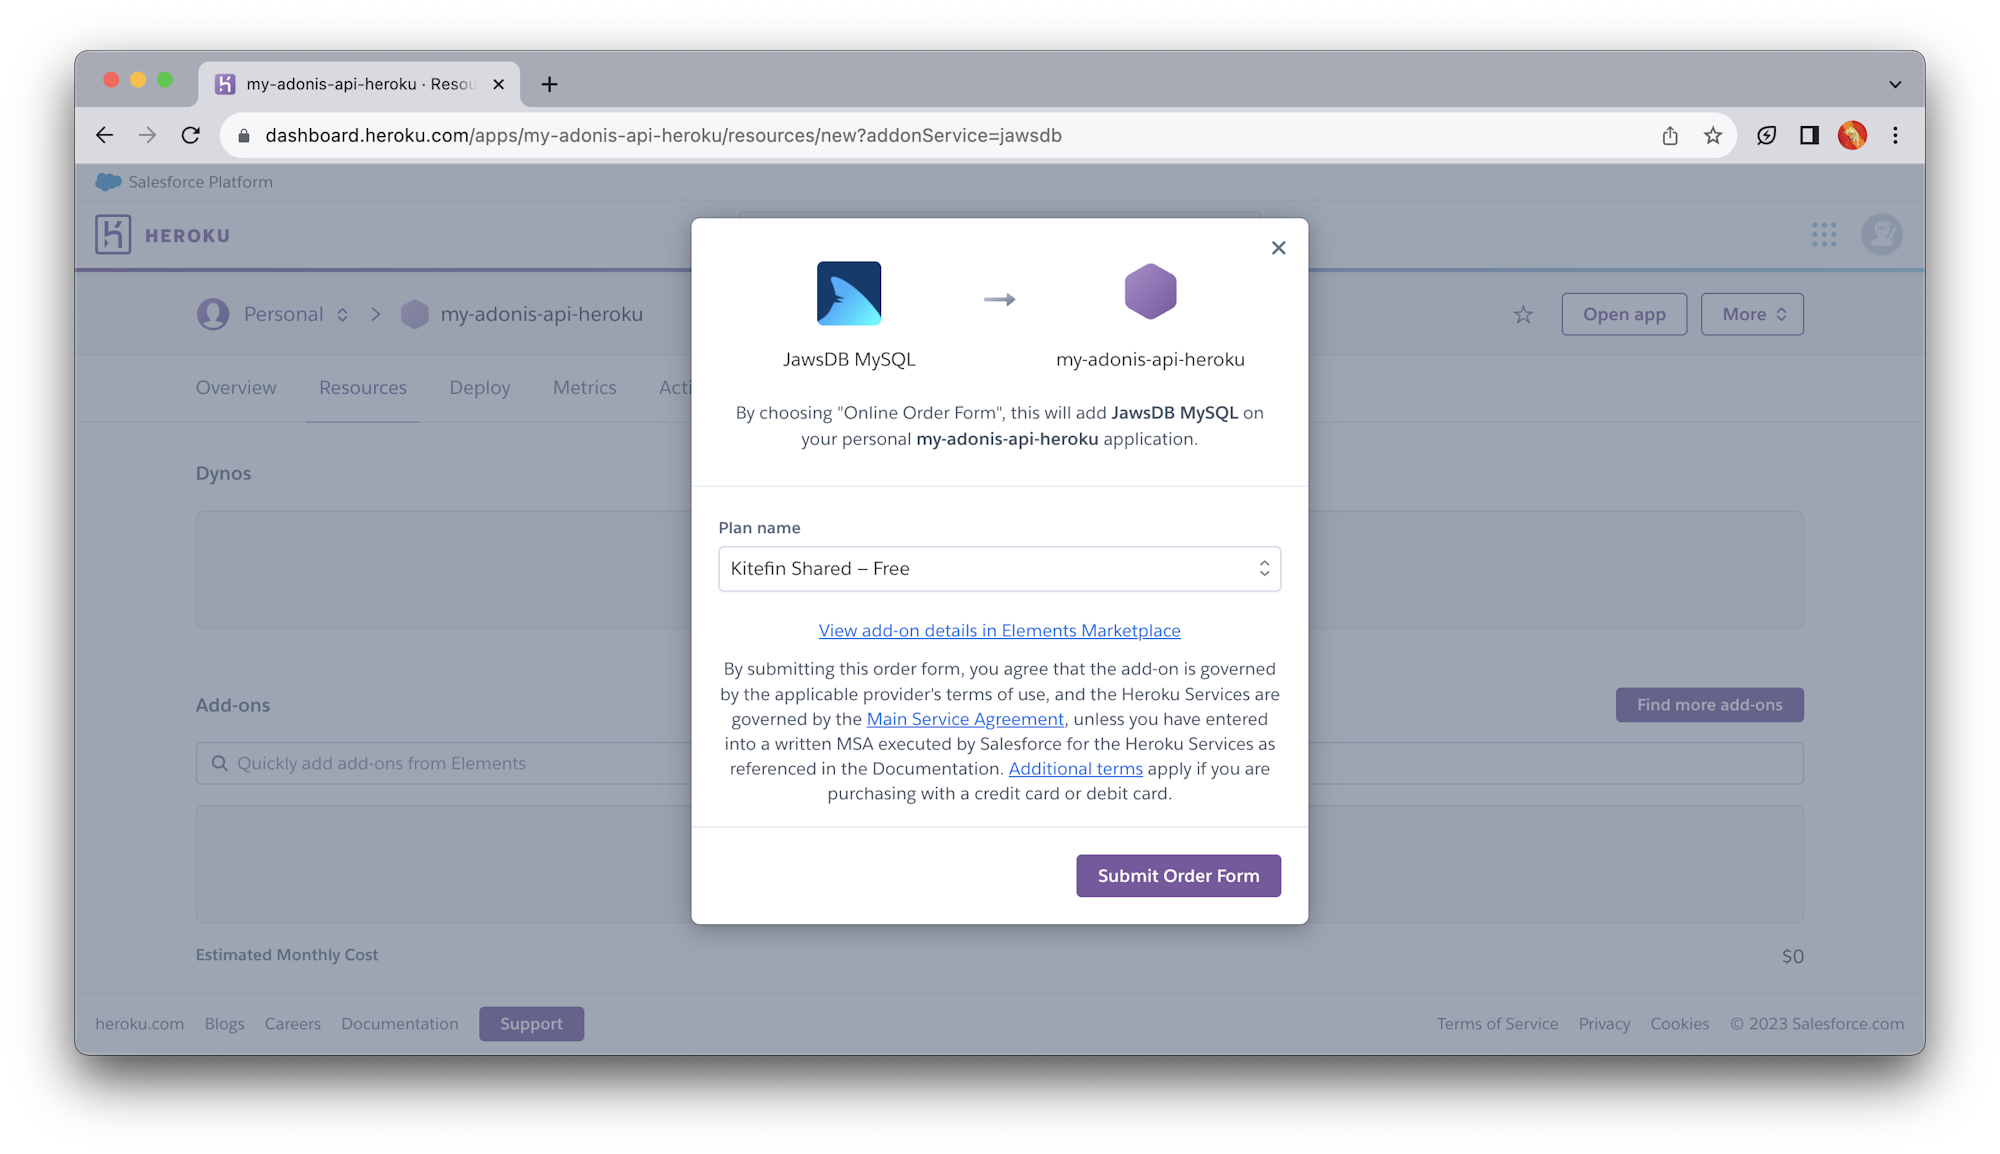
Click Provision to set up the database. Once this is done, it is added to your list of add-ons and a new JAWSDB_URL environment variable will be added to your application. You can find it in the Config Vars section of your application’s Settings page.
On that page, click Reveal Config Vars to reveal your environment variables. Now, add two other environment variables to this list:
APP_KEY: Your application’s API key found in your.envfileDB_CONNECTION: To ensure thatMySQLis used in production and notSQlite, set this tomysqlHOST: set this value as0.0.0.0DRIVE_DISK: This configures the file system. set its value aslocal
The final step in setting up the production database is to configure the mysql connection in ./config/database.js. The url-parse package helps you correctly resolve the connection string to the MySQL database on jawsDB. You also need the mysql package as a driver to connect to the production database. Install these packages with this command:
npm install url-parse mysql --save
Now, replace everything in ./config/database.js with this code:
"use strict";

const Env = use("Env");

const Helpers = use("Helpers");
const URL = require("url-parse");
const PROD_MYSQL_DB = new URL(Env.get("CLEARDB_DATABASE_URL"));

module.exports = {
  connection: Env.get("DB_CONNECTION", "sqlite"),

  sqlite: {
    client: "sqlite3",
    connection: {
      filename: Helpers.databasePath(`${Env.get("DB_DATABASE", "adonis")}.sqlite`),
    },
    useNullAsDefault: true,
    debug: Env.get("DB_DEBUG", false),
  },

  mysql: {
    client: "mysql",
    connection: {
      host: Env.get("DB_HOST", PROD_MYSQL_DB.hostname),
      port: Env.get("DB_PORT", PROD_MYSQL_DB.port),
      user: Env.get("DB_USER", PROD_MYSQL_DB.username),
      password: Env.get("DB_PASSWORD", PROD_MYSQL_DB.password),
      database: Env.get("DB_DATABASE", PROD_MYSQL_DB.pathname.substr(1)),
    },
    debug: Env.get("DB_DEBUG", false),
  },
};
This file configures your mysql connection to make use of the jawsDB instance in production. The sqlite connection will be used as a fallback on your local machine.
Automating the deployment of the API
Now you can start automating the deployment of your Adonis.js API to the Heroku hosting platform. In my opinion, this is the simplest step.
Create a Heroku Procfile to provide instructions for Heroku about how you want your application to be deployed. At the root of the project, create a file named Procfile (no file extension). Paste these commands into it:
release: ENV_SILENT=true node ./build/ace migration:run --force
web: ENV_SILENT=true node ./build/server.js
This file instructs Heroku to run your migrations using node ./build/ace migration:run --force. This step is done in Heroku’s release phase.
Next, instruct Heroku to run your application.
You have prefixed both commands with ENV_SILENT=true. The prefix suppresses some Adonis.js warnings as it tries to look for a .env file whose purpose has been replaced with the environment variables we set earlier on the Heroku application.
Adding CircleCI configuration
Now you can write the deployment script. At the root of the project, create a folder named .circleci and a file within it named config.yml. Inside the config.yml file, enter this code:
version: 2.1

jobs:
  deploy:
    docker:
      - image: cimg/base:2023.09
    steps:
      - checkout
      - run:
          name: Deploy app to Heroku
          command: |
            git push https://heroku:$HEROKU_API_KEY@git.heroku.com/$HEROKU_APP_NAME.git main
workflows:
  build-deploy:
    jobs:
      - deploy
This configuration uses Git to deploy your latest code changes to your Heroku account.
Get your project set up on CircleCI by pushing your project to GitHub.
Log into your CircleCI account. If you signed up with your GitHub account, all your repositories will be available on your project’s dashboard.
Click Set Up Project next to your my-adonis-api-heroku project.
CircleCI detects the config.yml file for the project. Click Use Existing Config and then Start Building. Your first workflow will start running, but it will fail.
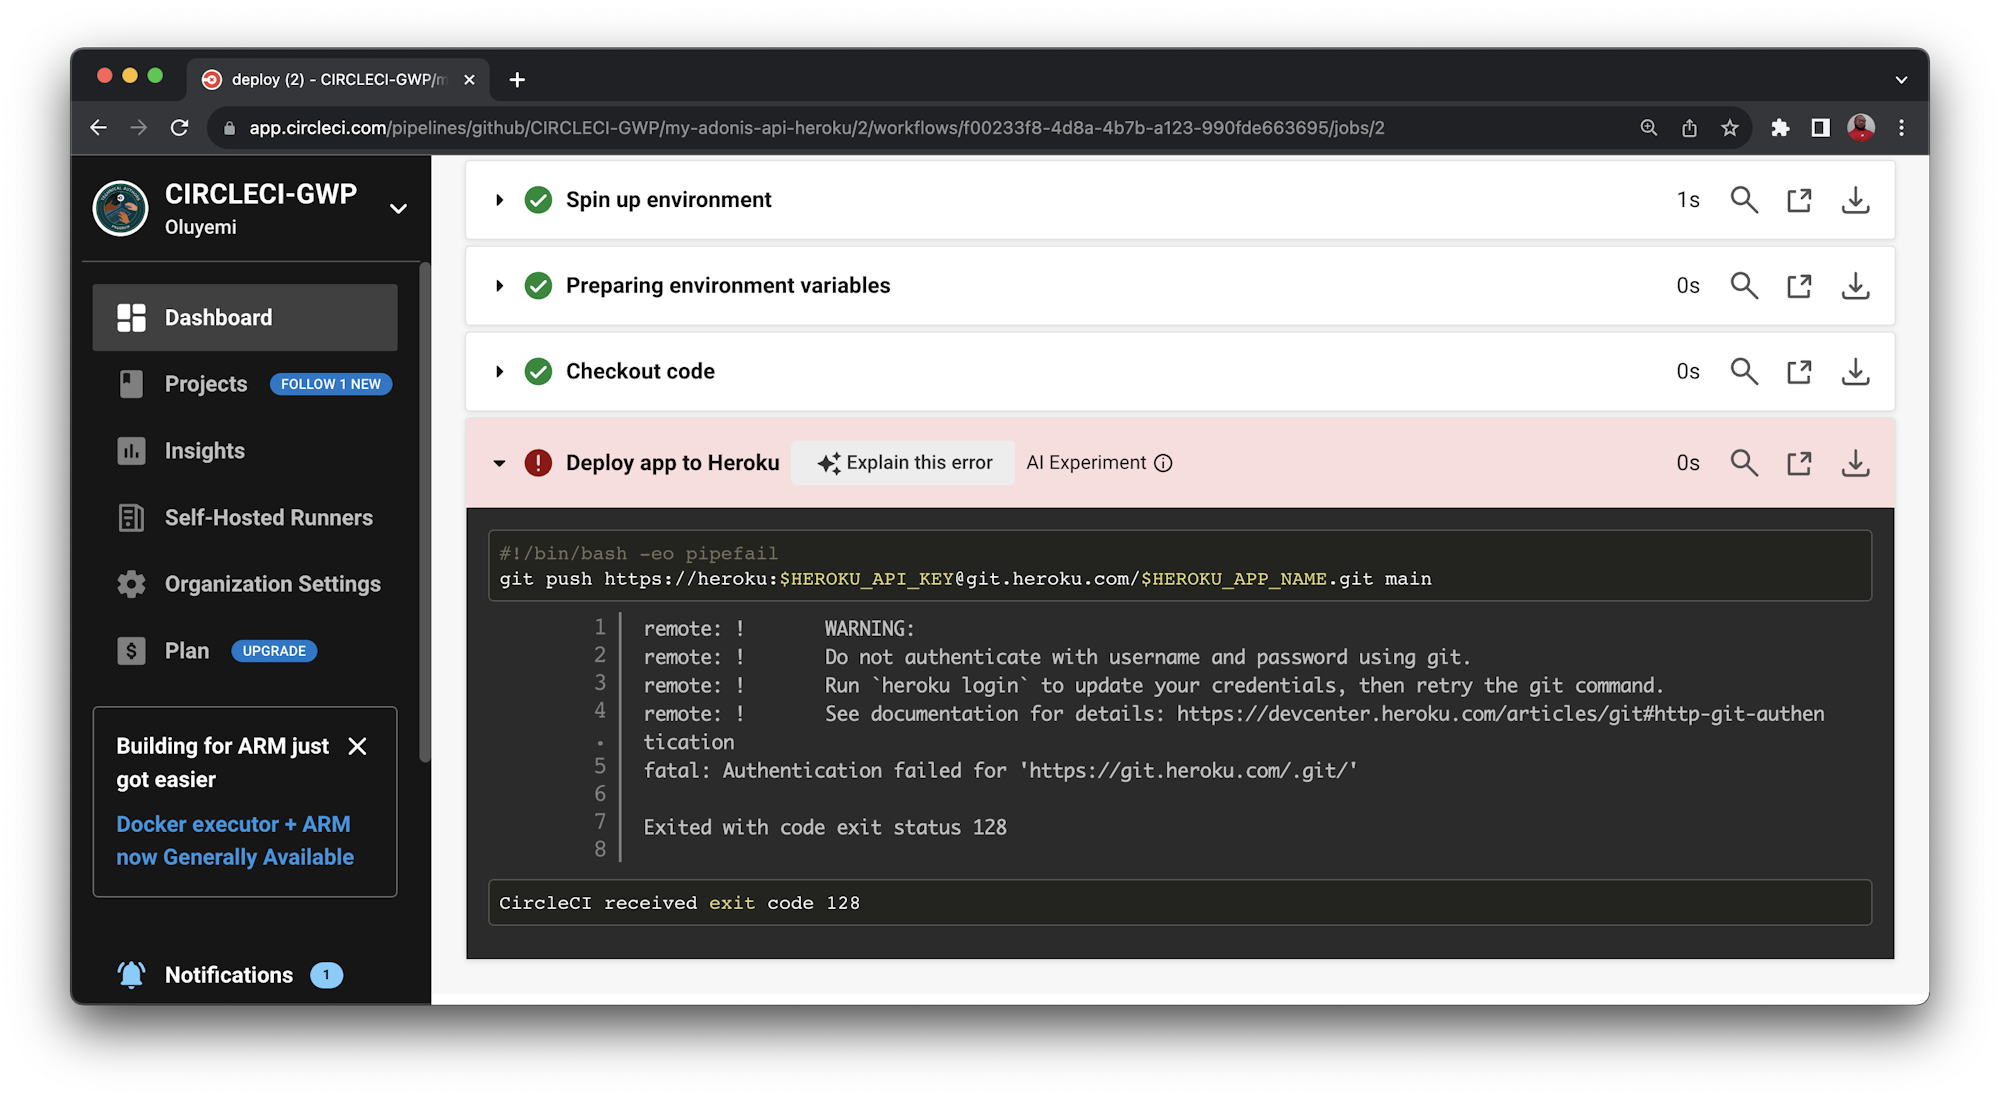
The deployment process fails because you have not provided the Heroku API key. To fix that, click the Project Settings button, then click Environment Variables. Add two new variables.
- For
HEROKU_APP_NAME, add the app name you used in Heroku. The name will be eithermy-adonis-api-herokuor a custom name (if you created one). - For
HEROKU_API_KEYenter the Heroku API key that you retrieved earlier from the Account Settings page.
Re-run your workflow from the start, and this time your workflow will run successfully.
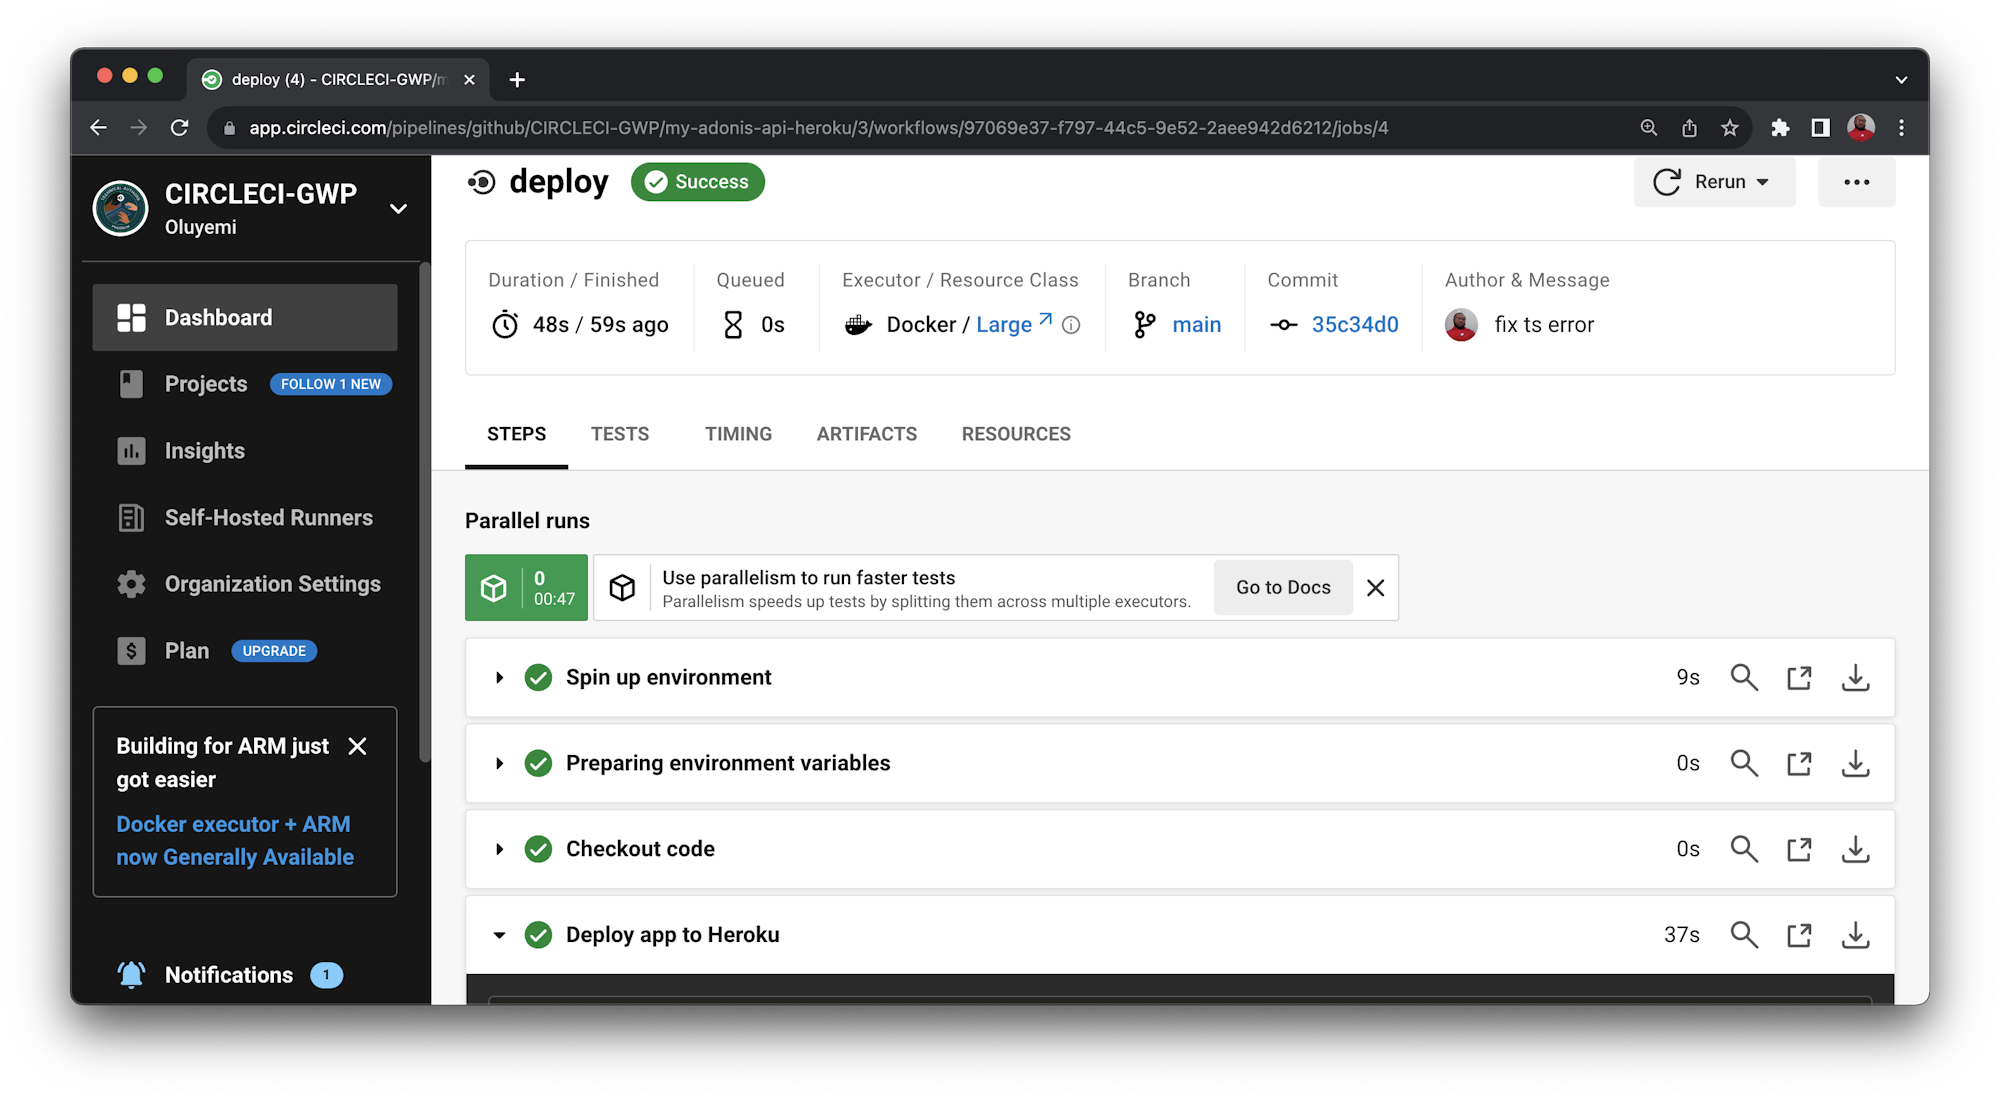
To review the behind-the-scenes action of the deployment, click build.
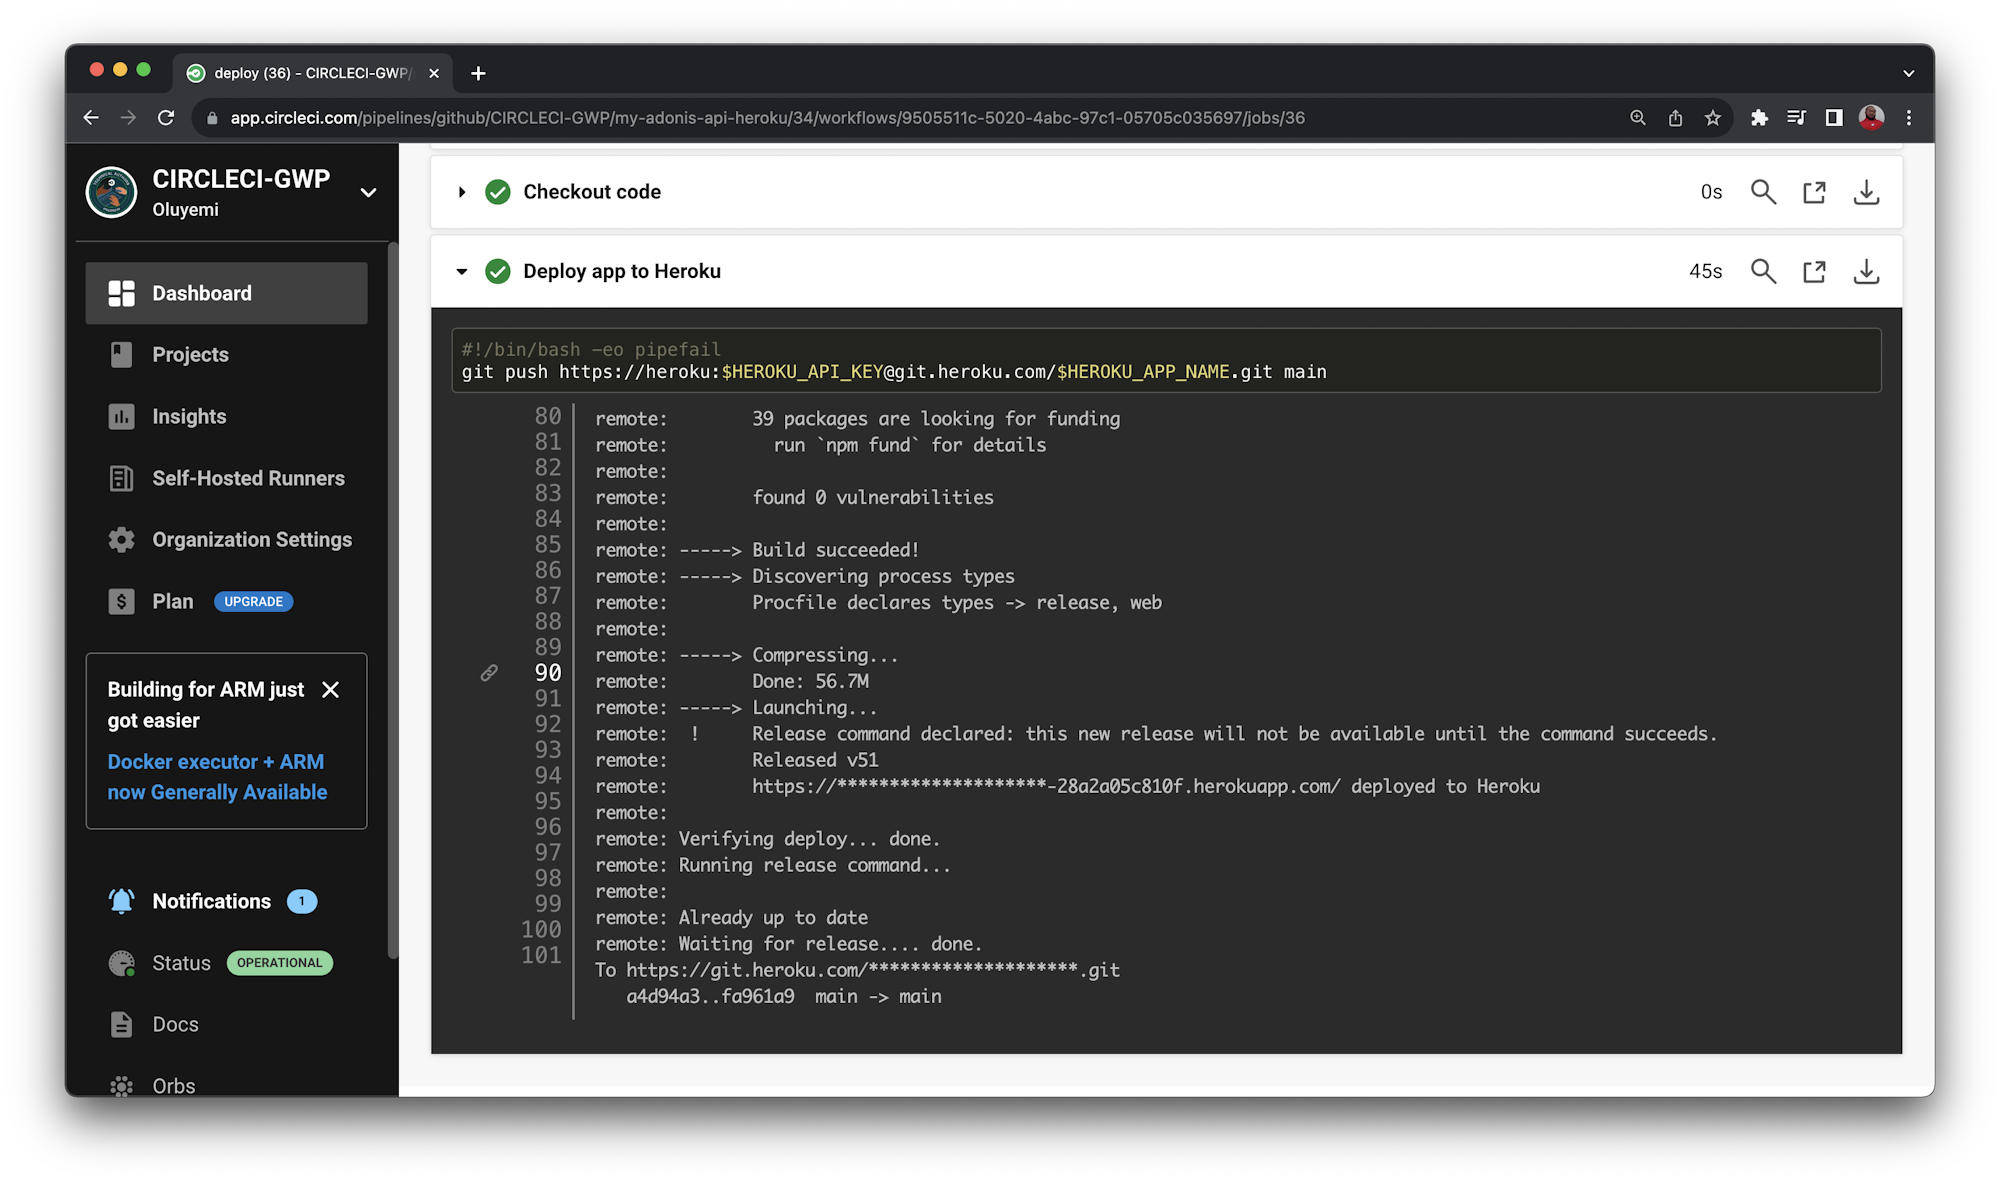
Confirm that your workflow was successful by opening your newly deployed app in a browser. The URL for your application should be in this format: https://<HEROKU_APP_NAME>-<RANDOM_NUMBER>.herokuapp.com/. You can find the generated domain name for your app on the Settings page.
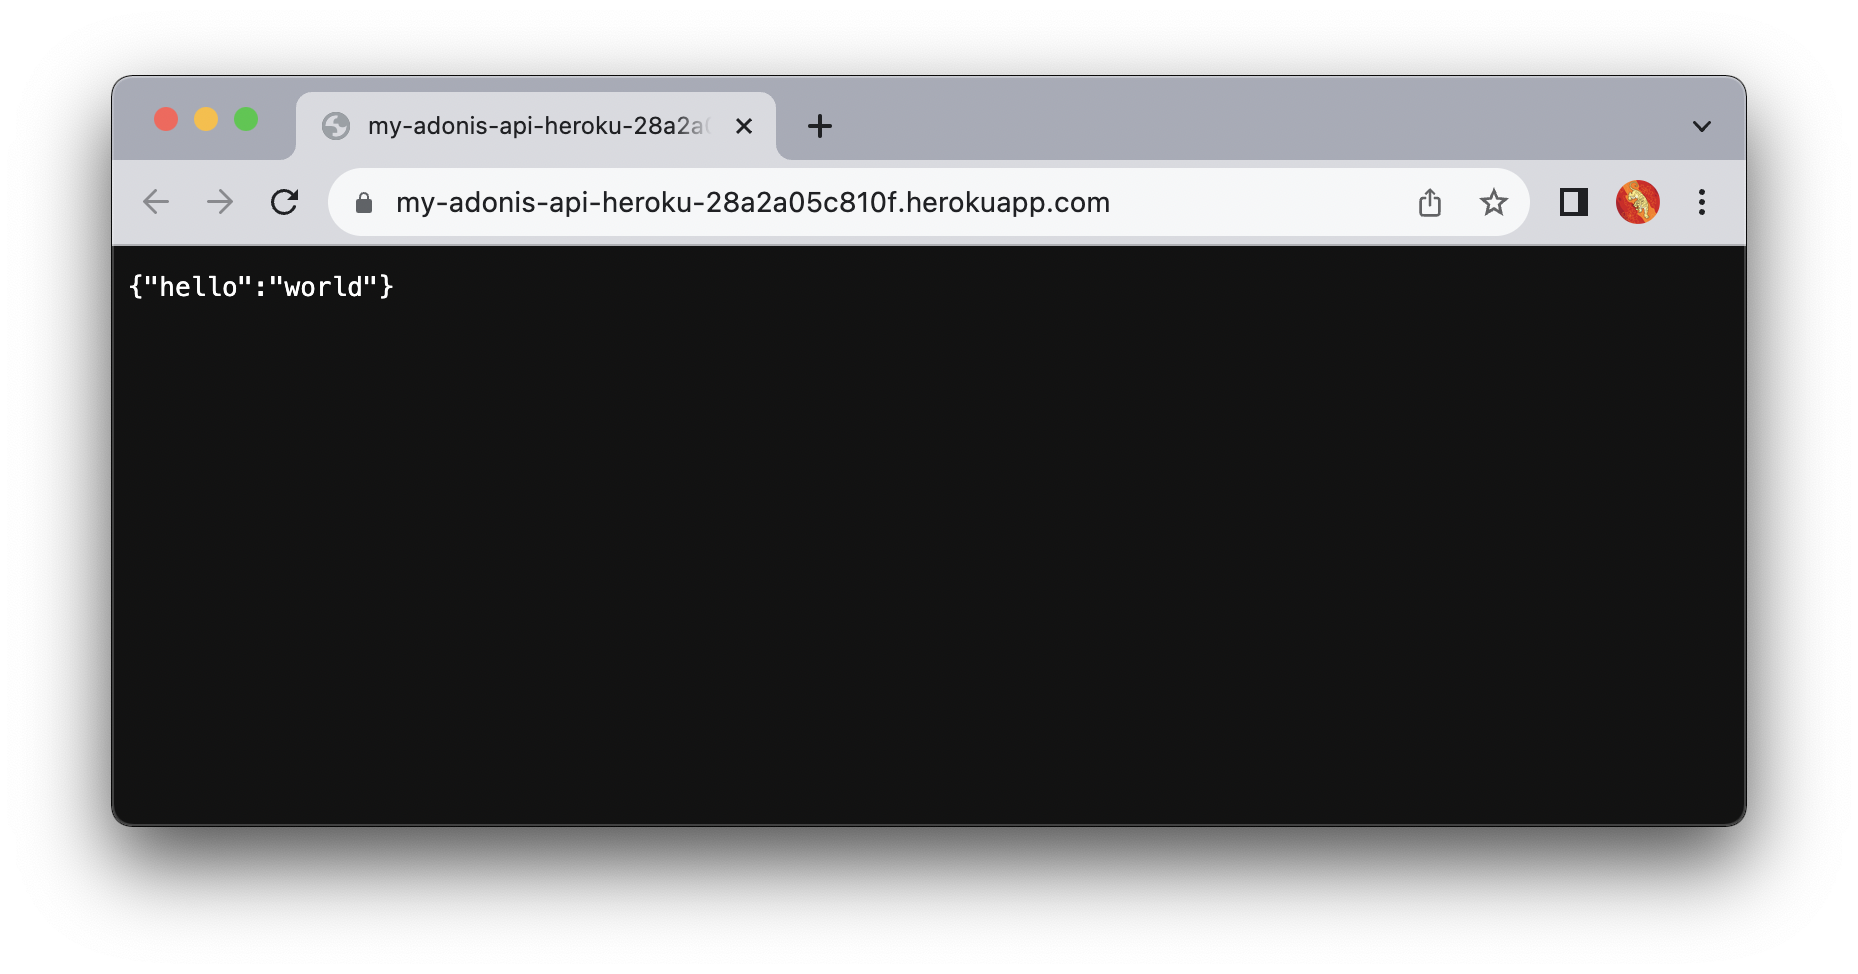
Now you can run some tests from Postman on your production API.
Awesome!
You now have a working production API deployed to Heroku.
Conclusion
Building APIs is fun with Adonis.js. In this tutorial, you learned how to create an automated CD pipeline using CircleCI. The pipeline automatically deploys your Adonis.js API to Heroku every time you push code to your repository. You also learned to configure different database systems for development and production environments.
The complete source code can be found here on Github.
Happy coding!
Fikayo Adepoju is a LinkedIn Learning (Lynda.com) Author, Full-stack developer, technical writer, and tech content creator proficient in Web and Mobile technologies and DevOps with over 10 years experience developing scalable distributed applications. With over 40 articles written for CircleCI, Twilio, Auth0, and The New Stack blogs, and also on his personal Medium page, he loves to share his knowledge to as many developers as would benefit from it. You can also check out his video courses on Udemy.


