Storing build artifacts
This document describes how to work with artifacts on CircleCI. Use artifacts to persist data after a job or pipeline has completed. For example building documents or other assets, or saving test results for further inspection.
Artifacts overview
Artifacts persist data after a job is completed and may be used for storage of the outputs of your build process.
For example, when a Java build/test process finishes, the output of the process is saved as a .jar file. CircleCI can store this file as an artifact, keeping it available after the process has finished.
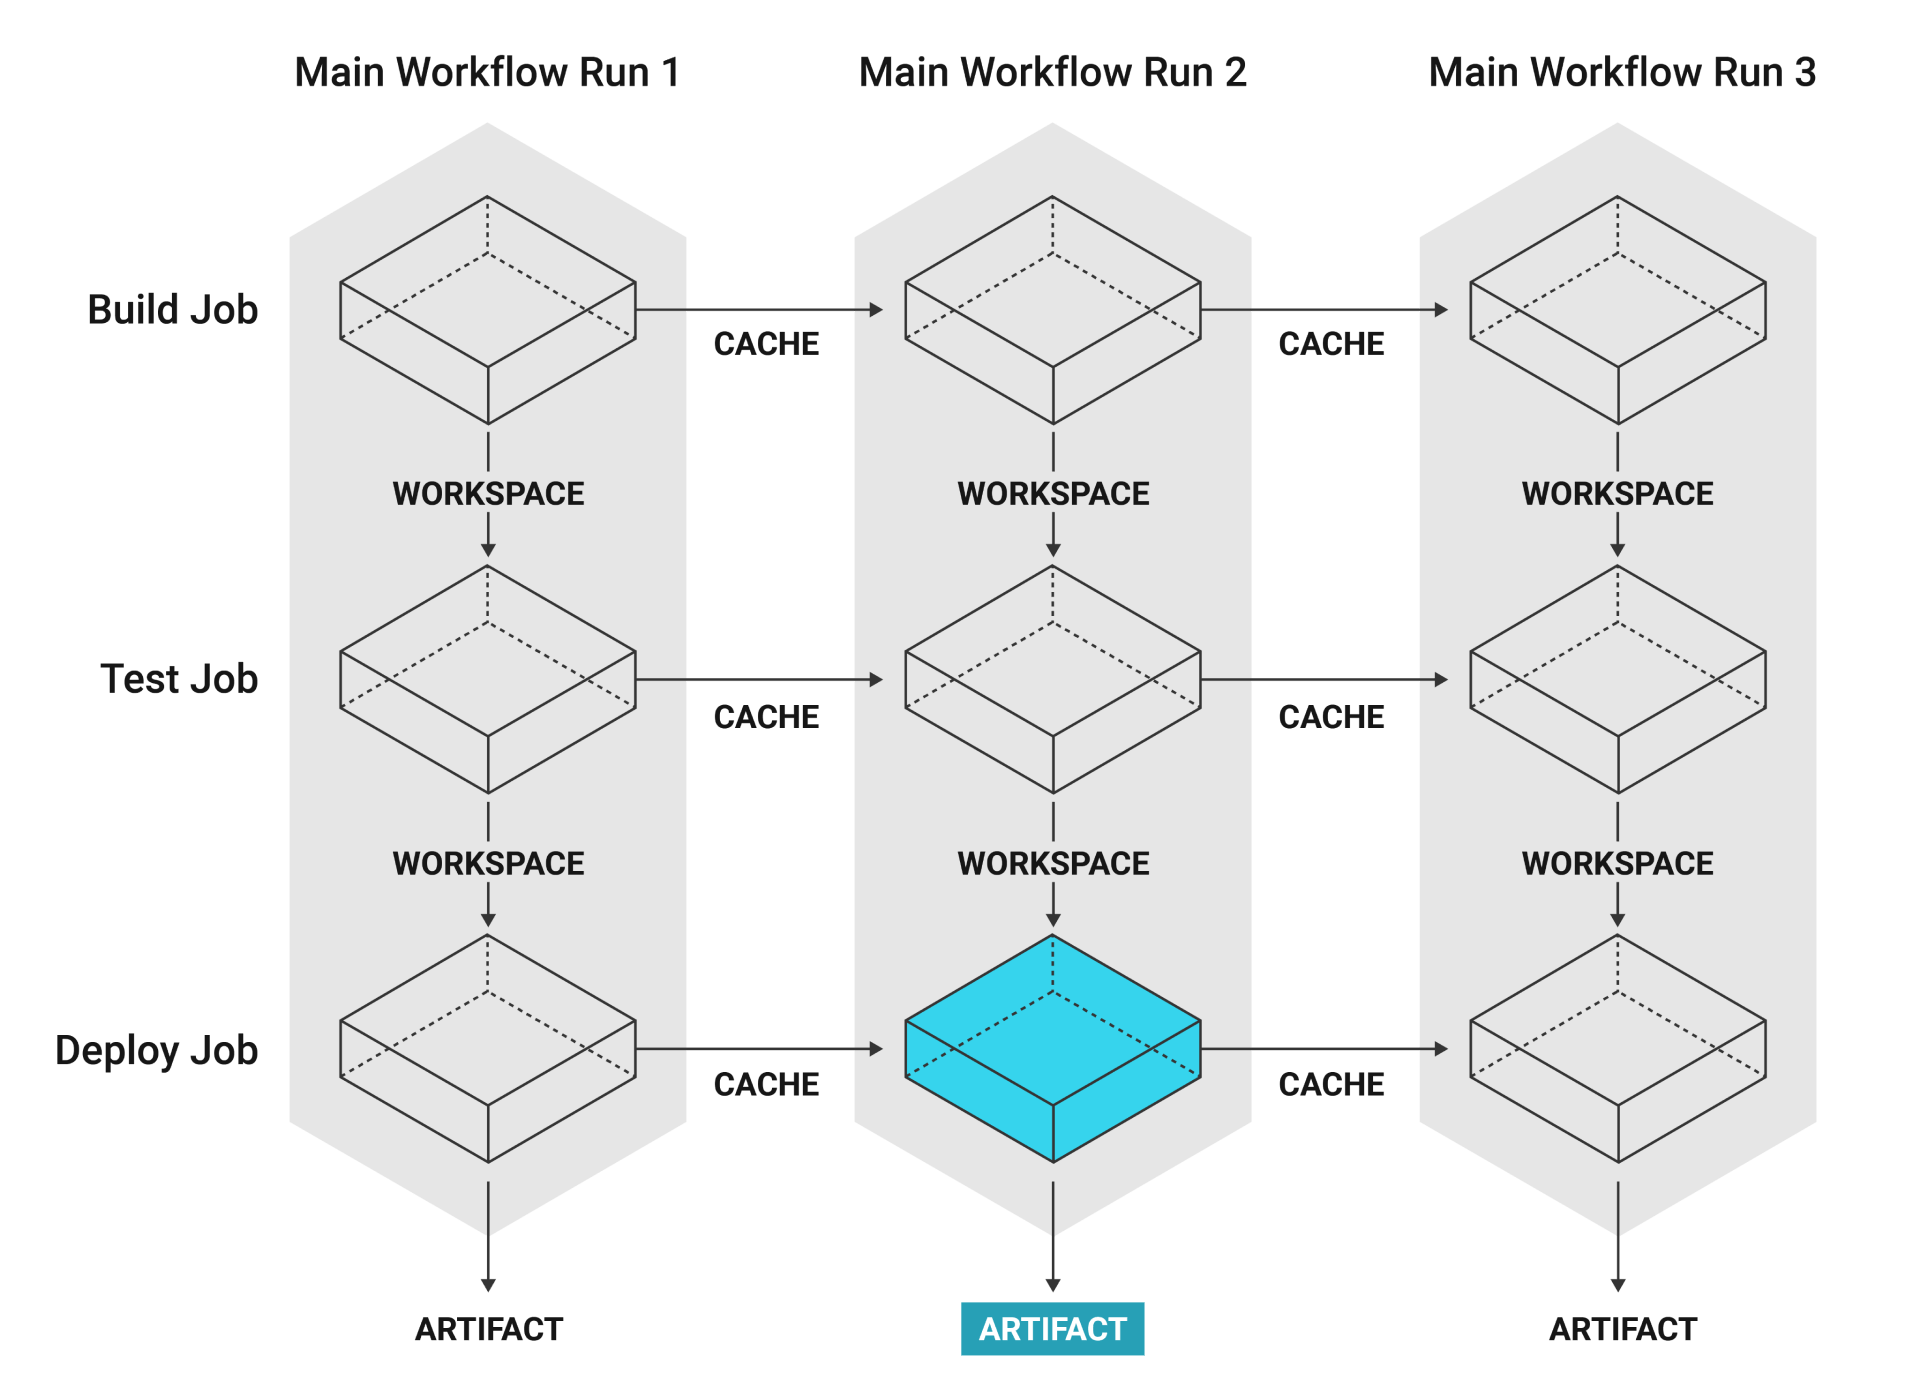
Another example of an artifact is a project that is packaged as an Android app where the .apk file is uploaded to Google Play.
If a job produces persistent artifacts such as screenshots, coverage reports, core files, or deployment tarballs, CircleCI can automatically save and link them for you.
Navigate to a pipeline’s Job page on the CircleCI web app to find the Artifacts tab. Artifacts are stored on Amazon S3 and are protected with your CircleCI account for private projects. There is a 3GB curl file size limit.
By default, artifact storage duration is set to 30 days. This can be customized on the CircleCI web app by navigating to . Currently, 30 days is also the maximum storage duration you can set.
For information on managing network and storage usage, see the Persisting Data page.
| Uploaded artifact filenames are encoded using the Java URLEncoder. Keep this in mind if you are expecting to find artifacts at a given path within the application. |
If you need to restrict the connections allowed in your jobs, consider enabling IP ranges. This enables CircleCI jobs to go through a set of well-defined IP address ranges.
Uploading artifacts
To upload artifacts created during builds, use the following example:
| Using Docker? Authenticating Docker pulls from image registries is recommended when using the Docker execution environment. Authenticated pulls allow access to private Docker images, and may also grant higher rate limits, depending on your registry provider. For further information see Using Docker authenticated pulls. |
version: 2.1
jobs:
build:
docker:
- image: python:3.6.3-jessie
working_directory: /tmp
steps:
- run:
name: Creating Dummy Artifacts
command: |
echo "my artifact file" > /tmp/artifact-1;
mkdir /tmp/artifacts;
echo "my artifact files in a dir" > /tmp/artifacts/artifact-2;
- store_artifacts:
path: /tmp/artifact-1
destination: artifact-file
- store_artifacts:
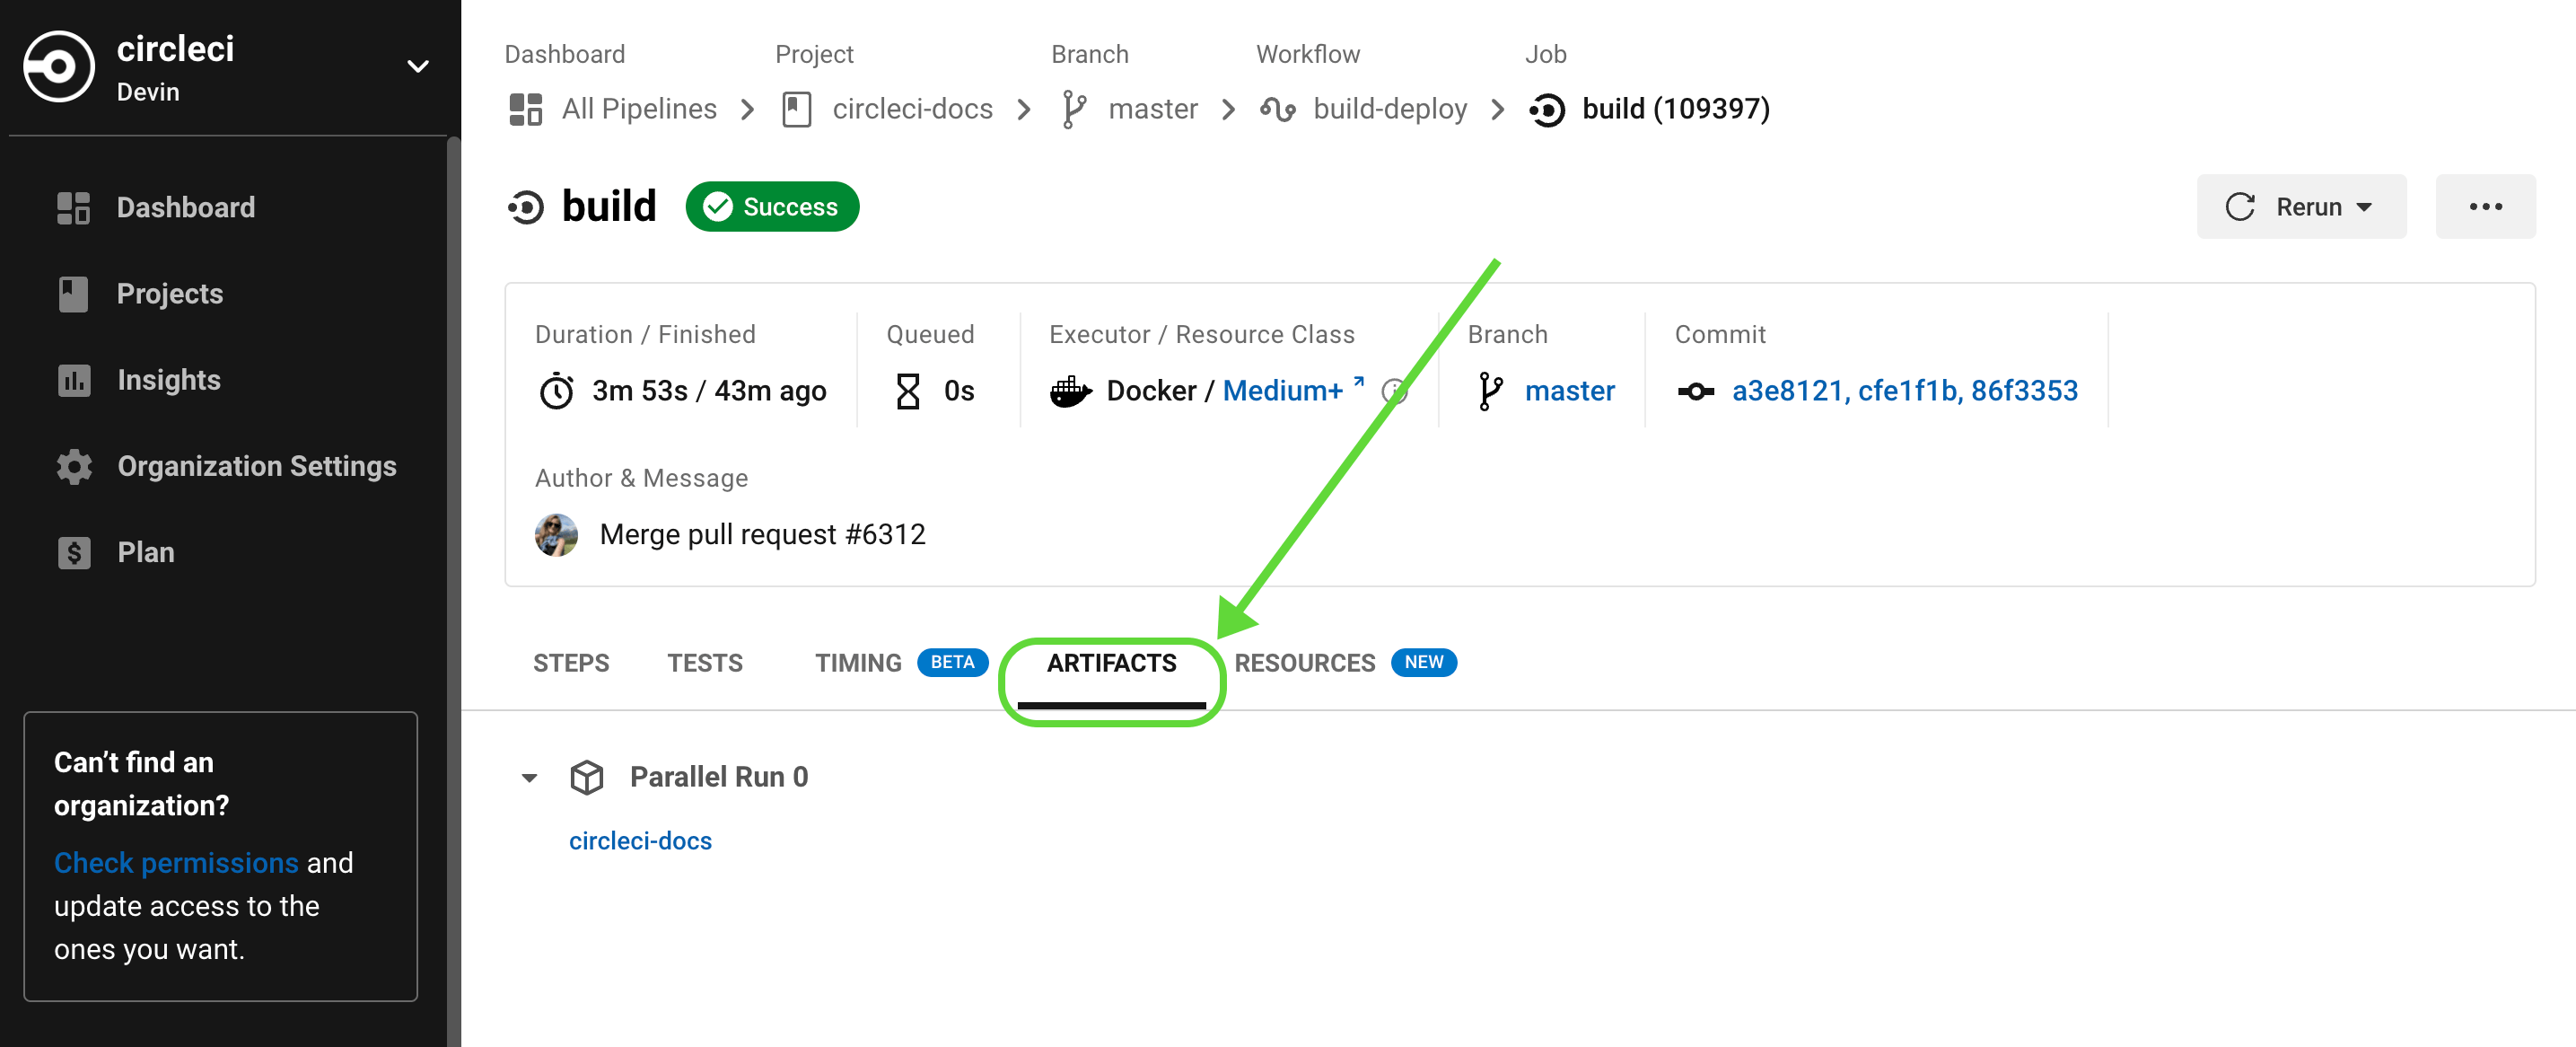
path: /tmp/artifactsThe store_artifacts step uploads two build artifacts: a file (/tmp/artifact-1) and a directory (/tmp/artifacts). After the artifacts successfully upload, view them in the Artifacts tab of the Job page in your browser. If you are uploading hundreds of artifacts, then consider compressing and uploading as a single compressed file to accelerate this step. There is no limit on the number of store_artifacts steps a job can run.
Currently, store_artifacts has two keys: path and destination.
-
pathis a path to the file or directory to be uploaded as artifacts. -
destination(optional) is a prefix added to the artifact paths in the artifacts API. The directory of the file specified inpathis used as the default.
Uploading core files
This section describes how to get core dumps and push them as artifacts for inspection and debugging. The following example creates a short C program that runs abort(3) to crash the program.
-
Create a
Makefilewith the following lines:all: gcc -o dump main.c -
Create a
main.cfile with the following lines.#include <stdlib.h> int main(int argc, char **argv) { abort(); } -
Run
makeand./dumpon the generated program to printAborted (core dumped)!
Following is a full config.yml that compiles the example C abort program, and collects the core dumps as artifacts.
version: 2.1
jobs:
  build:
    docker:
      - image: gcc:8.1.0
    working_directory: ~/work
    steps:
      - checkout
      - run: make
      - run: |
          # tell the operating system to remove the file size limit on core dump files
          ulimit -c unlimited
          ./dump
      - run:
          command: |
            mkdir -p /tmp/core_dumps
            cp core.* /tmp/core_dumps
          when: on_fail
      - store_artifacts:
          path: /tmp/core_dumps
The ulimit -c unlimited removes the file size limit on core dump files. With the limit removed, every program crash creates a core dump file in the current working directory. The core dump file is named core.%p.%E where %p is the process id and %E is the pathname of the executable. See the specification in /proc/sys/kernel/core_pattern for details.
Finally, the core dump files are stored to the artifacts service with store_artifacts in the /tmp/core_dumps directory.
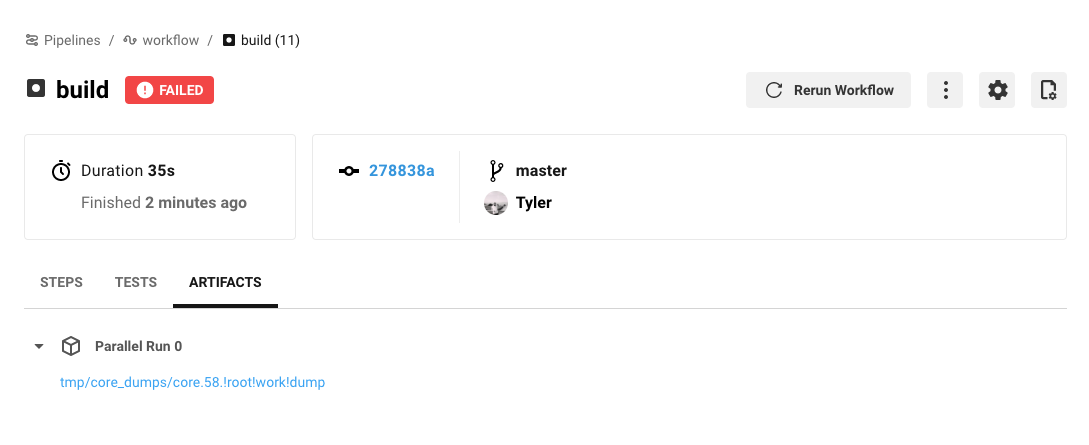
When CircleCI runs a job, a link to the core dump file appears in the Artifacts tab of the Job page.
Downloading all artifacts for a build on CircleCI
To download your artifacts with curl, follow the steps below.
-
Create a personal API token and copy it to a clipboard.
-
In a Terminal window,
cdto a directory where you want to store the artifacts. -
Run the commands below. Use the table beneath the commands to substitute actual values for all variables that start with
:.
# Set an environment variable for your API token.
export CIRCLE_TOKEN=':your_token'

# `curl` gets all artifact details for a build
# then, the result is piped into `grep` to extract the URLs.
# finally, `wget` is used to download the artifacts to the current directory in your terminal.

curl -s -H "Circle-Token: $CIRCLE_TOKEN" https://circleci.com/api/v1.1/project/:vcs-type/:username/:project/:build_num/artifacts \
  | grep -o -E 'https://([^"]*)' \
  | wget --verbose --header "Circle-Token: $CIRCLE_TOKEN" --input-file -
Similarly, if you want to download the latest artifacts of a build, replace the curl call with a URL that follows this scheme:
curl -H "Circle-Token: <circle-token>" https://circleci.com/api/v1.1/project/:vcs-type/:username/:project/latest/artifactsYou can read more about using CircleCI’s API to interact with artifacts in our API reference guide.
| Placeholder | Meaning |
|---|---|
| The personal API token you created above. |
| The version control system (VCS) you are using. Either |
| The VCS project account username or organization name for the target project. Located at the top left of the screen in the CircleCI application. |
| The name of the target VCS repository. |
| The number of the job (aka. build) for which you want to download artifacts. |
Artifact storage customization
When using self-hosted runners, there is a network and storage usage limit included in your plan. There are certain actions related to artifacts that will accrue network and storage usage. Once your usage exceeds your limit, charges will apply.
Retaining an artifact for a long period of time will have storage cost implications, therefore, it is best to determine why you are retaining artifacts. One benefit of retaining an artifact might be so you can use it to troubleshoot why a build is failing. Once the build passes, the artifact is likely not needed. Setting a low storage retention for artifacts is recommended if this suits your needs.
You can customize storage usage retention periods for artifacts on the CircleCI web app by navigating to . For information on managing network and storage usage, see the Persisting Data page.
Artifacts optimization
Check which artifacts are being uploaded
Often we see that the store_artifacts step is being used on a large directory when only a few files are really needed, so a simple action you can take is to check which artifacts are being uploaded and why.
If you are using parallelism in your jobs, it could be that each parallel task is uploading an identical artifact. You can use the CIRCLE_NODE_INDEX environment variable in a run step to change the behavior of scripts depending on the parallel task run.
Uploading large artifacts
Artifacts that are text can be compressed at very little cost. If you must upload a large artifact you can upload them to your own bucket at no cost.
If you are uploading images/videos of UI tests, filter out and upload only failing tests. Many organizations upload all of the images from their UI tests, many of which will go unused.
If your pipelines build a binary or uberJAR, consider if these are necessary for every commit. You may wish to only upload artifacts on failure or success, or perhaps only on a single branch using a filter.
Only upload test results on failure
The when attribute lets you filter what happens within a step in your configuration. The when attribute can be set to on_success, on_fail or always. To only upload artifacts for tests that have failed, add the when: on_fail line to your job as follows:
jobs:
  build:
    docker:
      - image: cimg/base:2024.01
    steps:
      - run:
          name: Testing application
          command: make test
          shell: /bin/bash
          working_directory: ~/my-app
          no_output_timeout: 30m
          environment:
            FOO: bar

      - run: echo 127.0.0.1 devhost | sudo tee -a /etc/hosts

      - run: |
          sudo -u root createuser -h localhost --superuser ubuntu &&
          sudo createdb -h localhost test_db

      - run:
          name: Upload Failed Tests
          command: curl --data fail_tests.log http://example.com/error_logs
          when: on_fail