Test splitting to speed up your pipelines
This guide walks you through a basic example of test splitting in CircleCI. Test splitting helps speed up your pipelines.
Introduction
Test splitting is a technique in which tests are executed simultaneously across multiple execution environments. Test splitting takes advantage of a feature called parallelism, which allows you to run a job in CircleCI on different nodes at the same time.
You may have a test suite that consists of dozens or hundreds of tests, and executing them one after the other can take up a lot of time and consume a lot of credits. When you split tests, you have the opportunity to significantly reduce wait times, receive feedback more quickly, and optimize your plan usage.
Test splitting in CircleCI can work with many testing frameworks, including Jest, pytest, Maven, and Gradle.
In this tutorial, you will:
-
Set up a basic React app as a project in CircleCI.
-
Modify the project’s
.circleci/config.ymlfile to split tests based on timing data. -
View the resulting parallel test runs in the CircleCI web app.
-
See how test splitting can help decrease pipeline run times and optimize credit usage.
To complete this tutorial, you need:
-
A CircleCI account - if you do not have an account, you can sign up for free.
-
A Version Control System (VCS) provider, such as GitHub, Bitbucket, or GitLab, connected to your CircleCI account. If you have not already done so, follow the steps in the GitHub, Bitbucket, or GitLab integration pages to connect your VCS provider.
About the sample app
You will use a basic React app for this tutorial. The project repository is available on GitHub. The app was created using Create React App, and is set up to use the Jest testing framework. It uses the jest-junit reporter to export test results as JUnit XML files.
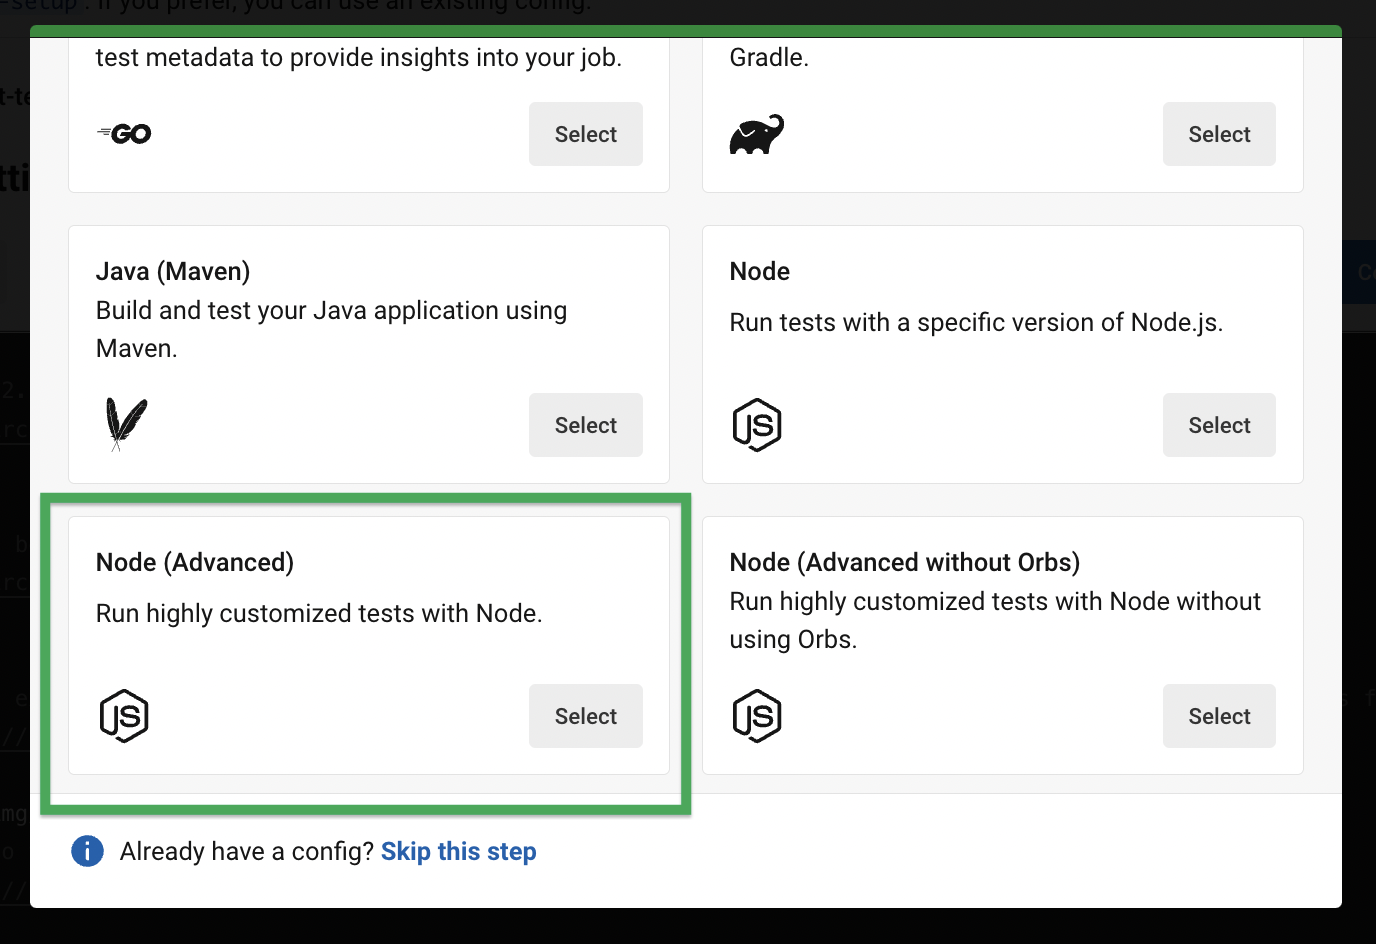
When you set up the project in CircleCI later in this tutorial, you’ll select the option to use a config.yml template that you can edit. The template used with this tutorial is a starter configuration that can be used with Node projects. Read the following section for a quick walkthrough of the configuration, or feel free to skip ahead to set up the project if you’re already familiar with setting up Node projects in CircleCI.
Configuration walkthrough
The following is a copy of the .circleci/config.yml template that you will edit later.
| Using Docker? Authenticating Docker pulls from image registries is recommended when using the Docker execution environment. Authenticated pulls allow access to private Docker images, and may also grant higher rate limits, depending on your registry provider. For further information see Using Docker authenticated pulls. |
version: 2.1

orbs:
  node: circleci/node@4.7

jobs:
  build-and-test:
    docker:
      - image: cimg/node:16.10
    steps:
      - checkout
      - node/install-packages:
          pkg-manager: npm
      - run:
          name: Run tests
          command: npm test

workflows:
  sample:
    jobs:
- build-and-test-
Line 1: This project uses the configuration
version: 2.1. This enables CircleCI features such as orbs and reusable configuration. More information on config version 2.1 can be found in the Configuration reference page. -
Lines 3-4: This project uses the CircleCI Node orb. The Node orb is a package of reusable configuration elements that allow you to execute tasks common to Node.js apps and help reduce complexity in your config.yml file. In this particular example, the orb’s
install-packagescommand is used to easily install Node packages and configure Yarn as the default package manager using thepkg-managerparameter. More details on the Node orb can be found on the Developer Hub. -
Lines 18-21: The project pipeline consists of one workflow called
sample. This workflow is comprised of one job, namedbuild-and-test, which is made up of a few steps to check out the project code, install Node packages and set the default package manager, and run tests (lines 8 to 16).
Test splitting is typically set up within a job. In this tutorial you will modify the build-and-test job to define the number of parallel test runs, where the test suites are located, and how tests should be split (in this case, by timing).
1. Add the project
To get started, you need to get the sample app building as a project on CircleCI. If you are using GitHub the steps are slightly different depending on whether you have a GitHub OAuth app or CircleCI GitHub App integration. To find out which integration you have, see the GitHub App integration page.

2. Set up test splitting
If you downloaded a local copy of the code repository, carry out the following steps in your text editor to modify .circleci/config.yml. Alternatively, if you are using GitHub or Bitbucket, you may edit the project’s configuration in the CircleCI web app by selecting a branch, and then clicking Edit Config.
-
In the
build-and-testjob, after thedockerkey, add theparallelismkey with a value of5.parallelism: 5For test splitting to work, the parallelism key has to be set to a value greater than 1, ensuring that the tests are distributed across multiple executors. Otherwise, if the value is 1, tests will be run sequentially within the same environment, and you do not get the benefits of reducing test times and credit usage.
In this example, five separate Docker containers will spin up.
-
Within the
stepskey of thebuild-and-testjob, make the following updates:-
After the
node/install-packagesstep, add aruncommand to create a new subdirectory namedjunit:- run: mkdir ~/junitTest results, including timing data, will be saved in this subdirectory of the executor.
-
Replace the existing
runcommand namedRun testswith the following:- run: name: Test application command: | TEST=$(circleci tests glob "src/__tests__/*.js") echo "$TEST" | circleci tests run --command="xargs yarn test" --split-by=timingsThis step uses the CircleCI CLI to pass in the location of the test suites and configure how the tests are split. You can use the
circleci tests globcommand to select the test files:-
First, you want those that match the
src/__tests__/*.jsglobbing pattern, that is, any.jsfiles located insrc/__tests__and any of its subdirectories. -
Then, the matching files are piped into
circleci tests run, which creates the test split groupings and then runs your tests. -
The
--split-by=timingsflag indicates that the tests should be split according to timing data. For other test splitting options, see the Test splitting and parallelism page.The circleci testscommands (globandrun) cannot be run locally via the CLI as they require information that only exists within a CircleCI container.
-
-
Add a step to copy the test results (saved as JUnit XML files) to the
~/junitsubdirectory created in an earlier step. Using thewhenattribute with a value ofalwayswill execute this particular step always regardless of whether the preceding steps were executed successfully or not.- run: command: cp junit.xml ~/junit/ when: always -
Finally, add a
store_test_resultsstep:- store_test_results: path: ~/junitThis step uploads the test data to CircleCI and is required to split tests by timing data. This step allows test data to be accessible on the Tests tab of the job in the CircleCI web app, and can be helpful for debugging if tests fail. To read more about the Tests tab and test insights in CircleCI, visit the Collect test data page.
-
Here is a full copy of the updated configuration:
version: 2.1
orbs:
node: circleci/node@4.7
jobs:
build-and-test:
docker:
- image: cimg/node:16.10
parallelism: 5
steps:
- checkout
- node/install-packages:
pkg-manager: yarn
- run: mkdir ~/junit
- run:
      name: Test application
      command: |
          TEST=$(circleci tests glob "src/__tests__/*.js")
          echo "$TEST" | circleci tests run --command="xargs yarn test" --split-by=timings
- run:
    command: cp junit.xml ~/junit/
    when: always
- store_test_results:
    path: ~/junit
workflows:
sample:
jobs:
- build-and-testOnce you have made these changes to .circleci/config.yml, go ahead and push the changes. This triggers the pipeline and runs the tests again, but this time the results are stored.
3. View results
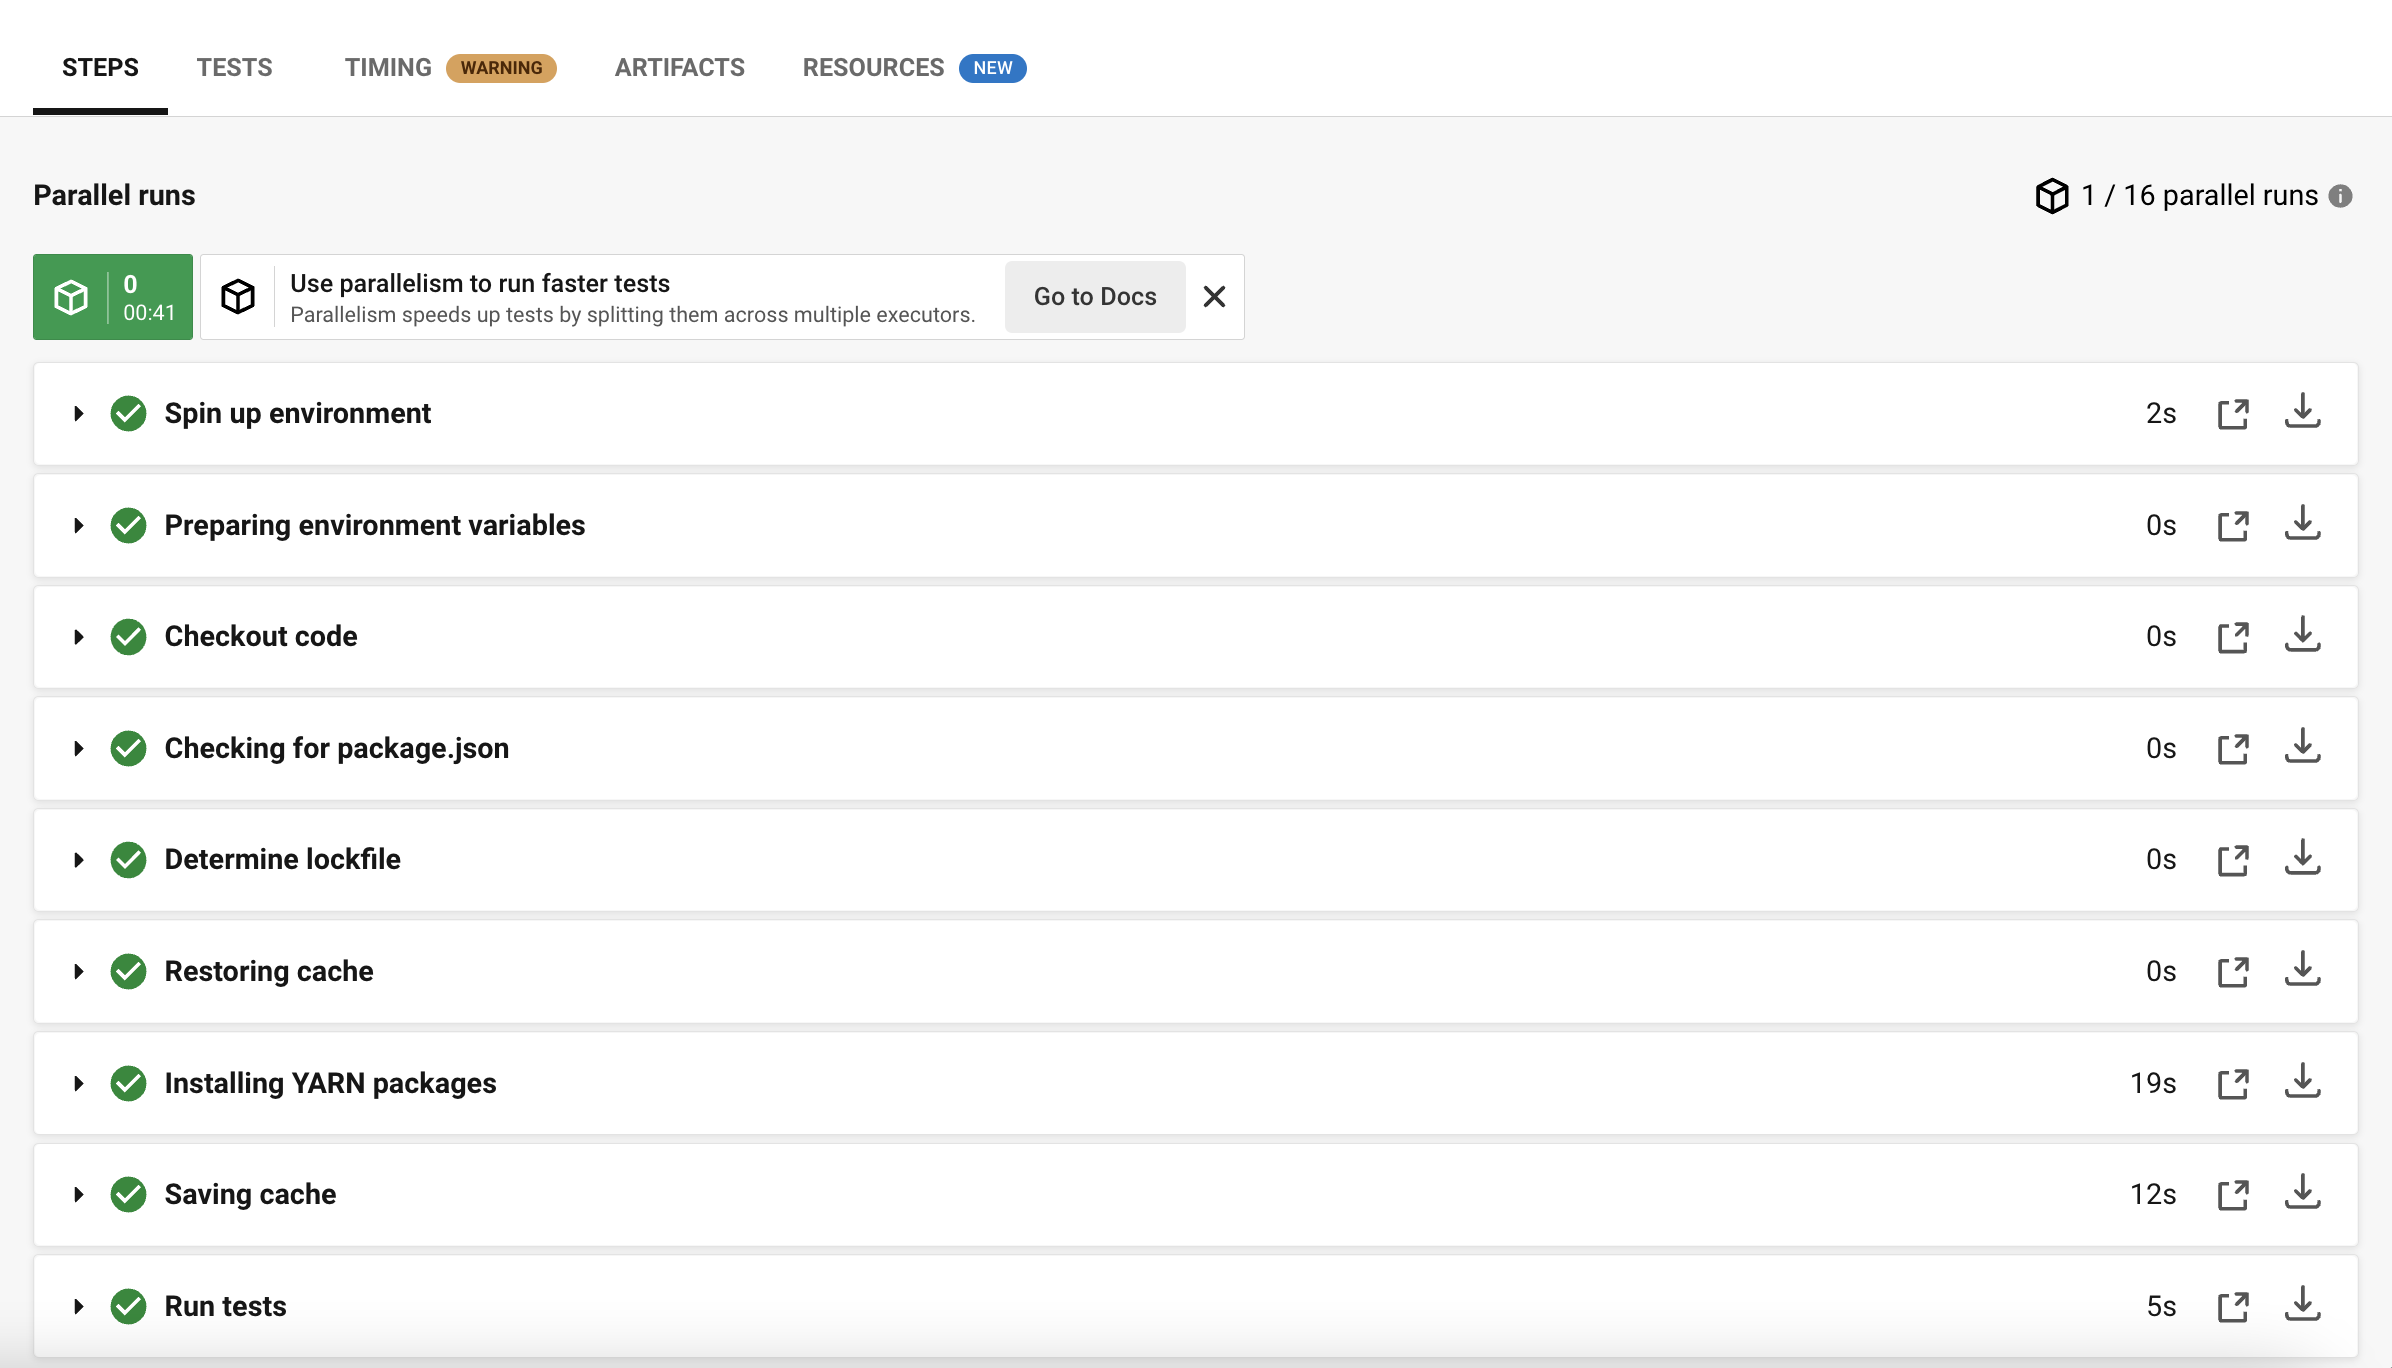
In the CircleCI web app, take a look at the steps in the recently triggered pipeline by clicking on the Success status and opening the build-and-test job.
-
You may have noticed that this pipeline ran more quickly compared to earlier. The Node orb automatically caches node packages by default, so a cache exists from the earlier pipeline run. This helps speed up the install step.
-
You should also now see five parallel runs, as a result of the number of execution environments set by the
parallelismkey. Each Docker environment (node) is labeled by its index number (so you have numbers 0 through 4). You can click on each node to see the individual steps that executed in each parallel run. The environment you are viewing will be highlighted in green.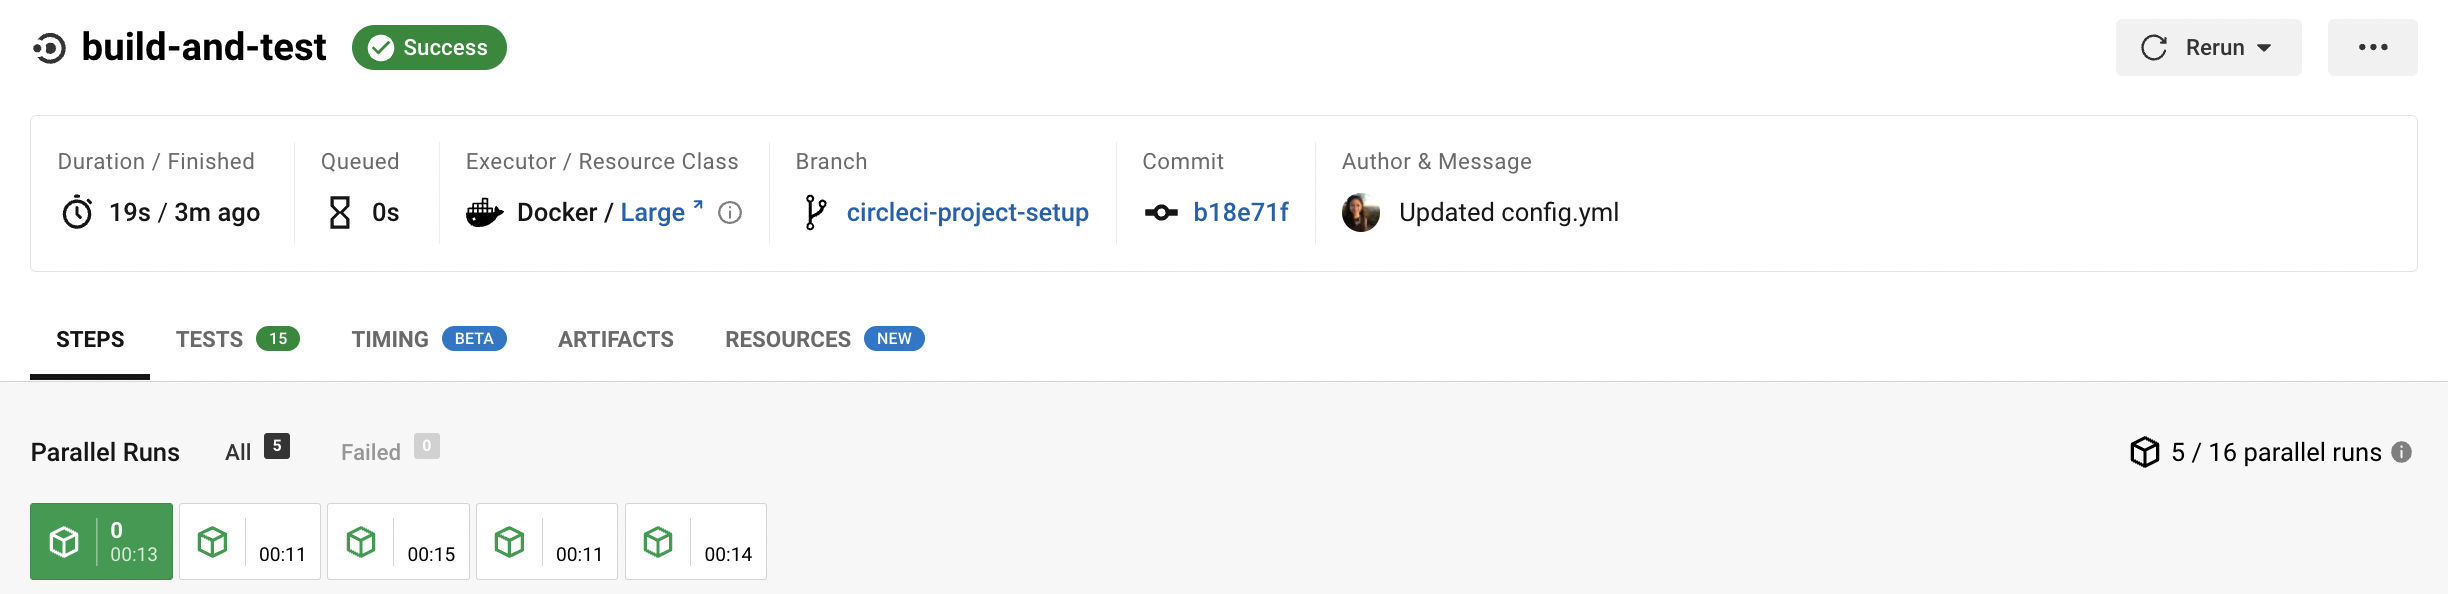
You might also notice that the parallel run times are not all equal, nor is the overall run time of the pipeline cut down to precisely 1/5. Each executor runs the same steps, but there is a difference in terms of which executor runs which tests. There may also be some variation in how long each executor takes to spin up.
Splitting tests by timing is the best way to ensure tests are split as evenly as possible and parallel runs finish around the same time. With that said, you may need to play around with the parallelism level to find the number that works best for you.
-
In any of the parallel runs, open the Test application step. You will see which test suites and how many individual tests were executed in this particular run. You will also see this message in the output:
Error reading historical timing data: file does not exist
Requested weighting by historical based timing, but they are not present. Falling back to weighting by name.
Since this is the first time you are storing test data from the pipeline, CircleCI does not currently have timing data to work with, so it defaults to splitting tests by name.
-
Open the Timing tab in the job. This tab provides a visualization of how each parallel run did relative to each other.
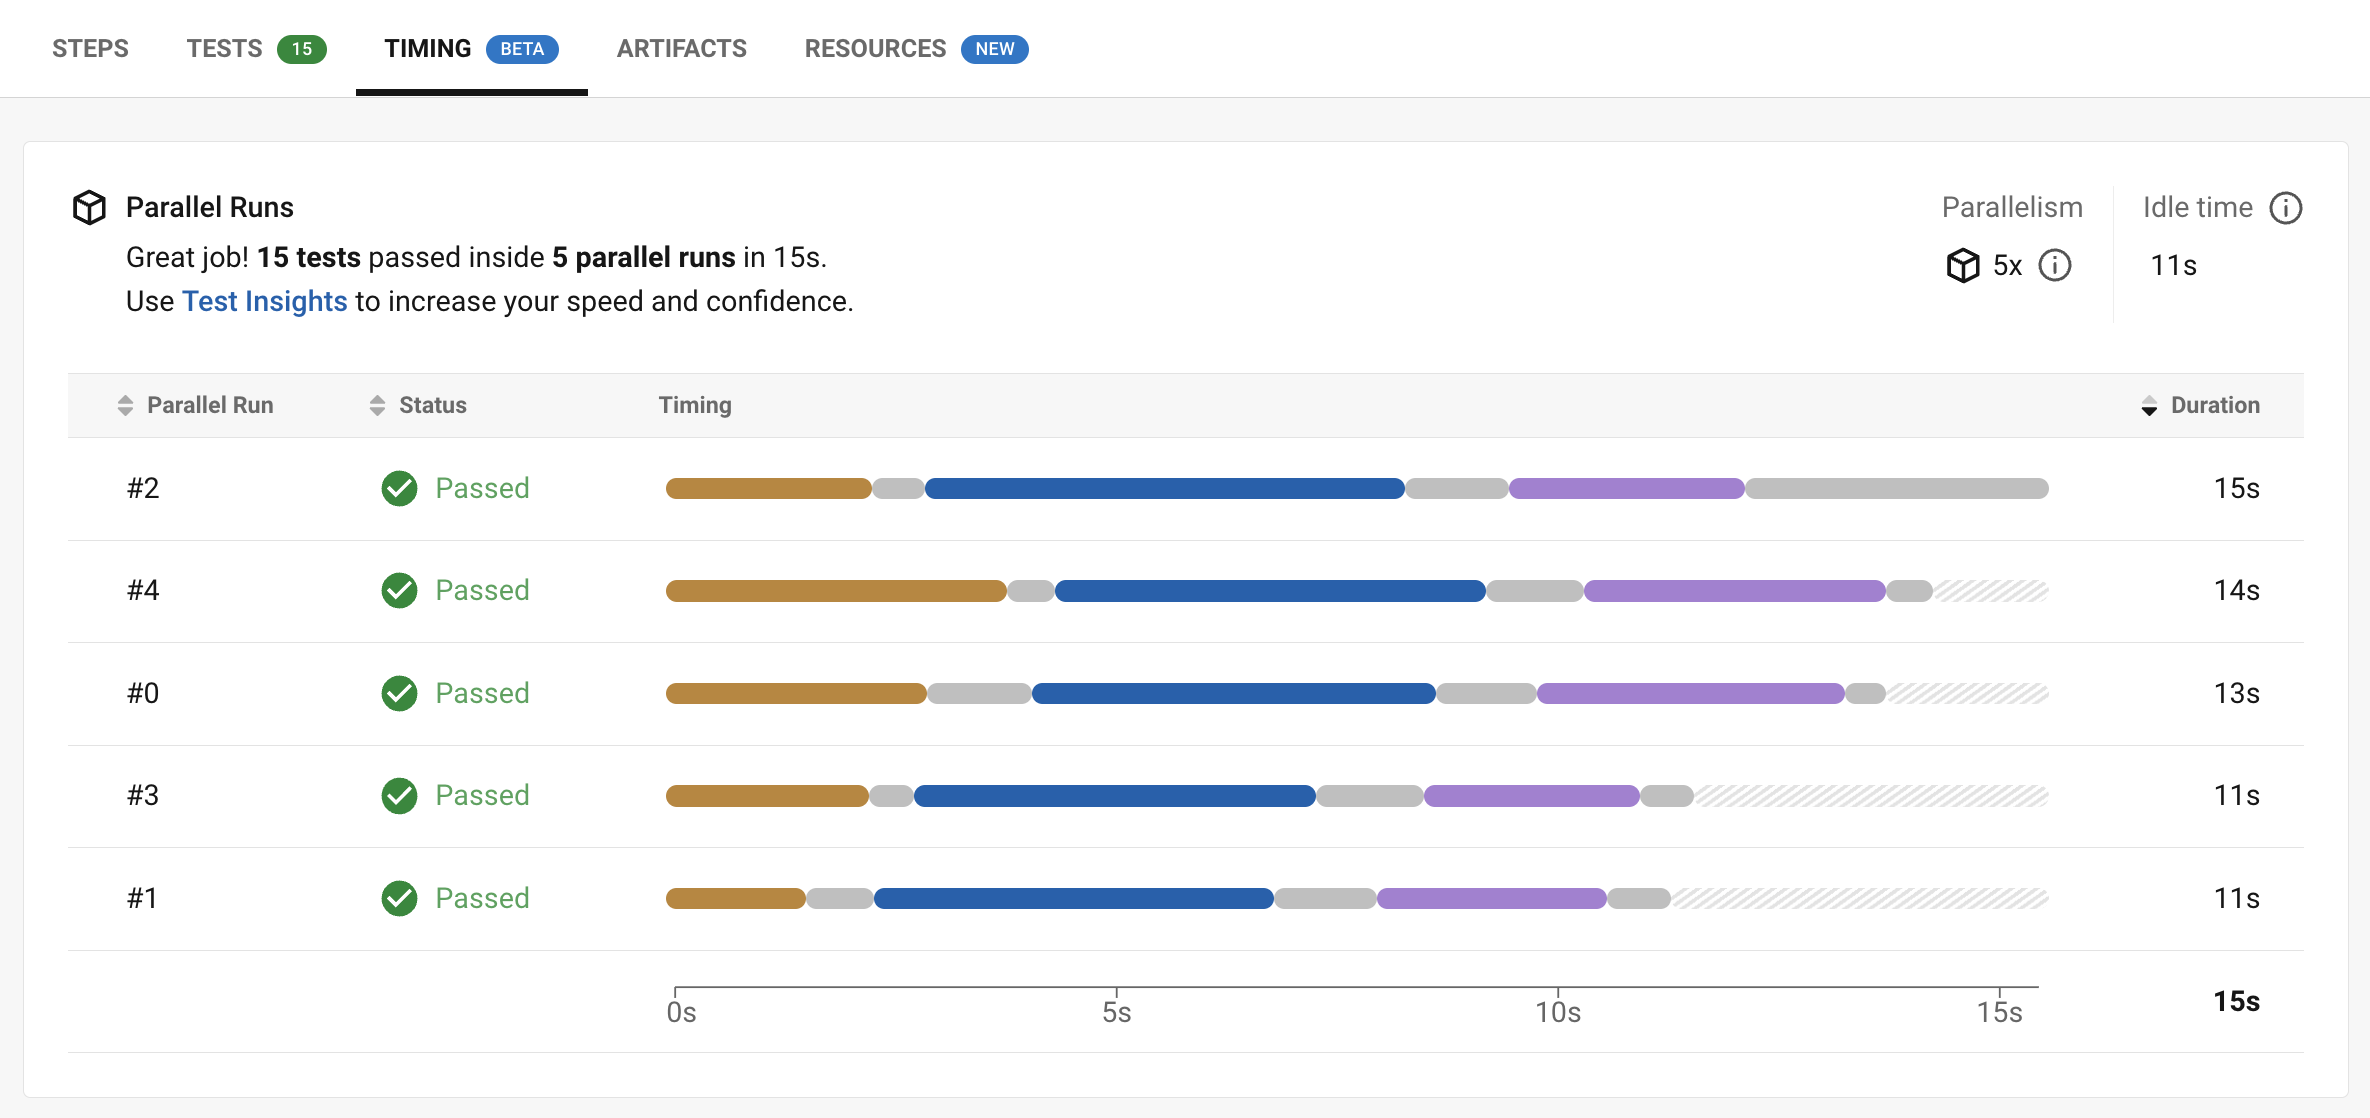
The chart indicates which three steps within each run took the longest to complete. Hover over each section of the bar to see those respective steps.
You may also notice on the upper right corner within the Timing tab an indicator for idle time. In this pipeline, there was a total of 11 seconds between each finished run and the end of the longest run.
4. Split by timing data
In the previous step, you saw that test splitting defaulted to splitting tests based on name. Now that test data has been saved, CircleCI can now split your tests by timing the next time the pipeline runs.
-
Commit a change in your project to trigger the pipeline again.
For example, you can try upgrading to a newer version of the Node orb, such as
circleci/node@5.0.2. Or, if you are using GitHub or Bitbucket, you may choose to just trigger a pipeline again, by going to your project Dashboard in the web app and clicking Trigger Pipeline on your project dashboard. -
Open the pipeline in the web app, and view the Test application step. This time, you should see
Autodetected filename timings.in the output. This means that CircleCI is now splitting tests based on available timing data from preceding runs.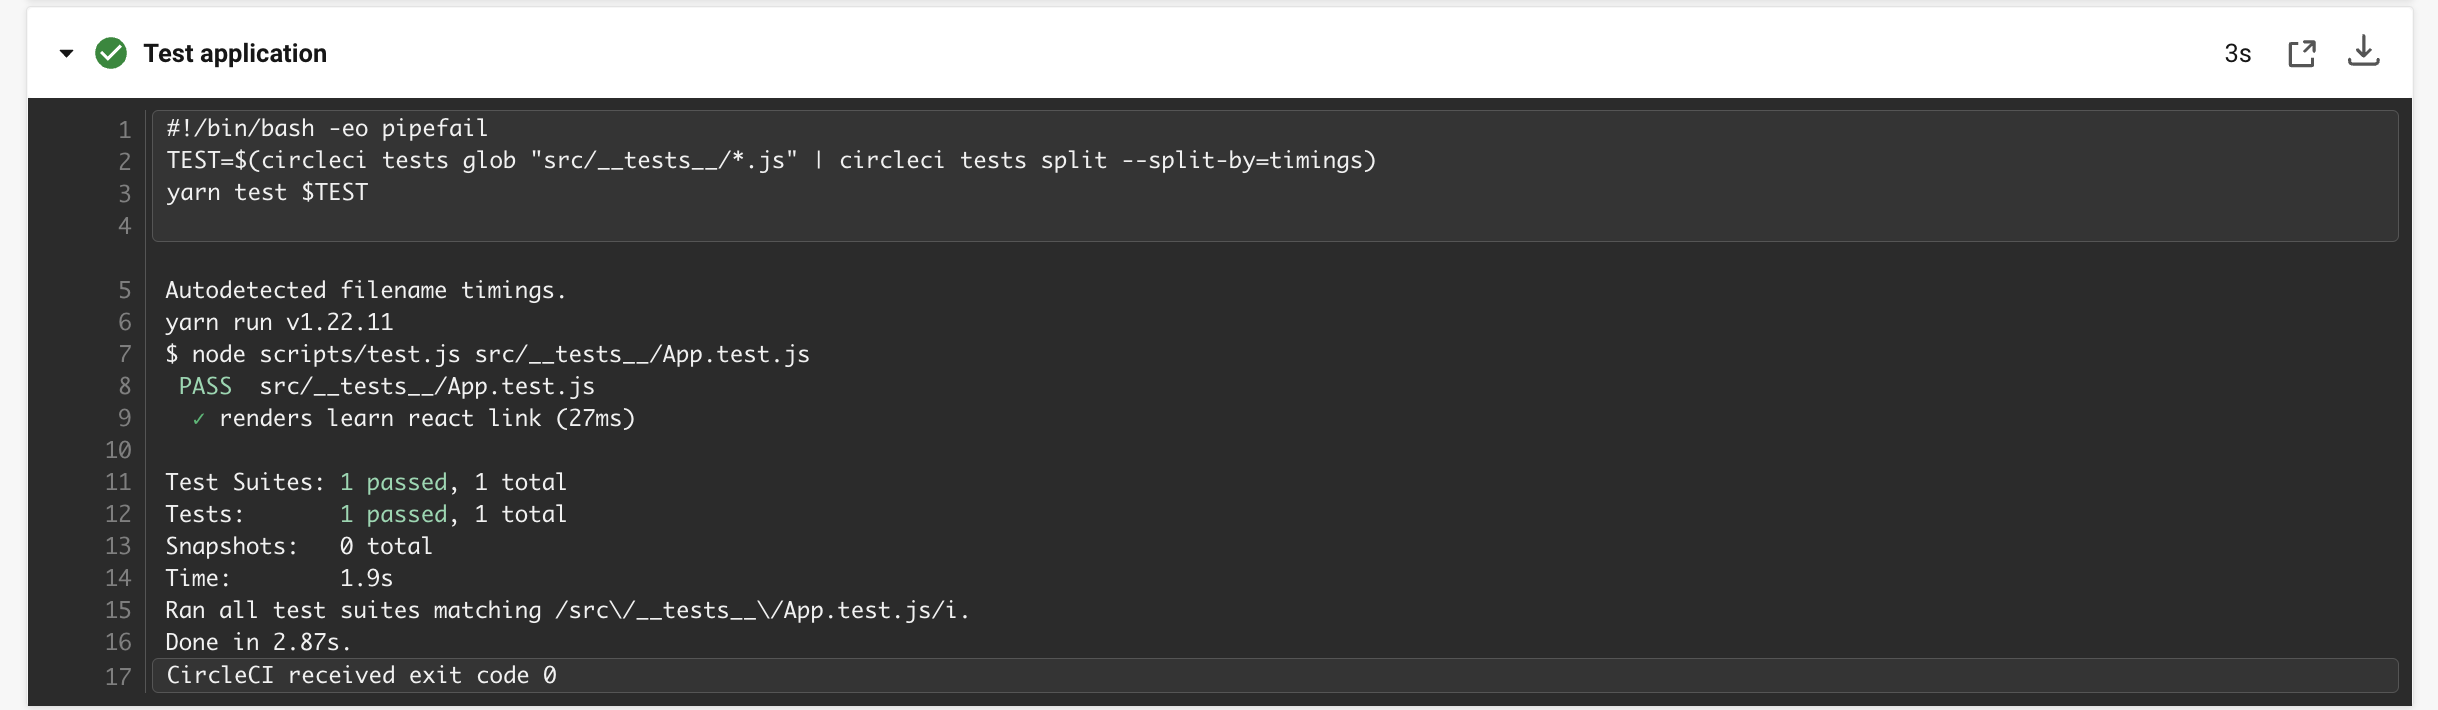
-
Lastly, open the Timing tab. In this particular example, you might find that the time taken for the testing step to complete is not drastically different from earlier, when tests were split by name. However, you may notice that the idle time between runs has now been cut down to only five seconds, compared to 11 seconds from earlier.
Conclusion
In this tutorial, you have configured your pipeline to split tests by timing data using parallelism and circleci tests commands. By storing test results, you also enabled access to test data and insights for further analysis.
Next steps
-
For a more in-depth discussion of the demo used in this tutorial, read our A Guide to Test Splitting blog post.
-
Learn about Test insights available in CircleCI.