テストデータの収集
このページの内容
- 概要
- ストレージ使用量の表示
- テストインサイト
- Server v2.x のテストインサイト
- フォーマッタの有効化
- 各言語のテストランナーの例
- Jest
- Node.js 用の Mocha
- Mocha と nyc の組み合わせ
- Karma
- Node.js 用の AVA
- ESLint
- RSpec
- Minitest
- Cucumber
- pytest
- unittest
- Java JUnit の結果に使用する Maven Surefire プラグイン
- Gradle JUnit のテスト結果
- PHPUnit
- Visual Studio/.NET Core テスト用の trx2junit
- Kaocha
- Clojure テスト用の test2junit
- C/C++ テスト用の CTest
- Bash での Bats
- API
CircleCI でテストを実行する際に、テスト結果を保存する方法は 2 つあります。 アーティファクトを使用する方法と store_test_results ステップを使用する方法です。 それぞれの方法にメリットがあるので、プロジェクトごとに選ぶ必要があります。
store_test_results ステップを使ってデータを保存する場合、CircleCI は XML ファイルからデータを収集し、そのデータを使ってジョブのインサイトを提供します。 このページでは、一般的なテストランナー用にテストデータを XML として出力し、store_test_results ステップでレポートを保存するように CircleCI を設定する方法について説明します。
store_test_results ステップ を使うと以下が可能です。
- CircleCI Web アプリの テスト
- テストインサイトと結果が不安定なテストの検出
- テストの分割
または、テスト結果をアーティファクトとして保存すると、生の XML を見ることができます。 これは、たとえば誤ってアップロードされたファイルを見つける場合など、プロジェクトのテスト結果処理の設定に関する問題をデバッグする際に便利です。
テスト結果をビルドアーティファクトとして表示するには、 store_artifacts ステップを使ってテスト結果をアップロードします。 アーティファクトはストレージを使うので、アーティファクトを保存すると料金が発生します。 アーティファクトなどのオブジェクトをストレージに保存する期間をカスタマイズする方法については、 データの永続化のページを参照してください。
store_test_results と store_artifacts の両方を使ってテスト結果をアップロードすることも可能です。概要
store_test_results ステップを使用すると、テスト結果をアップロードして保存することができ、また CircleCI のWeb アプリで成功したテストや失敗したテストを表示することができます。
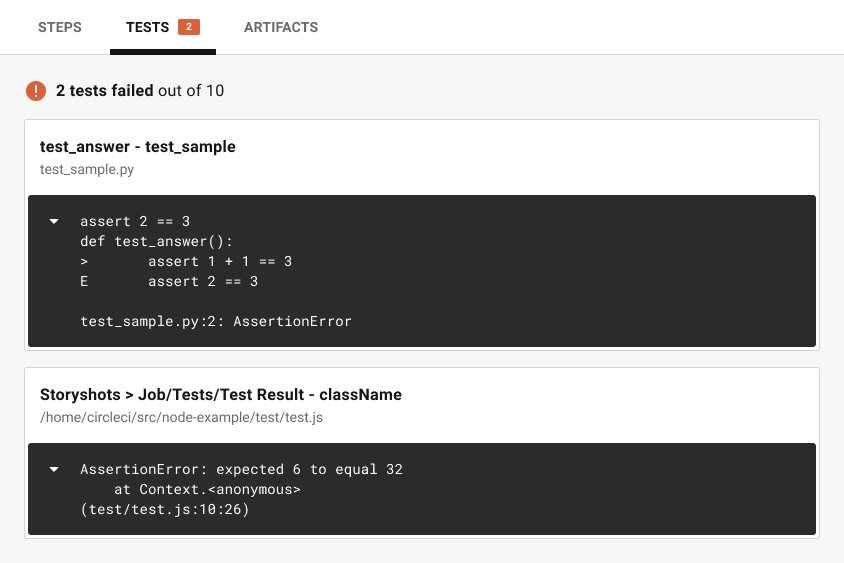
このテスト結果には、ジョブを表示する際に Tests タブからアクセスできます。以下の例をご覧ください。

.circleci/config.yml では、 store_test_results キーは以下のように使用します。
steps:
  - run:
  #...
  # run tests and store XML files to a subdirectory, for example, test-results
  #...
  - store_test_results:
    path: test-results
ここで、path キーは、JUnit XML テストのメタデータファイルのサブディレクトリが含まれる working_directory への絶対パスまたは相対パス、またはすべてのテスト結果が含まれる一つのファイルのパスです。
path の値が隠しフォルダではないことを確認してください。 たとえば、.my_hidden_directory は無効な形式です。ストレージ使用量の表示
ストレージの使用状況の表示、および毎月のストレージの超過料金の計算については、 データの永続化ガイドを参照してください。
テストインサイト
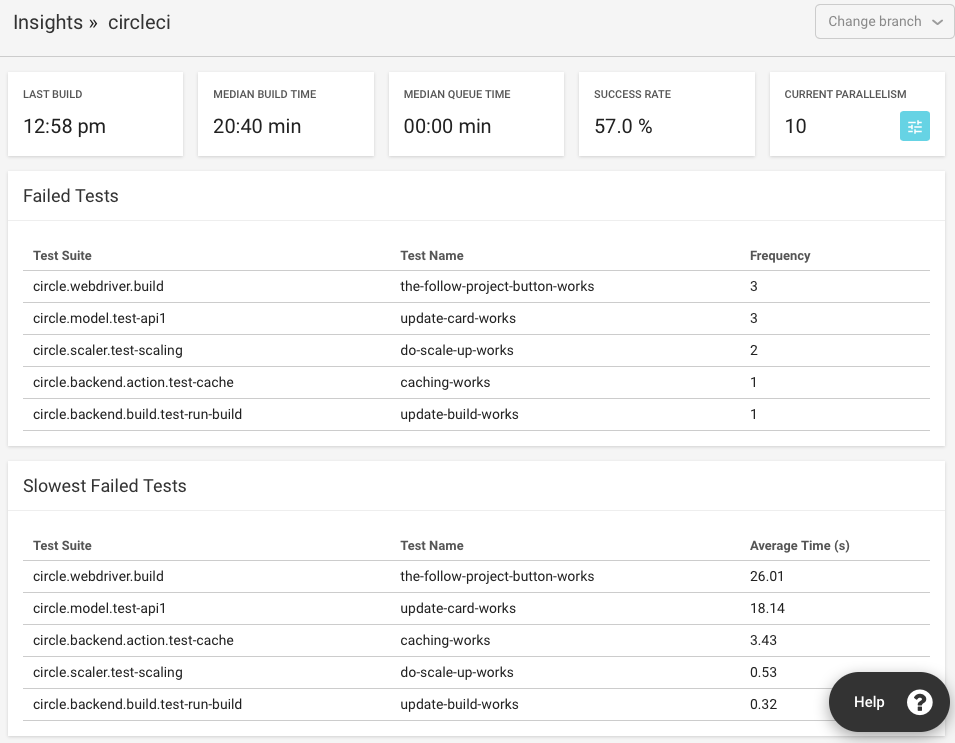
インサイト機能を使ったテストに関する情報は、 テストインサイトのガイドをご確認下さい。 このページでは、結果の不安定なテストの検知、失敗の多いテスト、実行速度の遅いテスト、およびパフォーマンスの概要について説明しています。
また、テストの失敗についての情報は、 API v2 のインサイトのエンドポイントをご覧ください。
Server v2.x のテストインサイト
CircleCI Server v2.x をご使用の場合、テストメタデータを収集するように設定すると、頻繁に失敗するテストが Insights ページのリストに表示されます。それにより、不安定なテストを特定し、繰り返し発生する問題を隔離することができます。

フォーマッタの有効化
JUnit フォーマッタを有効化するまで、テストメタデータは CircleCI で自動的に収集されません。 RSpec、Minitest、および Django に、以下の設定を追加してフォーマッタを有効化します。
- RSpec では、gemfile に以下を追加する必要があります。
gem 'rspec_junit_formatter'
- Minitest では、gemfile に以下を追加する必要があります。
gem 'minitest-ci'
- Django は、 django-nose テストランナーを使用して設定する必要があります。
注: iOS アプリケーションをテストする方法は、 macOS での iOS アプリケーションのテストをご覧ください。
各言語のテストランナーの例
ここでは、以下のテストランナーの例を示します。
| 言語 | テストランナー | フォーマッタ | 例 |
|---|---|---|---|
| JavaScript | Jest | jest-junit | 例 |
| JavaScript | Mocha | mocha-junit-reporter | 例、 NYC での例 |
| JavaScript | Karma | karma-junit-reporter | 例 |
| JavaScript | AVA | tap-xunit | 例 |
| JavaScript | ESLint | JUnit formatter | 例 |
| Ruby | RSpec | rspec_junit_formatter | 例 |
| Ruby | Minitest | minitest-ci | 例 |
| — | Cucumber | ビルトイン | 例 |
| Python | pytest | ビルトイン | 例 |
| Python | unittest | テストの実行には pytest を使用 | 例 |
| Java | Neocortix | Maven Surefire プラグイン | 例 |
| Java | Happo | ビルトイン | 例 |
| PHP | PHPUnit | ビルトイン | 例 |
| .NET | — | trx2junit | 例 |
| Clojure | Kaocha | kaocha-junit-xml | 例 |
| Clojure | clojure.test | test2junit | 例 |
| C, C++ | CTest | ctest | 例 |
Jest
Jest で JUnit の互換テストデータを出力するには、 jest-junit を使用します。
.circleci/config.yml の作業セクションは、以下のようになります。
steps:
  - run:
      name: Install JUnit coverage reporter
      command: yarn add --dev jest-junit
  - run:
      name: Run tests with JUnit as reporter
      command: jest --ci --runInBand --reporters=default --reporters=jest-junit
      environment:
        JEST_JUNIT_OUTPUT_DIR: ./reports/
  - store_test_results:
      path: ./reports/
全手順については、Viget の記事 Using JUnit on CircleCI 2.0 with Jest and ESLint (Jest および ESLint と共に CircleCI 2.0 で JUnit を使用する) を参照してください。 この記事では、使用されている jest cli 引数 --testResultsProcessor は --reporters 構文に置き換えられており、JEST_JUNIT_OUTPUT は、JEST_JUNIT_OUTPUT_DIR や JEST_JUNIT_OUTPUT_NAME に置き換えられているのでご注意ください (上図参照)。
注: Jest テストの実行時には、--runInBand フラグを使用してください。 このフラグがない場合、Jest はジョブを実行している仮想マシン全体に CPU リソースを割り当てようとします。 --runInBand を使用すると、Jest は仮想マシン内の仮想化されたビルド環境のみを使用するようになります。
--runInBand の詳細については、 Jest CLI ドキュメントを参照してください。 この問題の詳細については、公式 Jest リポジトリの Issue 1524 と Issue 5239 を参照してください。
Node.js 用の Mocha
Mocha のテストランナーで JUnit テストを出力するには、 mocha-junit-reporter を使用します。
.circleci/config.yml のテスト用作業セクションは、以下のようになります。
    steps:
      - checkout
      - run: npm install
      - run: mkdir ~/junit
      - run:
          command: mocha test --reporter mocha-junit-reporter
          environment:
            MOCHA_FILE: ~/junit/test-results.xml
          when: always
      - store_test_results:
          path: ~/junit
Mocha と nyc の組み合わせ
以下は、 marcospgp から提供された、Mocha と nyc の組み合わせに使用できるサンプルの全文です。
version: 2
jobs:
    build:
        environment:
            CC_TEST_REPORTER_ID: code_climate_id_here
            NODE_ENV: development
        docker:
            - image: cimg/node:16.10
              auth:
                username: mydockerhub-user
                password: $DOCKERHUB_PASSWORD  # context / project UI env-var reference
              environment:
                MONGODB_URI: mongodb://admin:password@localhost:27017/db?authSource=admin
            - image: mongo:4.0
              auth:
                username: mydockerhub-user
                password: $DOCKERHUB_PASSWORD  # context / project UI env-var reference
              environment:
                MONGO_INITDB_ROOT_USERNAME: admin
                MONGO_INITDB_ROOT_PASSWORD: password
        working_directory: ~/repo
        steps:
            - checkout

            # Update npm
            - run:
                name: update-npm
                command: 'sudo npm install -g npm@latest'

            # Download and cache dependencies
            - restore_cache:
                keys:
                    - v1-dependencies-{{ checksum "package-lock.json" }}
                    # fallback to using the latest cache if no exact match is found
                    - v1-dependencies-

            - run: npm install

            - run: npm install mocha-junit-reporter # just for CircleCI

            - save_cache:
                paths:
                    - node_modules
                key: v1-dependencies-{{ checksum "package-lock.json" }}

            - run: mkdir reports

            # Run mocha
            - run:
                name: npm test
                command: ./node_modules/.bin/nyc ./node_modules/.bin/mocha --recursive --timeout=10000 --exit --reporter mocha-junit-reporter --reporter-options mochaFile=reports/mocha/test-results.xml
                when: always

            # Run eslint
            - run:
                name: eslint
                command: |
                    ./node_modules/.bin/eslint ./ --format junit --output-file ./reports/eslint/eslint.xml
                when: always

            # Run coverage report for Code Climate

            - run:
                name: Setup Code Climate test-reporter
                command: |
                    # download test reporter as a static binary
                    curl -L https://codeclimate.com/downloads/test-reporter/test-reporter-latest-linux-amd64 > ./cc-test-reporter
                    chmod +x ./cc-test-reporter
                    ./cc-test-reporter before-build
                when: always

            - run:
                name: code-coverage
                command: |
                    mkdir coverage
                    # nyc report requires that nyc has already been run,
                    # which creates the .nyc_output folder containing necessary data
                    ./node_modules/.bin/nyc report --reporter=text-lcov > coverage/lcov.info
                    ./cc-test-reporter after-build -t lcov
                when: always

            # Upload results

            - store_test_results:
                path: reports

            - store_artifacts: # upload test coverage as artifact
                path: ./coverage/lcov.info
                prefix: tests
Karma
Karma テストランナーで JUnit テストを出力するには、 karma-junit-reporter を使用します。
.circleci/config.yml の作業セクションは、以下のようになります。
    steps:
      - checkout
      - run: npm install
      - run: mkdir ~/junit
      - run:
          command: karma start ./karma.conf.js
          environment:
            JUNIT_REPORT_PATH: ./junit/
            JUNIT_REPORT_NAME: test-results.xml
          when: always
      - store_test_results:
          path: ./junit
// karma.conf.js

// additional config...
{
  reporters: ['junit'],
  junitReporter: {
    outputDir: process.env.JUNIT_REPORT_PATH,
    outputFile: process.env.JUNIT_REPORT_NAME,
    useBrowserName: false
  },
}
// additional config...
Node.js 用の AVA
AVA テストランナーで JUnit テストを出力するには、 tap-xunit を指定して TAP レポーターを使用します。
.circleci/config.yml のテスト用作業セクションは、以下の例のようになります。
    steps:
      - run:
          command: |
            yarn add ava tap-xunit --dev # or you could use npm
            mkdir -p ~/reports
            ava --tap | tap-xunit > ~/reports/ava.xml
          when: always
      - store_test_results:
          path: ~/reports
ESLint
ESLint から JUnit 結果を出力するには、 JUnit フォーマッタを使用します。
.circleci/config.yml のテスト用作業セクションは、以下の例のようになります。
    steps:
      - run:
          command: |
            mkdir -p ~/reports
            eslint ./src/ --format junit --output-file ~/reports/eslint.xml
          when: always
      - store_test_results:
          path: ~/reports
RSpec
カスタム rspec ビルドステップを使用するプロジェクトにテストメタデータ コレクションを追加するには、Gemfile に以下の gem を追加します。
gem 'rspec_junit_formatter'
さらに、テストコマンドを以下のように変更します。
    steps:

      - checkout
      - run: bundle check || bundle install
      - run:
          command: bundle exec rake test
          when: always

      - store_test_results:
          path: test/reports
Minitest
カスタム minitest ビルドステップを使用するプロジェクトにテストメタデータコレクションを追加するには、Gemfile に以下の gem を追加します。
gem 'minitest-ci'
さらに、テストコマンドを以下のように変更します。
    steps:
      - checkout
      - run: bundle check || bundle install
      - run:
          command: bundle exec rake test
          when: always
      - store_test_results:


See the [minitest-ci README](https://github.com/circleci/minitest-ci#readme) for more info.
詳細については、 minitest-ci README を参照してください。
Cucumber
カスタム Cucumber ステップの場合は、JUnit フォーマッタを使用してファイルを生成し、それを cucumber ディレクトリに書き込む必要があります。 .circleci/config.yml ファイルに追加するコード例は以下のとおりです。
    steps:
      - run:
          name: Save test results
          command: |
            mkdir -p ~/cucumber
            bundle exec cucumber --format junit --out ~/cucumber/junit.xml
          when: always
      - store_test_results:
          path: ~/cucumber
path: は、ファイルが格納されるディレクトリをプロジェクトのルートディレクトリからの相対ディレクトリで指定します。 CircleCI は、アーティファクトを収集して S3 にアップロードし、アプリケーションの Job ページの Artifacts タブに表示します。
pytest
pytest を使用するプロジェクトにテストメタデータを追加するには、JUnit XML を出力するように指定した上で、テストメタデータを保存します。
      - run:
          name: run tests
          command: |
            . venv/bin/activate
            mkdir test-results
            pytest --junitxml=test-results/junit.xml

      - store_test_results:
          path: test-results
unittest
unittest は JUnit XML をサポートしていませんが、ほぼすべてのケースで pytest を使って unittest テストを実行することができます。
プロジェクトに pytest を追加すると、以下のようにテスト結果を生成したり、アップロードできるようになります。
      - run:
          name: run tests
          command: |
            . venv/bin/activate
            mkdir test-results
            pytest --junitxml=test-results/junit.xml tests

      - store_test_results:
          path: test-results
Java JUnit の結果に使用する Maven Surefire プラグイン
Maven ベースのプロジェクトをビルドする場合は、 Maven Surefire プラグインを使用して XML 形式のテストレポートを生成することがほとんどです。 CircleCI では、これらのレポートを簡単に収集できます。 以下のコードをプロジェクトの .circleci/config.yml ファイルに追加します。
    steps:
      - run:
          name: Save test results
          command: |
            mkdir -p ~/test-results/junit/
            find . -type f -regex ".*/target/surefire-reports/.*xml" -exec cp {} ~/test-results/junit/ \;
          when: always
      - store_test_results:
          path: ~/test-results
Gradle JUnit のテスト結果
Gradle で Java または Groovy ベースのプロジェクトをビルドする場合は、テストレポートが XML 形式で自動的に生成されます。 CircleCI では、これらのレポートを簡単に収集できます。 以下のコードをプロジェクトの .circleci/config.yml ファイルに追加します。
    steps:
      - run:
          name: Save test results
          command: |
            mkdir -p ~/test-results/junit/
            find . -type f -regex ".*/build/test-results/.*xml" -exec cp {} ~/test-results/junit/ \;
          when: always
      - store_test_results:
          path: ~/test-results
PHPUnit
PHPUnit テストの場合は、--log-junit コマンドラインオプションを使用してファイルを生成し、それを /phpunit ディレクトリに書き込む必要があります。 .circleci/config.yml は以下のようになります。
    steps:
      - run:
          command: |
            mkdir -p ~/phpunit
            phpunit --log-junit ~/phpunit/junit.xml tests
          when: always
      - store_test_results:
          path: ~/phpunit
Visual Studio/.NET Core テスト用の trx2junit
Visual Studio または .NET Core で出力される trx ファイルを XML 形式に変換するには、 trx2junit を使用します。
.circleci/config.yml の作業セクションは、以下のようになります。
    steps:
      - checkout
      - run: dotnet build
      - run: dotnet test --no-build --logger "trx"
      - run:
          name: test results
          when: always
          command: |
              dotnet tool install -g trx2junit
              export PATH="$PATH:/root/.dotnet/tools"
              trx2junit tests/**/TestResults/*.trx
      - store_test_results:
          path: tests/TestResults
Kaocha
kaocha をテストランナーとして既にご利用の場合、以下を実行してテスト結果を生成および保存してください。
依存関係に kaocha-junit-xml を追加します。
project.clj を編集して lambdaisland/kaocha-junit-xml プラグインを追加する、または deps.edn を使用している場合は同様なプラグインを追加します。
(defproject ,,,
  :profiles {,,,
             :dev {:dependencies [,,,
                                  [lambdaisland/kaocha-junit-xml "0.0.76"]]}})
kaocha の設定ファイルの test.edn をこのテストレポーターを使用するように編集します。
#kaocha/v1
{:plugins [:kaocha.plugin/junit-xml]
 :kaocha.plugin.junit-xml/target-file "junit.xml"}
.circleci/config.yml に store_test_results ステップを追加します。
version: 2.1
jobs:
  build:
    docker:
      - image: circleci/clojure:tools-deps-1.9.0.394
        auth:
          username: mydockerhub-user
          password: $DOCKERHUB_PASSWORD  # context / project UI env-var reference
    steps:
      - checkout
      - run: bin/kaocha
      - store_test_results:
          path: junit.xml
Clojure テスト用の test2junit
Clojure のテスト出力を XML 形式に変換するには、[test2junit](https://github.com/ruedigergad/test2junit) を使用します。 詳細については、 サンプルプロジェクトを参照してください。
C/C++ テスト用の CTest
CTest ではテスト結果を XML 形式で追加保存する --output-junフラグを提供しています。 この機能を使用するには、CMake >=3.21にする必要があります。 XML ファイルは、ビルドディレクトリに基づいて保存されます。
.circleci/config.yml のテスト用作業セクションは、以下の例のようになります。
    steps:
      - checkout
      - run: mkdir build
      - run: cmake -S . -B build
      - run: ctest --test-dir build --output-junit out.xml
      - store_test_results:
          path: build/out.xml
Bash での Bats
Bats により --report-formatter junit オプションが提供され、--output で指定した場所で JUnit フォーマットのレポートを作成できます。 その後の store_test_results も同じ場所に渡すことができます。
circleci/bats Orb の run ジョブ がこの機能を処理します。
たとえば、src/tests フォルダー内のすべての *.bats テストを実行する .circleci/config.yml セクションは以下のようになります。
orbs:
  bats: circleci/bats@1.1.0
workflows:
  test:
    jobs:
      - bats/run:
          path: ./src/tests
API
ジョブのテストメタデータに API からアクセスするには、 テストメタデータ API に関するドキュメントを参照してください。