CircleCI server v4.x overview
On This Page
Introduction
CircleCI server is an on-premises CI/CD platform for enterprise customers who have compliance or security needs that require them to operate within their firewall, in a private cloud, or in a data center.
CircleCI server provides the same features as CircleCI’s cloud offering, but operates within your Kubernetes cluster.
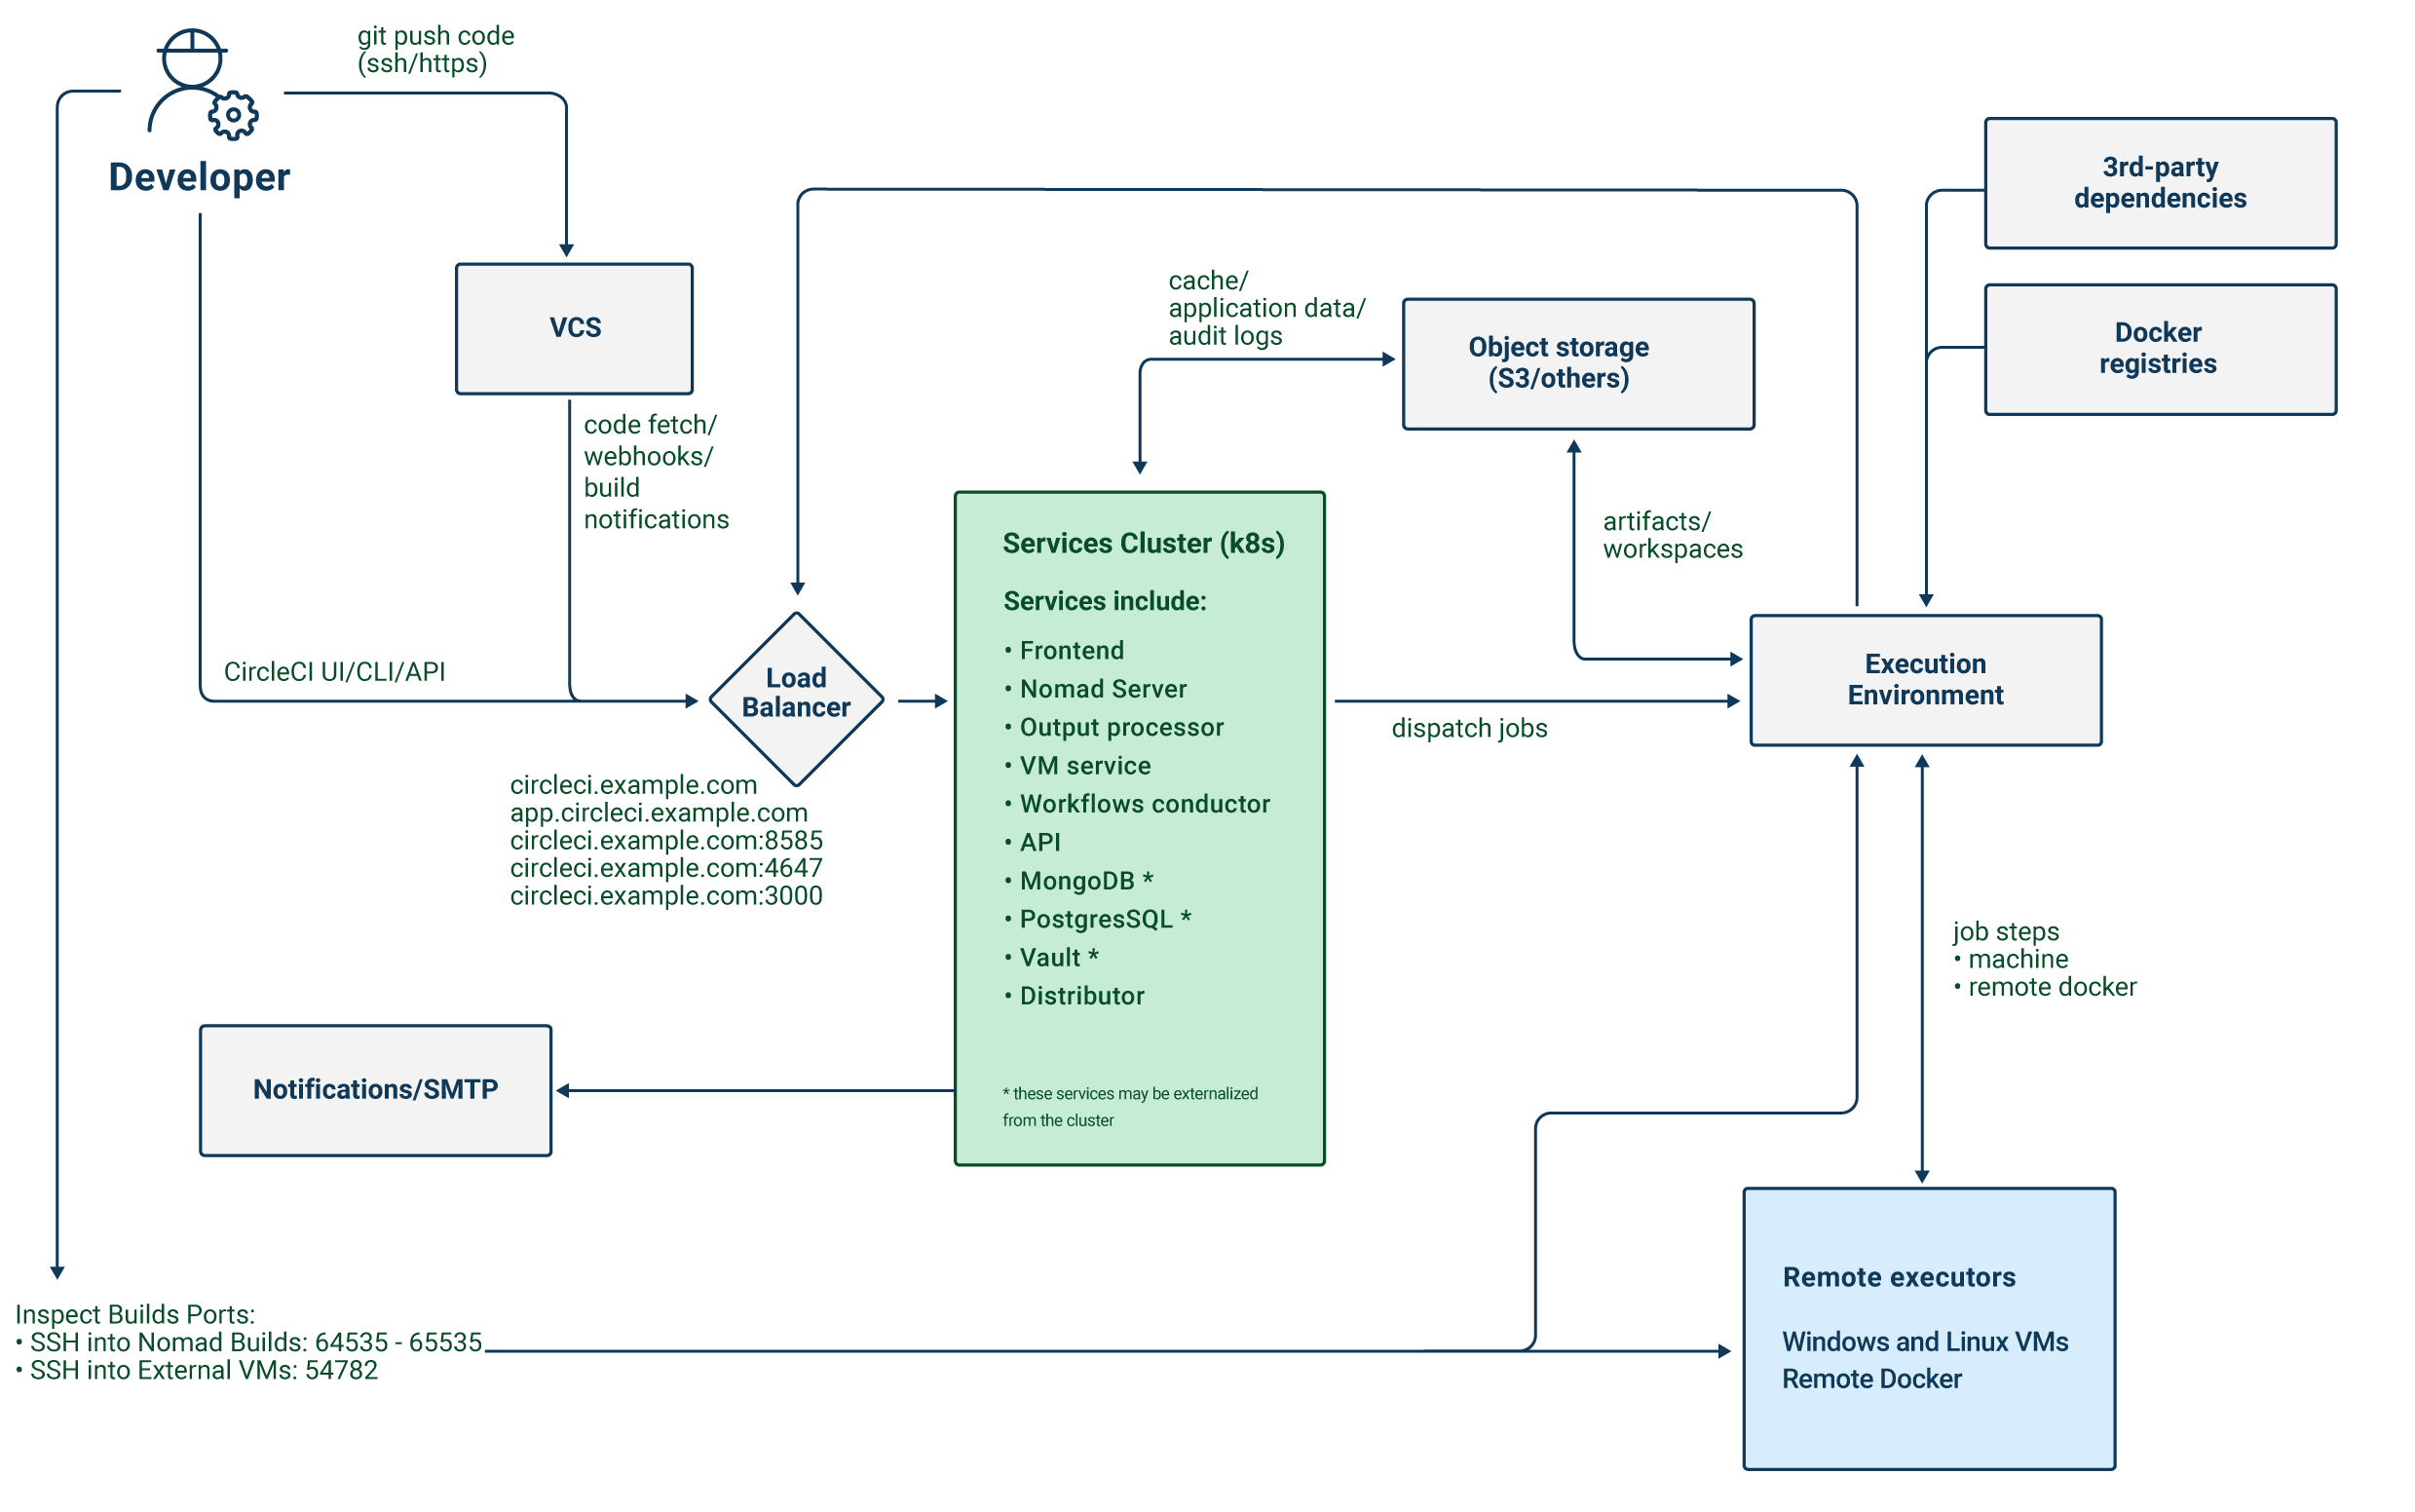
The CircleCI server application exposes four services, using a single load balancer. If required, the load balancer can be made private, separating it from the public internet.
| Service | Ports | Description |
|---|---|---|
Frontend GUI Proxy & API | 80 and 443 | Exposes the web application. |
Nomad Control Plane | 4647 | Exposes an RPC protocol for Nomad clients. |
Output Processor | 8585 | Ingests output from Nomad runners. |
VM Service | 3000 | Provisions virtual machines. |
The application exposes a number of external ports. These ports are used for various functions as defined in the table below.
| Port number | Protocol | Direction | Source / Destination | Use | Notes |
|---|---|---|---|---|---|
80 | TCP | Inbound | End users | HTTP web app traffic | |
443 | TCP | Inbound | End users | HTTP web app traffic | |
22 | TCP | Inbound | Administrators | SSH | Only required for the bastion host. |
64535-65535 | TCP | Inbound | SSH into builds | Only required for the Nomad clients. |
CircleCI server schedules CI jobs using the Nomad scheduler. The Nomad control plane runs inside of Kubernetes, while the Nomad clients, which are responsible for running scheduled CircleCI jobs, are provisioned outside the cluster. CircleCI server can run Docker jobs on the Nomad clients themselves or in a dedicated virtual machine (VM).
Job artifacts and outputs are sent directly from jobs in Nomad to object storage (S3, Google Cloud Storage, or other supported options). Audit logs and other items from the application are also stored in object storage, so both the Kubernetes cluster and the Nomad clients need access to object storage.
Services
CircleCI server v4.x consists of the following services. Find their descriptions and failure implications below:
| Service | Component | Description | What happens if it fails? | Notes |
|---|---|---|---|---|
api-service | App Core | Provides a GraphQL API that provides data to render the web frontend. | Many parts of the UI (such as Contexts) will fail completely. | |
audit-log-service | App Core | Persists audit log events to blob storage for long-term storage. | Some events may not be recorded. | |
branch-service | App Core | A service responsible for listening to the event stream. Detects branch deletions, job updates, pushes, workflow updates. | ||
builds-service | App Core | Ingests from www-api and sends to plans-service, workflows-conductor, and to orbs-service. | ||
circleci-mongodb | Execution | Primary datastore | ||
circleci-postgres | Data storage for microservices. | |||
circleci-rabbitmq | Pipelines and Execution | Queuing for workflow messaging, test results, usage, crons, output, notifications, and scheduler. | ||
circleci-redis | Execution | Caches data that will not be stored permanently (such as build logs), for request caching, and for rate limit calculations. | A failed cache can result in rate limiting from the VCS if too many calls are made to it. | |
circleci-telegraf | Telegraf collects statsd metrics. All white-boxed metrics in our services publish statsd metrics that are sent to telegraf, but can also be configured to be exported to other places (such as Datadog or Prometheus). | |||
circleci-vault | HashiCorp Vault to run encryption and decryption as a service for secrets. | |||
contexts-service | App Core | Stores and provides encrypted contexts. | All builds using Contexts will fail. | |
cron-service | Pipelines | Triggers scheduled workflows. | Scheduled workflows will not run. | |
dispatcher | Execution | Split jobs into tasks and send them to scheduler to run. | No jobs will be sent to Nomad. The run queue will increase in size, but there should be no meaningful loss of data. | |
distributor-* | App Core | Responsible for accepting build requests and destributing the job to appropriate queues. | ||
domain-service | App Core | Stores and provides information about our domain model. Works with permissions and API. | Workflows will fail to start and some REST API calls may fail, causing 500 errors in the CircleCI UI. If LDAP authentication is in use, all logins will fail. | |
frontend | Frontend | CircleCI web app and www-api proxy. | The UI and REST API will be unavailable and no jobs will be triggered by GitHub/Enterprise. Running builds will be OK, but no updates will be seen. | Rate limit of 150 requests per second with a single user instantaneous limit of 300 requests. |
insights-service | Metrics | A service to aggregate build and usage metrics for exporting and analysis. | ||
kong | App Core | API management. | ||
legacy-notifier | App Core | Handles notifications to external services (for example, Slack or email). | ||
nginx | App Core / Frontend | Handles traffic redirection and ingress. | ||
nomad-autoscaler | Nomad | Manages scaling of Nomad clusters in AWS and GCP environments. | ||
nomad-server | Nomad | Responsible for managing nomad clients. | ||
orb-service | Pipelines | Handles communication between orb registry and config. | ||
output-processor | Execution | Receives job output and status updates and writes them to MongoDB. Also provides an API to running jobs to access caches, workspaces, store caches, workspaces, artifacts, & test results. | ||
permissions-service | App Core | Provides the CircleCI permissions interface. | Workflows will fail to start and some REST API calls may fail, causing 500 errors in the UI. | |
scheduler | Execution | Runs tasks sent to it. Works with Nomad server. | No jobs will be sent to Nomad. The run queue will increase in size, but there should be no meaningful loss of data. | |
socketi | Frontend | Websockets server. | ||
telegraf | Metrics | Collection of metrics. | ||
test-results-service | Execution | Parses test result files and stores data. | There will be no test failure or timing data for jobs, but this will be back-filled once the service is restarted. | |
vm-gc | Compute Management | Periodically checks for stale machine and remote Docker instances and requests that vm-service remove them. | Old vm-service instances might not be destroyed until this service is restarted. | |
vm-scaler | Machine | Periodically requests that vm-service provision more instances for running machine and remote Docker jobs. | VM instances for machine and Remote Docker might not be provisioned, causing you to run out of capacity to run jobs with these executors. | Different overlay for EKS versus GKE. |
vm-service | Machine | Inventory of available vm-service instances, and provisioning of new instances. | Jobs that use machine or remote Docker will fail. | |
web-ui-* | Frontend | Micro Front End (MFE) services used to render the frontend web application GUI. | The respective services page will fail to load. Example: A web-ui-server-admin failure means the server Admin page will fail to load. | The MFEs are used to render the web application located at app.<my domain here> |
webhook-service | App Core | Service reponsible for all webhooks, including management of state and handling events. | ||
workflows-conductor-event-consumer | Pipelines | Takes in information from VCS to kick off pipelines. | New Pipelines will not be kicked off when there are changes in the VCS. | |
workflows-conductor-grpc | Pipelines | Helps translate the information through gRPC. |
Platforms
CircleCI server is designed to deploy within a Kubernetes cluster. The virtual machine service (VM Service) is able to leverage unique EKS or GKE offerings to dynamically create VM images.
If installing outside of EKS or GKE, additional work is required to access some of the same machine build features. Setting up CircleCI runner gives you access to the same feature set as VM service across a much wider range of operating systems and machine types (for example, macOS).
We do our best to support a wide range of platforms for installation. We use environment-agnostic solutions wherever possible. However, we do not test all platforms and options. For that reason, we provide a list of tested environments, which we will continue to expand.
| Environment | Status | Notes |
|---|---|---|
EKS | Tested | |
GKE | Tested | |
Azure | Untested | Should work with Minio Azure gateway and Runner. |
Digital Ocean | Untested | Should work with Minio Digital Ocean gateway and Runner. |
OpenShift | Untested | Known not to work. |
Rancher | Untested | Should work with Minio and Runner. |