Configuration introduction
This guide gets you started with the CircleCI config.yml file.
Getting started with CircleCI config
This guide covers the following topics:
-
How CircleCI finds and runs
config.yml. -
How you can use shell commands to perform actions.
-
How
config.ymlinteracts with your code. -
How to trigger a build.
-
How to use Docker containers to run your jobs in a specific environment.
-
How to use workflows to orchestrate your build.
-
How to add approval steps to your workflow.
CircleCI believes in configuration as code. Consequently, the entire delivery process from build to deploy is orchestrated through a single file called config.yml. The config.yml file is located in a folder called .circleci at the top of your repository project. CircleCI uses the YAML syntax for config. See the Introduction to YAML configurations page for guidance on the basics.
Part 1: Using the shell
CircleCI provides an on-demand shell to run commands. In this first example, you will set up a build and execute a shell command.
-
If you have not done so already, sign up with CircleCI and then either create or set up a new project. You can follow the steps to connect a code repository in our Quickstart guide.
-
Once you have created or set up your project in CircleCI, go to the
.circleci/config.ymlfile and replace its contents with the following code:Using Docker? Authenticating Docker pulls from image registries is recommended when using the Docker execution environment. Authenticated pulls allow access to private Docker images, and may also grant higher rate limits, depending on your registry provider. For further information see Using Docker authenticated pulls. version: 2.1 jobs: build: docker: - image: alpine:3.15 steps: - run: name: The First Step command: | echo 'Hello World!' echo 'This is the delivery pipeline'The following commentary describes what occurs in each line of the sample code:
-
Line 1: This indicates the version of the CircleCI platform you are using.
2.1is the most recent version. -
Line 2: The
jobslevel contains a collection of children, representing your jobs. You specify the names for these jobs, for example, build, test, deploy. -
Line 3:
buildis the first child in thejobscollection. In this example,buildis also the only job. -
Line 4: This specifies that you are using a Docker image for the container where your job’s commands are run.
-
Line 5: This is the Docker image. The example shows
alpine:3.15, a minimal image based on Alpine Linux.As mentioned in the note above the sample code, you may optionally supply your Docker credentials when using a Docker executor.
-
Line 6: The
stepscollection is a list ofrundirectives. -
Line 7: Each
rundirective is executed in the order in which it is declared. -
Line 8: The
nameattribute provides useful information when returning warnings, errors, and output. Thenameshould be meaningful to you as an action within your build process. -
Line 9: The
commandattribute is a list of shell commands that you want to execute. The initial pipe,|, indicates there will be multiple lines of shell commands. -
Line 10: Prints
Hello World!in your build shell. -
Line 11: Prints
This is the delivery pipeline.
-
-
Commit your
config.ymlfile (and push, if you are working remotely). -
A new pipeline is triggered in CircleCI. You can see the output in the CircleCI dashboard. A green tick denotes a successful pipeline. A red exclamation mark alerts you to a failure. Click on the job for more details.
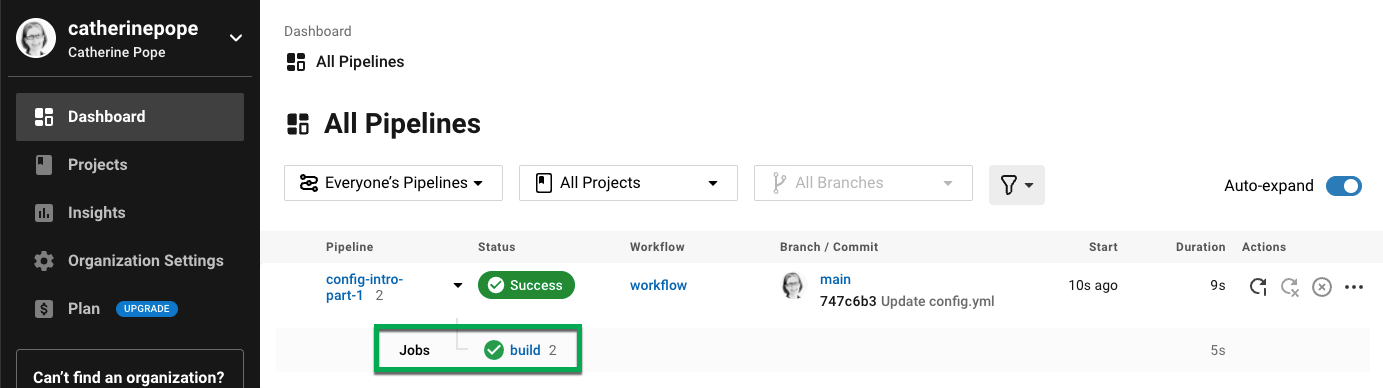
You should see your step - The First Step - with the output of the commands:
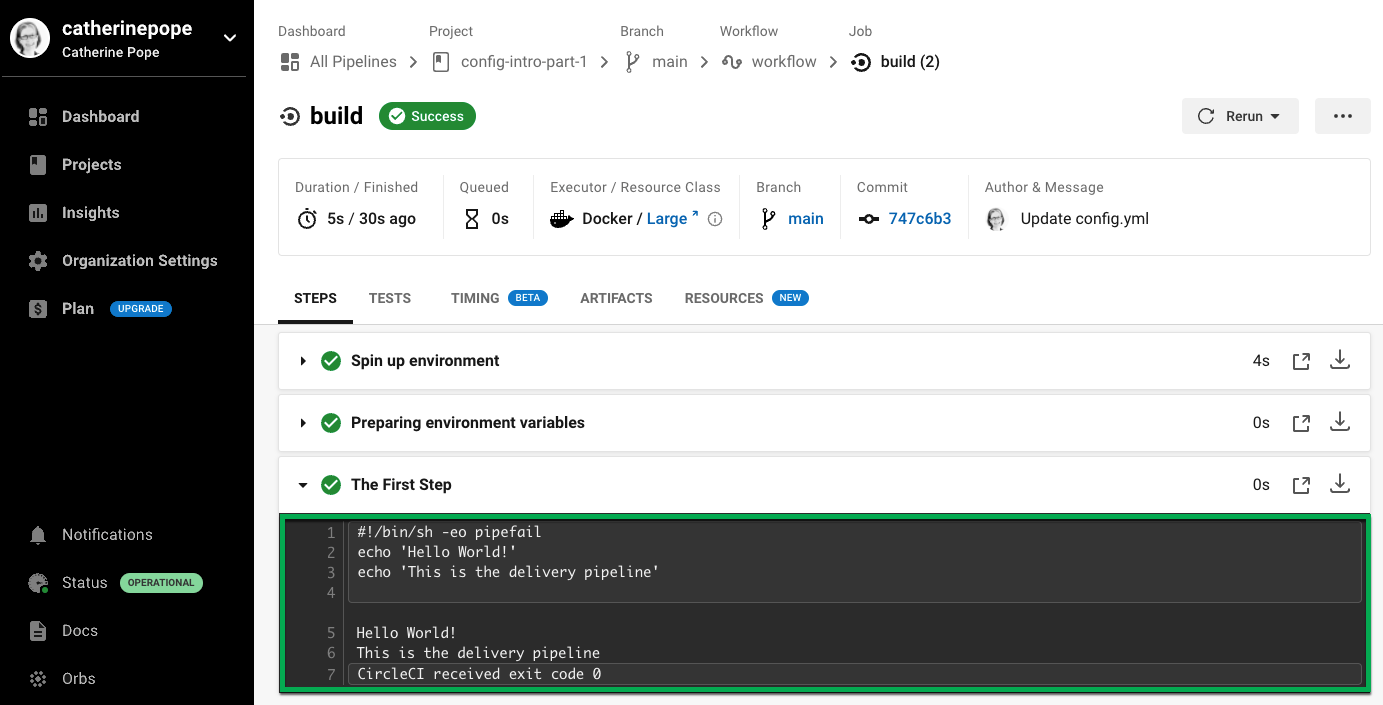
Although the config.yml syntax itself is straightforward, the indentation is more complicated. Incorrect indentation is the most common error. If you are experiencing problems with this example, check your indentation carefully, or copy and paste the sample code. |
Part 2: Using code from your repository
CircleCI provides several commands to simplify complex actions. In this example, you will use the checkout command. This command fetches the code from your git repository. Once you have retrieved that code, you can work with it in subsequent steps.
If you have not done so already, create a .circleci directory in your project, add a config.yml file, and type or paste the code from the example below.
If you already have a config.yml file from the example above, here are the changes you need to make:
-
On Line 5, change the image to
cimg/base:2021.04. -
On Line 7, add a
checkoutcommand. -
Add another run step (lines 13-17) at the end.
Make sure you observe the indentation.
version: 2.1
jobs:
  build:
    docker:
      - image: cimg/base:2021.04
    steps:
      - checkout
      - run:
          name: The First Step
          command: |
            echo 'Hello World!'
            echo 'This is the delivery pipeline'
      - run:
          name: The Second Step
          command: |
            ls -al
            echo '^^^The files in your repo^^^'
These two small changes have significantly increased the functionality of your config file:
-
Line 5: This line now specifies a Docker image that supports git.
cimg/base:2021.04is a small Ubuntu-based image for running basic jobs. -
Line 7: The
checkoutcommand fetches the code from your git repository. -
Lines 13-17: This second step in the
buildjob is listing (usingls -al) the contents of the repository that has been checked out. You can now perform further actions on this repository.
As before, commit and push your updated config.yml file.
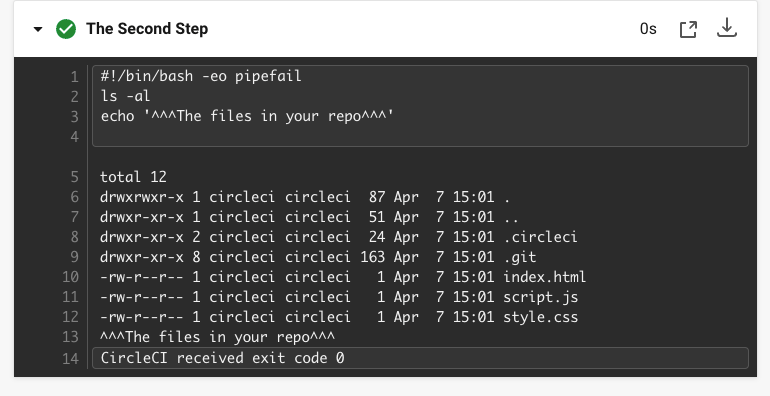
You should now see some additional steps on the CircleCI dashboard:
-
Checkout code has cloned the code from your git repository.
-
The Second Step has listed the files found in your git repository.
Part 3: Using different environments and creating workflows
In Parts 1 and 2, you ran your job in basic Linux-based Docker containers.
With CircleCI, you can run different jobs in different execution environments, such as virtual machines or Docker containers. By changing the Docker image, you can quickly upgrade your environment version or change languages.
In this part, you will create additional jobs and run them using different Docker images.
If you have not done so already, create a .circleci directory in your project, add a config.yml file, and type or paste the code from the example below.
version: 2.1
jobs:
  # running commands on a basic image
  Hello-World:
    docker:
      - image: cimg/base:2021.04
    steps:
      - run:
          name: Saying Hello
          command: |
            echo 'Hello World!'
            echo 'This is the delivery pipeline'
  # fetching code from the repo
  Fetch-Code:
    docker:
      - image: cimg/base:2021.04
    steps:
      - checkout
      - run:
          name: Getting the Code
          command: |
            ls -al
            echo '^^^Your repo files^^^'
  # running a node container
  Using-Node:
    docker:
      - image: cimg/node:17.2
    steps:
      - run:
          name: Running the Node Container
          command: |
            node -v
workflows:
  Example-Workflow:
    jobs:
      - Hello-World
      - Fetch-Code:
          requires:
            - Hello-World
      - Using-Node:
          requires:
            - Fetch-Code
This example is more complicated than the others, but it introduces several important concepts. Parts 1 and 2 included just one job called build, which contained several steps. This example includes three jobs. By separating those steps into jobs, you can run each of them in a different environment.
The following commentary describes what occurs in each line of the sample code:
-
Line 3: You can add comments to your config.yml file by preceding them with the # (hash) sign.
-
Lines 4-12: The first job is Hello-World. As in Part 1, it runs two commands in a basic image.
-
Line 14: The second job is Fetch-Code. It is indented to align with the Hello-World job.
-
Lines 15-16: The Fetch-Code job uses a basic git-compatible image.
-
Lines 17-23: This code is repeated from Part 2, but now it is a separate job.
-
Line 25: The third job is Using-Node.
-
Lines 26-27: This Using-Node job uses a Docker image called
cimg/node:17.2. This image contains version 17.2 of Node, along with a browser and other useful tools. -
Lines 28-32: As in the previous jobs, there is a run step. This time, the command
node -vprints the version of Node running in the container. -
Lines 33-34: This line creates a workflow called Example-Workflow. Workflows define a list of jobs and their run order.
-
Lines 35-36: These lines specify the first job, Hello-World.
-
Lines 37-39: The syntax for the Fetch-Code job is slightly different. The job name is followed by a
requires:, then a requires statement. This line specifies that the Hello-World job must run successfully before the Fetch-Code job is executed. -
Lines 40-42: The final job is Using-Node. As before, this job requires the successful completion of the previous job, Fetch-Code.
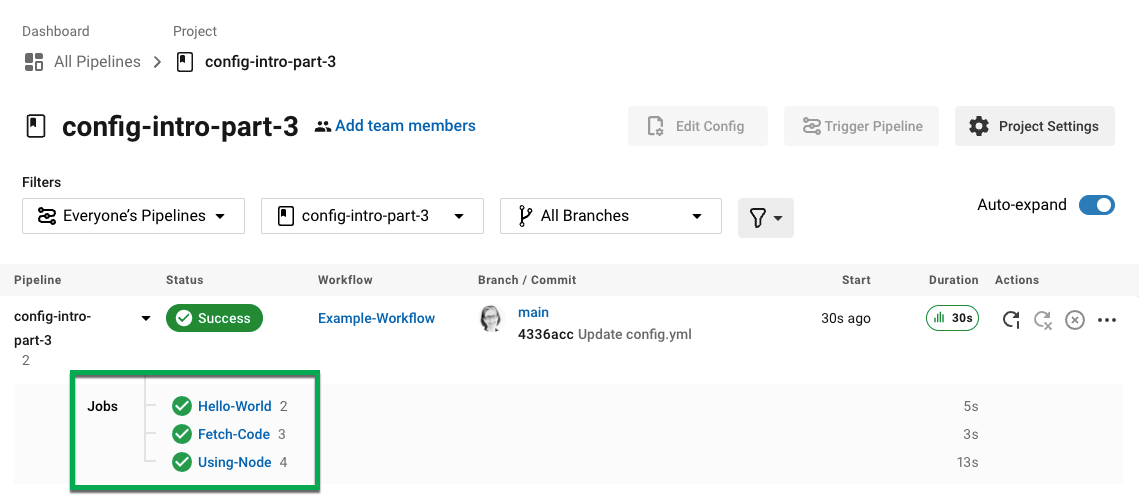
As before, commit and push your updated config.yml file.
In CircleCI, your pipeline will look different. Your workflow is now called Example-Workflow and you have three jobs, rather than just one.
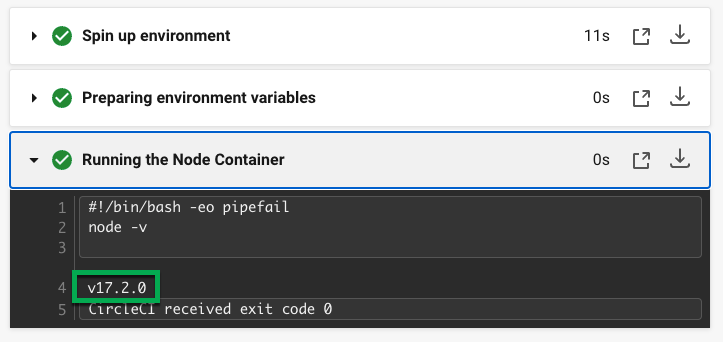
If you click on the Using-Node job and then the Running the Node Container step, you should see that the command node -v has printed the version of Node.
In this example, you have:
-
Added comments to document your jobs.
-
Created multiple jobs to run in different Docker containers.
-
Created a workflow to define the order in which your jobs run.
-
Introduced some logic to ensure that the previous job must complete successfully before the next job is executed.
| To increase your understanding, experiment with other CircleCI images, or add some more jobs to your workflow. |
Part 4: Adding a manual approval
The CircleCI workflow model is based on the orchestration of preceding jobs. As you saw in Part 3, the requires statement specifies that a job should run only if the previous job has been successfully executed.
In Part 3, an event triggering the pipeline caused the Hello-World job to run immediately. The remaining jobs ran automatically, once Hello-World had completely successfully.
In this part, you will create a manual approval stage. This means subsequent jobs are executed only after you have approved the next step in the CircleCI app.
If you have not done so already, create a .circleci directory in your project, add a config.yml file, and type or paste the code from the example below:
version: 2.1
jobs:
  # running commands on a basic image
  Hello-World:
    docker:
      - image: alpine:3.15
    steps:
      - run:
          name: Saying Hello
          command: |
            echo 'Hello World!'
            echo 'This is the delivery pipeline'
  # fetching code from the repo
  Fetch-Code:
    docker:
      - image: cimg/base:2021.04
    steps:
      - checkout
      - run:
          name: Getting the Code
          command: |
            ls -al
            echo '^^^Your repo files^^^'
  # running a node container
  Using-Node:
    docker:
      - image: cimg/node:17.2
    steps:
      - run:
          name: Running the Node Container
          command: |
            node -v
  Now-Complete:
    docker:
      - image: alpine:3.15
    steps:
      - run:
          name: Approval Complete
          command: |
            echo 'The work is now complete.'

workflows:
  Example-Workflow:
    jobs:
      - Hello-World
      - Fetch-Code:
          requires:
            - Hello-World
      - Using-Node:
          requires:
            - Fetch-Code
      - Hold-for-Approval:
          type: approval
          requires:
            - Using-Node
            - Fetch-Code
      - Now-Complete:
          requires:
            - Hold-for-Approval
Most of this code will look familiar to you. There are a couple of important additions:
-
Lines 52-56: This creates a new job called Hold-for-Approval. The
typespecifies this is an approval, so you are required to manually approve this job in CircleCI. This is useful if you want to see whether the previous jobs have been executed as expected. For example, you can check that a website looks correct on a test server before making it live. Or you might want a human to perform checks before you execute any expensive jobs. -
Lines 57-59: This final job - Now-Complete -
requiresthe successful completion of Hold-for-Approval, so will execute only once you have approved that previous job in CircleCI.
As before, commit and push your updated config.yml file.
If you look at your pipeline in CircleCI, you will see the a purple status badge of Needs Approval.
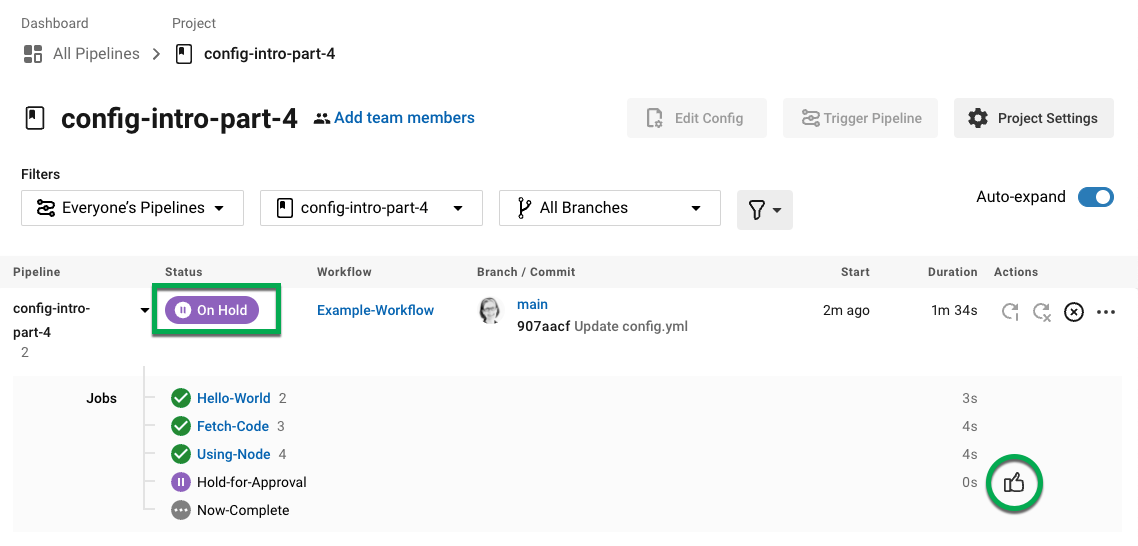
To approve the job, click the thumbs up icon to the right of the Hold-for-Approval job in the Actions column. In the pop-up message, click the blue Approve button.
Now you will see a tick in the Actions column and your jobs should complete.
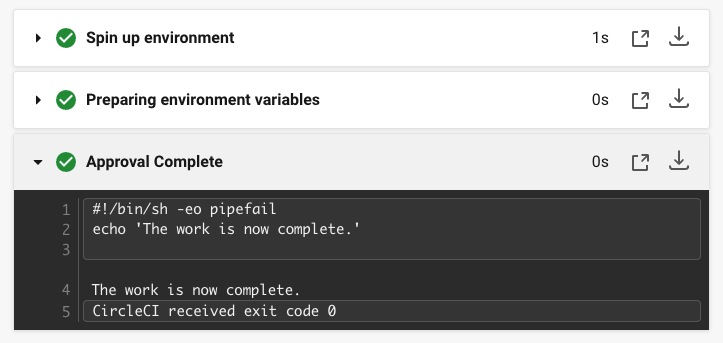
Select the Now-Complete job, then the Approval Complete step. You should see the output of your command: The work is now complete.
| If you encounter errors, the problem is likely to be caused by incorrect indentation. The CircleCI Configuration Editor validates your syntax, provides autocomplete suggestions, and offers tips. |
In this example, you have:
-
Introduced some additional logic to control your workflow.
-
Implemented the
approvaljob type to require a manual approval within your workflow.
Using what you have learned above, you are ready to create some powerful pipelines.
VS Code extension
If you use VS Code, you might find the official CircleCI extension useful when writing, editing, navigating and troubleshooting your YAML Config files.
The extension provides real-time syntax highlighting and validation, assisted navigation through go-to-definition and go-to-reference commands, usage hints, and autocomplete suggestions.
The CircleCI VS Code extension is available to download on the VS Code marketplace.