Phase 1 - Prerequisites
On This Page
- 1. Install required software
- AWS required software
- GCP required software
- S3 compatible storage required software
- 2. Create a Kubernetes cluster
- VPC and cluster sizing recommendations
- Supported Kubernetes versions
- Minimum permissions requirements
- EKS
- GKE
- Enable Workload Identity in GKE (optional)
- 3. Create a new GitHub OAuth app
- GitHub Enterprise
- 4. Static IP addresses
- GCP - Reserve a static external IP address
- AWS - Reserve an elastic IP address
- 5. Frontend TLS certificates
- AWS Route 53
- Google Cloud DNS
- AWS Certificate Manager
- Upstream TLS termination
- 6. Encryption/signing keys
- a. Artifact signing key
- b. Encryption signing key
- 7. Object storage and permissions
- S3 storage
- a. Create AWS S3 Bucket
- b. Set up authentication
- Google Cloud Storage
- a. Create a GCP bucket
- b. Set up authentication
- Next steps
CircleCI server v4.x is installed as a Helm chart. The installation process is broken down into four phases. There is a validation step at the end of each phase, allowing you to confirm success before moving to the next phase. Depending on your requirements, phases 3 and 4 may include multiple steps. This installation guide assumes you have already read the CircleCI server v4.1 overview.
In the following sections, replace any sections indicated by < > with your details. |
1. Install required software
Download and install the following software before continuing:
| Tool | Version | Used for | Notes |
|---|---|---|---|
0.15.4 or greater | Infrastructure Management | ||
1.19 or greater | Kubernetes CLI | ||
3.9.2 or greater | Kubernetes Package Management | ||
3.5.0 or greater | Helping with | Optional, but may help with troubleshooting between releases |
AWS required software
GCP required software
-
gcloudandgsutil. You can install and set-up these tools up by installing Google Cloud SDK. For further information refer to the Google Cloud SDK docs.
S3 compatible storage required software
-
Install and configure MinIO CLI for your storage provider.
2. Create a Kubernetes cluster
CircleCI server installs into an existing Kubernetes cluster. The application uses a large number of resources. Depending on your usage, your Kubernetes cluster should meet the following requirements:
| Number of daily active CircleCI users | Minimum Nodes | Total CPU | Total RAM | NIC speed |
|---|---|---|---|---|
< 500 | 3 | 12 cores | 32 GB | 1 Gbps |
500+ | 3 | 48 cores | 240 GB | 10 Gbps |
VPC and cluster sizing recommendations
While there are no strict requirements for VPC (Virtual Private Cloud) setup or disk size, the following practices are recommended for optimal performance and stability in production environments.
-
VPC Selection
We recommend you create a new VPC specifically for CircleCI server and its components, rather than using an existing VPC.
-
Subnet Provisioning
For high availability, and to avoid potential outages, you should provision subnets using /18 CIDR blocks across multiple Availability Zones.
Supported Kubernetes versions
| CircleCI Version | Kubernetes Version |
|---|---|
4.1.x | 1.22 - 1.24 |
Minimum permissions requirements
The installing user must have at least admin permissions for the namespace into which CircleCI is to be installed.
EKS
You can learn more about creating an Amazon EKS cluster in the EKS docs. We recommend using eksctl to create your cluster, which creates a VPC and selects the proper security groups for you.
-
Install
eksctl. -
Create your cluster by running the following (Cloud formation with
eksctland EKS can take more than 20 minutes to complete):eksctl create cluster --name=circleci-server --nodes 4 --node-type m5.xlarge -
Once the cluster has been created, you can use the following command to configure
kubectlaccess:eksctl utils write-kubeconfig --cluster circleci-server
You may see the following error AWS STS Access - cannot get role ARN for current session: InvalidClientTokenID. This means your AWS credentials are invalid, or your IAM user does not have permission to create an EKS cluster. Proper IAM permissions are necessary to use eksctl. See the AWS documentation on IAM permissions. |
| As of EKS 1.24, EKS will no longer have the EBS CSI Driver installed by default. This means that EKS cannot manage the EBS volumes for the persistent volumes of your cluster. CircleCI uses persistent volumes for services such as PostgreSQL, MongoDB and Redis. You may manually provision persistence volumes or you may install the EBS CSI Driver on your cluster following the AWS documentation. |
GKE
You can learn more about creating a GKE cluster in the GKE docs.
| Do not use Autopilot cluster. CircleCI requires functionality that is not supported by GKE Autopilot. |
-
Install and configure the GCP CLI for your GCP account. This includes creating a Google Project, which will be required to create a cluster within your project.
When you create your project, make sure you also enable API access. If you do not enable API access, the command we will run next (to create your cluster) will fail. Setting the default
project id, computezoneandregionwill make running subsequent commands easier:gcloud config set project <PROJECT_ID> gcloud config set compute/zone <ZONE> gcloud config set compute/region <REGION> -
Create your cluster.
CircleCI recommends using Workload Identity to allow workloads/pods in your GKE clusters to impersonate Identity and Access Management (IAM) service accounts to access Google Cloud services. Use the following command to provision a simple cluster:
gcloud container clusters create circleci-server \
  --num-nodes 3 \
  --machine-type n1-standard-4 \
  --workload-pool=<PROJECT_ID>.svc.id.goog
Your kube-context should get updated with the new cluster credentials automatically. If you need to update your kube-context manually, you can by running the following:
gcloud container clusters get-credentials circleci-server -
Install the GKE authentication plugin for
kubectl:gcloud components install gke-gcloud-auth-plugin -
Verify your cluster:
kubectl cluster-info -
Create a service account to be used for authentication with Workload Identity:
gcloud iam service-accounts create <SERVICE_ACCOUNT_ID> --description="<DESCRIPTION>" \ --display-name="<DISPLAY_NAME>" -
Create a private key for your service account:
gcloud iam service-accounts keys create <KEY_FILE> \
  --iam-account <SERVICE_ACCOUNT_ID>@<PROJECT_ID>.iam.gserviceaccount.com
Enable Workload Identity in GKE (optional)
Follow these steps if you already have a GKE cluster and need to enable Workload Identity on the cluster and the node pools.
-
Enable Workload Identity on existing cluster:
gcloud container clusters update "<CLUSTER_NAME>" \ --workload-pool="<PROJECT_ID>.svc.id.goog" -
Create a service account to be used for authentication with Workload Identity:
gcloud iam service-accounts create <SERVICE_ACCOUNT_ID> --description="<DESCRIPTION>" \ --display-name="<DISPLAY_NAME>" -
Create a private key for your service account:
gcloud iam service-accounts keys create <KEY_FILE> \ --iam-account <SERVICE_ACCOUNT_ID>@<PROJECT_ID>.iam.gserviceaccount.com -
Get node pools of existing GKE cluster:
gcloud container node-pools list --cluster "<CLUSTER_NAME>" -
Update existing node pools:
  gcloud container node-pools update "<NODEPOOL_NAME>" \
    --cluster="<CLUSTER_NAME>" \
    --workload-metadata="GKE_METADATA"
You must repeat Step 3 for all the existing node pools. Follow these links for steps to enable Workload Identity for your Kubernetes service accounts:
3. Create a new GitHub OAuth app
| If GitHub Enterprise and CircleCI server are not on the same domain, then images and icons from GHE will fail to load in the CircleCI web app. |
Registering and setting up a new GitHub OAuth app for CircleCI server allows for authorization control to your server installation using GitHub OAuth and for updates to GitHub projects/repos using build status information. The following steps apply for both GitHub.com and GitHub Enterprise.
-
In your browser, navigate to and select New OAuth App.
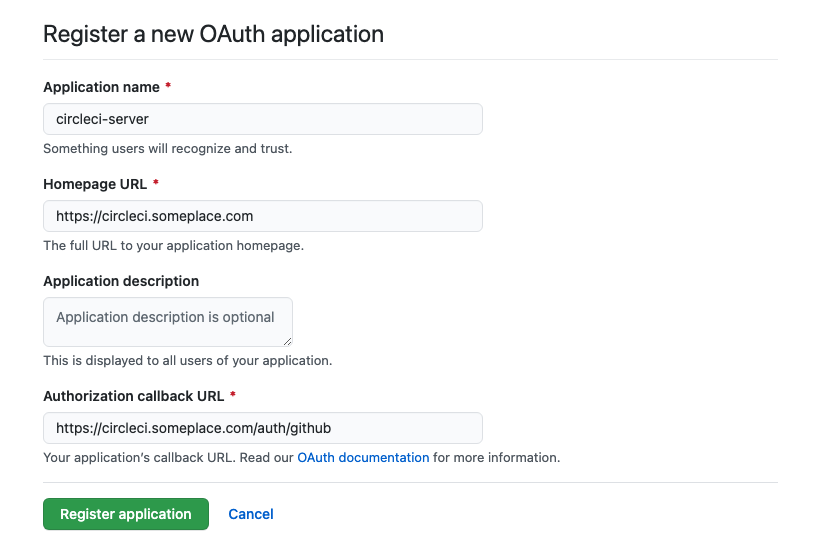 Figure 1. New GitHub OAuth App
 -
Complete the following fields, based on your planned installation:
-
Homepage URL: The URL of your planned CircleCI installation.
-
Authorization callback URL: The authorization callback URL is the URL of your planned CircleCI installation followed by
/auth/github
-
-
Once completed, you will be shown the Client ID. Select Generate a new Client Secret to generate a Client Secret for your new OAuth App. You will need these values when you configure CircleCI server.
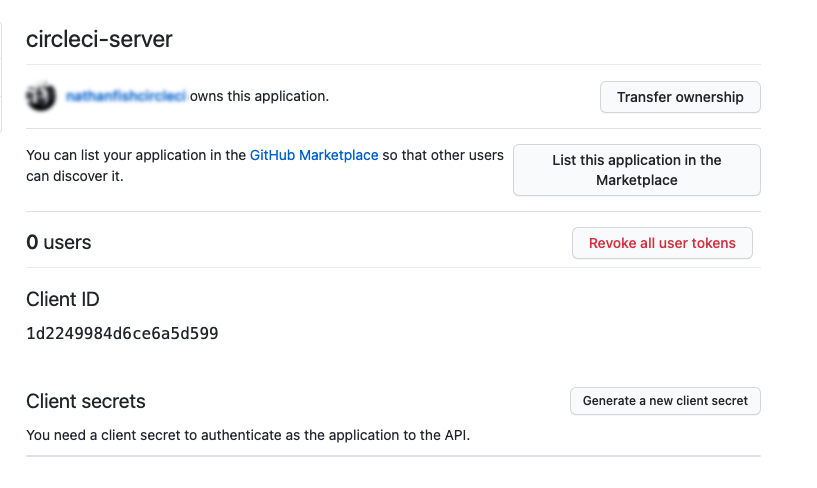 Figure 2. Client ID and Secret
GitHub Enterprise
If using GitHub Enterprise, you also need a personal access token and the domain name of your GitHub Enterprise instance.
Create the defaultToken by navigating to User Settings > Developer Settings > Personal access tokens. The default token requires no scopes. You will need this value when you configure CircleCI server.
4. Static IP addresses
It is recommended to provision a static IP address to assign to the load balancer created by the cluster. While this is not necessary, it does eliminate the need to update DNS records if the service-created load balancer is re-provisioned.
GCP - Reserve a static external IP address
The Google Cloud docs provide information on how reserve an IP address.
Make note of the returned IPv4 address for use later in the values.yaml file.
AWS - Reserve an elastic IP address
To reserve an elastic IP address in AWS, run the following AWS CLI commands in your desired environment.
This command needs to be run to generate an address for every subnet the load balancer deploys into - default 3.
# Run x times per x subnets (default 3)
aws ec2 allocate-address

# {
#    "PublicIp": "10.0.0.1,
#    "AllocationId": "eipalloc-12345",
#    "PublicIpv4Pool": "amazon",
#    "NetworkBorderGroup": "us-east-1",
#    "Domain": "vpc"
#}
Make note of each of the returned AllocationId values from the CLI for use in the values.yaml file.
5. Frontend TLS certificates
By default, CircleCI server creates self-signed certificates to get you started. In production, you should supply a certificate from a trusted certificate authority. The Let’s Encrypt certificate authority, for example, can issue a free certificate using their Certbot tool. The sections below cover using Google Cloud DNS and AWS Route 53.
It is important that your certificate contains both your domain and the app.* subdomain as subjects. For example, if you host your installation at server.example.com, your certificate must cover app.server.example.com and server.example.com. |
Once you have created your certificates using one of the methods described below, you can use the following commands to retrieve the certificates later when you need them during this installation:
ls -l /etc/letsencrypt/live/<CIRCLECI_SERVER_DOMAIN>cat /etc/letsencrypt/live/<CIRCLECI_SERVER_DOMAIN>/fullchain.pemcat /etc/letsencrypt/live/<CIRCLECI_SERVER_DOMAIN>/privkey.pemAWS Route 53
-
If you are using AWS Route 53 for DNS, you need the
certbot-route53plugin installed. You can install the plugin with the following command:python3 -m pip install certbot-dns-route53 -
Then execute this example to create a private key and certificate (including intermediate certificates) locally in
/etc/letsencrypt/live/<CIRCLECI_SERVER_DOMAIN>:certbot certonly --dns-route53 -d "<CIRCLECI_SERVER_DOMAIN>" -d "app.<CIRCLECI_SERVER_DOMAIN>"
Google Cloud DNS
-
If you host your DNS on Google Cloud, you need the
certbot-dns-googleplugin installed. You can install the plugin with the following command:python3 -m pip install certbot-dns-google -
The service account used to run
certbotwill need to have access to Cloud DNS in order to provision the necessary records used by Let’s Encrypt for domain validation.-
Create a custom role for Certbot:
gcloud iam roles create certbot --project=<PROJECT_ID> \ --title="<TITLE>" --description="<DESCRIPTION>" \ --permissions="dns.changes.create,dns.changes.get,dns.changes.list,dns.managedZones.get,dns.managedZones.list,dns.resourceRecordSets.create,dns.resourceRecordSets.delete,dns.resourceRecordSets.list,dns.resourceRecordSets.update" \ --stage=ALPHA -
Bind the new role to the service account which we created earlier:
gcloud projects add-iam-policy-binding <PROJECT_ID> \
    --member="serviceAccount:<SERVICE_ACCOUNT_ID>@<PROJECT_ID>.iam.gserviceaccount.com" \
    --role="<ROLE_NAME>"
-
-
Finally, the following commands will provision a certification for your installation:
certbot certonly --dns-google --dns-google-credentials <KEY_FILE> -d "<CIRCLECI_SERVER_DOMAIN>" -d "app.<CIRCLECI_SERVER_DOMAIN>"
AWS Certificate Manager
Instead of provisioning your own TLS certificates, if you are setting up CircleCI server in an AWS environment, you can have AWS provision TLS certificates using Certificate Manager.
aws acm request-certificate \
  --domain-name <CIRCLECI_SERVER_DOMAIN> \
  --subject-alternative-names app.<CIRCLECI_SERVER_DOMAIN> \
  --validation-method DNS \
  --idempotency-token circle
After running this command, navigate to the Certificate Manager AWS console and follow the wizard to provision the required DNS validation records with Route53. Take note of the ARN of the certificate once it is issued.
Upstream TLS termination
You may have a requirement to terminate TLS for CircleCI server outside the application. This is an alternate method to using ACM or supplying the certificate chain during Helm deployment. An example would be a proxy running in front of the CircleCI installation providing TLS termination for your domain name. In this case the CircleCI application acts as the backend for your load balancer or proxy.
CircleCI server listens on a number of ports which need to be configured depending how your are routing the traffic. See the list of port numbers below:
-
Frontend / API Gateway [TCP 80, 443]
-
VM service [TCP 3000]
-
Nomad server [TCP 4647]
-
Output processor [gRPC 8585]
Depending on your requirements you may choose to terminate TLS for only the frontend/api-gateway or provide TLS for services listening on all the ports.
| The Output Processor service communicates using gRPC and requires the proxy or load balancer to support HTTP/2. |
6. Encryption/signing keys
The keysets generated in this section are used to encrypt and sign artifacts generated by CircleCI. You will need these values to configure server.
| Store these values securely. If they are lost, job history and artifacts will not be recoverable. |
a. Artifact signing key
To generate an artifact signing key, run the following command:
docker run circleci/server-keysets:latest generate signing -a stdoutb. Encryption signing key
To generate an encryption signing key, run the following command:
docker run circleci/server-keysets:latest generate encryption -a stdout7. Object storage and permissions
CircleCI server v4.x hosts build artifacts, test results, and other state object storage. The following storage options are supported:
While any S3 compatible object storage may work, we test and support AWS S3 and MinIO.
Follow the instructions below to create a bucket and access method for S3 or GCS.
If you are installing behind a proxy, object storage should be behind this proxy also. Otherwise, proxy details will need to be supplied at the job level within every project .circleci/config.yml to allow artifacts, test results, cache save and restore, and workspaces to work. For more information see the Installing server behind a proxy guide. |
S3 storage
a. Create AWS S3 Bucket
aws s3api create-bucket \
    --bucket <YOUR_BUCKET_NAME> \
    --region <YOUR_REGION> \
    --create-bucket-configuration LocationConstraint=<YOUR_REGION>
b. Set up authentication
You can authenticate CircleCI with S3 in one of two ways:
-
IAM Roles for Service Accounts (IRSA)
-
IAM access keys - recommended
Option 1: IRSA
The following is a summary of AWS’s Documentation on IRSA that is sufficient for installing CircleCI.
-
Create an IAM OIDC Identity Provider for your EKS Cluster.
eksctl utils associate-iam-oidc-provider --cluster <CLUSTER_NAME> --approve -
Get the OIDC provider ARN. You will need this in later steps.
aws iam list-open-id-connect-providers | grep $(aws eks describe-cluster --name <CLUSTER_NAME> --query "cluster.identity.oidc.issuer" --output text | awk -F'/' '{print $NF}') -
Get your OIDC provider URL. You will need this in later steps.
aws eks describe-cluster --name <CLUSTER_NAME> --query "cluster.identity.oidc.issuer" --output text | sed -e "s/^https:\/\///" -
Create the role using the command and trust policy template below. You will need the Role ARN and name in later steps.
aws iam create-role --role-name circleci-s3 --assume-role-policy-document file://<TRUST_POLICY_FILE>{ "Version": "2012-10-17", "Statement": [ { "Effect": "Allow", "Principal": { "Federated": "<OIDC_PROVIDER_ARN>" }, "Action": "sts:AssumeRoleWithWebIdentity", "Condition": { "StringEquals": { "<OIDC_PROVIDER_URL>:sub": "system:serviceaccount:<K8S_NAMESPACE>:object-storage" } } } ] } -
Create the policy using the command and template below. Fill in the bucket name and the role ARN.
aws iam create-policy --policy-name circleci-s3 --policy-document file://<POLICY_FILE>{ "Version": "2012-10-17", "Statement": [ { "Effect": "Allow", "Action": [ "s3:PutAnalyticsConfiguration", "s3:GetObjectVersionTagging", "s3:CreateBucket", "s3:GetObjectAcl", "s3:GetBucketObjectLockConfiguration", "s3:DeleteBucketWebsite", "s3:PutLifecycleConfiguration", "s3:GetObjectVersionAcl", "s3:PutObjectTagging", "s3:DeleteObject", "s3:DeleteObjectTagging", "s3:GetBucketPolicyStatus", "s3:GetObjectRetention", "s3:GetBucketWebsite", "s3:GetJobTagging", "s3:DeleteObjectVersionTagging", "s3:PutObjectLegalHold", "s3:GetObjectLegalHold", "s3:GetBucketNotification", "s3:PutBucketCORS", "s3:GetReplicationConfiguration", "s3:ListMultipartUploadParts", "s3:PutObject", "s3:GetObject", "s3:PutBucketNotification", "s3:DescribeJob", "s3:PutBucketLogging", "s3:GetAnalyticsConfiguration", "s3:PutBucketObjectLockConfiguration", "s3:GetObjectVersionForReplication", "s3:GetLifecycleConfiguration", "s3:GetInventoryConfiguration", "s3:GetBucketTagging", "s3:PutAccelerateConfiguration", "s3:DeleteObjectVersion", "s3:GetBucketLogging", "s3:ListBucketVersions", "s3:ReplicateTags", "s3:RestoreObject", "s3:ListBucket", "s3:GetAccelerateConfiguration", "s3:GetBucketPolicy", "s3:PutEncryptionConfiguration", "s3:GetEncryptionConfiguration", "s3:GetObjectVersionTorrent", "s3:AbortMultipartUpload", "s3:PutBucketTagging", "s3:GetBucketRequestPayment", "s3:GetAccessPointPolicyStatus", "s3:GetObjectTagging", "s3:GetMetricsConfiguration", "s3:PutBucketVersioning", "s3:GetBucketPublicAccessBlock", "s3:ListBucketMultipartUploads", "s3:PutMetricsConfiguration", "s3:PutObjectVersionTagging", "s3:GetBucketVersioning", "s3:GetBucketAcl", "s3:PutInventoryConfiguration", "s3:GetObjectTorrent", "s3:PutBucketWebsite", "s3:PutBucketRequestPayment", "s3:PutObjectRetention", "s3:GetBucketCORS", "s3:GetBucketLocation", "s3:GetAccessPointPolicy", "s3:GetObjectVersion", "s3:GetAccessPoint", "s3:GetAccountPublicAccessBlock", "s3:ListAllMyBuckets", "s3:ListAccessPoints", "s3:ListJobs" ], "Resource": [ "arn:aws:s3:::<YOUR_BUCKET_NAME>", "arn:aws:s3:::<YOUR_BUCKET_NAME>/*" ] }, { "Effect": "Allow", "Action": [ "iam:GetRole", "sts:AssumeRole" ], "Resource": "<OBJECT_STORAGE_ROLE_ARN>" } ] } -
Attach the policy to the role:
aws iam attach-role-policy --role-name <OBJECT_STORAGE_ROLE_NAME> --policy-arn=<STORAGE_POLICY_ARN>
Google Cloud Storage
a. Create a GCP bucket
If your server installation runs in a GKE cluster, ensure that your current IAM user is cluster admin for this cluster, as RBAC (role-based access control) objects need to be created. More information can be found in the GKE documentation.
gsutil mb gs://circleci-server-bucketb. Set up authentication
The recommended method for workload/pod authentication is to use Workload Identity. However, you may also use static credentials (JSON) key file).
-
Create a Service Account.
gcloud iam service-accounts create circleci-storage --description="Service account for CircleCI object storage" --display-name="circleci-storage" -
Bind the
objectAdminrole to the service account.gcloud projects add-iam-policy-binding <PROJECT_ID> \ --member="serviceAccount:circleci-storage@<PROJECT_ID>.iam.gserviceaccount.com" \ --role="roles/storage.objectAdmin" \ --condition='expression=resource.name.startsWith("projects/_/buckets/circleci-server-bucket"),title=restrict_bucket' -
Either enable Workload Identity or use static credentials.
Option 1: Workload Identity
When using Workload Identity you need to configure your account such that the workloads/pods can access the storage bucket from the cluster using the Kubernetes service account
"<K8S_NAMESPACE>/object-storage".gcloud iam service-accounts add-iam-policy-binding circleci-storage@<PROJECT_ID>.iam.gserviceaccount.com \ --role roles/iam.workloadIdentityUser \ --member "serviceAccount:<PROJECT_ID>.svc.id.goog[<K8S_NAMESPACE>/object-storage]"gcloud projects add-iam-policy-binding <PROJECT_ID> \ --member serviceAccount:circleci-storage@<PROJECT_ID>.iam.gserviceaccount.com \ --role roles/iam.serviceAccountTokenCreator \ --condition=None