Generative AI has already shown its huge potential, but there are many applications that out-of-the-box large language model (LLM) solutions aren’t suitable for. These include enterprise-level applications like summarizing your own internal notes and answering questions about internal data and documents, as well as applications like running queries on your own data to equip the AI with known facts (reducing “hallucinations” and improving outcomes).
LLMs often require significant manual adjustments during both training and testing due to their complex and unpredictable behavior, making it difficult to automate deployments for applications that rely on them. However, there are tools that can help you standardize and automate the processes surrounding this core manual intervention.
In this tutorial, you’ll learn how to use LangChain and LangSmith to build and debug custom LLM-powered applications. You’ll also learn how you can leverage these tools in a continuous integration and continuous delivery (CI/CD) pipeline for faster, more consistent model evaluations and a more scalable development process.
Automating LLM workflows with CI/CD
In our CI/CD for ML series, we described how you can apply CI/CD best practices to a machine learning (ML) workflow. In this tutorial, we demonstrate how to build and test a custom application based on existing language models using retrieval augmented generation (RAG).
RAG is a technique that sends your prompts to the language model along with information related to your question, so that it can provide you with more accurate answers. This avoids having to retrain your model on your own data, which can be much more complicated and time-consuming than supplying the data at execution time using RAG.
This tutorial will focus on how you can fit your specialized LLM systems into a CircleCI pipeline to bring CI/CD best practices to your AI development workflows.
Tools and prerequisites
To build your LLM-powered app and set up automated testing and evaluation, you’ll need the following frameworks and tools:
- CircleCI: A configuration-as-code CI/CD platform that allows users to run and orchestrate pipelines in the cloud or locally.
- LangChain: An open-source framework for developing language model-powered applications. It provides prompt templates, models, document loaders, text splitters, and many other tools for interacting with models.
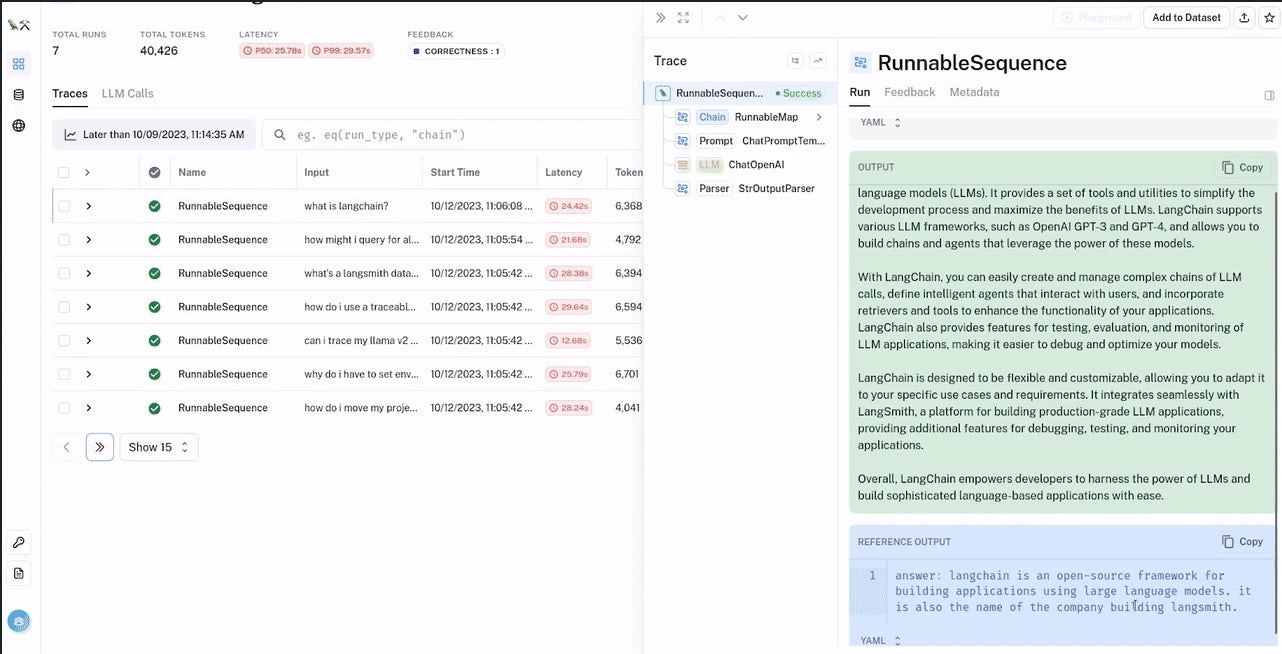
- LangSmith: A tool to more efficiently debug LLM apps by showing the trace of LLM calls, as well as inputs and outputs for certain prompts. This allows you to view the test results and metadata for all LLM calls in a single dashboard. Note that at the time of writing, LangSmith is in private beta, so you will need to sign up for an account to request access.
Sample code: You can follow along with this tutorial by forking the example repository and cloning it to your local machine using Git.
What we’re building: an LLM integration test platform
For this example, we will be building and testing an automated question-answering (QA) chatbot with special knowledge of LangSmith’s documentation — but it can be adapted to answer questions about any website (including your own internal documentation). This tutorial is based on the official LangSmith cookbook example, with the test suite updated to fit into a CI/CD pipeline.
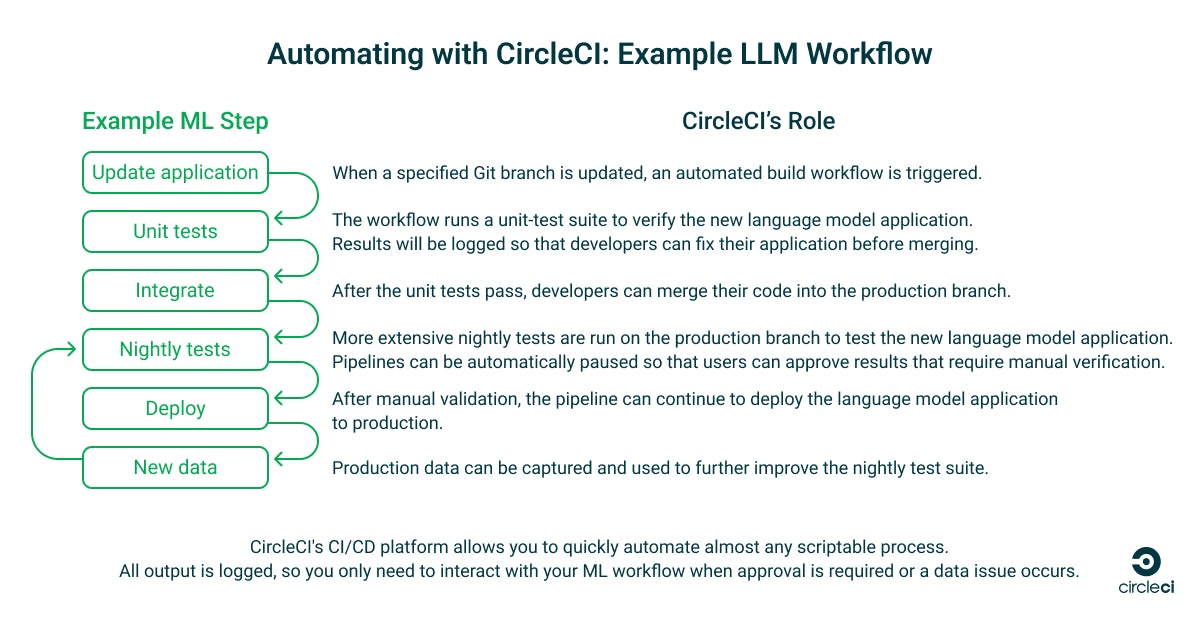
As shown in the diagram below, this example CI/CD pipeline runs an automated test suite that evaluates the output of this application, with deterministic unit tests and more complex ones that rely on separate LLM evaluators to judge the correctness of the LLM app’s responses.
The LangChain RAG application
The first step in this automated CircleCI pipeline is loading the LangSmith documentation into LangChain using document loaders, breaking it into different chunks of text (using splitters) and storing these chunks of text in the ChromaDB database. Then the pipeline begins the RAG process for each test query: based on a user’s prompt, it will retrieve the most similar chunks of text from the vector store (using retrievers) and add this information to the prompt, before supplying the prompt to the language model.
This will augment the knowledge of our language model with only the relevant information from the documentation, so that it can answer specific questions even though it hasn’t been trained on that information. This is far more effective than sending the entirety of our documentation to every prompt, because that would crowd out the relevant data and significantly weaken the reliability of the LLM’s output (and send a lot of unnecessary data over the network).
The test suite
The test suite in this example uses a CircleCI CI pipeline to automate unit tests, logging the failure if any of the deterministic unit tests do not pass and logging the links to view the full results of the non-deterministic unit tests in LangSmith.
Usually, this process is completely automated. However, due to the closed-box nature of LLMs, it can be an advantage to include a manual verification step for judging the correctness of more complex answers. Every other part of the process is still completely automated.
The sample application and test suite
To help you create your LangChain LLM application and test suite, we have built this example repository, so that you can fork and adapt it to your needs. It contains the following directories:
- The
rag/directory contains an example LLM-powered application and unit test suite spread across multiple Python scripts. - These scripts rely on a
.envfile with API keys to OpenAI and Langchain, as well as other environment variables. An example is provided, but you need to populate it with your own variables. - The
tools/directory contains a script for setting up the environment to run the LLM workflow and testing it locally. - Finally, the
.circleci/directory contains the CircleCIconfig.ymlfile that defines the CircleCI pipelines that call the scripts.
Instructions are provided below for setting up each of these example components.
Creating an automated CircleCI pipeline for your LangChain system
The following tutorial steps will walk you through creating your own automated RAG pipeline from a fork of the above repository. These steps have been tested on Ubuntu 22.04.1, and should work in most other Linux environments:
- Fork the example repository and clone your forked version locally.
- Install your virtual environment using
source ./tools/install-venv.sh.- This will enter a Python virtual environment and make sure all of the necessary packages in
requirements.txtare installed. After running the command, you should see a newvenv/directory and your command line prompt should be prepended with(venv)to indicate you are in the virtual environment. - You can leave the virtual environment any time with the
deactivatecommand. After executing this command, you can confirm you are no longer in the virtual environment by making sure(venv)is no longer be prepended to your prompt. - Note: You must source the script rather than executing. If not, a new process will be spawned, the child process will enter the virtual environment by setting its environment variables, then it will exit, leaving your original shell process without the right environment variables.
- This will enter a Python virtual environment and make sure all of the necessary packages in
- Create a
.envfile by runningcp .env.example .env, then set the necessary environment variables in it. This will include:- OpenAI API key: Go to the OpenAI API key setup page, set up a paid account, and create a new secret key. This key should be stored in the
OPENAI_API_KEYenvironment variable in your.envfile. - LangChain API key: Create a LangChain account, and create an API key by clicking the API Keys button on the bottom left of the page and following the instructions. This key should be stored in the
LANGCHAIN_API_KEYenvironment variable in your.envfile.
- OpenAI API key: Go to the OpenAI API key setup page, set up a paid account, and create a new secret key. This key should be stored in the
Building the LLM application
The code for the LLM application is stored in the rag/ directory.
rag/chains.pycontains the Python classes that act as wrappers to the LangChain chain objects. These chain objects are themselves wrappers around the OpenAI LLM APIs.rag/app.pycontains the application code that allows users to enter questions about the LangSmith documentation and have the chatbot answer them. This is a simple Flask application.
It would be a monumental task for a single developer to build all of this functionality from scratch. However, by relying on the pre-built libraries supported by LangChain, you need relatively few lines of code to build a complete LLM application.
Building the test suite
This example uses pytest to test the Python classes used by the LLM application explained above. The file containing the unit tests is stored in the rag/ directory and prepended with the name test_, as required by pytest. Note that the names of all functions inside of this test_ file must also be prepended with test_ to be run by pytest.
rag/test_rag.py contains our unit tests for the classes above. Some of these tests are deterministic, so the tests look for certain strings in the output of the LLM calls. Others are non-deterministic, so LangSmith’s LLM evaluators are used to judge the correctness of the LLM application’s outputs.
For this test suite, different functions each run a different deterministic unit test. There is a single function, test_llm_evaluators, that runs all of the non-deterministic unit tests.
| Test name | Test type | What it does |
|---|---|---|
test_name |
deterministic | Asks the LLM what its name is and checks that the string bob appears in the answer. |
test_basic_arithmetic |
deterministic | Asks the LLM what 5 + 7 is and checks that the string 12 appears in the answer |
test_llm_evaluators |
non-deterministic | Asks the LLM questions in the example list of tuples, then uses an LLM evaluator available in LangSmith to judge whether the actual output was close enough to the desired output |
These tests are just to give you an idea of what’s possible — when building an LLM on your own documents, you can modify and add to these tests to reduce the chances that your LLM application gives incorrect answers by checking the outputs against known responses.
You can also customize the LLM evaluators against more specific criteria like conciseness, harmfulness, maliciousness, criminality, and so on. Having a robust framework like this can help your company avoid potentially damaging outcomes by ensuring that the language model’s outputs align with your specific ethical and regulatory standards.
Evaluating your LLM locally
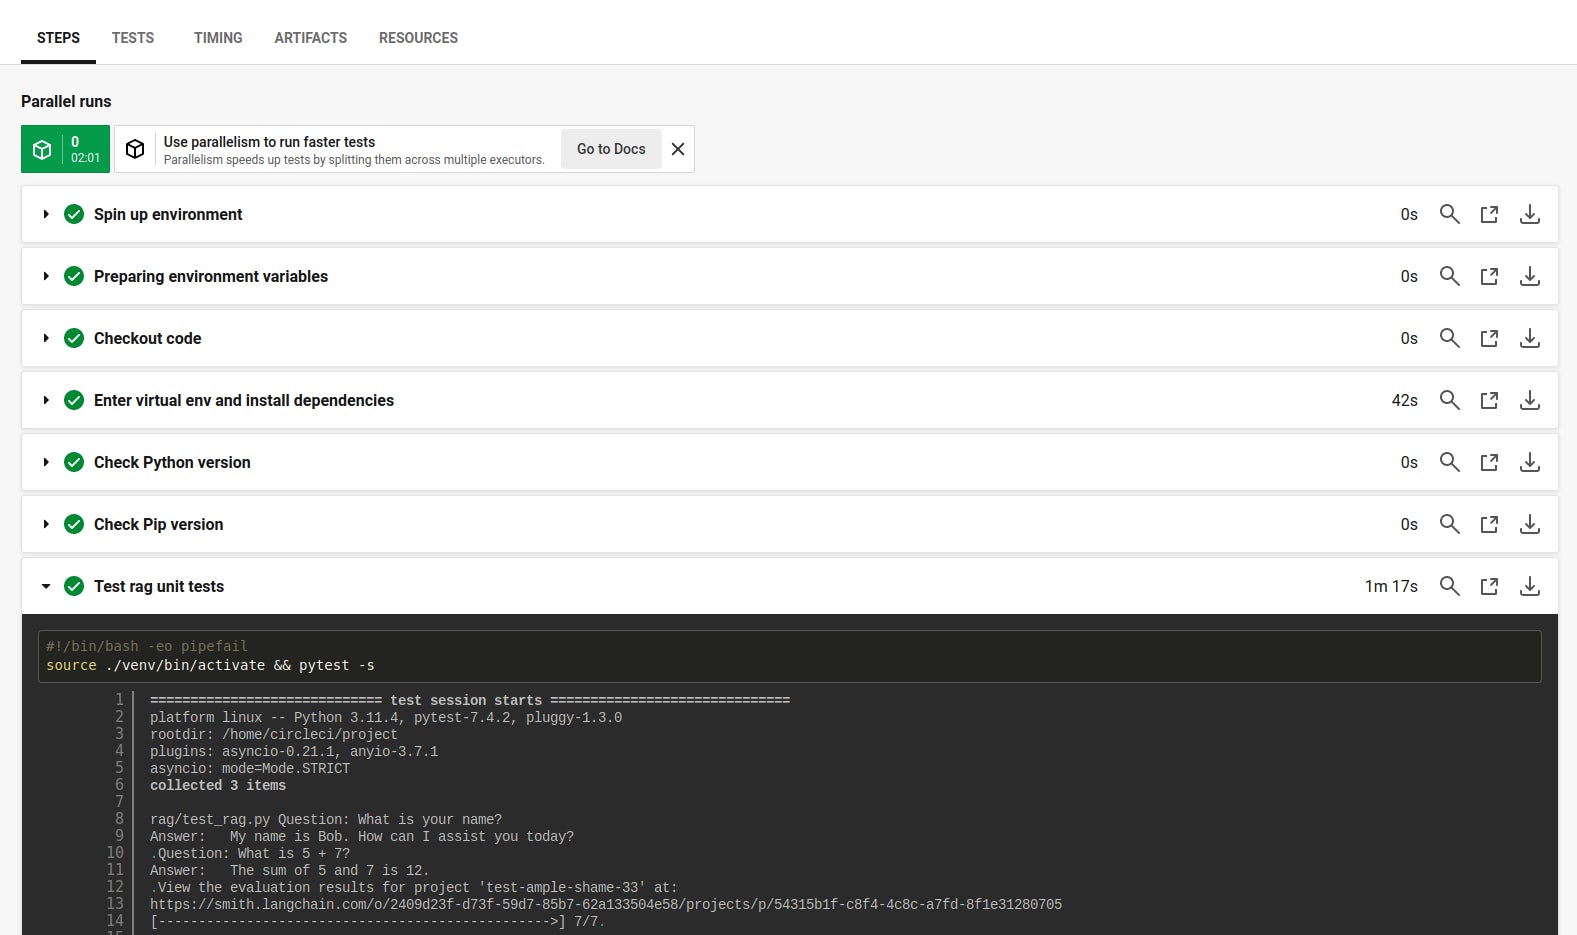
You can evaluate the LLM application locally with the pytest -s command. You can also evaluate individual tests with pytest -s -k [test name]. The -s flag shows the LLM output in the logs. However, it is not strictly necessary because all of the inputs and outputs will show up in your LangSmith dashboard as well.
It is important to be verbose with the tests so you can understand the exact execution by reviewing the logs. The output from pytest -s should look something like this.
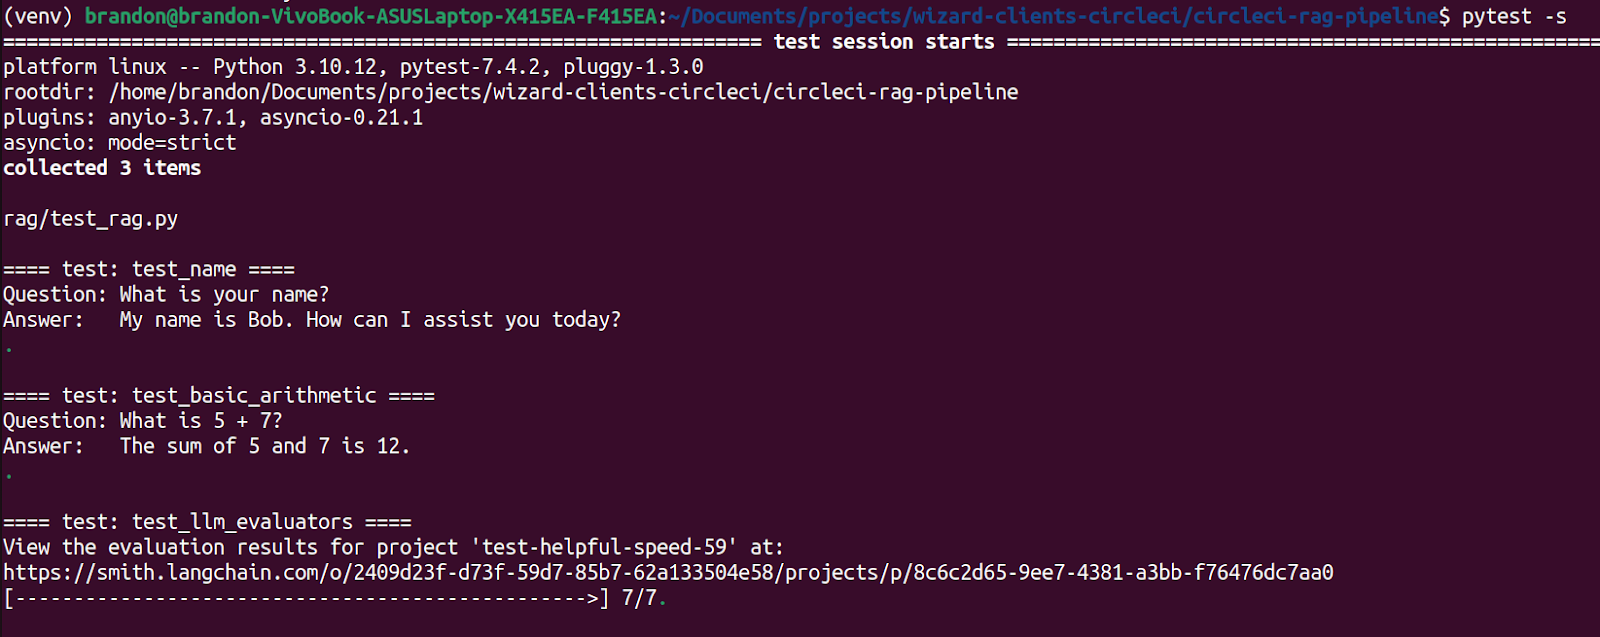
You can see that the last test gives you a link to view the more in-depth LangSmith results for the LLM evaluators. LangSmith also does a great job of revealing all of the details that LangChain hides to make development easier. You can dig into the metadata, input prompt, and output for each LLM call with LangSmith to more fully understand the behavior of the system.
You can also check out the more detailed demo given by the LangSmith team during their recent Beta release to see more of what LangSmith can do.
Creating a CircleCI integration pipeline to automatically run the tests
This next step creates a continuous integration pipeline to automatically run your LLM test suite when code is pushed to a branch.
To accomplish this, you first need to sign up for a free CircleCI account and link your GitHub account to your CircleCI account. Your GitHub repositories will be shown in the Projects section of your CircleCI dashboard. From here, click Set Up Project next to the forked repository for this tutorial, and select the main branch.
Creating a CircleCI context to hold environment variables securely
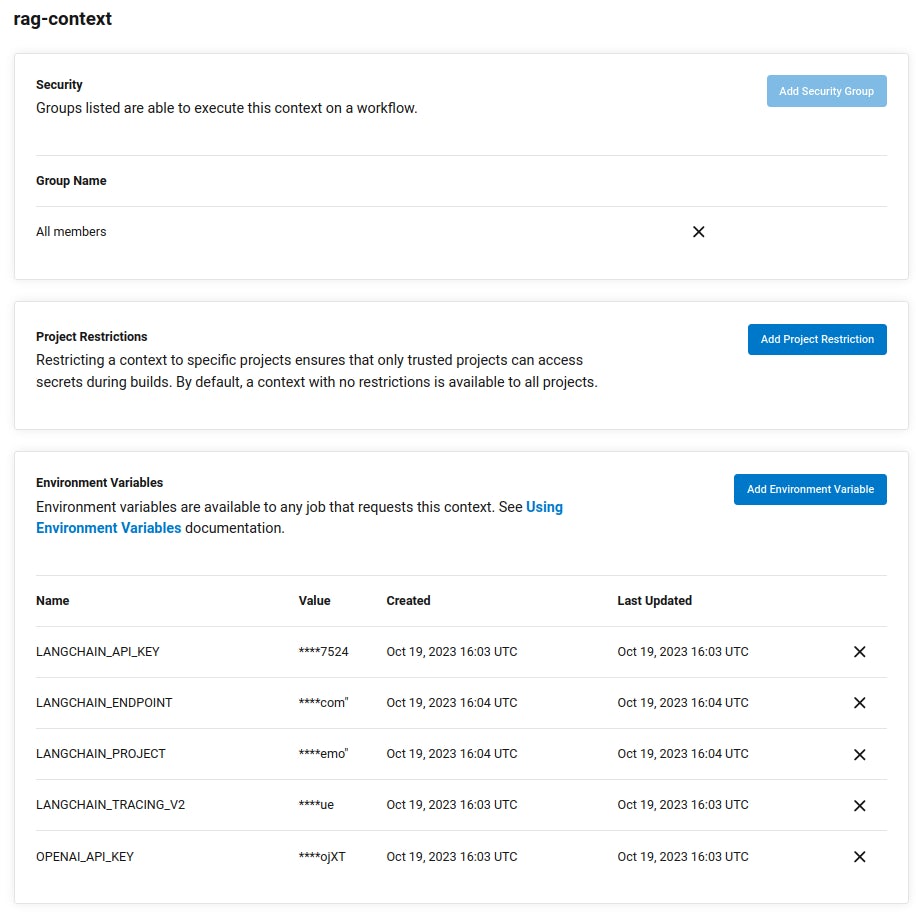
Committing secrets like passwords and API keys to source control risks them being disclosed to third parties, and is considered poor security practice. To avoid the need to commit .env files containing secrets, CircleCI provides contexts to store environment variables and share them between projects. This example workflow uses the context rag-context.
You will need to create a new context with this name to store your environment variables and ensure that your project has permissions to access variables stored in the context. To do so, navigate to Organization Settings > Contexts in the CircleCI web app, then click Create Context and provide the name rag-context.
You will then need to create the following environment variables in rag-context with the same values as your .env file locally:
OPENAI_API_KEYLANGCHAIN_TRACING_V2LANGCHAIN_API_KEYLANGCHAIN_ENDPOINTLANGCHAIN_PROJECT
If you want to keep all of your data within your own infrastructure, you can set up your own self-hosted runners and use a credentials store to host your sensitive secrets, passwords and keys.
Creating a workflow
There is already a CircleCI configuration file .circleci/config.yml in the example repository, which will be identified by CircleCI. This file contains the configurations for the CircleCI pipeline, consisting of workflows, jobs, and steps.
At the bottom of the file, the integration-tests workflow defines the continuous integration stage of the pipeline. This runs the run-unit-tests job using the rag-context context whenever the branch rag-pipeline is updated.
# Invoke jobs via workflows
# See: https://circleci.com/docs/workflows/
workflows:
  integration-tests:
    jobs:
  	- run-unit-tests:
        context: rag-context  # contains environment variables
        filters:
          branches:
            only:
              - rag-pipeline # Only run the job when this branch is updated
Setting up jobs
Each job in a CircleCI workflow specifies the execution environment that will run the job. Different jobs can be run in different environments, including Docker images, Linux VMs, GPUs, and self-hosted runners. This tutorial uses a cloud-based Linux virtual machine running Ubuntu 22.04 that is automatically provisioned on CircleCI’s infrastructure when the job is run.
jobs:
  run-unit-tests:
    machine: # Executor type
  	# For a full list of Linux VM execution environments, see
  	# https://circleci.com/developer/images?imageType=machine
  	image: ubuntu-2204:2023.07.2
    steps:
  	- checkout      # Check out the code in the project directory
  	- install-venv
  	- check-python  # Invoke command "check-python" after entering venv
  	- run:
        command: source ./venv/bin/activate && pytest -s
        name: Test rag unit tests
The steps in this job are constructed by referencing predefined or reusable commands or defining ad-hoc commands with the run keyword.
The checkout command is a built-in command that checks out the source code, whereas install-env and check-python are reusable commands defined in the commands section of the config.yml file.
# Define custom commands for this config
# See https://circleci.com/docs/reusing-config/#authoring-reusable-commands
commands:
  check-python:
    steps:
      - run:
          command: source ./venv/bin/activate && python3 --version
          name: Check Python version
  	- run:
          command: source ./venv/bin/activate && pip3 --version
          name: Check Pip version
  install-venv:
    steps:
      - run:
          command: source ./tools/install-venv.sh
          name: Enter virtual env and install dependencies
You also need to activate the Python virtual environment before each command so that the right libraries will be used.
Putting it all together
Every time you push to the rag-pipeline branch of the repository, the workflow defined in the CircleCI configuration for that branch will be executed, including the defined jobs and commands.
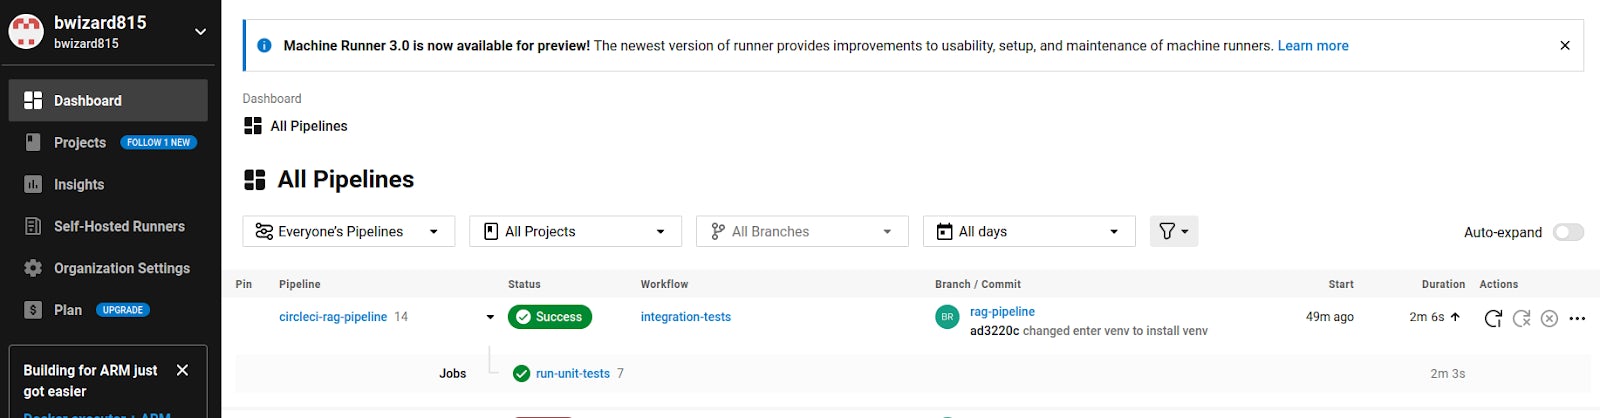
By selecting a workflow in the CircleCI dashboard, you can see which commands were run, the status of those commands, and the detailed logs for each command to quickly identify any errors.
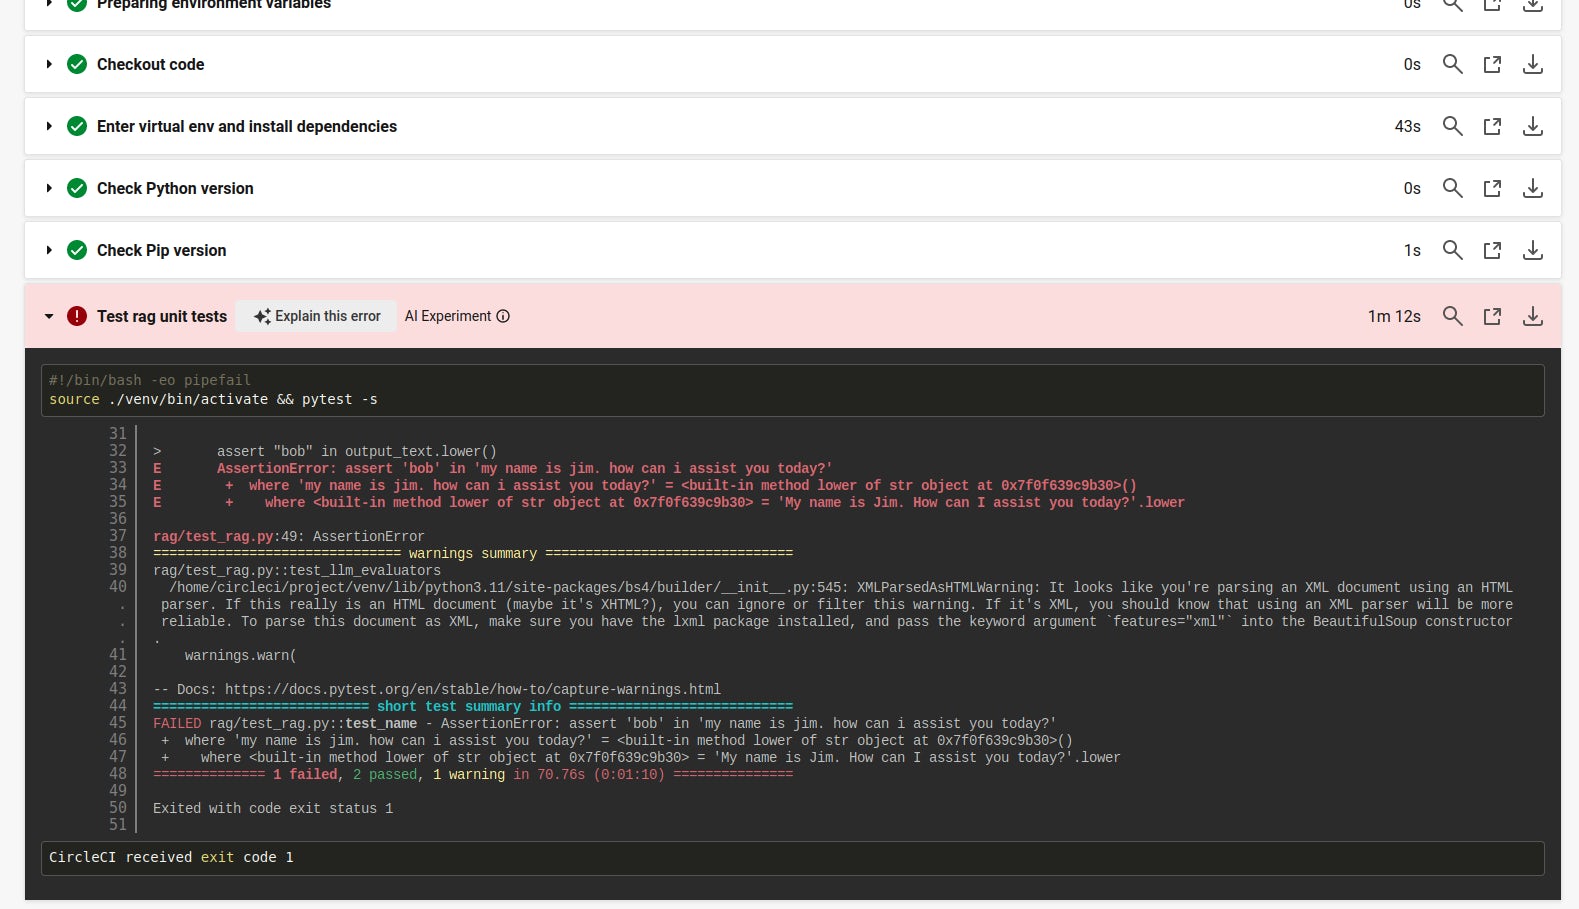
The deterministic tests in the unit test suite provide a pass/fail status that can be seen in the CircleCI dashboard.
You can force a failure of the deterministic unit test test_name by changing the name that you instantiate the chain with from Bob to Jim. After pushing this code, the unit test suite will run and the test_name unit test will fail. You will see this error in the CircleCI console because the assert statement in that unit test returns a non-zero error code.
The non-deterministic unit tests require manual approval, so you have to observe the LangSmith results by following the link in the workflow’s logs. In a follow-up tutorial, you will learn how to require manual user approval for these non-deterministic tests within CircleCI.
Where to go next
In this tutorial, we’ve covered how to build an LLM-powered application from the ground up, how to test it, and how to set up a CI pipeline through CircleCI to run this automated test suite whenever code is pushed to a feature branch.
You can further customize your RAG application and evaluation pipeline by feeding your own documents to the LangChain RAG application and writing additional evaluation prompts in test_rag.py.
To get started building and evaluating your own models today, sign up for a free CircleCI account and claim your 6,000 free build minutes per month.