Building a Laravel API for CircleCI webhooks

Fullstack Developer and Tech Author

Software applications consist of interconnected systems - each providing a specialized service towards the common goal of meeting a business need. As with any network, efficient data exchange is key to its functionality, effectiveness, and responsiveness.
In the past, data exchange was performed using polling requests. At regular intervals, a system would make a request to get the latest information or find out if there is an update. This technique proved to be inefficient because most requests were returned with no new information to act on. If there was something new to process, the information was likely to be stale, making it impossible for the application to respond in real-time.
This led to a new form of communication: webhooks. If a pre-agreed event occurs, a request is made to notify the system in need of that information, allowing that system to respond immediately. Using webhooks has the advantage of a lower overhead on the system since fewer requests are made. It also ensures that data is being exchanged in real-time. CircleCI provides webhooks that allow you to receive information about your pipeline in real time. This can help you avoid polling the API or manually checking the CircleCI web application for the data you need.
In this tutorial, I will lead you through building a Laravel API that will be used as a webhook for a CircleCI pipeline you will also create.
Prerequisites
To get the most from this tutorial you will need a few things:
- A basic understanding of PHP and Laravel
- PHP 8.0 or higher
- Git
- Composer
- The Laravel installer
Use cases for CircleCI webhooks
If you are still wondering about how CircleCI webhooks can be used regardless of your choice of programming language, here are some use cases:
- Aggregating events from single or multiple projects and sending data to a communication channel such as Slack
- Automating notifications sent to the development team when workflows/jobs are either canceled or completed.
- Visualizing and analyzing workflows/job events through a custom dashboard.
- Sending valuable data to data logging and incident management tools
Getting started
Create a new project to get started.
laravel new laravel-api-for-circleci-webhook
When prompted by Laravel to install a starter kit, choose “No starter kit”. For testing framework, choose PHPUnit. Lastly, select MySQL as the database option for the application.
cd laravel-api-for-circleci-webhook
Now, to set up a webhook, you will need to create a base CircleCI configuration and set up a GitHub repository for the CI pipeline. In the root directory of the project, create a new folder named .circleci. In the .circleci folder, create a new file named config.yml. Add this to the file:
version: 2.1
jobs:
  build:
    docker:
      - image: cimg/php:8.2.7

    steps:
      - checkout
      - run:
          name: "Prepare Environment"
          command: |
            sudo apt update

      # Download and cache dependencies
      - restore_cache:
          keys:
            # "composer.lock" can be used if it is committed to the repo
            - v1-dependencies-{{ checksum "composer.json" }}
            # fallback to using the latest cache if no exact match is found
            - v1-dependencies-

      - run:
          name: "Install Dependencies"
          command: composer install

      - save_cache:
          key: v1-dependencies-{{ checksum "composer.json" }}
          paths:
            - ./vendor
The next step is to create a controller. This controller will be used to handle requests from CircleCI and to retrieve the history of requests based on what you save to the database. To create a controller, run this artisan command:
php artisan make:controller CircleCIController
In the newly created app/Http/Controllers/CircleCIController.php file, add this:
<?php

namespace App\Http\Controllers;

use Illuminate\Http\JsonResponse;
use Symfony\Component\HttpFoundation\Response;

class CircleCIController extends Controller
{
    public function getAllNotifications()
    : JsonResponse {

        return response()->json();
    }

    public function handleNotification()
    : JsonResponse {

        return response()
            ->json(null, Response::HTTP_NO_CONTENT);
    }
}
This code snippet declares two functions that currently return JSON responses with status codes 200 and 204, respectively.
The latest version of Laravel does not comes with the routes/api.php file by default, run the following command to create it:
php artisan install:api
If prompted to run migration, type no and press Enter as you will set up the database later.
Next, add two routes for your API. Open routes/api.php and add the following:
Route::post('circleci', [CircleCIController::class, 'handleNotification']);
Route::get('circleci', [CircleCIController::class, 'getAllNotifications']);
The first route is the webhook route. It will handle POST requests from CircleCI. The second route will be used to get the notifications that CircleCI has sent to the webhook. Because these routes have been registered as API routes, the full route URIs will be prepended with api (i.e api/circleci).
Import the CircleCIController:
use App\Http\Controllers\CircleCIController;
Now you are ready to serve your application. Run the application using this command:
php artisan serve
Setting up ngrok
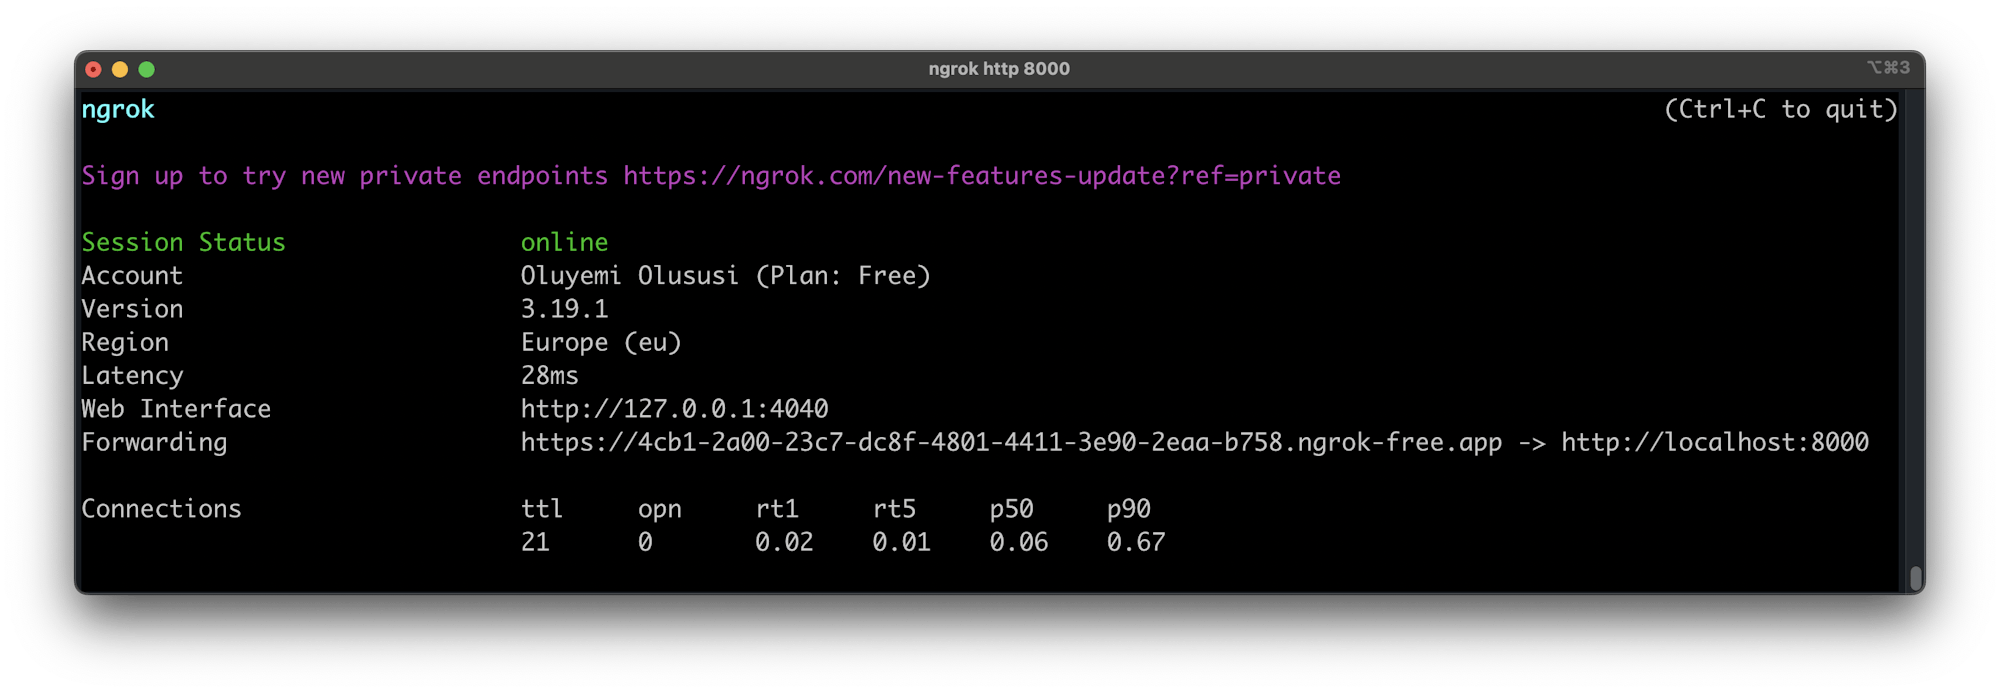
For development purposes, you need a way of exposing your local application as a webhook to CircleCI. We can use ngrok to expose the running Laravel application to the internet.
Download the ngrok executable file and unzip it. To expose a port on your local machine, use the ngrok http command, specifying the port number you want to be exposed. Your Laravel application will be running on port 8000, so use this command:
ngrok http 8000
When you start ngrok, it will display a UI in your terminal with the public URL of your tunnel and other status and metrics information about connections made over your tunnel.

Setting up a CircleCI pipeline
Next, set up a repository on GitHub and link the project to CircleCI. Refer to this post for help pushing your project to GitHub.
Log into your CircleCI account. If you signed up with your GitHub account, all your repositories will be displayed on your project’s dashboard.
Next to your laravel-api-for-circleci-webhook project, click Set Up Project.

A prompt will show up instructing you to use existing config.yml in your project. Enter the name of the branch housing your config file and click Set Up Project to proceed.
Your first build process will start running and complete successfully.

Configuring a webhook for the project
On the CircleCI dashboard for the laravel-api-for-circleci-webhook project, click Project Settings. In the sidebar, click Webhooks and then click Add Webhook. Fill the form.

Specify the public URL given by ngrok in the Receiver URL field. The URL should be in the format http://<ngrok_public_url>/api/circleci. Next, add a secret token to verify incoming requests to the webhook and ensure that only requests from CircleCI are accepted. Make a note of the secret token, because you will use it to validate incoming requests to the receiver URL.
Click Add Webhook to save the details of the webhook. A POST request will be sent to the api/circleci route of the Laravel application when a workflow or job has been completed.
Setting up environment variables
For this tutorial, you will use MySQL to manage your database. In the .env file, update the database-related parameters with this:
DB_CONNECTION=mysql
DB_HOST=127.0.0.1
DB_PORT=3306
DB_DATABASE=circle_ci_webhook_api
DB_USERNAME=YOUR_DATABASE_USERNAME
DB_PASSWORD=YOUR_DATABASE_PASSWORD
Using your preferred database management application, create a new database called circle_ci_webhook_api.
You also need an environment variable to hold the webhook secret token. Include the following in the .env file.
CIRCLE_CI_WEBHOOK_SECRET="YOUR_CIRCLE_CI_WEBHOOK_SECRET"
Creating the WebhookNotification model
In your application, you need a model which will represent the details for the notification received by your webhook. Name this model WebhookNotification. It will have these fields:
idis the primary key in the database.notification_idis the id provided with the webhook to uniquely identify each notification from CircleCI.- The
typevalue is eitherworkflow-completedorjob-completed. happened_atis the ISO 8601 timestamp representing when the event happened.has_vcs_infolets you know whether the notification has a version control map for accessing metadata related to the git commit that triggered the event.commit_subjectrepresents the subject of the commit if the notification has a version control map. Otherwise the value is null.commit_authorrepresents the author of the commit. This value can be null ifhas_vcs_infois false.event_statuscorresponds to the status of the workflow or job when it reaches the terminal state. The values can besuccess,failed,error,canceled, orunauthorized.workflow_urlcontains the URL for the workflow or job on your CircleCI dashboard.
Create the model using this command:
php artisan make:model WebhookNotification -m
In the newly created database/migrations/*YYYY_MM_DD_HHMMSS*_create_webhook_notifications_table.php, update the up function to match this code block:
public function up() {

        Schema::create('webhook_notifications', function (Blueprint $table) {

            $table->id();
            $table->string('notification_id');
            $table->string('type');
            $table->string('happened_at');
            $table->boolean('has_vcs_info');
            $table->string('commit_subject')->nullable();
            $table->string('commit_author')->nullable();
            $table->string('event_status');
            $table->text('workflow_url');
            $table->timestamps();
        });
    }
Next, open the WebhookNotification model file: app/Models/WebhookNotification.php. Update it to add fields as $fillable properties using this code:
<?php

namespace App\Models;

use Illuminate\Database\Eloquent\Factories\HasFactory;
use Illuminate\Database\Eloquent\Model;

class WebhookNotification extends Model
{
    use HasFactory;

    protected $fillable = [
        'notification_id', 'type', 'happened_at', 'has_vcs_info', 'commit_subject','commit_author',
        'event_status','workflow_url'
    ];
}
Run your migrations to create the webhook_notifications table and its columns.
php artisan migrate
Creating a helper class to manage CircleCI requests
To separate concerns and make your controller leaner, you can create a helper class. The helper class validates incoming requests and parses the information in the request used to populate the WebhookNotification model.
In the app folder of the project, create a new folder named Helpers. In that folder, create a new file called CircleCINotificationHelper.php. Update the content of that file with this code:
<?php

namespace App\Helpers;

use App\Models\WebhookNotification;
use Illuminate\Http\{Request, Response};

class CircleCINotificationHelper {

    public static function handle(Request $request)
    : void {

        $circleCISignature = $request->headers->get('circleci-signature');

        self::validate($circleCISignature, $request->getContent());
        $requestContent = $request->toArray();
        $hasVCSInfo = isset($requestContent['pipeline']['vcs']);

        $notificationType = $requestContent['type'];

        $notificationDetails = [
            'notification_id' => $requestContent['id'],
            'type'            => $notificationType,
            'happened_at'     => $requestContent['happened_at'],
            'workflow_url'    => $requestContent['workflow']['url'],
            'has_vcs_info'    => $hasVCSInfo,
        ];

        if ($hasVCSInfo) {
            $commitDetails = $requestContent['pipeline']['vcs']['commit'];
            $notificationDetails['commit_subject'] = $commitDetails['subject'];
            $notificationDetails['commit_author'] = $commitDetails['author']['name'];
        }

        $notificationDetails['event_status'] = $notificationType === 'job-completed' ?
            $requestContent['job']['status'] :
            $requestContent['workflow']['status'];

        $webhookNotification = new WebhookNotification($notificationDetails);

        $webhookNotification->save();
    }

    private static function validate(string $signature, string $requestContent)
    : void {

        $receivedSignature = explode('=', $signature)[1];

        $generatedSignature = hash_hmac(
            'sha256',
            $requestContent,
            env('CIRCLE_CI_WEBHOOK_SECRET')
        );

        abort_if(
            $receivedSignature !== $generatedSignature,
            Response::HTTP_UNAUTHORIZED,
            'Invalid Signature Provided'
        );
    }
}
The CircleCINotificationHelper has only one public method named handle, which takes a Request object.
Before parsing the content of the request, a validation check is first carried out using the validate function. This ensures that only requests from CircleCI are treated. To validate the request, the circleci-signature header is compared with the HMAC-SHA256 digest of the request body, using the configured signing secret as the secret key. If the values do not match, the process is aborted and a 401 response is returned. You can read more about the Webhook Payload Signature here.
If the request signature checks out, the handle method retrieves the values for the WebhookNotification model, creates one, and saves it to the database.
Adding functionality to CircleCIController
With the model and helper in place, you can add functionality to the earlier defined functions in the CircleCIController. Open app/Http/Controllers/CircleCIController.php and update it to match this:
<?php

namespace App\Http\Controllers;

use App\Helpers\CircleCINotificationHelper;
use App\Models\WebhookNotification;
use Illuminate\Http\JsonResponse;
use Illuminate\Http\Request;
use Symfony\Component\HttpFoundation\Response;

class CircleCIController extends Controller
{
    public function getAllNotifications()
    : JsonResponse {

        return response()->json(WebhookNotification::all());
    }

    public function handleNotification(Request $request)
    : JsonResponse {

        CircleCINotificationHelper::handle($request);

        return response()
            ->json(null, Response::HTTP_NO_CONTENT);
    }
}
Now that these changes have been made, you can trigger a new event by committing and pushing your changes to the GitHub repository.
git add .

git commit -m 'Implemented Webhook for CircleCI'

git push origin main
This triggers a build process. When the process is completed, a request is sent to the ngrok public URL you specified. Using the tunnel created by ngrok, the application receives the request and saves the notification to the database. You can review the HTTP Requests section in your ngrok terminal.

Conclusion
In this tutorial, you set up a Laravel API to communicate with a CircleCI webhook. While you only saved the data to the database for future visualization/analysis, webhooks open the door for many operations dependent on real-time data such as incident detection and response/management. Share this tutorial with your team to expand on what you have learned using your own projects.
The code for this tutorial is available on GitHub and the complete documentation for CircleCI webhooks is available here.
Enjoy!


