Collect test data
On This Page
- Introduction
- Viewing storage usage
- Test Insights
- Enabling formatters
- Test runner examples by language
- Jest
- Mocha for Node.js
- Mocha with nyc
- Karma
- Ava for Node.js
- ESLint
- RSpec
- minitest
- Cucumber
- pytest
- unittest
- Maven Surefire Plugin for Java JUnit Results
- Gradle JUnit test results
- PHPUnit
- trx2junit for Visual Studio / .NET core tests
- Kaocha
- test2junit for Clojure tests
- CTest for C/C++ Tests
- Bats for Bash
- GoogleTest
- Xcode
- Playwright
- Cypress
- WebdriverIO
- API
- See Also
Introduction
When you run tests in CircleCI there are two ways to store your test results. You can either use artifacts or the store_test_results step. Each of these methods has advantages, so the decision needs to be made for each project.
When you save test data using the store_test_results step, CircleCI collects data from XML files and uses it to provide insights into your job. This page describes how to configure CircleCI to output test data as XML for some common test runners and store reports with the store_test_results step.
Using the store_test_results step gives you access to:
-
The Tests tab in the CircleCI web app.
-
Test insights and flaky test detection.
-
Test splitting.
You can also store test results as artifacts, which means you can look at the raw XML. Using artifacts can be useful when debugging issues with setting up your project’s test results handling, for example, finding incorrectly uploaded files.
To see test results as build artifacts, upload them using the store_artifacts step. Storing artifacts has associated costs due to the use of storage. See the Persisting data page for information on how to customize storage retention periods for objects like artifacts.
You can choose to upload your test results using both store_test_results and store_artifacts. |
Using the store_test_results step allows you to do the following:
-
Upload and store test results.
-
Get a view of your passing/failing tests in the CircleCI web app.
Access test results from the Tests tab when viewing a job, as shown below.
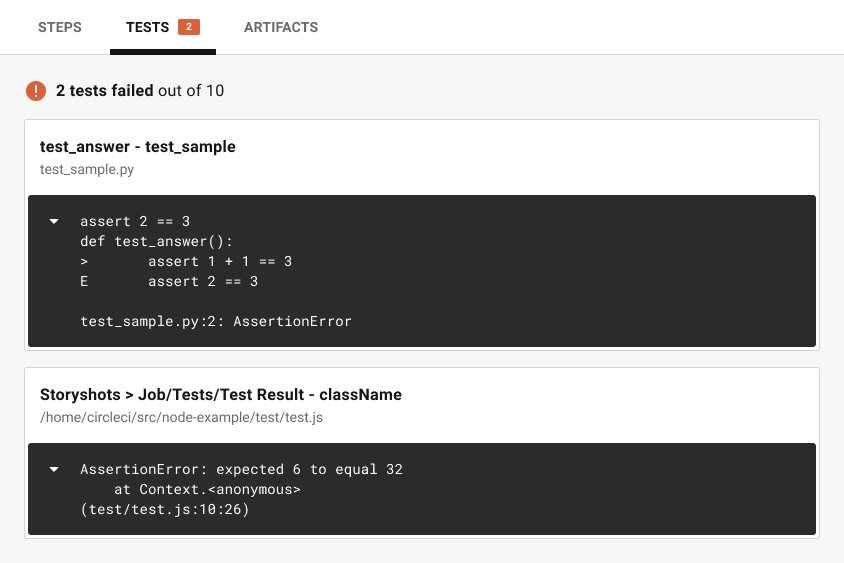
Below is an example of using the store_test_results key in your .circleci/config.yml.
steps:
  - run:
  #...
  # run tests and store XML files to a subdirectory, for example, test-results
  #...
  - store_test_results:
    path: test-results
The path key is an absolute or relative path to your working_directory containing subdirectories of JUnit XML test metadata files, or the path of a single file containing all test results.
Make sure that your path value is not a hidden folder. For example, .my_hidden_directory would be an invalid format. |
Viewing storage usage
For information on viewing your storage usage, and calculating your monthly storage overage costs, see the Persisting data guide.
Test Insights
| This feature is supported for orgs that use OAuth authentication. Check your Organization slug at . OAuth authenticated orgs are structured as follows:
This feature is not supported if your organization slug is in the following format:
For an overview of feature support, see the VCS integration overview page. |
See the Test Insights page for information on using the Insights feature to gather information about your tests. This includes flaky test detection, viewing tests that failed most often, slowest tests, and an overall performance summary.
Also, see the API v2 Insights endpoints to find test failure information.
Enabling formatters
Test metadata is not automatically collected in CircleCI until you enable the JUnit formatters. For RSpec, minitest, and Django, add the following configuration to enable the formatters:
-
RSpec requires the following be added to your Gemfile:
gem 'rspec_junit_formatter' -
minitest requires the following be added to your Gemfile:
gem 'minitest-ci' -
Django should be configured using the
django-nosetest runner.
For detailed information on how to test your iOS applications, refer to the Testing iOS applications page.
Test runner examples by language
This section provides the following test runner examples:
| Language | Test Runner | Formatter | Examples |
|---|---|---|---|
JavaScript | Jest | ||
JavaScript | Mocha | ||
JavaScript | Karma | ||
JavaScript | Ava | ||
JavaScript | ESLint | ||
JavaScript | Playwright | built-in | |
JavaScript | Cypress | ||
JavaScript | WebdriverIO | ||
Ruby | RSpec | ||
Ruby | minitest | ||
— | Cucumber | built-in | |
Python | pytest | built-in | |
Python | unittest | Use pytest to run these tests | |
Java | Maven | ||
Java | Gradle | built-in | |
PHP | PHPUnit | built-in | |
.NET | — | ||
.NET | NUnit | ||
Clojure | Kaocha | ||
Clojure | clojure.test | ||
C, C++ | CTest |
Jest
To output JUnit compatible test data with Jest you can use jest-junit.
A working .circleci/config.yml section might look like this:
    steps:
      - run:
          name: Install JUnit coverage reporter
          command: yarn add --dev jest-junit
      - run:
          name: Run tests with JUnit as reporter
          command: jest --ci --runInBand --reporters=default --reporters=jest-junit
          environment:
            JEST_JUNIT_OUTPUT_DIR: ./reports/
            JEST_JUNIT_ADD_FILE_ATTRIBUTE: "true"
      - store_test_results:
          path: ./reports/
For a full walkthrough, refer to this article Using JUnit on CircleCI 2.0 with Jest and ESLint by Viget. Note that usage of the Jest CLI argument --testResultsProcessor in the article has been superseded by the --reporters syntax, and JEST_JUNIT_OUTPUT has been replaced with JEST_JUNIT_OUTPUT_DIR and JEST_JUNIT_OUTPUT_NAME, as demonstrated above.
When running Jest tests, use the --runInBand flag. Without this flag, Jest will try to allocate the CPU resources of the entire virtual machine in which your job is running. Using --runInBand will force Jest to use only the virtualized build environment within the virtual machine.
For more details on --runInBand, refer to the Jest CLI documentation. For more information on these issues, see Issue 1524 and Issue 5239 of the official Jest repository.
Mocha for Node.js
To output JUnit tests with the Mocha test runner you can use mocha-junit-reporter.
A working .circleci/config.yml section for testing might look like this:
    steps:
      - checkout
      - run: npm install
      - run: mkdir ~/junit
      - run:
          command: mocha test --reporter mocha-junit-reporter
          environment:
            MOCHA_FILE: ~/junit/test-results.xml
          when: always
      - store_test_results:
          path: ~/junit
Mocha with nyc
Following is an example for Mocha with nyc, contributed by marcospgp.
version: '2.1'

jobs:
  build:
    environment:
      CC_TEST_REPORTER_ID: code_climate_id_here
      NODE_ENV: development
    docker:
      - image: cimg/node:16.10
        environment:
          MONGODB_URI: mongodb://admin:password@localhost:27017/db?authSource=admin
      - image: mongo:4.0
        environment:
          MONGO_INITDB_ROOT_USERNAME: admin
          MONGO_INITDB_ROOT_PASSWORD: password
    working_directory: ~/repo
    steps:
      - checkout

      # Update npm
      - run:
          name: update-npm
          command: 'sudo npm install -g npm@latest'

      # Download and cache dependencies
      - restore_cache:
          keys:
              - v1-dependencies-{{ checksum "package-lock.json" }}
              # fallback to using the latest cache if no exact match is found
              - v1-dependencies-

      - run: npm install

      - run: npm install mocha-junit-reporter # just for CircleCI

      - save_cache:
          paths:
              - node_modules
          key: v1-dependencies-{{ checksum "package-lock.json" }}

      - run: mkdir reports

      # Run mocha
      - run:
          name: npm test
          command: ./node_modules/.bin/nyc ./node_modules/.bin/mocha --recursive --timeout=10000 --exit --reporter mocha-junit-reporter --reporter-options mochaFile=reports/mocha/test-results.xml
          when: always

      # Run eslint
      - run:
          name: eslint
          command: |
              ./node_modules/.bin/eslint ./ --format junit --output-file ./reports/eslint/eslint.xml
          when: always

      # Run coverage report for Code Climate

      - run:
          name: Setup Code Climate test-reporter
          command: |
              # download test reporter as a static binary
              curl -L https://codeclimate.com/downloads/test-reporter/test-reporter-latest-linux-amd64 > ./cc-test-reporter
              chmod +x ./cc-test-reporter
              ./cc-test-reporter before-build
          when: always

      - run:
          name: code-coverage
          command: |
              mkdir coverage
              # nyc report requires that nyc has already been run,
              # which creates the .nyc_output folder containing necessary data
              ./node_modules/.bin/nyc report --reporter=text-lcov > coverage/lcov.info
              ./cc-test-reporter after-build -t lcov
          when: always

      # Upload results

      - store_test_results:
          path: reports

      - store_artifacts: # upload test coverage as artifact
          path: ./coverage/lcov.info
          prefix: tests
Karma
To output JUnit tests with the Karma test runner you can use karma-junit-reporter.
A working .circleci/config.yml section might look like this:
    steps:
      - checkout
      - run: npm install
      - run: mkdir ~/junit
      - run:
          command: karma start ./karma.conf.js
          environment:
            JUNIT_REPORT_PATH: ./junit/
            JUNIT_REPORT_NAME: test-results.xml
          when: always
      - store_test_results:
          path: ./junit
// karma.conf.js
// additional config...
{
reporters: ['junit'],
junitReporter: {
outputDir: process.env.JUNIT_REPORT_PATH,
outputFile: process.env.JUNIT_REPORT_NAME,
useBrowserName: false
},
}
// additional config...Ava for Node.js
A working .circleci/config.yml section for testing might look like the following example:
    steps:
      - run:
          command: |
            yarn add ava tap-xunit --dev # or you could use npm
            mkdir -p ~/reports
            ava --tap | tap-xunit > ~/reports/ava.xml
          when: always
      - store_test_results:
          path: ~/reports
ESLint
To output JUnit results from ESLint, you can use the JUnit formatter.
A working .circleci/config.yml test section might look like this:
    steps:
      - run:
          command: |
            mkdir -p ~/reports
            eslint ./src/ --format junit --output-file ~/reports/eslint.xml
          when: always
      - store_test_results:
          path: ~/reports
RSpec
To add test metadata collection to a project that uses a custom rspec build step, add the following gem to your Gemfile:
gem 'rspec_junit_formatter'And modify your test command to this:
    steps:
      - checkout
      - run: bundle check --path=vendor/bundle || bundle install --path=vendor/bundle --jobs=4 --retry=3
      - run: mkdir ~/rspec
      - run:
          command: bundle exec rspec --format progress --format RspecJunitFormatter -o ~/rspec/rspec.xml
          when: always
      - store_test_results:
          path: ~/rspec
minitest
To add test metadata collection to a project that uses a custom minitest build step, add the following gem to your Gemfile:
gem 'minitest-ci'And modify your test command to this:
    steps:
      - checkout
      - run: bundle check || bundle install
      - run:
          command: bundle exec rake test
          when: always
      - store_test_results:
          path: test/reports
See the minitest-ci README for more info.
Cucumber
For custom Cucumber steps, you should generate a file using the JUnit formatter and write it to the cucumber directory. Following is an example of the addition to your .circleci/config.yml file:
    steps:
      - run:
          name: Save test results
          command: |
            mkdir -p ~/cucumber
            bundle exec cucumber --format junit --out ~/cucumber/junit.xml
          when: always
      - store_test_results:
          path: ~/cucumber
The path: is a directory relative to the project’s root directory where the files are stored. CircleCI collects and uploads the artifacts to S3 and makes them available in the Artifacts tab of the Job page in the application.
pytest
To add test metadata to a project that uses pytest you need to tell it to output JUnit XML, and then save the test metadata:
    steps:
      - run:
          name: run tests
          command: |
            . venv/bin/activate
            mkdir test-results
            pytest --junitxml=test-results/junit.xml

      - store_test_results:
          path: test-results
unittest
unittest does not support JUnit XML, but in almost all cases you can run unittest tests with pytest.
After adding pytest to your project, you can produce and upload the test results like this:
    steps:
      - run:
          name: run tests
          command: |
            . venv/bin/activate
            mkdir test-results
            pytest --junitxml=test-results/junit.xml tests

      - store_test_results:
          path: test-results
Maven Surefire Plugin for Java JUnit Results
If you are building a Maven based project, you are more than likely using the Maven Surefire plugin to generate test reports in XML format. Add the following to the .circleci/config.yml file in your project to collect reports.
    steps:
      - run:
          name: Save test results
          command: |
            mkdir -p ~/test-results/junit/
            find . -type f -regex ".*/target/surefire-reports/.*xml" -exec cp {} ~/test-results/junit/ \;
          when: always
      - store_test_results:
          path: ~/test-results
Gradle JUnit test results
If you are building a Java or Groovy based project with Gradle, test reports are automatically generated in XML format. Add the following to the .circleci/config.yml file in your project to collect reports.
    steps:
      - run:
          name: Save test results
          command: |
            mkdir -p ~/test-results/junit/
            find . -type f -regex ".*/build/test-results/.*xml" -exec cp {} ~/test-results/junit/ \;
          when: always
      - store_test_results:
          path: ~/test-results
PHPUnit
For PHPUnit tests, you should generate a file using the --log-junit command line option and write it to the /phpunit directory. Your .circleci/config.yml might be:
    steps:
      - run:
          command: |
            mkdir -p ~/phpunit
            phpunit --log-junit ~/phpunit/junit.xml tests
          when: always
      - store_test_results:
          path: ~/phpunit
trx2junit for Visual Studio / .NET core tests
Use trx2junit to convert Visual Studio / .NET Core trx output to XML format.
A working .circleci/config.yml section might look like this:
    steps:
      - checkout
      - run: dotnet build
      - run: dotnet test --no-build --logger "trx"
      - run:
          name: test results
          when: always
          command: |
              dotnet tool install -g trx2junit
              export PATH="$PATH:/root/.dotnet/tools"
              trx2junit tests/**/TestResults/*.trx
      - store_test_results:
          path: tests/TestResults
Kaocha
Assuming that your are already using kaocha as your test runner, do these things to produce and store test results:
Add the kaocha-junit-xml plugin to your dependencies
Edit your project.clj to add the lambdaisland/kaocha-junit-xml plugin, or do the equivalent if you are using deps.edn.
(defproject ,,,
  :profiles {,,,
             :dev {:dependencies [,,,
                                  [lambdaisland/kaocha-junit-xml "0.0.76"]]}})
Edit the kaocha config file test.edn to use this test reporter
#kaocha/v1
{:plugins [:kaocha.plugin/junit-xml]
 :kaocha.plugin.junit-xml/target-file "junit.xml"}
Add the store_test_results step your .circleci/config.yml
version: 2.1
jobs:
  build:
    docker:
      - image: circleci/clojure:tools-deps-1.9.0.394
    steps:
      - checkout
      - run: bin/kaocha
      - store_test_results:
          path: junit.xml
test2junit for Clojure tests
Use test2junit to convert Clojure test output to XML format. For more details, refer to the sample project.
CTest for C/C++ Tests
CTest provides a --output-junit flag to additionally store test results to XML format. To use this feature, you will need CMake >=3.21. The XML file is stored relative to the build directory.
A working .circleci/config.yml section for testing might look like the following example:
    steps:
      - checkout
      - run: mkdir build
      - run: cmake -S . -B build
      - run: ctest --test-dir build --output-junit out.xml
      - store_test_results:
          path: build/out.xml
Bats for Bash
Bats provides a --report-formatter junit option to create a JUnit-format report in a location specified by the --output option. A subsequent store_test_results step can be passed to that same location.
The circleci/bats orb’s run job takes care of this functionality for you.
For example, a .circleci/config.yml section for running all *.bats tests within the src/tests folder might look like the following:
version: 2.1

orbs:
  bats: circleci/bats@1.1.0

workflows:
  test-my-app:
    jobs:
      - bats/run:
          formatter: junit
          path: ./src/tests
          timing: true
GoogleTest
GoogleTest provides an XML option for its output flag, which will generate a JUnit XML report that can be used to upload and view test results on CircleCI.
    steps:
      - attach_workspace:
          at: .
      - run:
          name: Execute Tests
          command: |
            cd build
            ./tests --gtest_output=XML
      - store_test_results:
          path: build
You can see a full example on this third party resource.
Xcode
Xcode generates test results in a Xcode Test Results (.xcresult) bundle format.
To integrate with CircleCI’s test results features you will need to convert your Xcode Test Result bundle to the JUnit XML format.
Playwright
    steps:
      - run:
          command: |
            mkdir test-results #can also be switched out for passing PLAYWRIGHT_JUNIT_OUTPUT_NAME directly to Playwright
            pnpm run serve &
            pnpm playwright test --config=playwright.config.ci.ts --reporter=junit

      - store_test_results:
path: results.xml| Ensure that you are using version 1.34.2 or later of Playwright. Earlier versions of Playwright may not output JUnit XML in a format that is compatible with some of CircleCI’s testing features. |
Cypress
    steps:
      - run:
          command: |
            npm install --save-dev cypress-multi-reporters mocha-junit-reporter
            cypress run --reporter cypress-multi-reporters --reporter-options configFile=reporter-config.json ...<other options>

      - store_test_results:
          path: results.xml
WebdriverIO
Update your wdio.conf.js to use the JUnit reporter:
// wdio.conf.js
module.exports = {
    // ...
    reporters: [
        'dot',
        ['junit', {
            outputDir: './test-results',
            outputFileFormat: function(options) { // optional
                return `results-${options.cid}.${options.capabilities}.xml`
            }
        }]
    ],
    // ...
};
Update your .circleci/config.yml to upload the test results to CircleCI.
    steps:
      - run:
          command: |
            npm install @wdio/junit-reporter --save-dev
            wdio wdio.test.conf.js

      - store_test_results:
          path: ./test-results
API
To access test metadata for a job from the API, refer to the test-metadata API documentation.