Deploy application environments on demand with the Quali Torque orb

Director of Business Development, Quali

Most developers care about building the next big thing. Automating your build, test, and release processes allows you to maintain focus on innovating and delivering value to your users. By combining the power of best-in-class CI/CD workflow orchestration with managed environments-as-a-service, developers can stay focused on building what’s next.
The Quali Torque orb lets developers trigger application environments on demand directly from their CircleCI pipelines. CircleCI users can easily integrate the Torque environments-as-a-service platform into their projects by utilizing the Torque orb’s pre-defined commands. In this tutorial, we will demonstrate how to set up a Torque account and application environment as well as how to automatically deploy your environments from your CircleCI pipelines using the Torque orb.
Setting up an application environment in the Torque UI
You need to follow just a few simple steps to get up and running with a fully functional environment. To get started, sign up for a free Torque account and set your password, then follow the steps below.
Define your cloud account in Torque
The next step, typically done by an administrator, is to define a cloud account in Torque. Navigate to the Admin Console from the left side menu. Click Connect a Cloud in the Cloud Accounts Admin section, then follow the instructions for setting up an account on AWS, Azure, or Kubernetes.

In this example, we will use AWS as our cloud provider.
Add a blueprint repository
In Torque, templates for your application environments are called blueprints. Torque follows the developer’s best practices, and all blueprints are stored in a source control repository and automatically synchronized. We currently support GitHub and Bitbucket and are actively adding more support. Check the Torque site for the latest integrations.
In the following example, we will use GitHub.
In GitHub, create a repository. Copy the repository’s URL. We recommend creating a repository by forking the sample repository (in the Sample space).
Next, in Torque, perform the following steps:
- Access your space.
- Open the Settings page.
- Click the Repositories tab. You can set two different repositories in the space, one for sandbox and another for production environments. In our example, we will set up a repo for sandbox environments.
- Click Add a Repository.
- Select the source control tool you wish to use (GitHub) and paste the copied URL in the Add a GitHub Repository pop-up window.
- Click Connect.
- Authorize Torque’s access to your GitHub repository.

Model your blueprint
The DevOps engineer models a blueprint representing the desired application and its infrastructure. Each blueprint can have input parameters, custom tagging and may differ depending on the stage of the pipeline.
There are several ways to create blueprints in Torque:
- Using our YAML native language from the sample repository, which contains examples that you can leverage to create a new blueprint
- By importing an existing Terraform template
- By importing an existing Helm chart
Let’s go over an example application that we will use in the rest of this project. This application is called Promotions Manager. It is a simple e-commerce sales tool that generates promotional offers.
The DevOps team would like to model the Promotions Manager application environment in Torque, integrate it into an automated CircleCI workflow, and use it to automatically test the latest release.
In this case, we are using the YAML approach and drawing from an existing blueprint that our team is working on. Use your favorite IDE to edit the YAML code and check it into the Git repository you defined in Torque in the previous step.

For your reference, this blueprint is available in the demo repository for this tutorial.
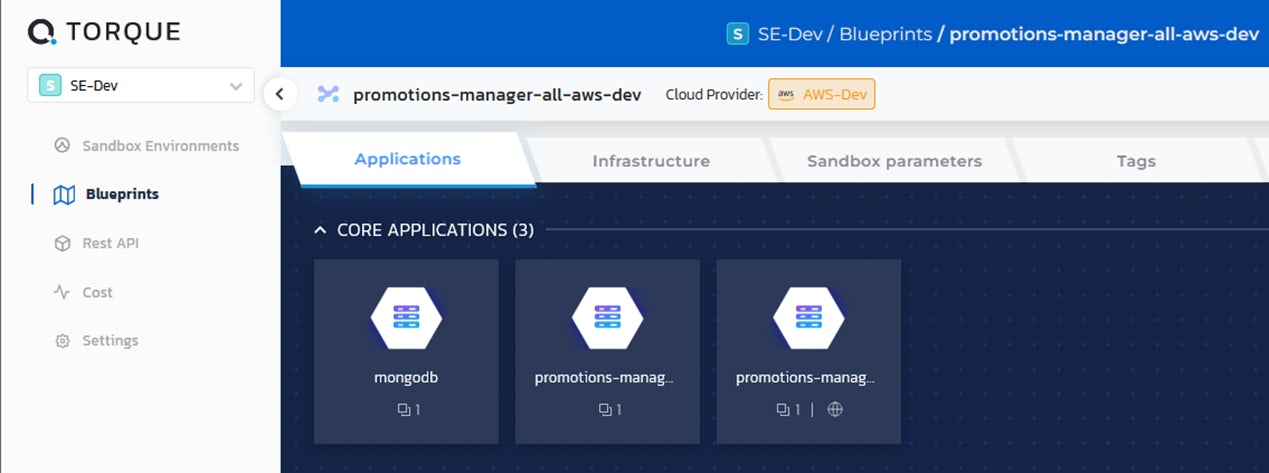
Our blueprint has three application services:
- A backend database running on MongoDB
- An API server
- A web server
We will deploy this application on AWS, the cloud provider we defined in the cloud account settings section.

Once your blueprint shows up in the Torque blueprint catalog, you can publish it using the toggle and test it to ensure it deploys correctly before including it in your CircleCI workflow.

To test it, navigate to Sandbox environments and select the blueprint from the catalog. Next, set the sandbox parameters. You can leave all the parameters as default and enter a name.

Finally, launch the sandbox and verify it deploys correctly.

You can also click on the quick link and check your application’s web UI front end.

Now that you are confident your application deploys correctly in Torque, you can end the sandbox or let it end automatically as defined in the sandbox Duration parameter.
Automating the deployment of application environments as part of a CI workflow
The next step is to create a project in CircleCI and include commands from the Torque orb registry in your config file. To complete this section of the tutorial, you will need to sign up for a CircleCI account if you don’t have one already.
In our example, we will log in to CircleCI using our GitHub account and connect the Git repository defined for our Torque blueprint.
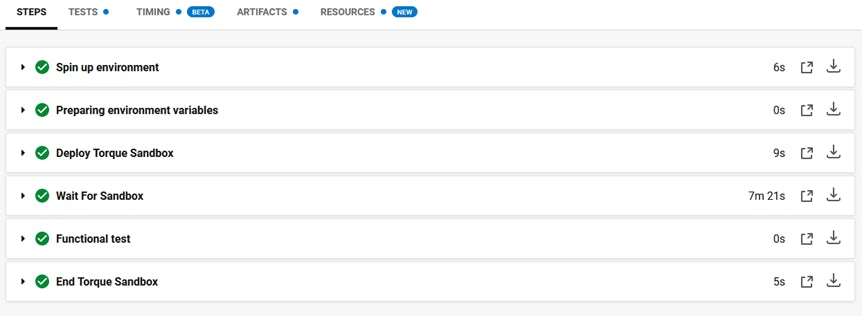
We will create a simple project that will start a sandbox to deploy our Promotions Manager blueprint, run a test, and terminate that sandbox.
Note: In a typical scenario, you would want to test the latest version of your application code. That means you would also add a build step as a trigger point of your workflow and make it the first step of the project.
Once your repository is listed in the list of projects, you will configure the environment variables to define your Torque context.
Configure your CircleCI pipeline
In the CircleCI web app, navigate to the Projects section and select Project Settings from the menu next to your Promotions Manager repository. Then navigate to the Environment Variables page.

Next, add the following three variables:
- TORQUE_SERVER: The URL of your Torque server (
https://app.qtorque.io) - TORQUE_SPACE: The name of your space in Torque, available in the upper left corner of the screen when you are logged in to Torque
- TORQUE_TOKEN: In Torque, navigate to Settings > Integrations tab and select CircleCI. Click Connect and then New Token. Enter the value generated for this variable.

Next, you are ready to generate your CircleCI project’s config.yml file. Go back to your project, and select Configuration File.

We will use the steps defined in the Torque orb repository:
start-sandbox: Deploys a Torque sandboxend-sandbox: Terminates a Torque sandbox
We will also run a quick test that will retrieve the application endpoint — feel free to add your own health check, security test, or performance validation as needed.
In our promotion application example, the config file will be the following (taken directly from our sample repo):
version: 2.1

orbs:
  torque: quali/torque@1.0.0
  aws-s3: circleci/aws-s3@1.0.11
jobs:
  test:
    docker:
      - image: circleci/ruby:2.4.1
    steps:
      - torque/start-sandbox:
          sandbox-name: "circleci-test"
          blueprint: "promotions-manager-all-aws-dev"
          inputs: "{'AWS_INSTANCE_TYPE': 'm5.large','PORT':'3000','API_PORT':'3001', 'RELEASE_NUMBER':'none', 'API_BUILD_NUMBER':'none'}"
          artifacts: "{'promotions-manager-ui':'artifacts/latest/promotions-manager-ui.master.tar.gz','promotions-manager-api':'artifacts/latest/promotions-manager-api.master.tar.gz', 'mongodb': 'artifacts/test-data/test-data-db.tar' }"
      - run:
          name: Functional test
          command: |
            SB_ENDPOINT="SB_${SANDBOX_ID}_SHORTCUT_1"
            echo "Checking Sandbox ${!SB_ENDPOINT}"
      - torque/end-sandbox:
          sandbox-id: SANDBOX_ID
workflows:
  testpromotionmanager:
    jobs:
      - test
Make sure to specify all the input parameters (comma-separated lists) to start the sandbox. The first time you run this flow, use the same values you did when you tested the deployment of your application directly in Torque.
In the backend, this workflow calls the Torque REST API to trigger the deployment of a sandbox environment based on the blueprint name and optional parameters. Similarly, once the test is complete, the sandbox environment is terminated, and the infrastructure is reset to its initial state.
Run the pipeline
The last step is to run your continuous integration pipeline. You can do that directly from the CircleCI UI (the first time you create or modify the configuration file) or automatically, based on the latest code merge to the main branch.

Conclusion
In a few steps, you were able to automate the deployment and testing of your application in a fully automated way. You can very quickly build and run a more complex pipeline using a similar approach, to release your own multiservice cloud application from dev to test, all the way to production.
For additional information, check out the Torque community and visit CircleCI’s partner profile on the Quali site.


