Deploying your Gradle Build Cache Node using GCP

Senior Software Engineer at Premise Data

This tutorial is a follow-up to TurboCharging your Android Gradle builds using build cache.
The key focus of this post is the remote build cache, a build speed acceleration technology that can be implemented for both local and CI builds. This is a technology worth knowing about because:
- Without a cache system in place, every build is a new, clean build so the entire project builds from scratch, even for a small change.
Gradle provides a build cache node available as a Docker image. You can host this image in a number of ways. In this tutorial, I will lead you through the steps of setting up a build cache node on GCP (Google Cloud Platform), a free tool.
Prerequisites
To follow this tutorial, a few things are required:
- Basic understanding of the Gradle build tool
- Knowledge of how to set up an Android project on CircleCI
- Knowledge of the Android build process
- Basic knowledge of GCP virtual machine (VM) instances, firewalls, and how both work
Create and access your Google Console account
To get started, you will need to create or access your Google Cloud Platform account. Note: If you are setting up your console for the first time, agree to terms of service, then click the Agree and Continue button.

To access the free tier products on GCP, select the Getting Started option from the Navigation menu. Then click the Get Started For Free button.
 : .zoomable }
Start by verifying your account information.

Next, enter a valid phone number. Google will send you a confirmation text. After you complete the verification, click the Continue button.

Although the next step requires you to enter you payment information, you will not be charged unless you turn on automatic billing.

When you successfully complete the verification process, you will see a confirmation message. Click Got it to proceed.
Now that you have set up the console to use the free tier products, you can go on to the build cache node setup.
Setting up the build cache node
The build cache node setup is a 2 part process on the GCP instance:
- Creating a firewall rule under the VPC Network section
- Creating a VM instance under the Compute Engine section
By leveraging the Build Cache Node User Manual and adding some customized configurations for GCP, you can set up your build cache nodes.
Configuring a Virtual Private Cloud (VPC) network
A VPC network is a virtual version of a physical network, implemented inside of Google’s production network. It does a bunch of things but of importance is that it provides connectivity for your Compute Engine Virtual Machine (VM) instances. This is important because by default, incoming traffic from outside your network is blocked. That means we need to create a firewall rule to control incoming or outgoing traffic to our build cache node VM instance.
Creating the firewall rule
On the Google console dashboard, navigate to: Networking > VPC Network > Firewall. Click Enable to enable Compute Engine if you are prompted to do so. Then, click the Create Firewall Rule button.
Enter firewall rule details:
- In the Name field, enter
gradle-firewall-rule - In the Description field, enter
Ingress firewall rule for the Gradle build cache node - Specify target tags as gradle-build-cache-node-tag
- Enter
0.0.0.0/0 192.168.2.0/24as source IP ranges - Specify protocols and ports as
tcp: 5071
When the details are entered, click the Create button.
Setting up GCP to launch virtual machines
Google Compute Engine (GCE) is the Infrastructure as a Service (IaaS) component of Google Cloud Platform (GCP). GCP is built on the global infrastructure that runs Google’s search engine, Gmail, YouTube, and other services. Google Compute Engine enables users to launch virtual machines (VMs) on demand.
To create the VM instance, go to the Google Cloud Console dashboard, navigate to Compute > Compute Engine > VM instances, and click the Create Instance button.
Enter VM instance details:
- In the Name field, enter
gradle-build-cache-node. - Select
Europe-north1 (Finland)as the region. Choose one that is close to you and your development team. - Select
europe-north1-aas the Zone. - For Machine Configuration, enter
N1for Series. - Enter
n1-standard-1(1 vCPU, 3.75 GB memory) for Machine Type.

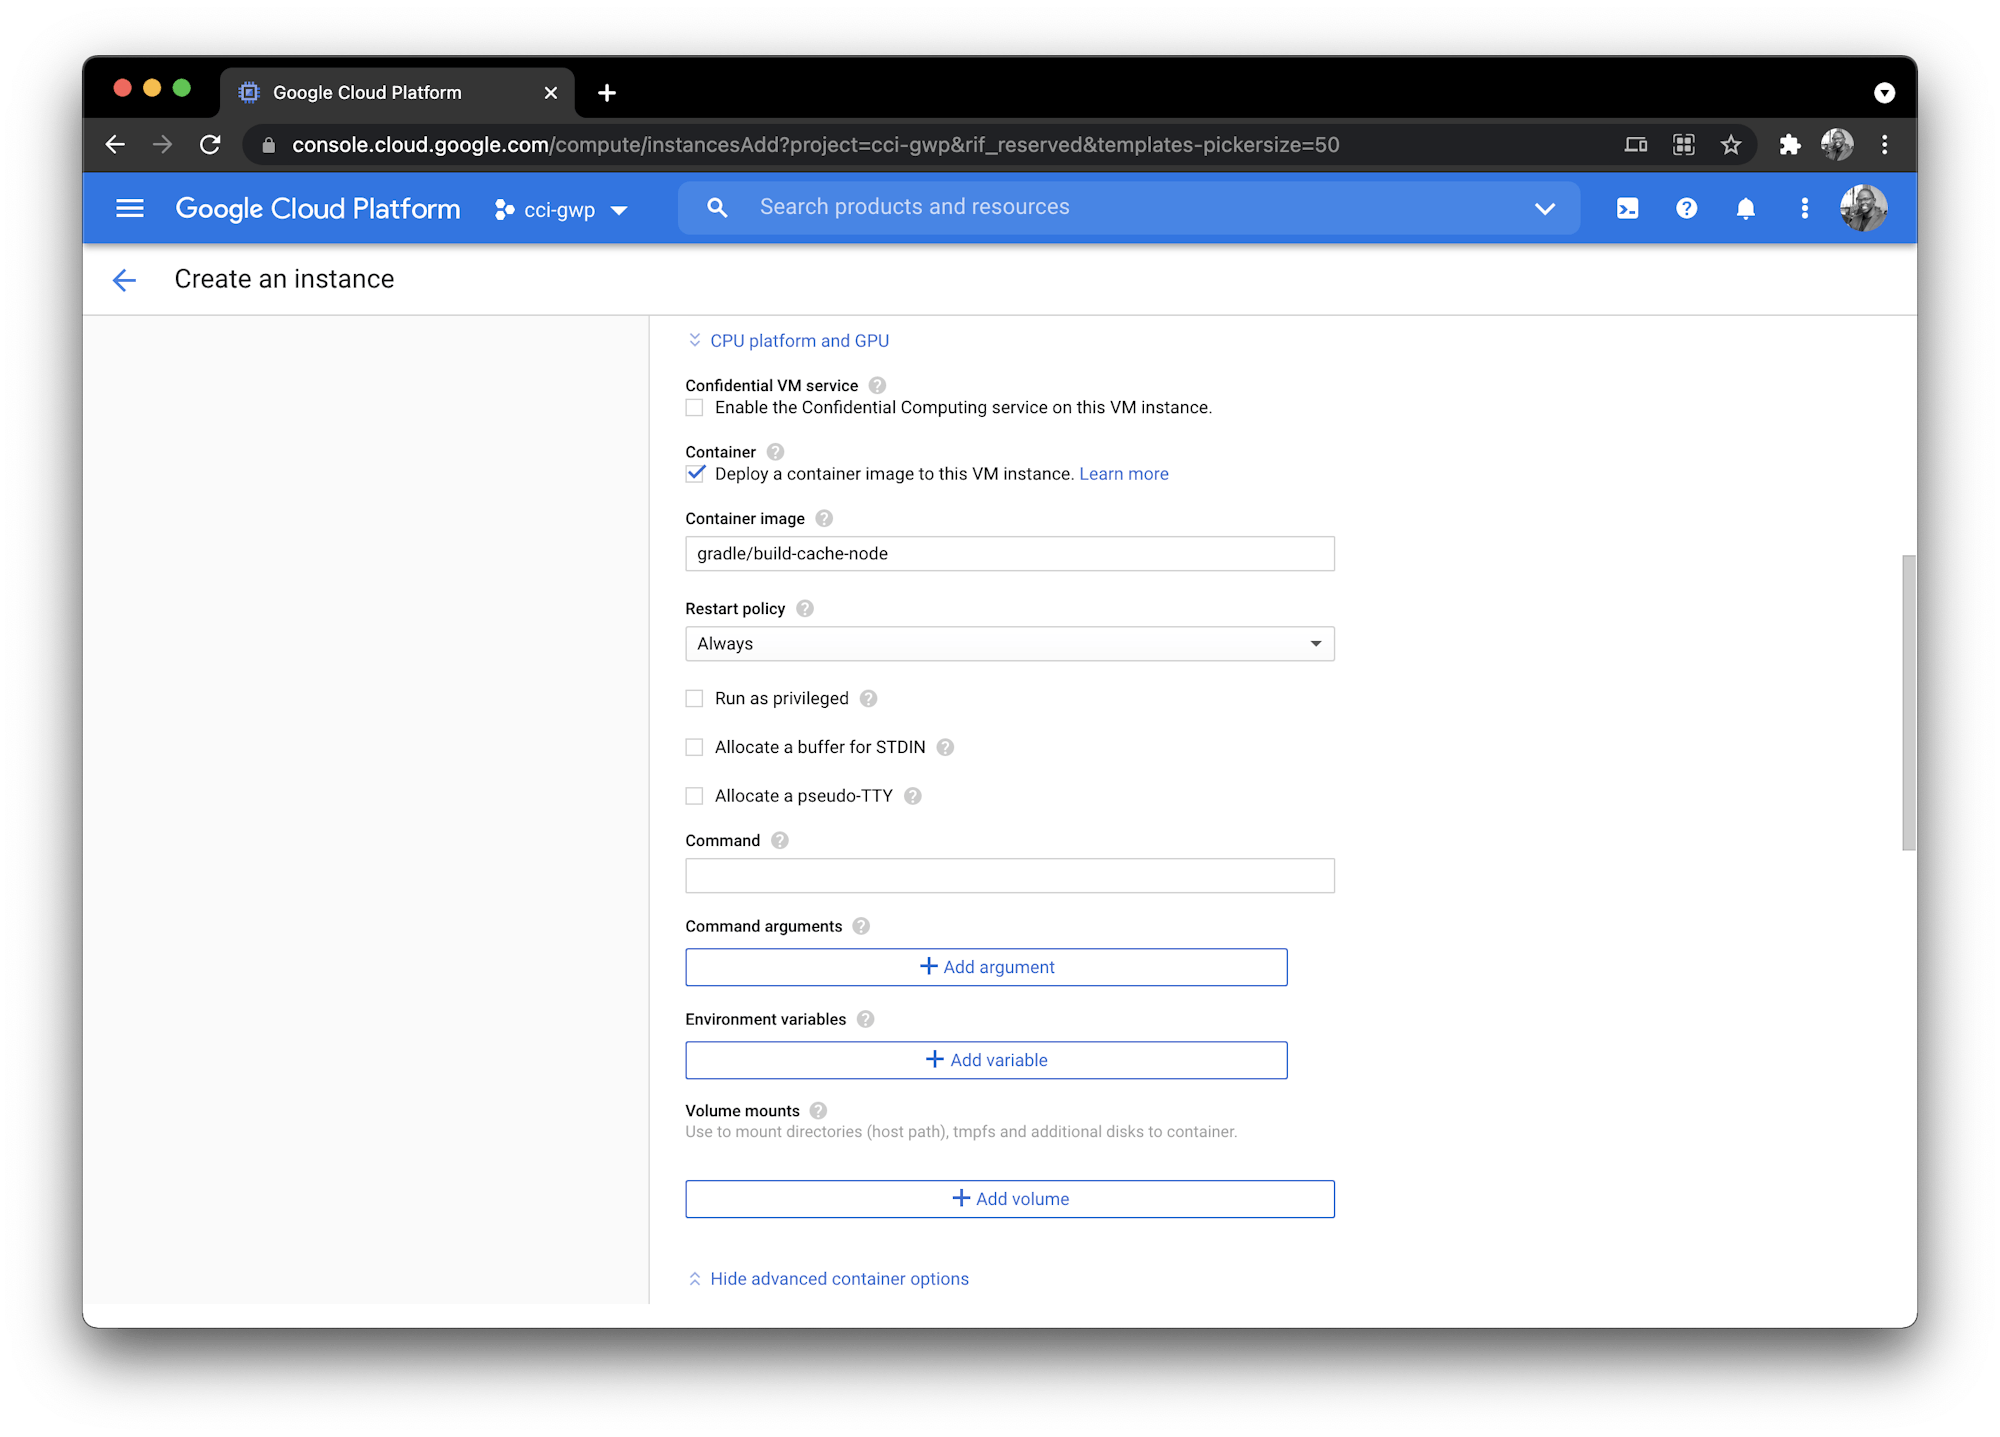
Next, select Deploy a container image to this VM instance. In the Container Image field, enter gradle/build-cache-node.

We also need to set up a disk volume for our build cache to use. Expand Advanced container options and click Add Volume. Then add these parameters:
- For Volume Type, add
Directory. - For Mount path, add
/data. - For Host path, add
/home/build-cache. - Select
Read/writemode.

Complete the firewall configuration
Your next task is to add tags and firewall rules to allow specific network traffic from the Internet. Expand the Management, security, disks, networking, sole tenancy section and select the Networking tab. Then add the firewall rule we created earlier:
gradle-build-cache-node-tag

Click Create and wait for your new VM to spin up.

Use the VM to access the cache node
To access the cache node via the VM instance’s external IP, append :5071 to the end of your external IP address. You can find the external IP address on the Google console.
Note: If you get a message that the site can’t provide a secure connection, access the IP via HTTP and not HTTPS.

Configure access control for the build cache
This next step is important because we are implementing the UI Authorization security check. By default, the built-in cache node allows any user to store and retrieve entries from the cache. This is not ideal because unauthorized users can store, retrieve and delete cache entries. The only system allowed to make changes to the build cache node is your CI server, making it your single source of truth.
To change this, collapse the Settings section under Build Cache. Click Add user, and give the new user a username, password, and access level of Read & write. Read & write access allows storing artifacts. The (notes) field is not required, but it is helpful if there are multiple users for different scenarios.
Once a user has been added to the system, it is possible to restrict anonymous access to None for no access or Read for read-only access.
Click Save to store the credentials and permissions.

The recommended approach is to create a user with Read & write access, and restrict anonymous access to Read only. CI builds then authenticate as the user and write to the cache, while developers connect anonymously and only read from the cache.
Note: If you try to access the cache node and you aren’t authorized, you will get a response status 401: Unauthorized error.
Cache access control on an Android project
You can configure the credentials the HttpBuildCache uses to access the build cache server as shown in the settings.gradle file.
buildCache {
    remote(HttpBuildCache) {
        url = 'https://example.com:8123/cache/'
        credentials {
            username = 'build-cache-user'
            password = 'C0mplic@ted-pa$$worD'
        }
    }
}
Run CI build to verify the working cache node
Now, we need to make sure that the Gradle build cache is working as expected. Push the changes you made to your settings.gradle file to the GitHub repository. This push triggers the CI build.
Once the build successfully completes, there will be some artifacts stored in the build cache as shown on the UI dashboard.

Conclusion
In this tutorial, you have learned how to create and run a Gradle build cache node using a GCP VM instance. You updated your app and pushed its cache to it. You now have experience using build speed acceleration technology that you can use for your local and CI builds. With a cache system in place, you no longer need to run the entire project from scratch. This saves your team time and resources, and lets you push smaller fixes and updates more often, so you can add features and fix bugs faster.


