Test and deploy containerized PyTorch models to Heroku

Software Engineer

PyTorch is an open source machine learning (ML) framework that makes it easy for researchers and developers to move their projects from prototyping to production. With PyTorch, you don’t have to learn complex C++ code - you can use regular Python for your ML projects. This makes it a great choice for anyone who wants to get started quickly and easily with ML.
In Test PyTorch Models and REST APIs using Flask and CircleCI, we learned how to create a PyTorch model using Flask and expose it as a REST API for getting predictions. This tutorial extends the previous one and walks you through the steps for deploying the model to Heroku, which is a popular platform that enables developers to build, run, and operate applications entirely in the cloud.
You will learn how to containerize the Flask API and deploy it to Heroku as a Docker container. You will also learn how to set up a simple CI/CD pipeline to automatically test and deploy the containerized application with every change to your model.
Prerequisites
For this tutorial, you need to set up a Python development environment on your machine. You also need a free CircleCI account to automate the testing and deployment of the PyTorch model and the REST API.
Refer to this list to set up everything required for this tutorial:
- Download and install Python
- Create a CircleCI account
- Create a Heroku account if you don’t have one
- Install Heroku CLI on your system (not necessary if you are using a Mac with Apple Silicon chip)
- Download and install Docker on your system
Creating a new Python project
First, create a new directory for your Python project and navigate into it.
mkdir circleci-pytorch-heroku-docker-deploy
cd circleci-pytorch-heroku-docker-deploy
Installing the Dependencies
In this tutorial, we will use the torchvision Python package for the PyTorch model and Flask for exposing the model’s prediction functionality as a REST API. We will also use the requests package for network calls.
Create a requirements.txt file in the project’s root and add the following content to it:
Flask
torchvision==0.16
requests
torch==2.1
gunicorn
pytest-docker
Notice the specific version of torchvision and torch packages. This works for Python >=3.8 to <=3.11.
If you are using a different version of Python, you can refer to the table here to install the right version of torch and torchvision packages for your Python version. You can also refer to the PyTorch documentation to find the list of previous versions of torch package and their matching torchvision package versions.
Edit the requirements file accordingly, if necessary, then install the dependencies using the pip install command:
pip install -r requirements.txt
Ideally, use a virtual environment.
Defining the inference script
First, create an imagenet_class_index.json file at the root of the project and add the class mappings to it from this file. Simply copy-and-paste to the file you created.
Next, create a predict.py file at the root of the project with the following code snippet to it.
import io
import json

from torchvision import models
import torchvision.transforms as transforms
from PIL import Image
from torchvision.models import DenseNet121_Weights

imagenet_class_index = json.load(open("imagenet_class_index.json"))
model = models.densenet121(weights=DenseNet121_Weights.IMAGENET1K_V1)
model.eval()

def transform_image(image_bytes):
    my_transforms = transforms.Compose(
        [
            transforms.Resize(255),
            transforms.CenterCrop(224),
            transforms.ToTensor(),
            transforms.Normalize([0.485, 0.456, 0.406], [0.229, 0.224, 0.225]),
        ]
    )
    image = Image.open(io.BytesIO(image_bytes))
    return my_transforms(image).unsqueeze(0)

def get_prediction(image_bytes):
    tensor = transform_image(image_bytes=image_bytes)
    outputs = model.forward(tensor)
    _, y_hat = outputs.max(1)
    predicted_idx = str(y_hat.item())
    return imagenet_class_index[predicted_idx]
In later sections, we will pass the input image to the get_prediction function and get the predicted class as a response. You can refer to this tutorial for a detailed explanation of the functions defined in this code snippet.
Next, let’s create unit tests for the inference script. First, create a utils.py file in the project root and add the following code snippet to it:
import requests

def download_image(url, filename):
    response = requests.get(url)
    if response.status_code == 200:
        with open(filename, "wb") as f:
            f.write(response.content)
        return filename
    else:
        raise Exception(f"Unable to download image from {url}")

def get_bytes_from_image(image_path):
    return open(image_path, "rb").read()
Next, define a unit test to test the DenseNet 121 model against a local image of a cat.
Create a test_predict.py file in the project root and add the following code snippet to it:
import unittest

from predict import get_prediction
from utils import get_bytes_from_image

class TestDenseNetModel(unittest.TestCase):
    def test_cat_image_inference(self):
        img_bytes = get_bytes_from_image("./test_images/cat_image.jpeg")

        prediction = get_prediction(img_bytes)

        self.assertEqual(prediction, ["n02124075", "Egyptian_cat"])
Note: Before proceeding, get the test_images folder (with a single image of a cat), from the attached GitHub repo and add it to your working directory.
You can run the test by executing the following command:
pytest ./
The test should pass and you should see a similar output to the following:
====================== test session starts ======================
platform darwin -- Python 3.11.8, pytest-8.1.1, pluggy-1.4.0
rootdir: ...circleci-pytorch-heroku-docker-deploy
plugins: docker-3.1.1
collected 1 item

test_predict.py .item

test_predict.py .                                          [100%]

====================== 1 passed in 28.01s =======================
Defining a Flask web server
Next, we will create a Flask app using Python3 and a /predict endpoint to get model predictions. To define the Flask app create a file - app.py at the root of the project and add the following code snippet to define a simple Flask app.
from flask import Flask, jsonify, request

from utils import download_image, get_bytes_from_image
from predict import get_prediction

import os

app = Flask(__name__)
tmp_dir = "/tmp"

@app.route("/")
def index():
    return "Welcome to the Image Classification API!"

@app.route("/predict", methods=["POST"])
def predict():
    if request.method == "POST":
        imageUrl = request.form["image_url"]
        print("imageUrl", imageUrl)
        try:
            filename = download_image(imageUrl, tmp_dir + "/image.jpg")

            img_bytes = get_bytes_from_image(filename)

            class_id, class_name = get_prediction(image_bytes=img_bytes)
            return jsonify({"class_id": class_id, "class_name": class_name})
        except Exception as e:
            print(e)
            return jsonify({"error": str(e)}), 500

if __name__ == "__main__":
    app.run(debug=True, host="0.0.0.0", port=int(os.environ.get("PORT", 8000)))
Let’s go over the above code snippet:
- The
predictfunction acceptsimage_urlas input, downloads the image to a temporary directory, and passes it to theget_predictionmethod defined in the previous section. - When the script is executed directly,
app.run()runs the Flask application on host0.0.0.0and the specified port in the environment variables. If the environment variable is not set, it defaults to port5000.
To test the API endpoint, first start the Flask web server by executing the following command:
flask --app app run
It will start a web-server at http://localhost:5000 and you can test the prediction API using curl.
curl --location 'http://127.0.0.1:5000/predict' \
--form 'image_url="https://raw.githubusercontent.com/CIRCLECI-GWP/pytorch-heroku-docker-deploy/main/test_images/cat_image.jpeg"'
You should see a response similar to the following:
{"class_id":"n02124075","class_name":"Egyptian_cat"}
It works!
Next, let’s define unit tests for the API endpoint. First, create a test_app.py in the project’s root and add the following code snippet to it:
from app import app

import unittest

class TestPredictionsAPI(unittest.TestCase):
    def test_cat_image_response(self):
        self.app = app
        self.client = self.app.test_client

        request = {
            "image_url": "https://raw.githubusercontent.com/CIRCLECI-GWP/pytorch-heroku-docker-deploy/main/test_images/cat_image.jpeg"
        }

        response = self.client().post("/predict", data=request)
        self.assertEqual(response.status_code, 200)
        self.assertEqual(response.json["class_id"], "n02124075")

    def test_invalid_image_response(self):
        self.app = app
        self.client = self.app.test_client

        request = {"image_url": "https://i.imgur.com/THIS_IS_A_BAD_URL.jpg"}

        response = self.client().post("/predict", data=request)
        self.assertEqual(response.status_code, 500)
This code snippet defines test cases for both success and failure scenarios.
- The first unit test,
test_cat_image_responseruns against a cat image and asserts that the prediction response matches the expected class ID. - The second test,
test_invalid_image_responseuses an invalid image URL. As expected, in this scenario, the API should throw a500error code.
You can run the test by executing this command:
pytest ./
The test should pass and your output should be similar to this:
====================== test session starts ======================
platform darwin -- Python 3.11.8, pytest-8.1.1, pluggy-1.4.0
rootdir: ...circleci-pytorch-heroku-docker-deploy
plugins: docker-3.1.1
collected 3 items

test_app.py ..                                             [ 66%]
test_predict.py .                                          [100%]

================ 3 passed in 208.29s (0:03:28) ==================
Defining the Dockerfile
In this section, we will define a Dockerfile to containerize the Flask application. We will use a python:3.10-slim base image to create the container.
Create a Dockerfile in the project’s root and the following content to it:
FROM python:3.10-slim
ARG port

USER root

WORKDIR /opt/app-root/

ENV PORT=$port

RUN apt-get update && apt-get install -y --no-install-recommends apt-utils \
    && apt-get -y install curl \
    && apt-get install libgomp1

COPY requirements.txt /opt/app-root/

RUN chgrp -R 0 /opt/app-root/ \
    && chmod -R g=u /opt/app-root/ \
    && pip install pip --upgrade \
    && pip install -r requirements.txt --no-cache-dir

COPY . /opt/app-root/

EXPOSE $PORT

CMD gunicorn app:app --bind 0.0.0.0:$PORT --preload
The Docker script performs the following steps:
- It installs some
apt-getpackages required to run our application. - Copies the
requirements.txtfile to the working directory and runspip installto install the Python dependencies. - It copies all the other files to the working directory.
- Next, it exposes the port number passed as an argument.
- Finally, it uses
gunicornto run the Flask application on the specified port. Note that instead of runningflask --app app run, we are using gunicorn which is a Python WSGI HTTP Server for UNIX.
Building and testing the container locally
Next, let’s build and test the Docker container locally before automating future deployments.
Note: Ensure that the Docker daemon is running in the background before invoking the docker commands below.
To build the Docker container, run the following command in the project’s root.
docker image build -t circleci-pytorch-flask-docker-heroku .
Note: If you are using a Mac with Apple Silicon chip, use the --platform linux/amd64 flag to set the build architecture.
Next, to run the containerized Flask application, execute the following command:
docker run -d -p 8000:8000 -e PORT=8000 circleci-pytorch-flask-docker-heroku
Note: Similar to the build step, use the --platform linux/amd64 flag to set the build architecture for Mac with Apple Silicon chip, if applicable
The outputs of the above commands should not contain any errors.
The above command runs the application as a Docker container and maps port 8000 on the container to your local port 8000. You can test the prediction API using curl.
curl --location 'http://0.0.0.0:8000/predict' \
--form 'image_url="https://raw.githubusercontent.com/CIRCLECI-GWP/pytorch-heroku-docker-deploy/main/test_images/cat_image.jpeg"'
In addition to running the application using Docker, you can also invoke the unit tests on it by executing the following command:
docker run circleci-pytorch-flask-docker-heroku pytest
Note: The following command should execute successfully. In some instances, a warning on the potential mismatch of platforms may be raised (for example: “linux/amd64” and “linux/arm64/v8”). Simply wait for the command to complete.
Deploying to Heroku using the CLI
In this section, we will create a Heroku app from the CLI and deploy the Dockerized application to it.
Creating a Heroku application
To create a Heroku application, first login to your Heroku account by executing the following command:
heroku login
It will prompt you to enter your credentials for authentication. Once login succeeds, execute the following command to create a Heroku application:
heroku create densenet-demo-app-circleci
We are using densenet-demo-app-circleci as the application name but you should replace it with a different name.
Deploying the application
First, create a heroku.yml file in the project’s root and add the following code snippet to it:
build:
  docker:
    web: Dockerfile
Next, let us set the application stack to container.
heroku stack:set container -a densenet-demo-app-circleci
Note: We are setting the stack as container since we will be deploying the application as a Docker container. You can learn more about Heroku stacks in the Heroku dev center.
Next, log into Heroku’s container registry:
heroku container:login
Finally, execute the following command to deploy the application to Heroku:
heroku container:push -a 'densenet-demo-app-circleci' web
Note: If you are using a Mac with an Apple Silicon chip, this command will throw an error. Continue to the next section to use CircleCI’s CI pipeline for testing your setup if you don’t have access to another device.
On executing the above command, Heroku CLI will first create a Docker image using the Dockerfile defined in the project root, push the container to the Heroku container registry, and deploy your application.
Automating deployment using CircleCI
Now that you have deployed the application to Heroku using the CLI, let us automate future deployments using CircleCI. In addition to deploying the containerized application to Heroku, we will use CircleCI to run unit tests too.
Adding the configuration script
First, add a .circleci/config.yaml script in the project’s root containing the configuration file for the CI pipeline. Add this code snippet to it.
jobs:
  # Build the docker image and run tests.
  build_and_test:
    executor: heroku/default
    steps:
      # For using docker commands.
      - setup_remote_docker

      # Build the docker image for testing.
      - checkout
      - run: docker build -t densenet-inference-heroku .

      # Run pytest in the docker container.
      - run:
          command: docker run densenet-inference-heroku pytest

  # Build the docker image and deploy it to Heroku.
  build_and_deploy:
    executor: heroku/default
    steps:
      # For using docker commands.
      - setup_remote_docker

      # Build the docker image
      - checkout
      # Deploy to Heroku
      - heroku/install
      - run: heroku stack:set container -a "${HEROKU_APP_NAME}"
      - heroku/deploy-via-git:
          app-name: "${HEROKU_APP_NAME}"

orbs:
  # For using Heroku CLI commands.
  heroku: circleci/heroku@2.0

version: 2.1
workflows:
  heroku_deploy:
    jobs:
      - build_and_test
      - build_and_deploy:
          requires:
            # Deploy after testing.
            - build_and_test
Take a moment to review the CircleCI configuration:
- The config defines the
build_and_testandbuild_and_deployjobs. Both use the circleci/heroku orb to simplify configuration. - The
build_and_testjob builds the Docker image and runs the unit tests on the generated container. - The
build_and_deployjob is dependent on the success ofbuild_and_testjob. When all tests pass, it installs the Heroku CLI, logs into your Heroku account, sets the application stack, and deploys the application.
Now that the configuration file has been set up, create a repository for the project on GitHub and push all the code to it. Review Pushing a project to GitHub for instructions.
Setting up the project on CircleCI
Next, log in to your CircleCI account.
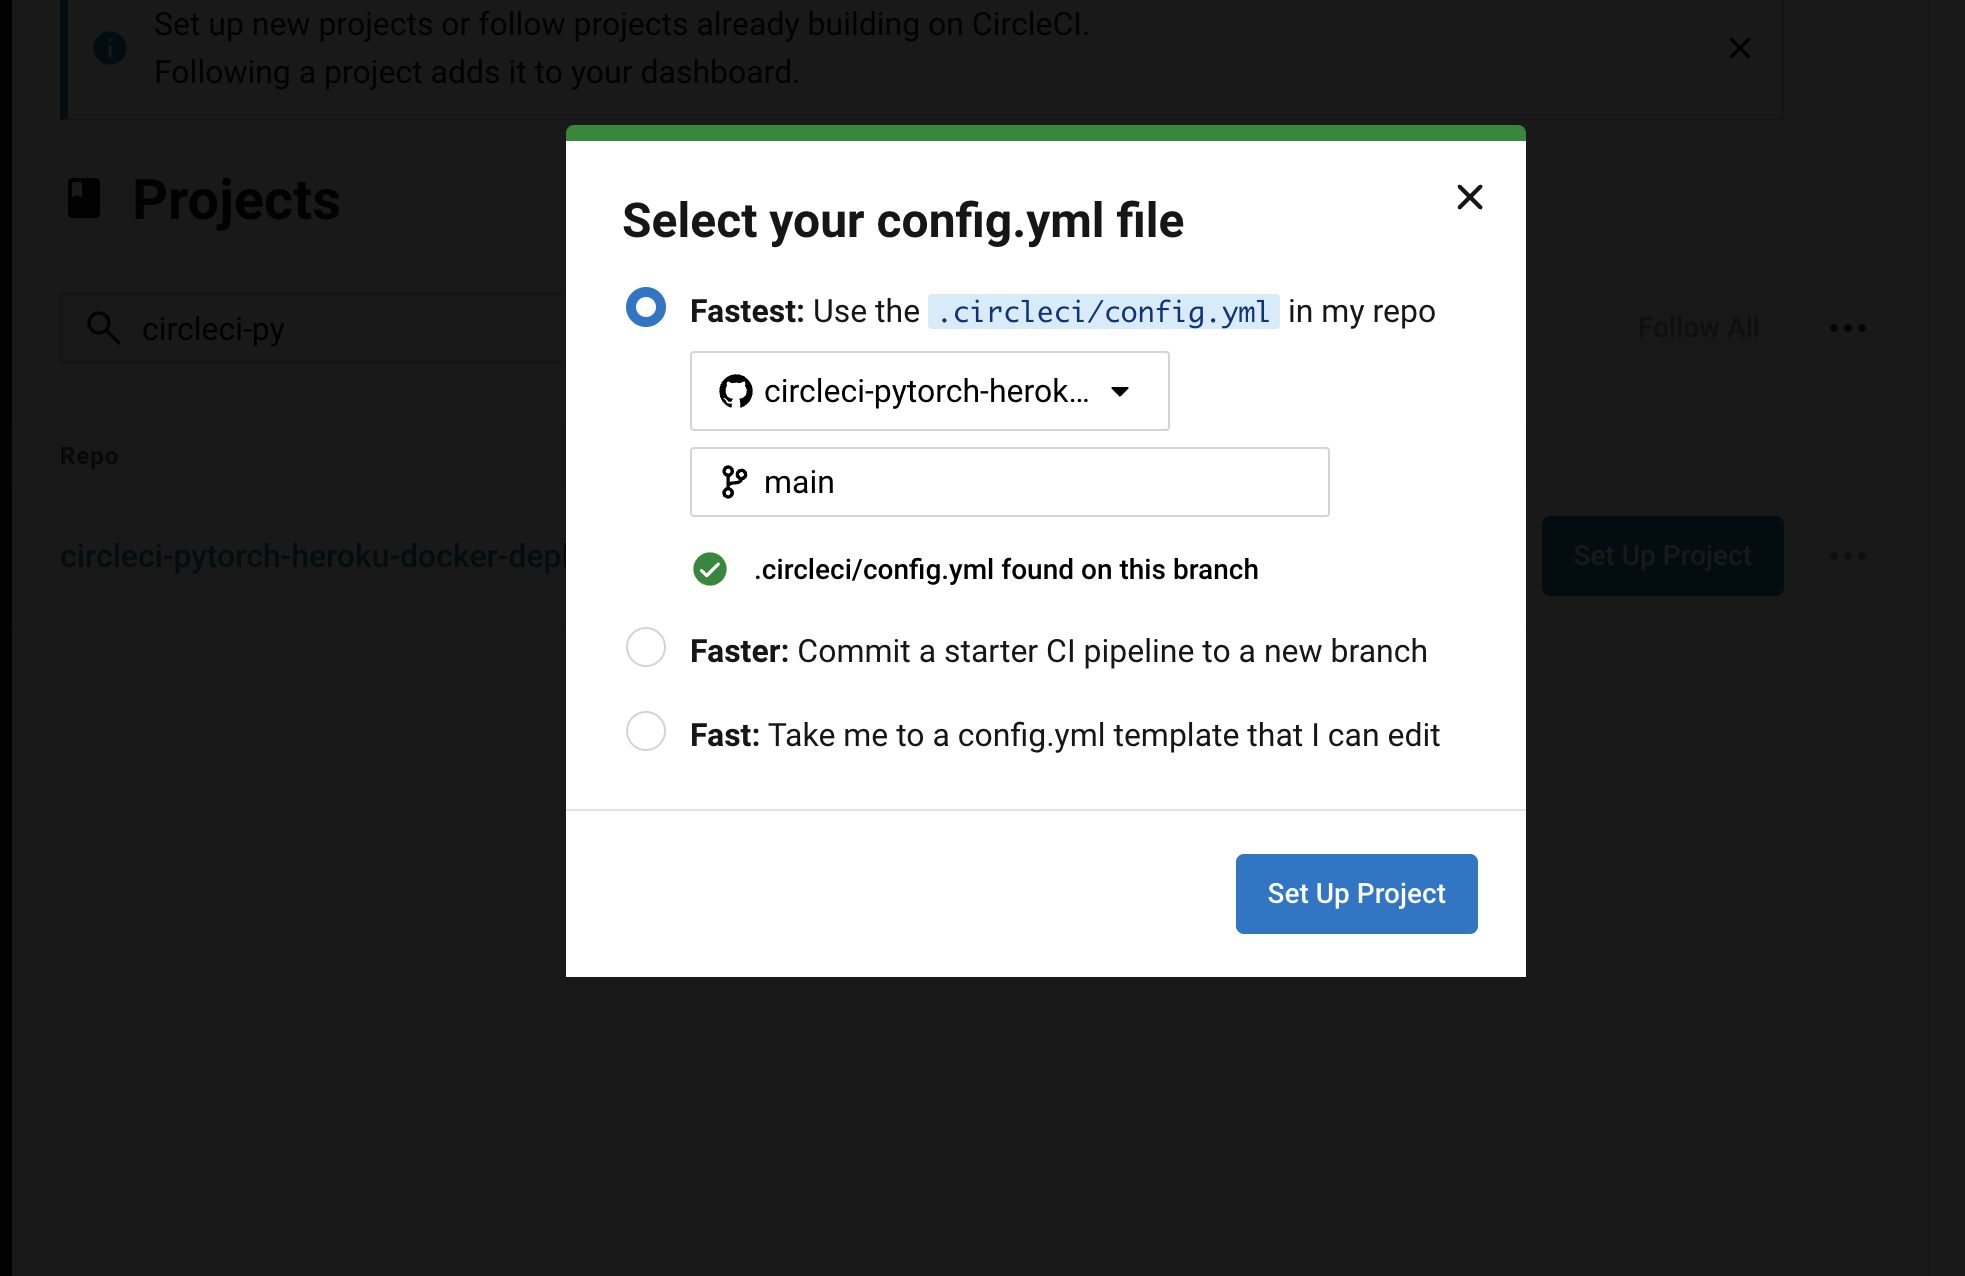
On the CircleCI dashboard, click the Projects tab, search for the GitHub repo name and click Set Up Project for your project.

You will be prompted to add a new configuration file manually or use an existing one. Since you have already pushed the required configuration file to the codebase, select the Fastest option and enter the name of the branch hosting your configuration file. Click Set Up Project to continue.

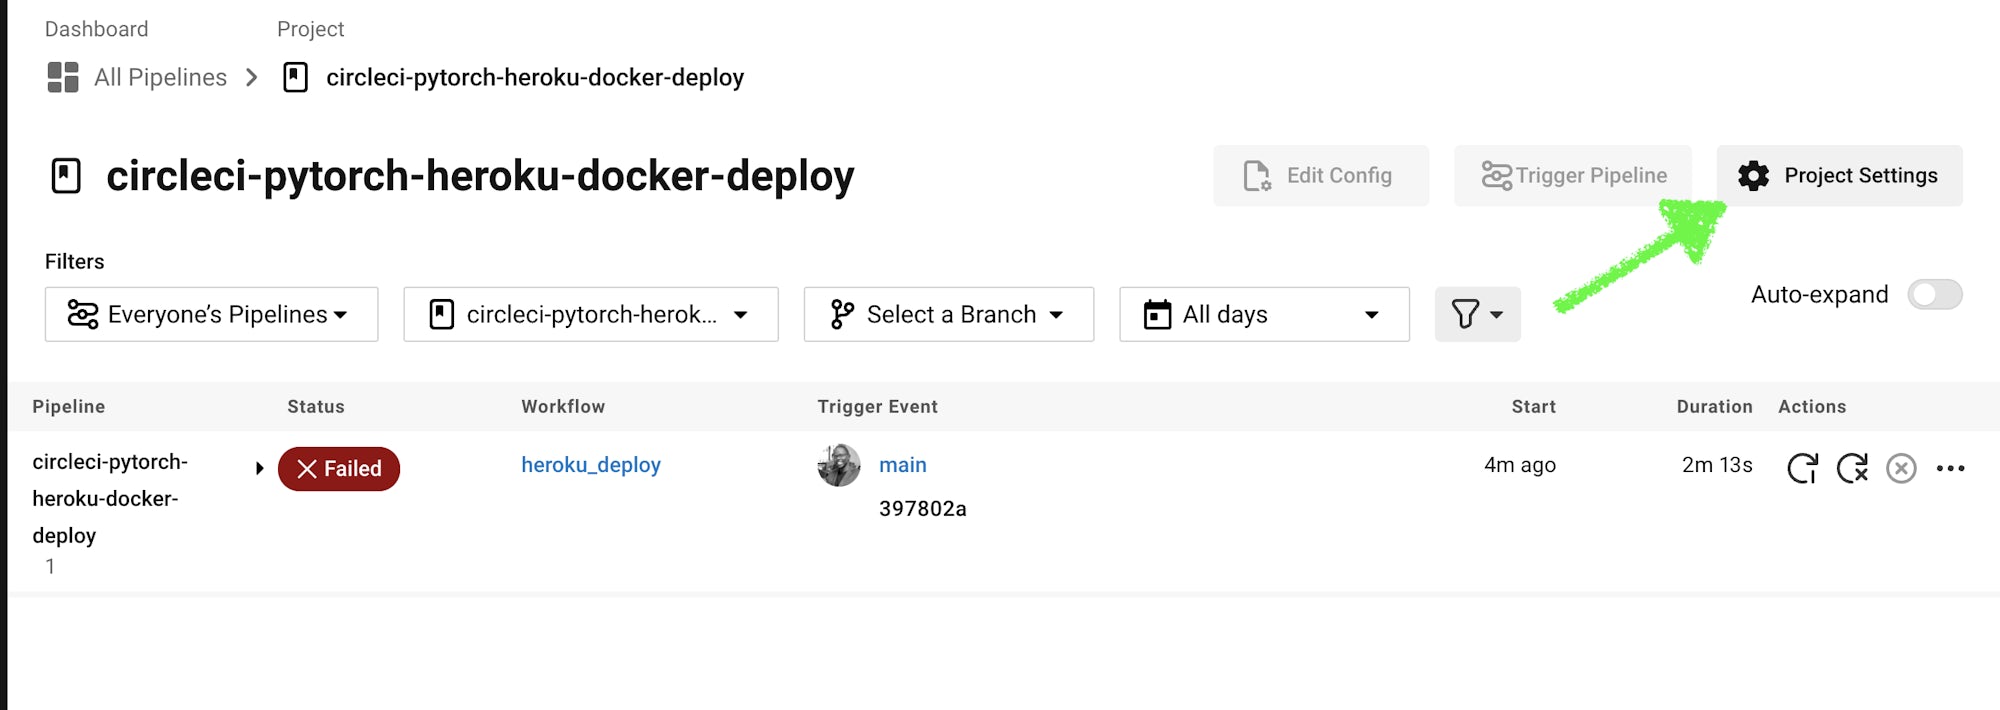
Completing the setup will trigger the pipeline, but it will fail since the environment variables are not set. Let’s do that next.
Setting environment variables
On the project page, click on Project settings

Go to the Environment variables tab. Click Add environment variable to add these:
HEROKU_APP_NAMEto the application that you used while creating the Heroku application.HEROKU_LOGINto your Heroku account’s username.HEROKU_API_KEYto your Heroku account’s API key. You can retrieve yourAPI keyfrom your Heroku account’s settings page.
Once you add the environment variables, it should show the key values on the dashboard.

Now that the environment variables are configured, trigger the pipeline again. This time the build should succeed.

Bonus: Updating the dyno for your application
Heroku offers different dynos for running your application. In this tutorial, since we are deploying a PyTorch model that requires higher CPU power, we need to choose the right-sized dyno to avoid out-of-memory errors. To upgrade the dyno for your application, login to the Heroku dashboard, and under the Resources tab, click Change Dyno type.

In the dialog box, choose Professional as the dyno type and click Save.

Next, click the dropdown next to web and choose Professional-M dynos for this tutorial.

Note: You can choose a different-sized dyno based on your application’s memory requirements. Keep in mind that the high-memory dynos are expensive as compared to the basic dynos, so you could switch back if you are no longer using them.
After updating the dynos, restart the application by clicking More > Restart all Dynos.
Conclusion
In this tutorial, you learned how to automatically build and deploy a containerized PyTorch model to Heroku using CircleCI. PyTorch reduces the complexity of working with ML models and increases the speed of prototyping and development. Heroku is a popular platform for deploying web applications with minimal configuration and can be used for scaling your application based on the load.
With CircleCI, you can automate the build, test, and deployment pipeline for continuous integration and continuous deployment (CI/CD). The pipeline can be used to execute unit tests for the PyTorch model and prediction API using [pytest] to boost development speed. When tests pass, it will automatically update your API in production.
You can check out the complete source code used in this tutorial on GitHub.


