マシンランナーの macOS へのインストール
このページでは、macOS に CircleCI のマシンランナーをインストールする方法を説明します。
前提条件
マシンランナーをインストールし、ジョブを実行するには、root 権限があり、以下のユーティリティとツールがシステムにインストールされている必要があります:
-
coreutils (Linux のみ)
-
curl (macOS ではデフォルトでインストール済み)
-
sha256sum (プリインストールされていない場合):
-
macOS の場合は、
brew install coreutils( Homebrew が必要) -
Ubuntu/Debain の場合は、`sudo apt install coreutils -
Red Hat の場合は、
sudo yum install coreutils
-
-
sepolicy ( RHEL 8 のみ)
-
rpmbuild ( RHEL 8 のみ)
-
コマンドラインからランナーをインストールする場合は、 CircleCI CLIを使用します。
セルフホストランナーの利用条件
Web アプリを介してマシンランナーをインストールする前に、 CircleCI ランナー規約 に同意する必要があります。 CircleCI Web アプリ の セルフホストランナー のセクションにアクセスするには、組織の管理者が Organization Settings > Self-Hosted Runners に行き、規約に同意する必要があります。
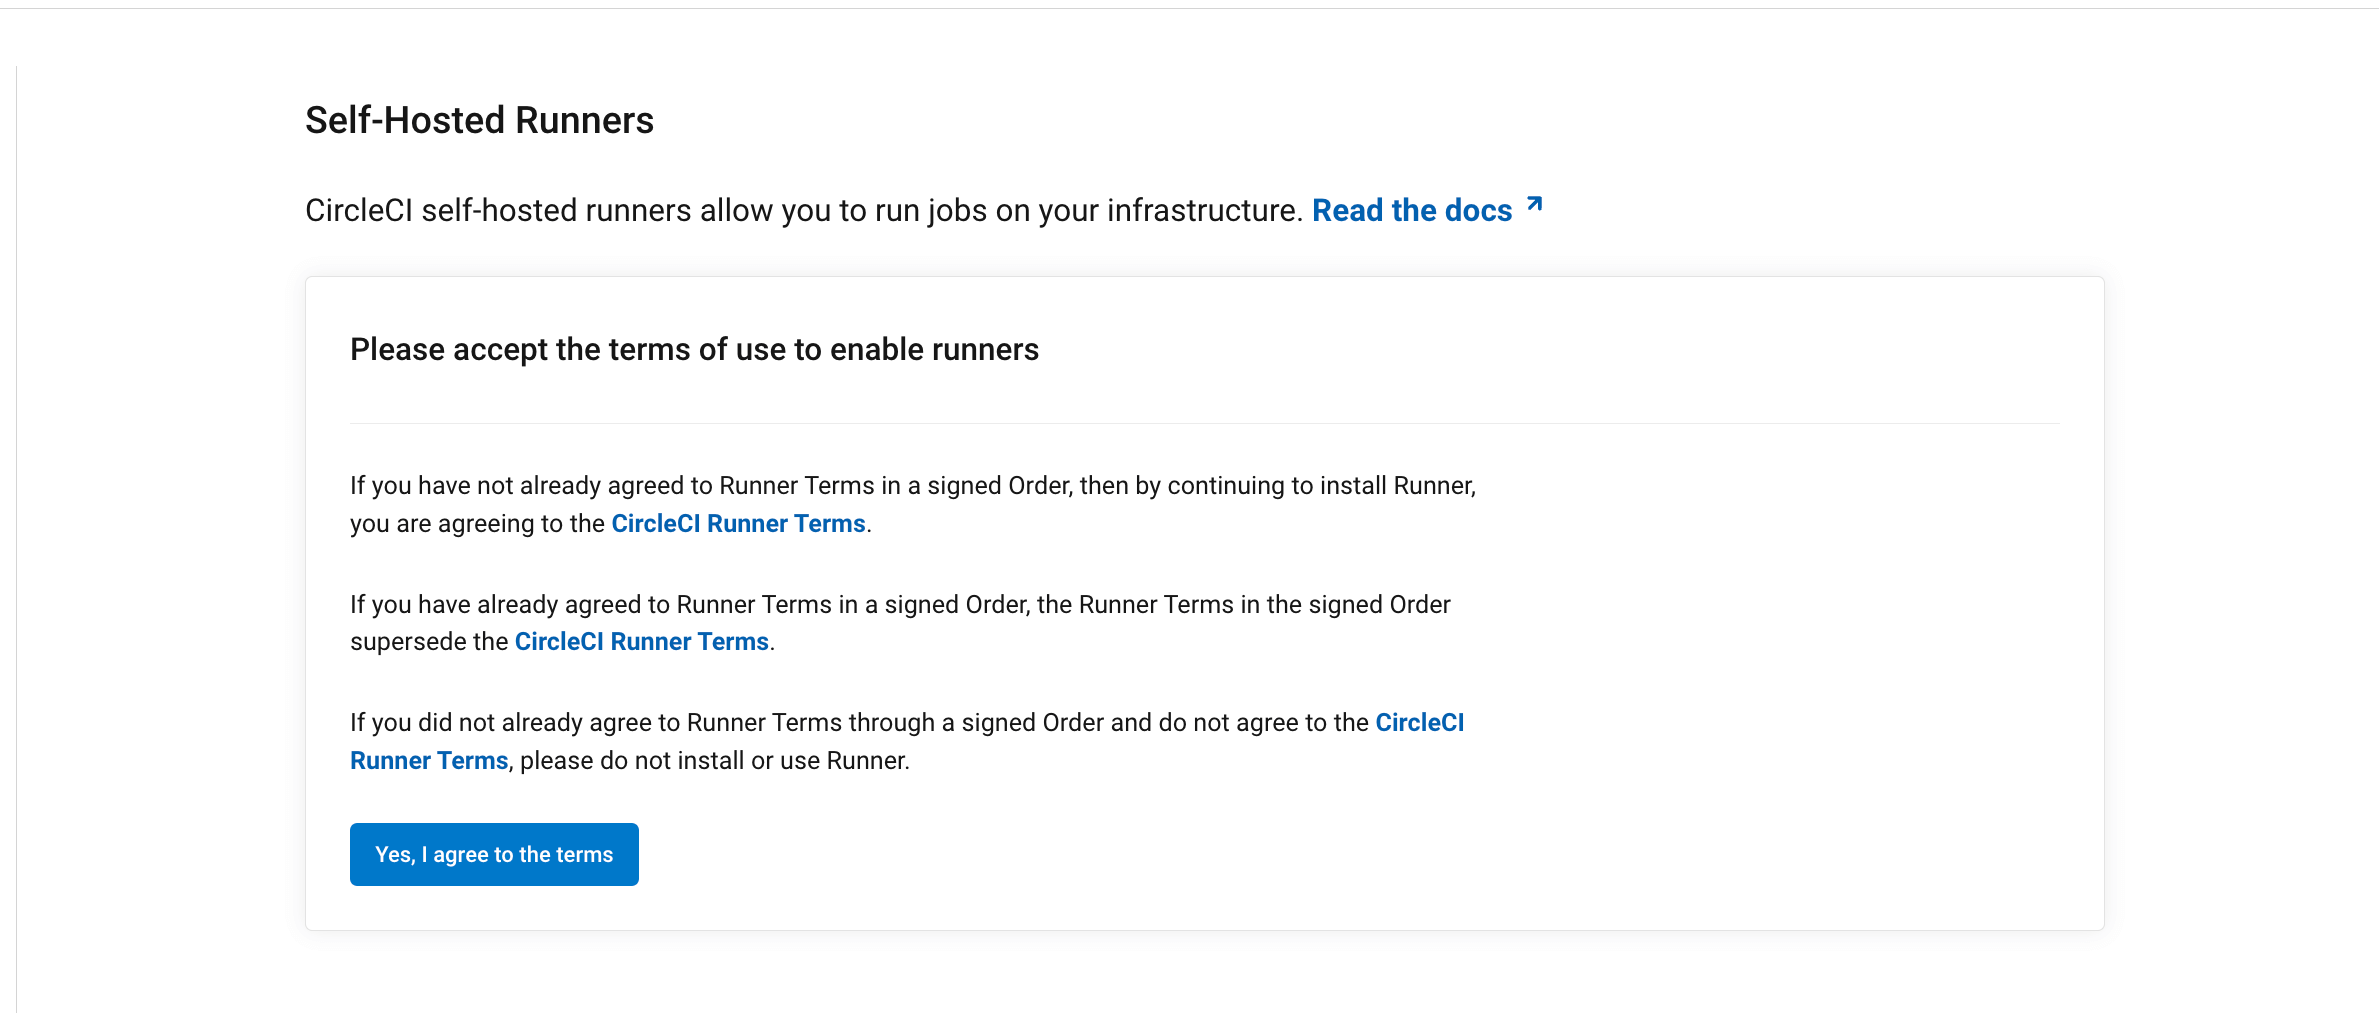
規約に同意すると、Self-Hosted Runners はサイドナビゲーションバーに常に表示されるようになります。
CircleCI は、組織の VCS 権限をミラーリングします。 組織の VCS の管理者が、CircleCI の管理者です。 不明な場合は、VCS の 管理者の権限を確認してください。
1. ネームスペースとリソースクラスの作成
セルフホストランナーをインストールするには、名前空間とリソースクラストークンを作成する必要があります。 リソース クラスとトークンを作成するには、VCS プロバイダーの組織管理者権限を持っている必要があります。 名前空間やリソースクラスについては、 コンセプト のページを参照してください。
お客様のランナーは、インベントリのページの左にあるナビゲーションバーで Self-Hosted Runners をクリックするとご覧いただけます。
-
CircleCI Web アプリ で、Self-Hostd Runners に移動します。

-
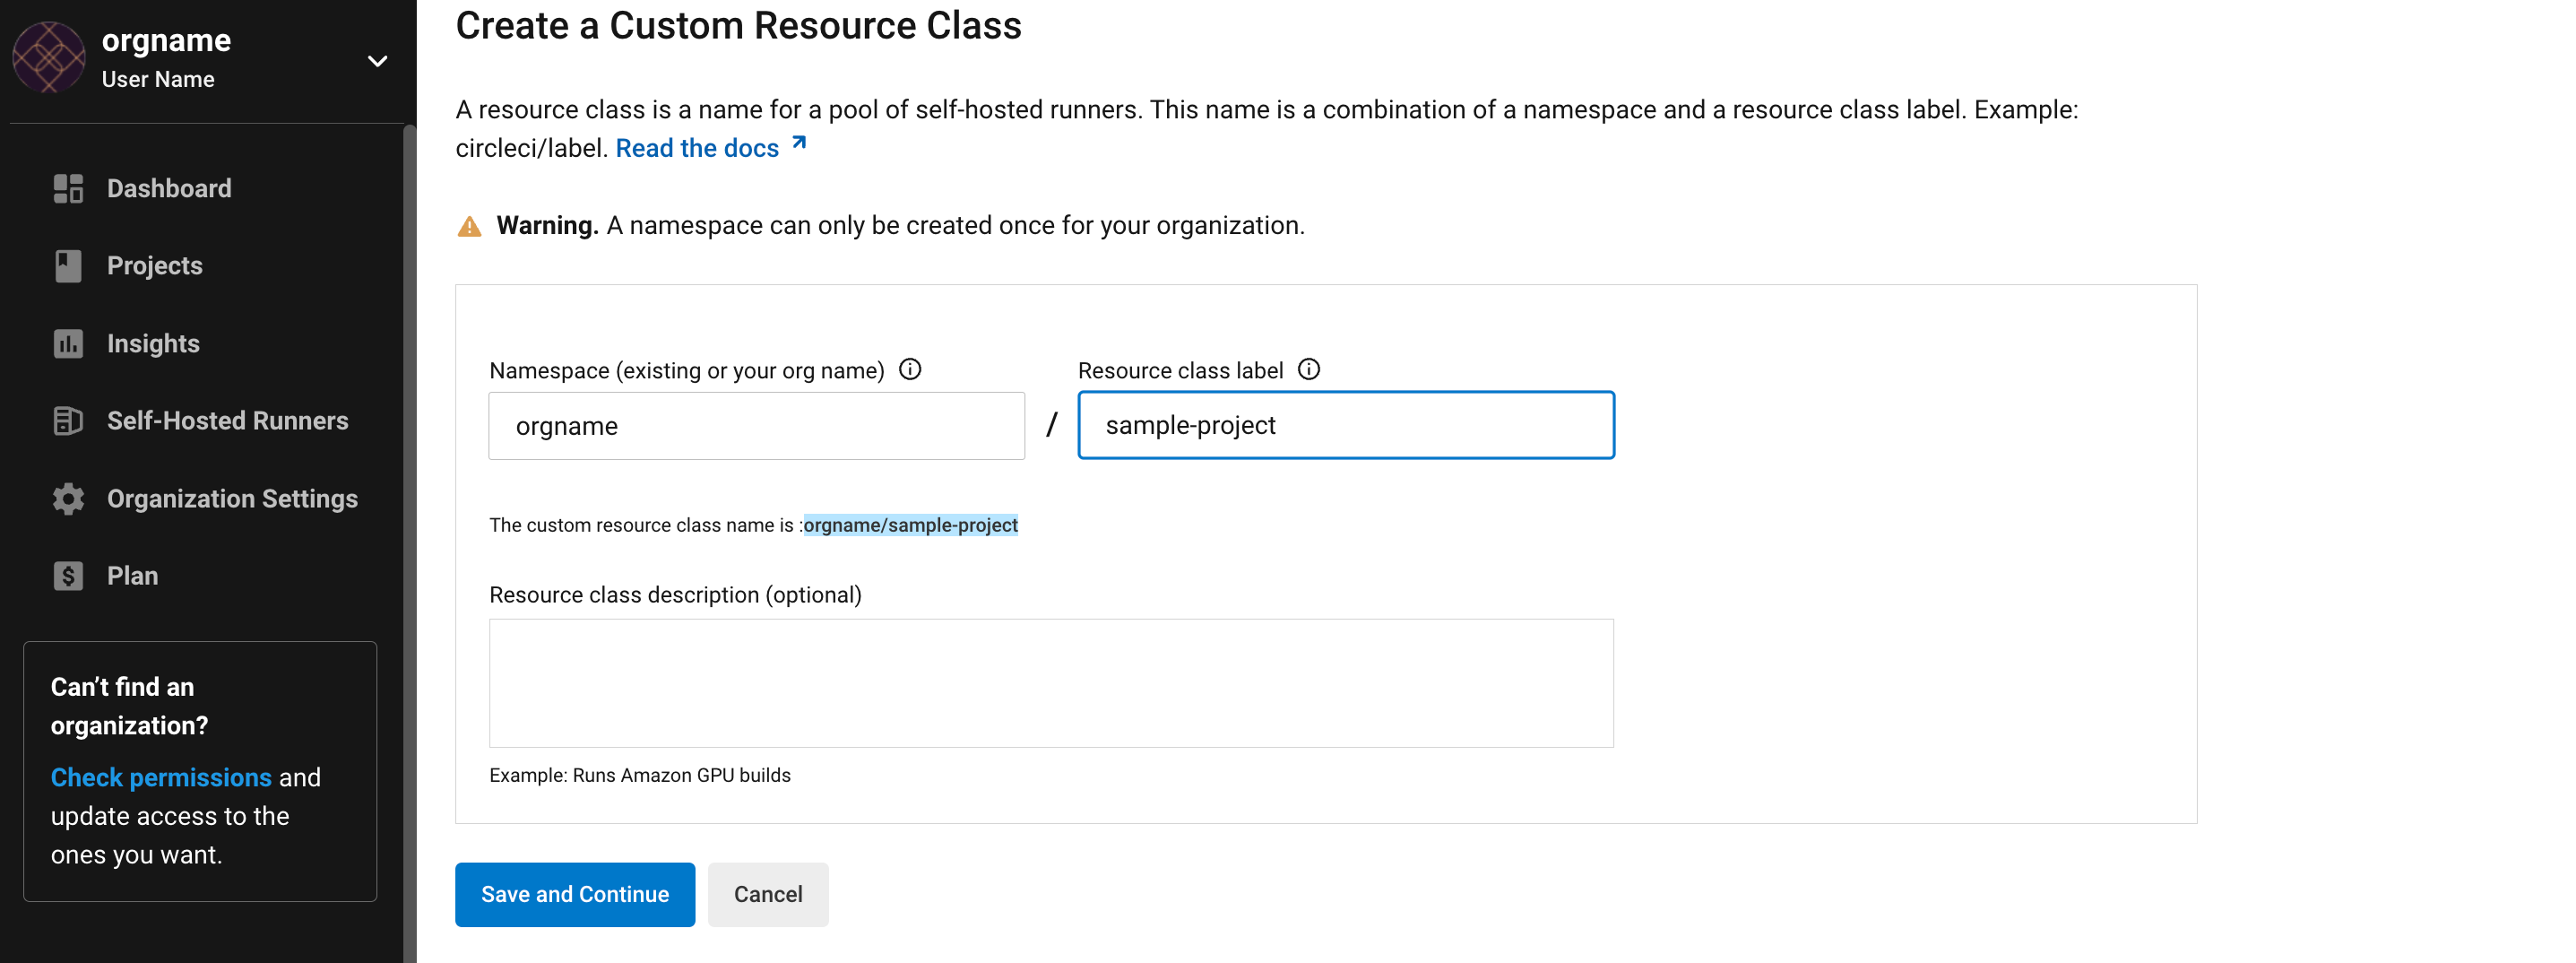
組織でセルフホストランナーを初めて使用する場合、ファーストステップとしてまず名前空間を作成する必要があります。 作成できる名前空間は、各組織につき 1 つのみです。 必須ではありませんが、 CircleCI のアカウント名を小文字で使用することを推奨します。 CircleCI は UI でデフォルトで推奨される名前空間として組織名を入力します。
もし、お客様の組織が既に Orb を使用しているのであれば、新しい名前空間を作らないでください。 その代わりに、お客様の組織が Orb に使用している名前空間を入力してください。
-
2つ目の入力フィールドには、セルフホスト・ランナー・リソース・クラスの名前を入力します。
-
リソースクラストークンをコピーし保存します。 セルフホストランナーはこのトークンを使って関連するリソースクラスの作業を要求します。

トークンは再取得できないので、必ず安全な場所に保管してください。 -
新しいリソースクラスの設定コードが提供されます。 既存の
.circleci/config.ymlがある場合は、既存のjobsセクションの下に新しいリソースクラスを追加してください。既存のファイルがない場合は、jobsセクション全体を追加します。 既存の.circleci/config.ymlファイルがない場合は、ファイルを作成し、すべてのコードをコピーします。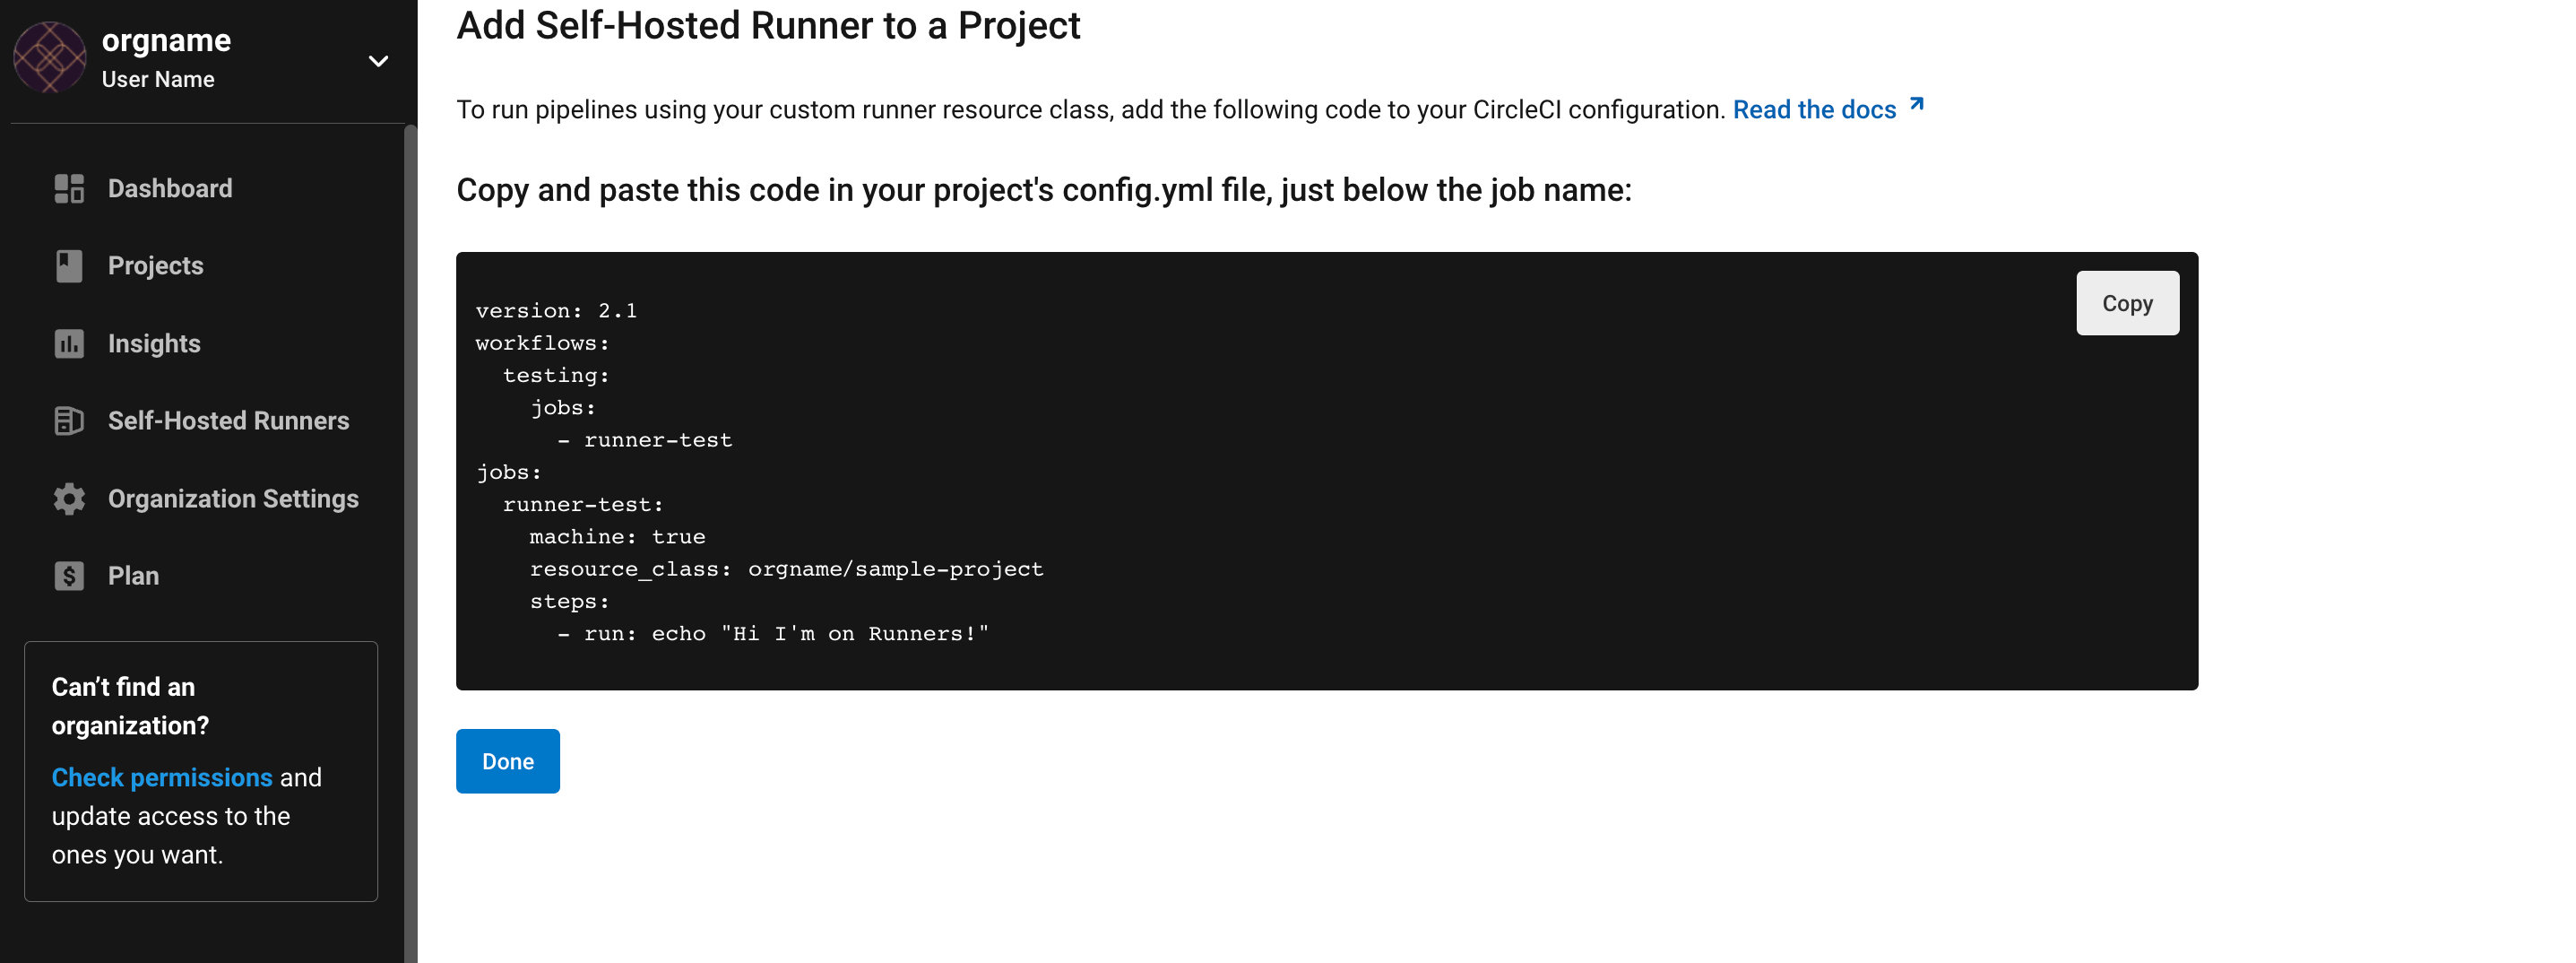
2. launch-agent スクリプトをダウンロードし、バイナリをインストールする。
-
Save the download-launch-agent script in the root of your project. When run (see the next step) the script will download the launch-agent binary, verify the checksum, and set the launch agent version.
Self-hosted runners on cloud auto-update to the latest supported versions. For server, specific self-hosted runner versions are validated for interoperability, and self-hosted runners do not auto-update.
-
Set your target platform and run the
download-launch-agent.shscript to download, verify, and install the binary.-
If you are using cloud, use the table below to find your platform variable:
Installation Target Variable macOS x86_64
platform=darwin/amd64macOS M1
platform=darwin/arm64For example, on cloud, to set your platform for macOS M1 and run the
download-launch-agent.shscript, run the following:export platform=darwin/arm64 && sh ./download-launch-agent.sh -
For server v3.1.0 and up, use the table below to find the compatible machine runner launch-agent version for the version of server you are running:
Server version Launch agent version 3.0
Runner not supported
3.1
1.0.11147-881b608
3.2
1.0.19813-e9e1cd9
3.3
1.0.29477-605777e
3.4
1.1.73695-40bf772
4.0
1.1.73695-40bf772
4.1
1.1.73695-40bf772
4.2
1.1.73695-40bf772
4.3
1.1.73189-8792751
Substitute
<launch-agent-version>with your launch-agent version for server and run the following:export agent_version="<launch-agent-version>" && sh ./download-launch-agent.shOnce your runner is successfully set up, you can delete the download-launch-agent.shfile.
-
3. CircleCI セルフホストランナー設定ファイルを作成する
CircleCI エージェントを実行するユーザーを選択します。 そのディレクトリの所有権を USERNAME に変更します。 USERNAME は、エージェントがインストールされるマシンのユーザーのことであり、CircleCI アカウントのユーザー名では_ありません_。
大文字で記載されたさまざまなパラメーターを適切な値に置き換えて、下記のテンプレートを完成させます。 完成したら、このテンプレートを launch-agent-config.yaml として保存します。
api:
  auth_token: AUTH_TOKEN
  # On server, set url to the hostname of your server installation. For example,
  # url: https://circleci.example.com

runner:
  name: RUNNER_NAME
  command_prefix : ["sudo", "-niHu", "USERNAME", "--"]
  working_directory: /var/opt/circleci/workdir
  cleanup_working_directory: true

logging:
file: /Library/Logs/com.circleci.runner.log-
Replace
AUTH_TOKENwith the resource class token created in the set up process. -
RUNNER_NAMEを任意のセルフホストランナー名に置き換えます。RUNNER_NAMEは、ランナーをインストールするマシン一意の名前です。RUNNER_NAMEには、任意の値を設定でき、名前空間やリソースクラス名を含む必要はありません。 CircleCI Web アプリでステータスやジョブ結果を確認する際にエージェントを特定できるよう、名前にはマシンのホスト名を使用することをお勧めします。 The only special characters accepted in RUNNER_NAME are. () - _.
4. 作業ディレクトリのアクセス許可を更新する
CircleCI エージェントに、作業ディレクトリが格納されているディレクトリへの書き込みアクセス許可を付与する必要があります。 そのディレクトリの所有権を USERNAME に変更します。
sudo chown USERNAME /var/opt/circleci5. セルフホストランナー設定ファイルをインストールする
CircleCI のセルフホストランナー設定ファイルの保存ディレクトリを root として作成します。
sudo mkdir -p '/Library/Preferences/com.circleci.runner'先程作成した launch-agent-config.yaml をディレクトリにコピーし、権限を`600` に変更します。
sudo cp "launch-agent-config.yaml" "/Library/Preferences/com.circleci.runner/launch-agent-config.yaml"sudo chmod 600 "/Library/Preferences/com.circleci.runner/launch-agent-config.yaml"6. launchd .plist を作成しインストールする
com.circleci.runner.plist ファイルを、パス /Library/LaunchDaemons/com.circleci.runner.plist、所有者 root、アクセス許可 644 で作成します。 次のコマンドを使用します。
sudo touch /Library/LaunchDaemons/com.circleci.runner.plistsudo chown root: /Library/LaunchDaemons/com.circleci.runner.plistsudo chmod 644 /Library/LaunchDaemons/com.circleci.runner.plist下記を新しく作成した /Library/LaunchDaemons/com.circleci.runner.plist ファイルにコピーします。
<?xml version="1.0" encoding="UTF-8"?>
<!DOCTYPE plist PUBLIC "-//Apple Computer//DTD PLIST 1.0//EN" "http://www.apple.com/DTDs/PropertyList-1.0.dtd">
<plist version="1.0">
    <dict>
        <key>Label</key>
        <string>com.circleci.runner</string>

        <key>Program</key>
        <string>/opt/circleci/circleci-launch-agent</string>

        <key>ProgramArguments</key>
        <array>
            <string>circleci-launch-agent</string>
            <string>--config</string>
            <string>/Library/Preferences/com.circleci.runner/launch-agent-config.yaml</string>
        </array>

        <key>RunAtLoad</key>
        <true/>

        <!-- The agent needs to run at all times -->
        <key>KeepAlive</key>
        <true/>

        <!-- This prevents macOS from limiting the resource usage of the agent -->
        <key>ProcessType</key>
        <string>Interactive</string>

        <!-- Increase the frequency of restarting the agent on failure, or post-update -->
        <key>ThrottleInterval</key>
        <integer>3</integer>

        <!-- Wait for 10 minutes for the agent to shut down (the agent itself waits for tasks to complete) -->
        <key>ExitTimeOut</key>
        <integer>600</integer>

        <!-- The agent uses its own logging and rotation to file -->
        <key>StandardOutPath</key>
        <string>/dev/null</string>
        <key>StandardErrorPath</key>
        <string>/dev/null</string>
    </dict>
</plist>
7. launchd サービスを有効にする
これで、サービスをロードできます。
sudo launchctl load '/Library/LaunchDaemons/com.circleci.runner.plist'| これまでに有効化手順を実行したことがある場合は、下記コマンドで既存サービスをアンロードしてください。 アンロード後、上記コマンドにより新しいサービスをロードできます。 |
sudo launchctl unload '/Library/LaunchDaemons/com.circleci.runner.plist'8. サービスの実行状態を確認する
プリインストールされている macOS アプリケーション、 コンソール を開きます。 このアプリケーションでは、 ログレポート で CircleCI エージェントのログを閲覧することができます。 リストから com.circleci.runner.log というログを探します。 このファイルは、 Library > Logs に移動しても見つけられます。
マシンランナーの設定例
セルフホストランナーを使って実行する特定のジョブについて、以下のフィールドを設定する必要があります。
-
machine: true -
resource_class: <namespace>/<resource-class>
以下は、ジョブ設定のシンプルなコード例です。
version: 2.1

workflows:
  build-workflow:
    jobs:
      - runner
jobs:
  runner:
    machine: true
    resource_class: <namespace>/<resource-class>
    steps:
      - run: echo "Hi I'm on Runners!"
トラブルシューティング
Refer to the Troubleshoot Machine Runner section of the Troubleshoot Self-hosted Runner guide if you encounter issues installing or running machine runner on macOS.