Splitting and parallelizing Android UI tests with Espresso and CircleCI

Senior Solutions Engineer

For Android developers, test automation on CI/CD platforms such as CircleCI has become an indispensable part of the development workflow. But merely implementing automated testing is no longer enough to remain competitive and continue to develop at speed. Developers must also work to continuously monitor, maintain, and improve their test automation.
As an application grows in complexity, the scale of development grows, as does the number of automated tests. This causes the execution time of builds and tests to increase, which in turn decreases development speed.
Android UI test frameworks such as Espresso must be run on an actual Android device or Android emulator which add significant execution time overhead. CircleCI offers a variety of features to reduce this execution time overhead, including:
Compute Customization Dependency Caching Test Splitting and Parallelization
In this article, you will learn how to shorten the execution time of Espresso UI tests by leveraging CircleCI’s test splitting and parallelization features.
How to split and run Espresso UI tests in parallel using CircleCI
This repo contains the sample Android application code that we will use in this tutorial.
The tests suite contains multiple UI tests that have been tweaked to differ in execution time using Thread.sleep().
@HiltAndroidTest
class GardenActivity10Test {

    private val hiltRule = HiltAndroidRule(this)
    private val activityTestRule = ActivityTestRule(GardenActivity::class.java)

    @get:Rule
    val rule = RuleChain
        .outerRule(hiltRule)
        .around(activityTestRule)

    @Test fun clickAddPlant_OpensPlantList() {
        // Given that no Plants are added to the user's garden

        // When the "Add Plant" button is clicked
        onView(withId(R.id.add_plant)).perform(click())

        Thread.sleep(100000)

        // Then the ViewPager should change to the Plant List page
        onView(withId(R.id.plant_list)).check(matches(isDisplayed()))
    }
}
CircleCI’s Android orb allows you to create a concise pipeline like the one below:
CircleCI Developer Hub - circleci/android
integration_test:
  executor:
    name: android/android-machine
    resource-class: xlarge
    tag: 2023.07.1
  steps:
    - checkout
    - android/start-emulator-and-run-tests
    - store_test_results:
        path: ./app/build/outputs/androidTest-results/connected
android/start-emulator-and-run-tests performs the following tasks:
- Create AVD (Android Virtual Device) and start Android emulator
- Restore the Gradle cache (if any)
- Build the application (
./gradlew assembleDebugAndroidTest) - Wait for Android emulator to start
- Run UI tests (
./gradlew connectedDebugAndroidTest)
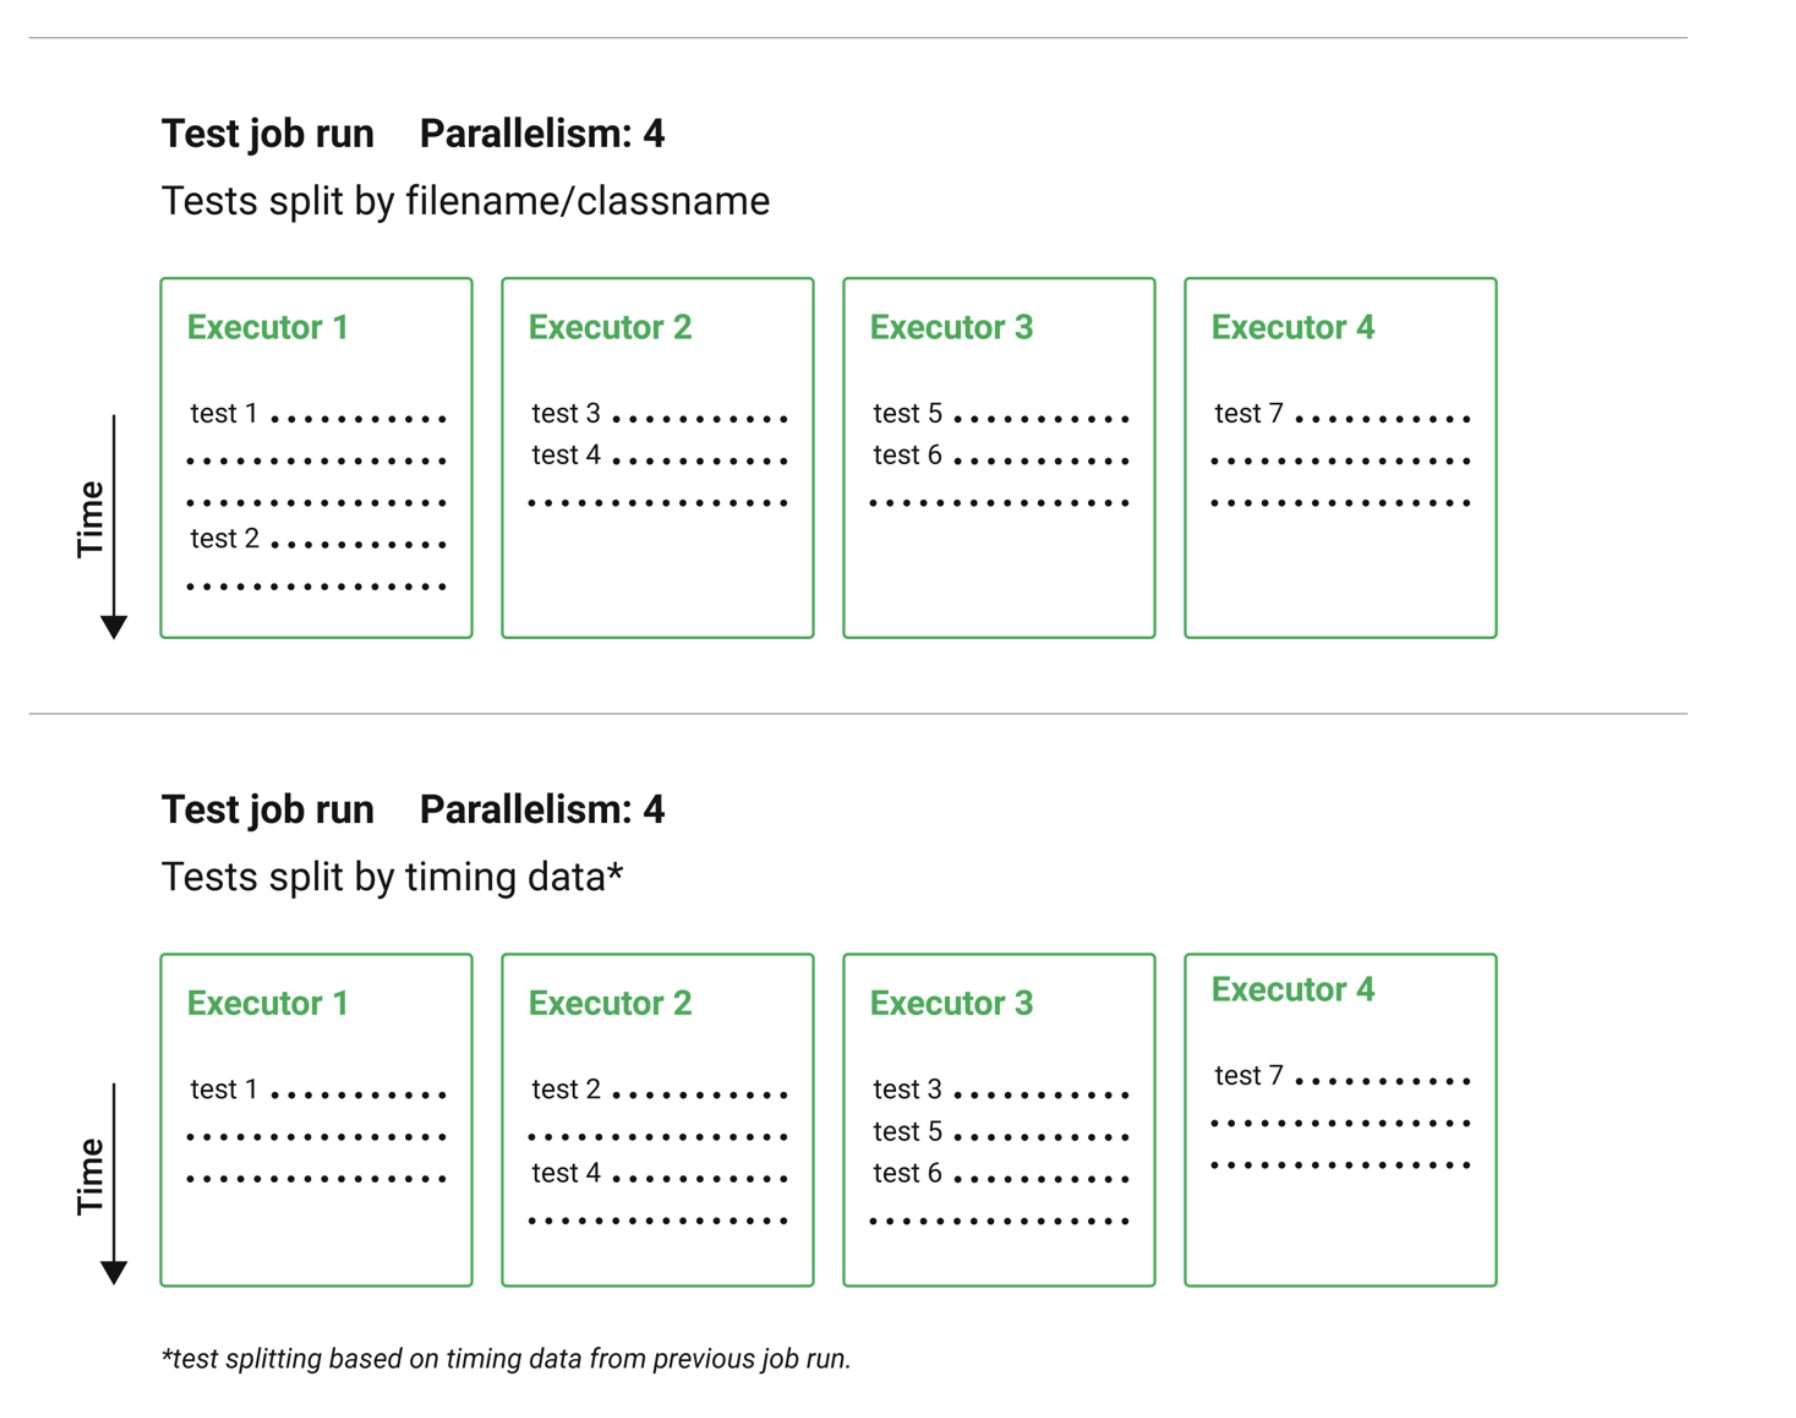
The UI tests are split and parallelized in the following way:
- Build the application (
./gradlew assembleDebugAndroidTest) - Launch multiple Linux VMs in parallel, each hosting an Android emulator
- Split the tests according to prior execution time
- Distribute the tests across the VMs
- Execute the tests in parallel
Building the Android application
Prior to running the UI tests, we must first build the application. This must be done prior to the other steps so that the build can be made available to the multiple VMs that are spun up during parallel testing.
Below is a job, build_for_integration_test, that performs the build:
build_for_integration_test:
  executor:
    name: android/android-machine
    resource-class: xlarge
    tag: 2023.07.1
  steps:
    - checkout
    - android/restore-gradle-cache
    - run: ./gradlew assembleDebugAndroidTest
    - android/save-gradle-cache
    - persist_to_workspace:
        root: ~/
        paths: .
This job performs the following steps:
- Restore Gradle cache using the Android Orb
- Build the application (
./gradlew assembleDebugAndroidTest) - Store the build artifact in a workspace so that it can be used in the subsequent test job persist_to_workspace
Splitting and executing UI tests in parallel
After the build job (build_for_integration_test) is completed, we can run the job (integration_test_parallel) to split and parallelize the tests:
integration_test_parallel:
  parallelism: 6
  executor:
    name: android/android-machine
    resource-class: xlarge
    tag: 2023.07.1
  steps:
    - checkout
    - attach_workspace:
        at: ~/
    - run:
        name: Split Espresso tests
        command: |
          cd app/src/androidTest/java
          CLASSNAMES=$(circleci tests glob "**/*Test.kt" \
            | sed 's@/@.@g' \
            | sed 's/.kt//' \
            | circleci tests split --split-by=timings --timings-type=classname)
          echo "export GRADLE_ARGS='-Pandroid.testInstrumentationRunnerArguments.class=$(echo $CLASSNAMES | sed -z "s/\n//g; s/ /,/g")'" >> $BASH_ENV
    - android/create-avd:
        avd-name: test
        install: true
        system-image: "system-images;android-29;default;x86"
    - android/start-emulator:
        avd-name: test
        post-emulator-launch-assemble-command: ""
    - run:
        name: Run Espresso tests
        command: ./gradlew connectedDebugAndroidTest $GRADLE_ARGS
    - store_test_results:
        path: ./app/build/outputs/androidTest-results/connected
First, multiple Linux VMs are launched to run the tests in parallel. The number of VMs launched can be adjusted via the parallelism attribute.
Next, the following tasks are performed:
- Attach a workspace to make the build artifact available attach_workspace
- Create AVD (Android Virtual Device) and start Android emulator via the Android Orb
- Split the tests according to execution time and create parameters to pass to the Gradle
- Execute the split tests in parallel
- Upload test results including execution time
store_test_results
Let’s step through the test splitting and parallel execution portions in detail. The Gradle command to run UI tests (Espresso) (./gradlew connectedDebugAndroidTest) executes all tests by default. If you want to run a specific test, you need to specify the following parameters that include the class name:
./gradlew connectedAndroidTest
-Pandroid.testInstrumentationRunnerArguments.class=com.google.samples.apps.sunflower.GardenActivity1Test,com.google.samples.apps.sunflower.GardenActivity2Test
The following command shows how the CircleCI CLI can be used to generate commands like the one above:
cd app/src/androidTest/java
          CLASSNAMES=$(circleci tests glob "**/*Test.kt" \
            | sed 's@/@.@g' \
            | sed 's/.kt//' \
            | circleci tests split --split-by=timings --timings-type=classname)
          echo "export GRADLE_ARGS='-Pandroid.testInstrumentationRunnerArguments.class=$(echo $CLASSNAMES | sed -z "s/\n//g; s/ /,/g")'" >> $BASH_ENV
circleci tests glob retrieves the target test classes and then splits them using circleci tests split. We are passing --split-by=timings to circleci tests split in order to use our previously recorded test timing data.
The store_test_results command uploads the test results to the CircleCI in JUnit format. These results can be retrieved from the CircleCI UI or API.
By enabling the --split-by=timings flag, it will attempt to split the tests evenly using the timing data contained in the test report. This reduces the overall test time.

The actual execution time of the parallelized tests can be seen under the “Timing” tab.

We have run 6 sets of tests in parallel with different execution times, with little variation in the test execution time.
Conclusion
In this article, we demonstrated how to reduce execution time by splitting and executing Espresso UI tests in parallel using an Android emulator.
Using CircleCI’s Android emulator and test splitting features, test execution can be reduced, greatly increasing developer productivity, and the degree of parallelization can be easily adjusted by making a simple config file change. Because CircleCI charges based on compute credits, you can run your pipelines in a cost-effective manner even when running multiple Linux VMs in parallel.
For more information on Android testing with CircleCI, please check out this article.


