Introducing the CircleCI visual config editor

Community and Partner Engineering Intern

Software Development Engineer
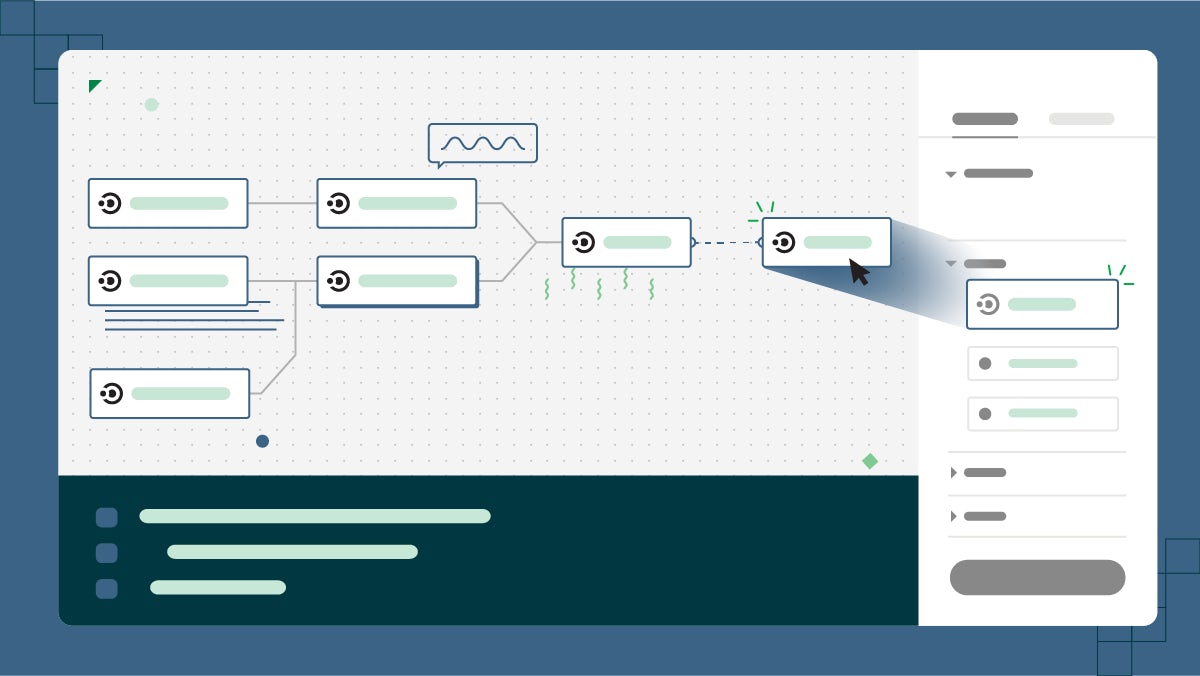
The CircleCI visual config editor (VCE) is now generally available as an open source project. Development teams can now create and modify CircleCI config files in a visual drag-and-drop, low-code environment.
The VCE is a node-graph editor that you can use to modify CircleCI config elements and generate config files. It provides a frictionless way to build CI/CD pipelines and interact with CircleCI’s platform in an efficient, user-friendly visual interface.
Our goal is not to replace YAML, our de facto Configuration as Code language, but more to provide an alternative in which you can visually orchestrate your pipeline development. In this post, we will touch on the motivations behind the visual config editor, walk through its elements along with supported features, explain common use cases, and demonstrate how to set up a pipeline with the VCE.
Use cases for the visual config editor
The visual config editor provides an all-in-one environment for config editing, including creating component definitions and usages. The visual ecosystem trades YAML for a low-code (or, when using the right orbs, even no code!) development experience.
Newcomers to CircleCI will find the visual config editor useful for:
- Generating configuration without the need to learn or write YAML
- Accessing CircleCI orbs with a single click, to quickly integrate with popular services
- Visually managing tag and branch filters
- Validating input in real time
- Streamlining the config building experience, so you can orchestrate your pipelines with confidence
More experienced users will find the visual config editor useful for:
- Making quick changes without having to trace through the YAML
- Previewing workflow orchestration
- Providing a visual explainer for educating peers on your project’s CI pipelines
- Easily accessing advanced functionality of orbs
Visual config editor features
Everything you need to create a pipeline configuration file is provided up front. The VCE is split into three focused panes: visualizer, inspector, and output.

The visualization pane consists of a node graph where workflows are created and organized.
Components are built in the inspector pane, where you can create, view, and edit the components that make up a config.
The output pane is an integrated code editor, providing the ability to view the YAML output of your configuration.
How to use the visual config editor to set up a pipeline
Let’s see it in action! In this section, we’ll demonstrate how to use the VCE to set up a pipeline that tests and deploys a sample frontend application built with Vue.js. You can fork the Continuous Food Delivery sample project and follow along, or instead use your own (preferably node based) project.
Getting started
To follow along with the demonstration and learn how to use the VCE to manage your own pipelines, you’ll also need to sign up for a free CircleCI account and Heroku account if you don’t already have one. Once logged into Heroku, go to the dashboard, click New and then select Create new app. Keep note of the app name you’ve chosen here, as you’ll need it later. For now, this is all the setup that is required for Heroku.
To access the VCE and start building your config file, visit the VCE home page.
Adding test jobs to your pipeline
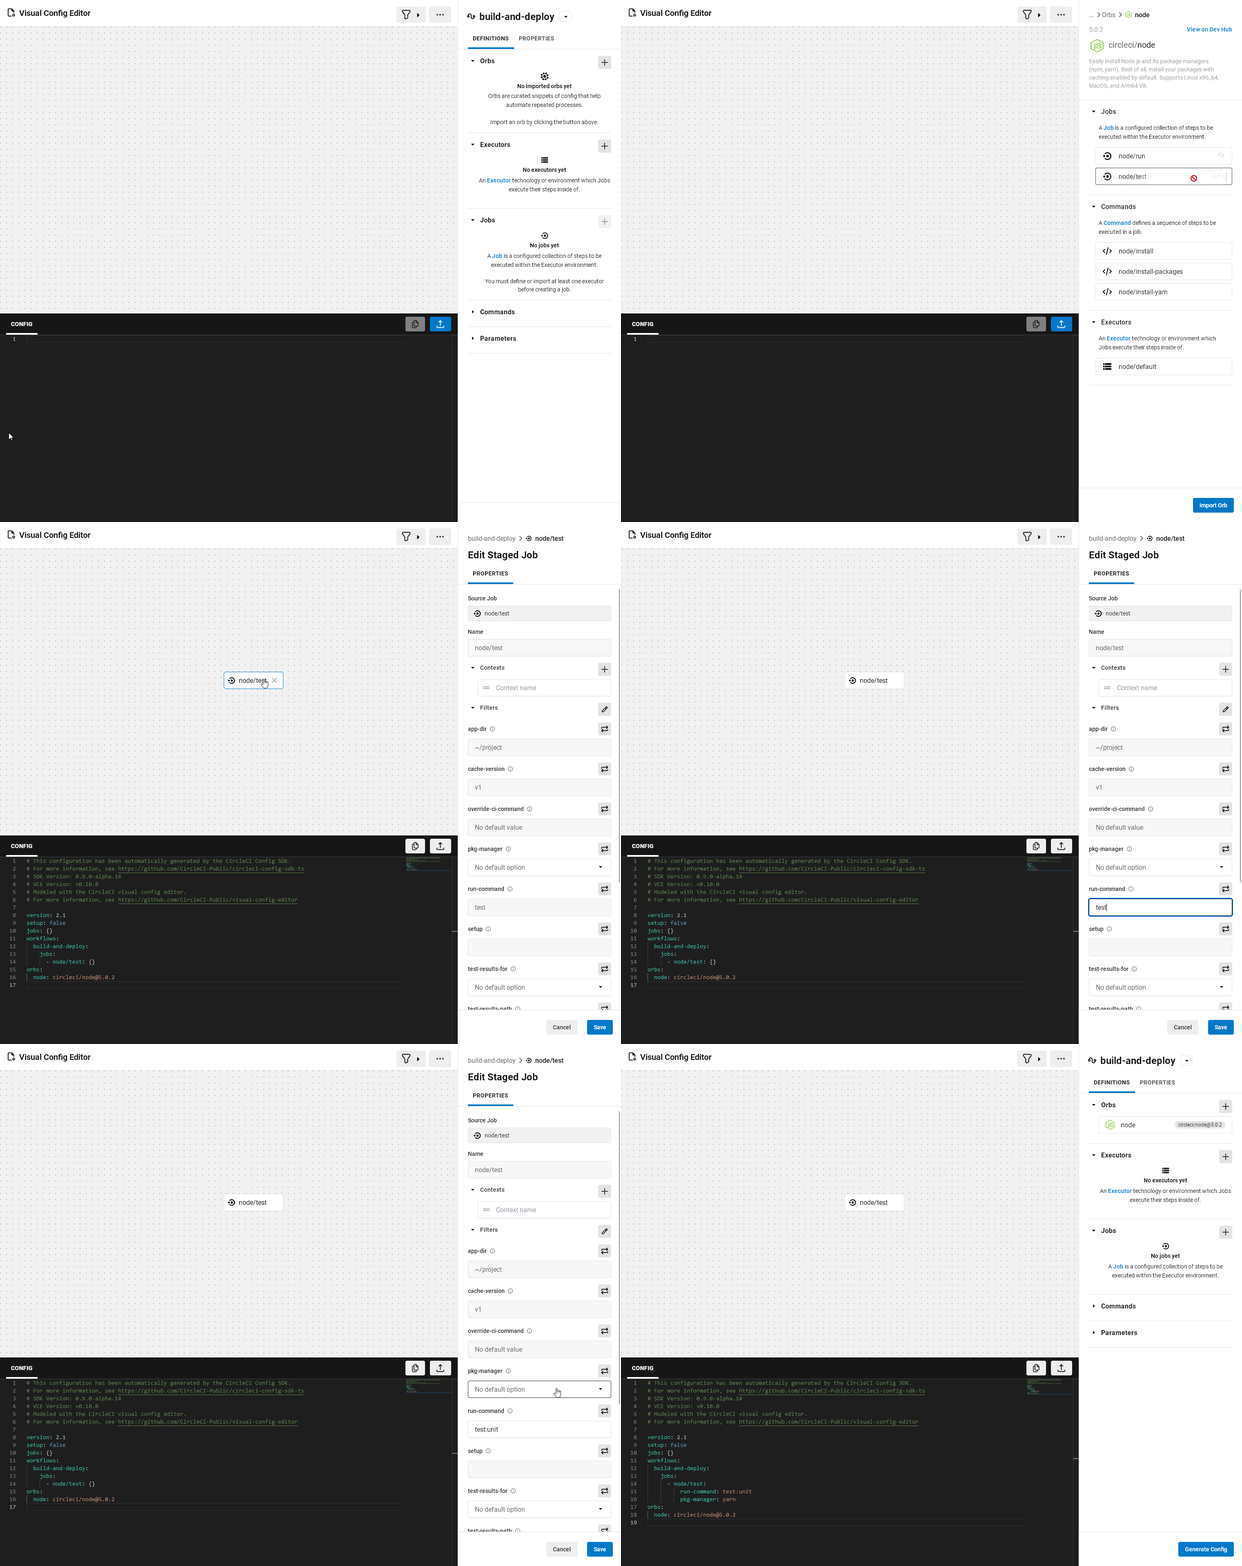
Good news! We don’t actually need to do much to get CI working on this project. The VCE has orb support, providing quick access to various pre-packaged configs to integrate with all of your favorite services. To add orbs to your pipeline from the VCE, simply click the plus button next to Orbs, and select the orb you want to use.
In this example, we’ll use the Node.js orb to add testing to our workflow. Since Node.js is one of our most popular orbs, it is the first orb available in the menu. Click the orb to view the jobs, commands, and executors available to use in your pipelines. To add the testing job, drag the node/test job into the visualization pane. Dependency installation and cache will be handled for us. However, in the case of the Continuous Food Delivery app, we’ll need to add some additional properties to tell the node test job which test we would like to run.
Click the node/test job that you just dropped onto the workflow stage to configure its settings. The file package.json in the sample repository contains the information we need about this project’s scripts.
{
  "name": "sample-javascript-cfd",
  "version": "0.1.0",
  "private": true,
  "scripts": {
    "build": "vue-cli-service build",
    "test:unit": "vue-cli-service test:unit",
    "test:e2e": "vue-cli-service test:e2e",
    "lint": "vue-cli-service lint",
    "start": "vue-cli-service serve"
  }
In the Continuous Food Delivery sample app, there are two different types of tests: an end-to-end test (test:e2e) and a unit test (test:unit). For our node/test job, we’ll set the run-command parameter to test:unit, as the e2e test will require further configuration.
Adding a deployment job
Now that we’ve added tests to our pipeline, we can deploy confidently to Heroku. Time to search orbs again and import a job for the certified Heroku orb. Just like earlier, navigate to the Orbs section of the inspector pane and click Import. Enter Heroku into the search bar to look up the Heroku orb.
Next, drag the heroku/deploy-via-git job into the visualization pane. To mark the test job as a requirement for the deployment job, draw a connection from the node/test job to the heroku/deploy-via-git job by long pressing on the node next to the test job and dragging the mouse over to the deploy job.
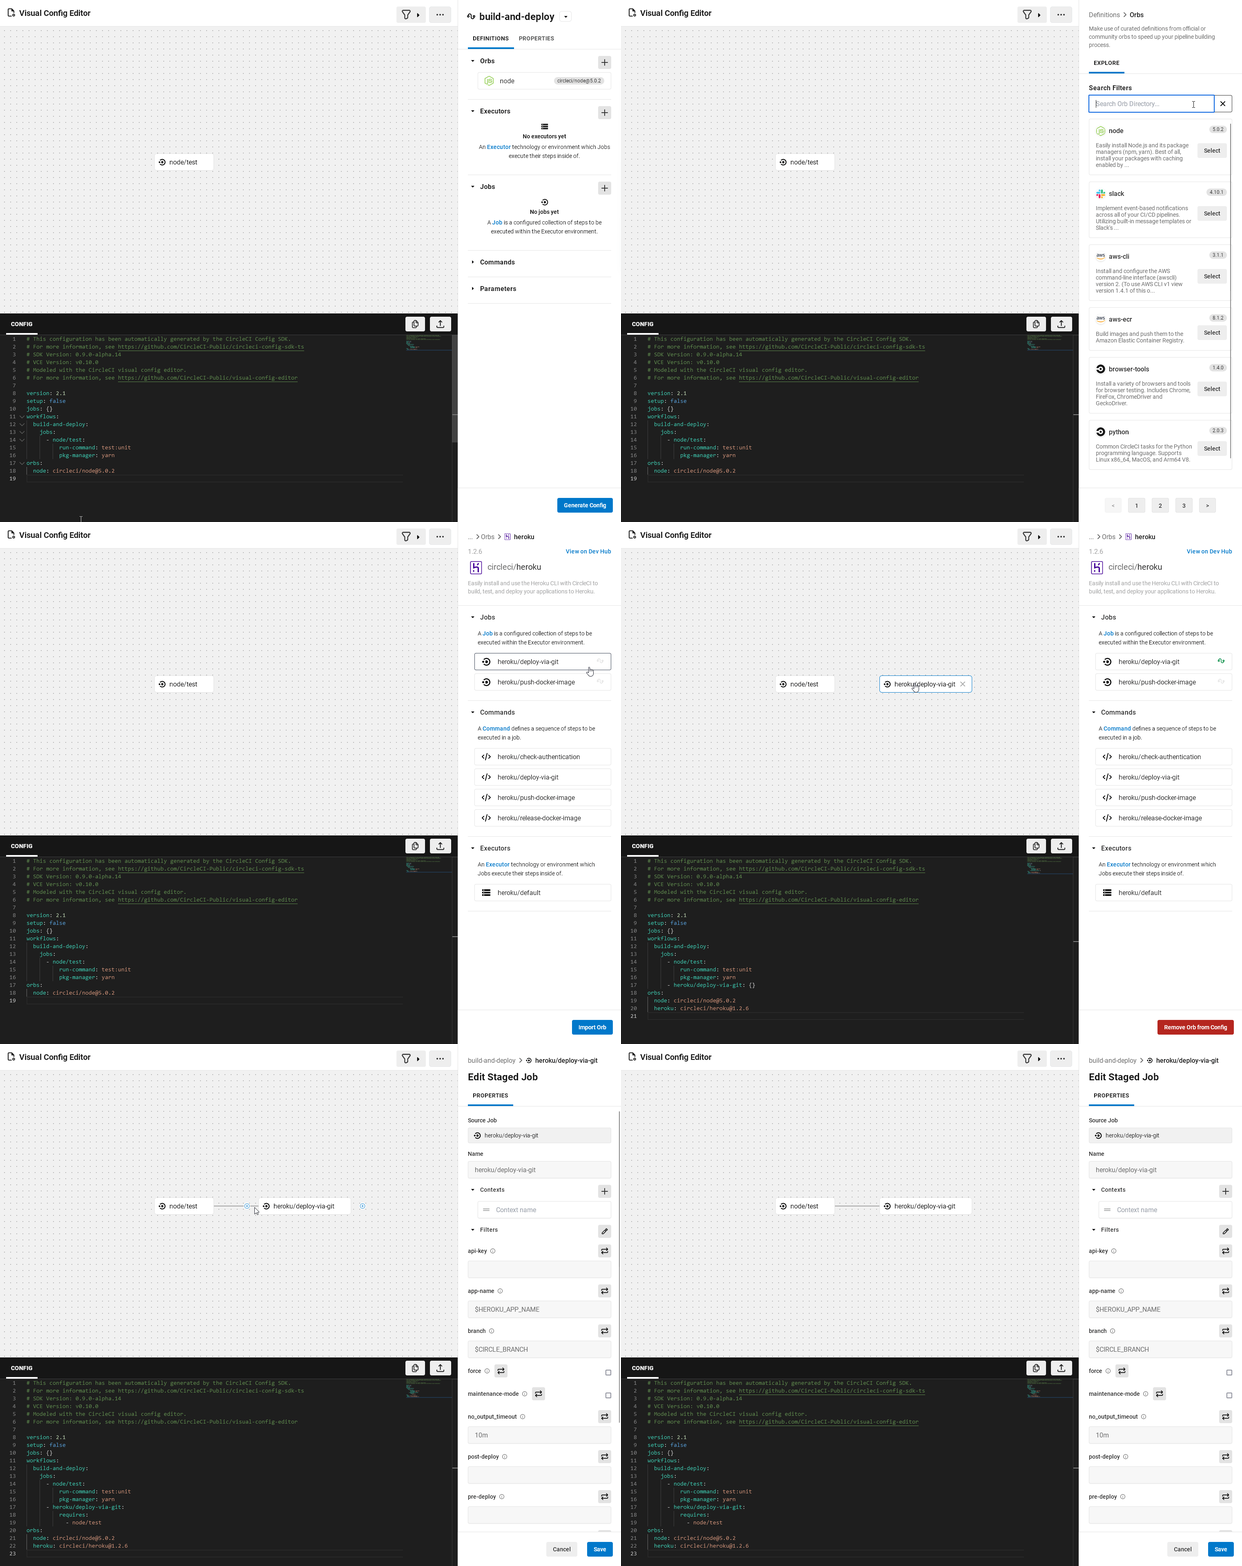
For Heroku to deploy our project, the deployment job needs to be configured with the app name you chose for the Heroku project. Make sure to use the same name in the app-name field of the job properties when you do.
When connecting third party services like Heroku, an API key is typically required. Let’s take a note to add the keys we need to a context before we onboard our project. Even though it’s not configured yet, we’ll tell the Heroku job to use the cfd-deploy context.
One more thing: Most development teams don’t want to deploy on every commit. To ensure your deployment job will only run when changes are made to the main branch of your repository, set the branch parameter in the job properties menu to main.
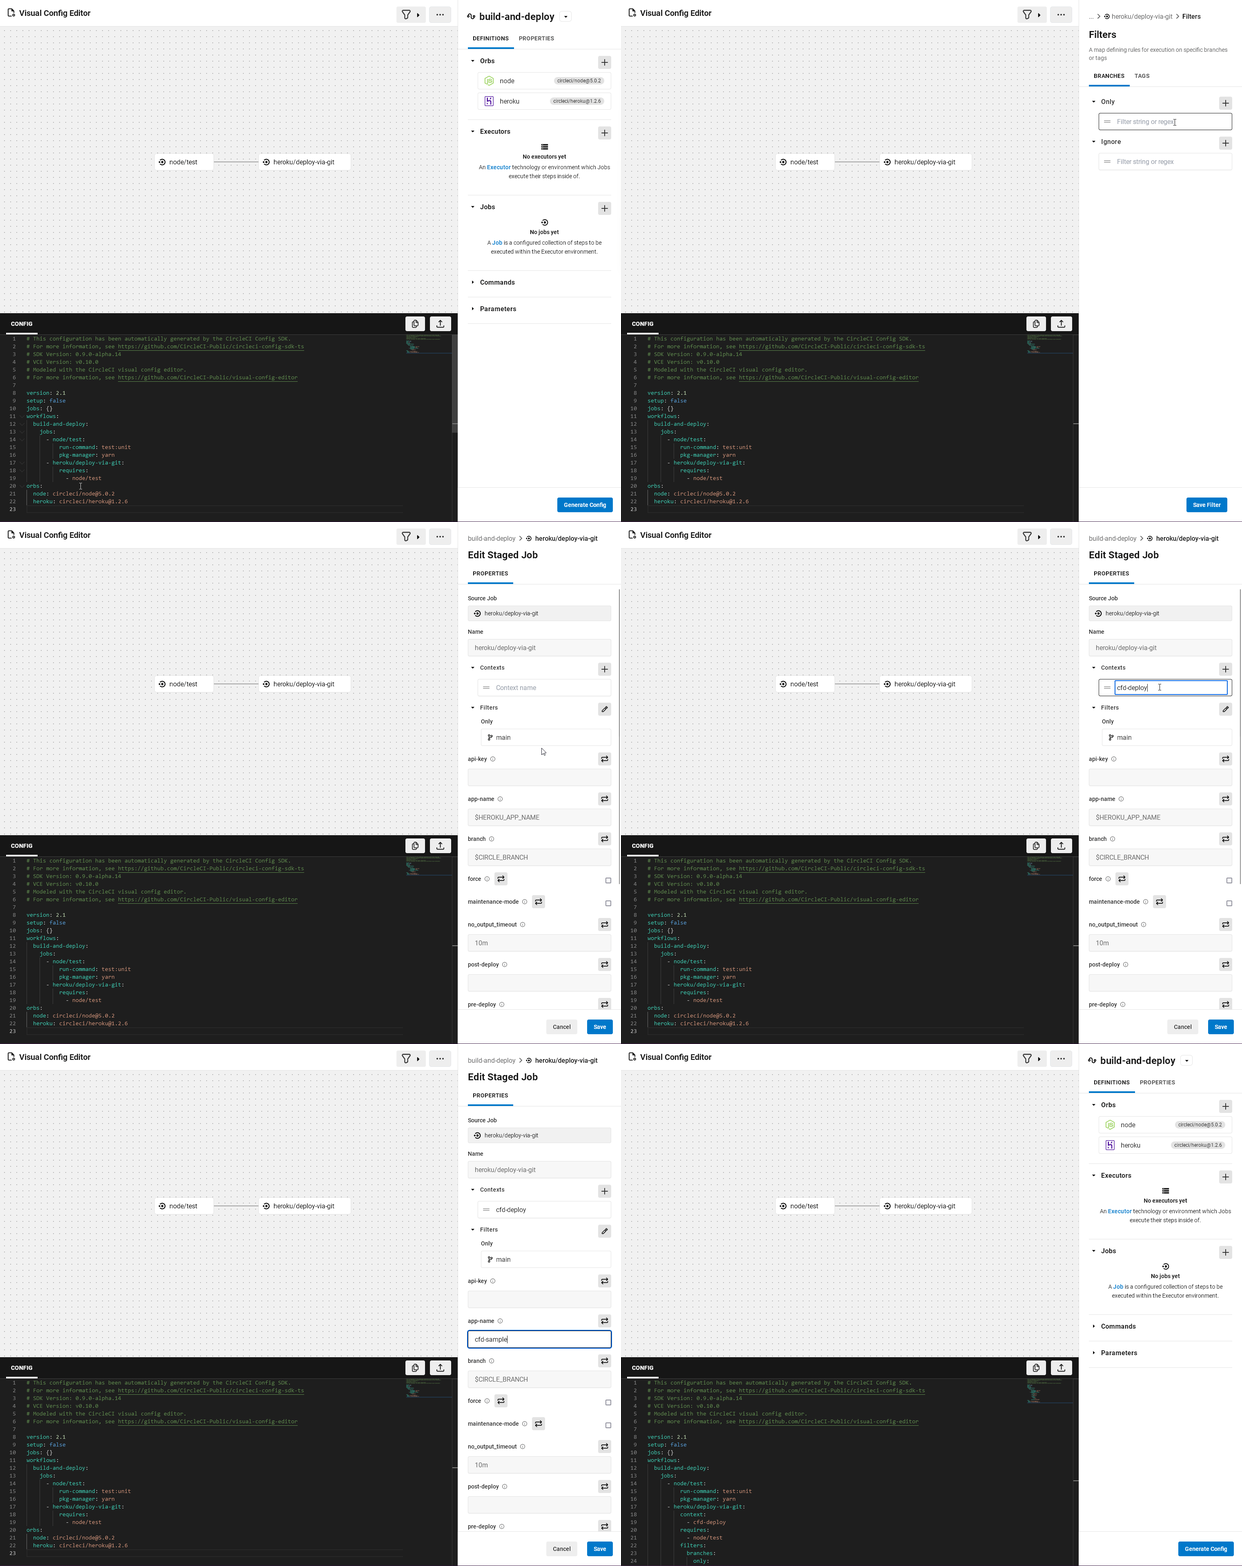
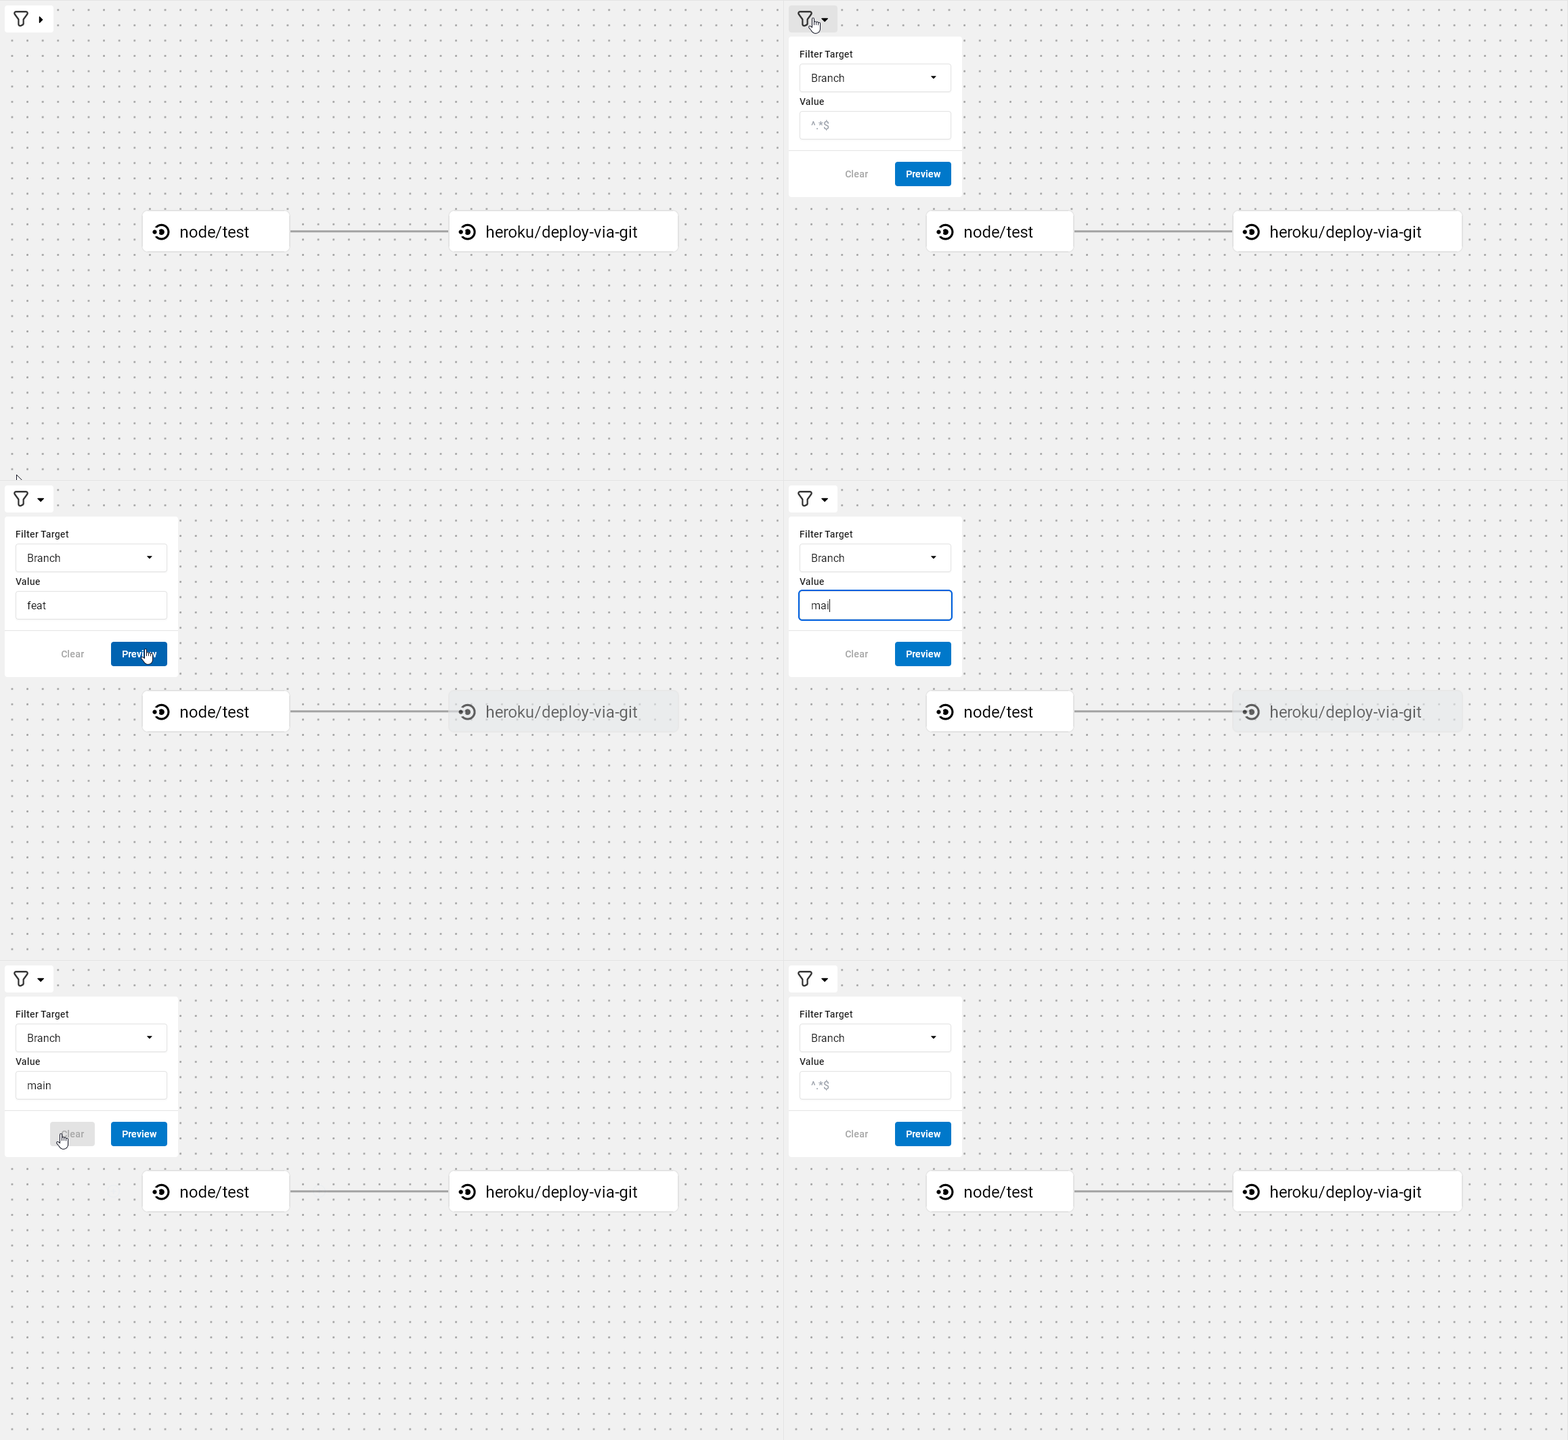
There are many more advanced ways to use filtering to control when jobs are run in your pipelines. You can use the preview toolbox in the upper left portion of your screen to get a visual preview of how different filters affect your workflows.
Here’s what the final generated config looks like after completing all the steps.
# This configuration has been automatically generated by the CircleCI Config SDK.
# For more information, see https://github.com/CircleCI-Public/circleci-config-sdk-ts
# SDK Version: 0.9.0-alpha.14
# VCE Version: v0.10.0
# Modeled with the CircleCI visual config editor.
# For more information, see https://github.com/CircleCI-Public/visual-config-editor

version: 2.1
setup: false
jobs: {}
workflows:
  build-and-deploy:
    jobs:
      - node/test:
          run-command: test:unit
          pkg-manager: yarn
      - heroku/deploy-via-git:
          context:
            - cfd-deploy
          requires:
            - node/test
          filters:
              branches:
                  only:
                    - main
          app-name: cfd-sample
orbs:
  node: circleci/node@5.0.2
  heroku: circleci/heroku@1.2.6
You can also open this example in the VCE to see the generated config file and workflow diagram.
Verifying your pipeline builds green
The configuration is now complete! To use it in a CircleCI pipeline, copy and paste the newly generated config into the pre-existing config.yml file within your sample project fork. Make sure to push up those changes.
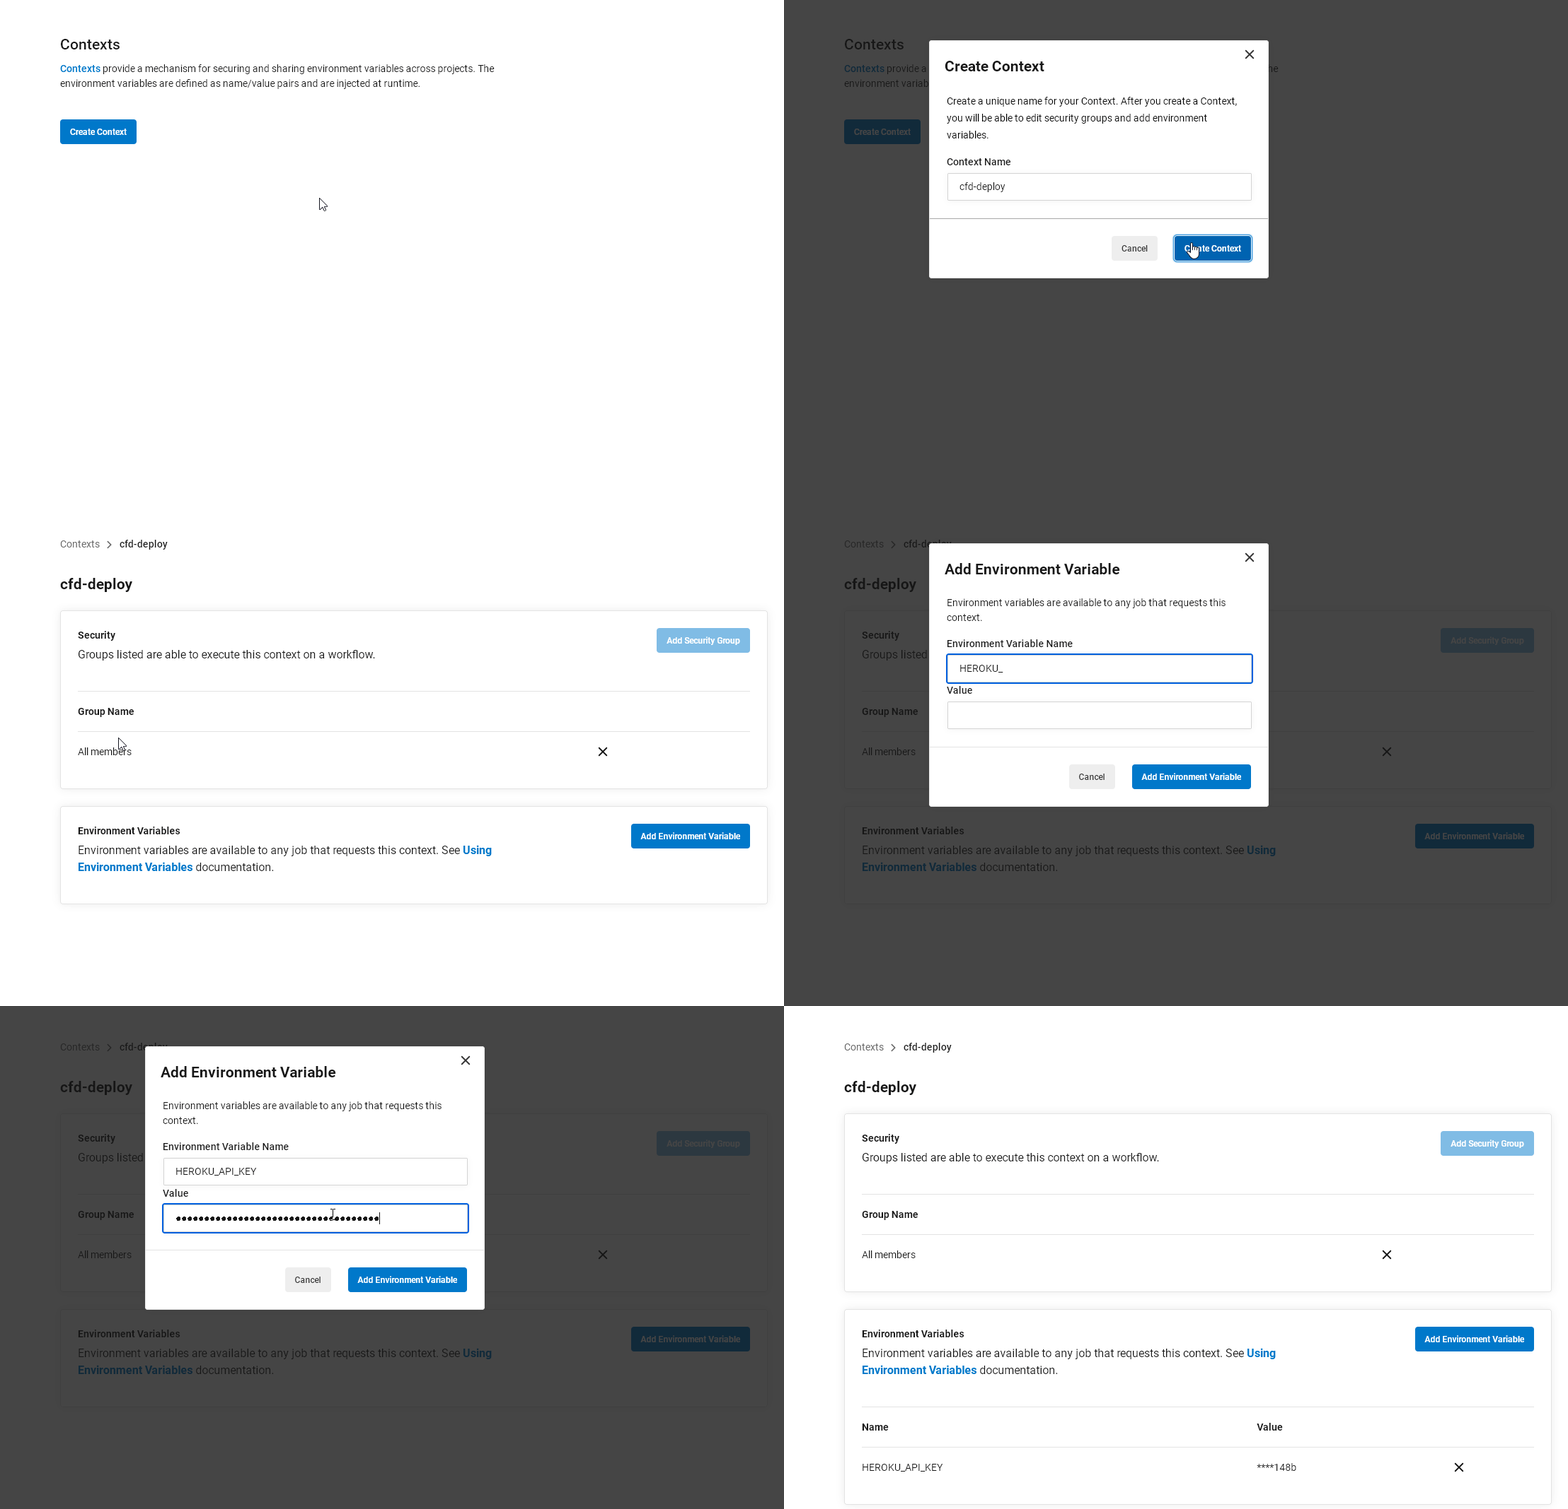
Finally, time to head to CircleCI. Before you add a project, you’ll need to configure our context to securely pass Heroku credentials to your jobs. First, generate a new Heroku token in the Heroku application page. Afterwards, go to Organization Settings > Contexts in the CircleCI web app. Create a context with the name you chose earlier, cfd-deploy, and add the HEROKU_API_KEY environment variable.
Now the project is ready to be added to CircleCI. Go to the project dashboard and click the Setup Project button for the sample project. Choose Use existing config.yml in the project. Enter the main branch name, and click Continue. This will trigger a build of the pipeline you set up.
If all goes as expected, your pipeline will result in a successful build, and the application will now be available on Heroku. Congratulations! You’ve just created an automated test and deployment pipeline on CircleCI using the visual config editor.

Conclusion
The visual config editor provides CircleCI users at any level an alternative method for orchestrating and maintaining their CI pipelines. From building your first pipeline to onboarding new team members to facilitating complex config reviews, the VCE gives you access to all the powerful features of CircleCI’s cloud platform without the additional overhead associated with managing complicated YAML.
The VCE project is open source, and we welcome contributions from all members of the community. To contribute, visit the contributing guide on GitHub or comment on the topic in our community on Discuss. We also have a community Discord — come chat with us about the project in the #visual-config-editor channel.
Users looking for a more advanced config-as-code solution may also be interested in the underlying tech that made the VCE possible, the CircleCI config SDK. To learn more about the config SDK and how you can use it to generate CircleCI config files from native JavaScript or TypeScript, visit the open source config SDK project on GitHub.


