When you sign a contract, you expect both parties to hold their end of the bargain. The same can be true for testing applications. Contract testing verifies that services can communicate with each other and that the data shared between the services is consistent with a specified set of rules. In this post, I will guide you through using Joi as a library to create API contracts for services consuming an API.
In this post, I will demonstrate writing contract tests for an open source API endpoint. The endpoint you will be testing monitors the Bitcoin Price Index for different currencies. You will then use a NodeJS app to test the contracts of the responses returned by the Coinbase API.
Prerequisites
To follow along with this tutorial, you will need:
- Basic knowledge of JavaScript.
- Basic knowledge of writing tests.
- Node.js installed on your system (version >= 18).
- A CircleCI account.
- A GitHub account.
Our tutorials are platform-agnostic, but use CircleCI as an example. If you don’t have a CircleCI account, sign up for a free one here.
Cloning the demo project
To begin the exercise, you will need to clone the demo project. The project is a Node application that is built on top of Express.js. The Coinbuzz application itself has not yet been developed. For this tutorial, you will focus on the contract tests that will ensure the stability of the application as if it will be developed.
The project will use Coinbase APIs, and for this tutorial, you will use the endpoint https://api.coindesk.com/v1/bpi/currentprice/CNY.json. This endpoint fetches the Bitcoin price index for the Chinese yuan in relation to the United States dollar.
Clone the project by running this command:
git clone https://github.com/CIRCLECI-GWP/coin-app-contract-testing.git
Install the dependencies from the project folder:
cd coin-app-contract-testing;

npm install
There is no need to run the application; you will be running only the tests in this project.
Why use contract testing
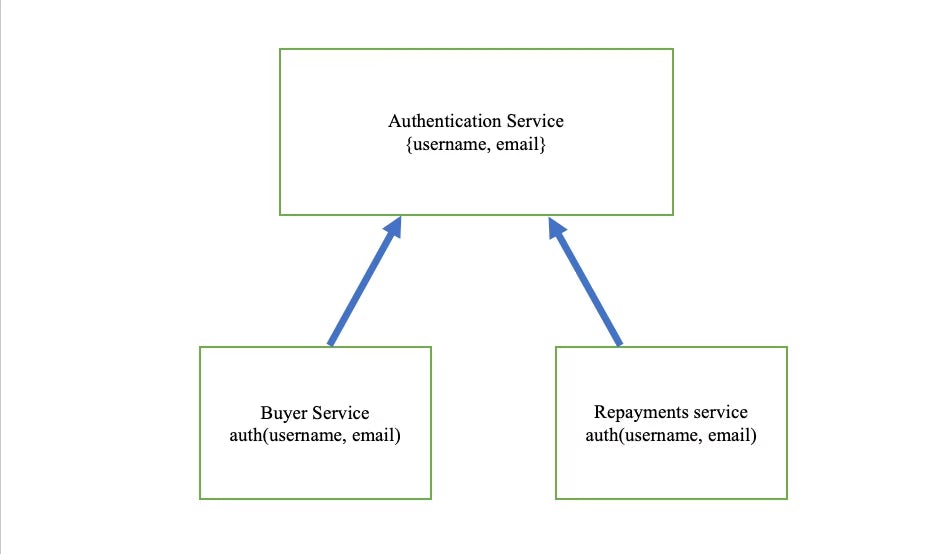
Before you get started, here is some background about contract testing. This kind of testing provides confidence that different services work when they are required to. Imagine that an organization has multiple payment services that use an Authentication API. The API logs in users into an application with a username and a password. It then assigns them an access token when the log-in operation is successful. Other services like Loans and Repayments require the Authentication API service once users are logged in.

If the Authentication service changes the way it works and requires email instead of username, the Loans and Repayments services will fail. With contract testing, both the Loans and Repayments services can keep track of the Authentication API by having an expected set of behaviors with the requests made from the service. The services have access to information about when, how, and where failures are happening. There is also information about whether the failures have been caused by an external dependency, which in this case is Authentication.
Setting up the contract test environment
Contract tests are designed to monitor the state of an application and notify testers when there is an unexpected result. Contract tests are most effective when they are used by a tool that relies on the stability of other services. Two examples:
- A front-end application that relies on the stability of a backend API (like in this project).
- A microservices environment or an API that relies on another API to process information.
Testing endpoints from CoinDesk will help you understand the Bitcoin Price Index for different currencies on different days. To learn more, review app.js in the cloned application.
Before you can begin testing the API, you need an understanding of its structure. That knowledge will help you write your contracts. First, use the browser to make a simple GET request to this URL:
https://api.coindesk.com/v1/bpi/currentprice/CNY.json
This request fetches the current price of Bitcoin over a certain period of time. It then shows the conversion in both USD (United States Dollars) and the CNY (Chinese Yuan).

While the response object might look intimidating at first, I will help you work through it. We will break it down into individual objects using Joi in the next section of the tutorial.
Creating the Joi contracts
Joi is a tool that makes it possible to analyze objects and break them into chunks that can be validated. Joi views a response as a single object with two key values of time and bpi. Each value is of a particular data type. By breaking down the response, Joi can to analyze the response and create assertions of either success or failure based on the defined schema contracts.
To install the joi package for your project, open a Terminal window and run this command:
npm install joi
Great! You have started the process of creating your Joi contracts. This section of the tutorial covers how to create just a part of the object, which can then be extended to create other sections of the response. You will use a sample code block that shows how to break down the object into chunks. You can test the currencyObject and later re-use it for either USD or CNY.
const currencyObject = Joi.object({
  code: Joi.string().required(),
  symbol: Joi.string().optional(),
  rate: Joi.string().required(),
  description: Joi.string().required(),
  rate_float: Joi.number().required(),
}).required();
In this code block, you are taking apart the currency object and telling Joi that you are expecting the currency object to have these key items: code, symbol, rate, description, and rate_float. Also in the contract, the state of the items in your object is described, including whether they should be optional() or required(). In this case you have added the symbol key as optional because you want to reuse the currencyObject with other responses that have a similar structure.

The currency object matches side-by-side to both the currency responses for the USD and the CNY. It can be re-used because the currencyObject contract matches the criteria for both the CNY and the USD response objects. The full BPIContract is integrated with the currencyObject in a way that can be re-used multiple times. The larger context of the full contract of the response is from CoinDesk CNY request.
This section of the tutorial has covered creating Joi contracts and defining the properties of responses that need to be verified by the contract schema. Keep in mind that to “tighten” schemas, you should define whether the contract schema values are required or optional. This creates a boundary on whether to throw an error on failure or to ignore it.
Handling Joi contract errors
When writing contracts, it is important to handle the errors that may arise from issues with the responses. You will need to know whether the responses are consistent every time you execute your tests, and when there is a contract schema failure. Understanding potential contract failures will help you learn how to tweak your applications to handle the failures.
To handle the errors, create a directory and call it lib. Add two files to the directory:
- One for the request helper that helps make the API requests using
axios. - Another file for the
schemaValidation()method to validate responses against the defined schemas.

The schema validation file verifies that that the response provided and the contract are consistent. If they are not, it results in an error. The next code block shows how a method will verify the received response against the defined Joi contract schema.
async function schemaValidation(response, schema) {
  if (!response || !schema) throw new Error("An API response and contract are required");
  const options = { abortEarly: false };
  try {
    const value = await schema.validateAsync(response, options);
    return value;
  } catch (err) {
    throw new Error(err);
  }
}

module.exports = {
  schemaValidation,
};
The schema.validateAsync() Joi method is responsible for validating the responses against the created schema. In this case, you already have a schema created in the file contracts/bpi-contracts.js. In the next section, you will verify that this method works by writing a test and passing in both the schema and the received API response from a Coinbase API.
Writing tests and assertions
You have successfully written your contracts and a method to validate them against API responses while checking for inconsistencies. Your next step is to write a test that uses this method. To test the API using your schema, you will need to install Jest, a JavaScript testing framework, and Axios, a JavaScript request-making framework.
npm install jest axios
You will use Jest to run your tests, and axios to make the API requests to the Coinbase endpoints. To set this up, add the test command to run the tests in the package.json file:
"scripts": {
    "start": "node ./bin/www",
    "test": "jest"
  },
Adding the command in the scripts section enables Jest to scan your project for any file that has either a .spec or .test extension. When one is discovered, Jest treats them as test files and runs them.
Now, create a test inside the contract-tests directory. This test calls the schema validation method after making an API request.
const { getData } = require("../lib/request-helper");
const { schemaValidation } = require("../lib/validateContractSchema");
const { BPIContract } = require("../contracts/bpi-contracts");

describe("BPI contracts", () => {
  test("CNY bpi contract schema check", async () => {
    const response = await getData({
      url: "https://api.coindesk.com/v1/bpi/currentprice/CNY.json",
    });
    return schemaValidation(response, BPIContract);
  });
});
This call uses the getData() method to make the request. The getData() method uses Axios to make a call to the Coinbase API. It then uses the response to verify the API response against the schema validation method schemaValidation(). This already has your Joi schema definitions for the response received from your endpoint. Run your test and validate that it works:
npm test
Check your terminal for some good news.

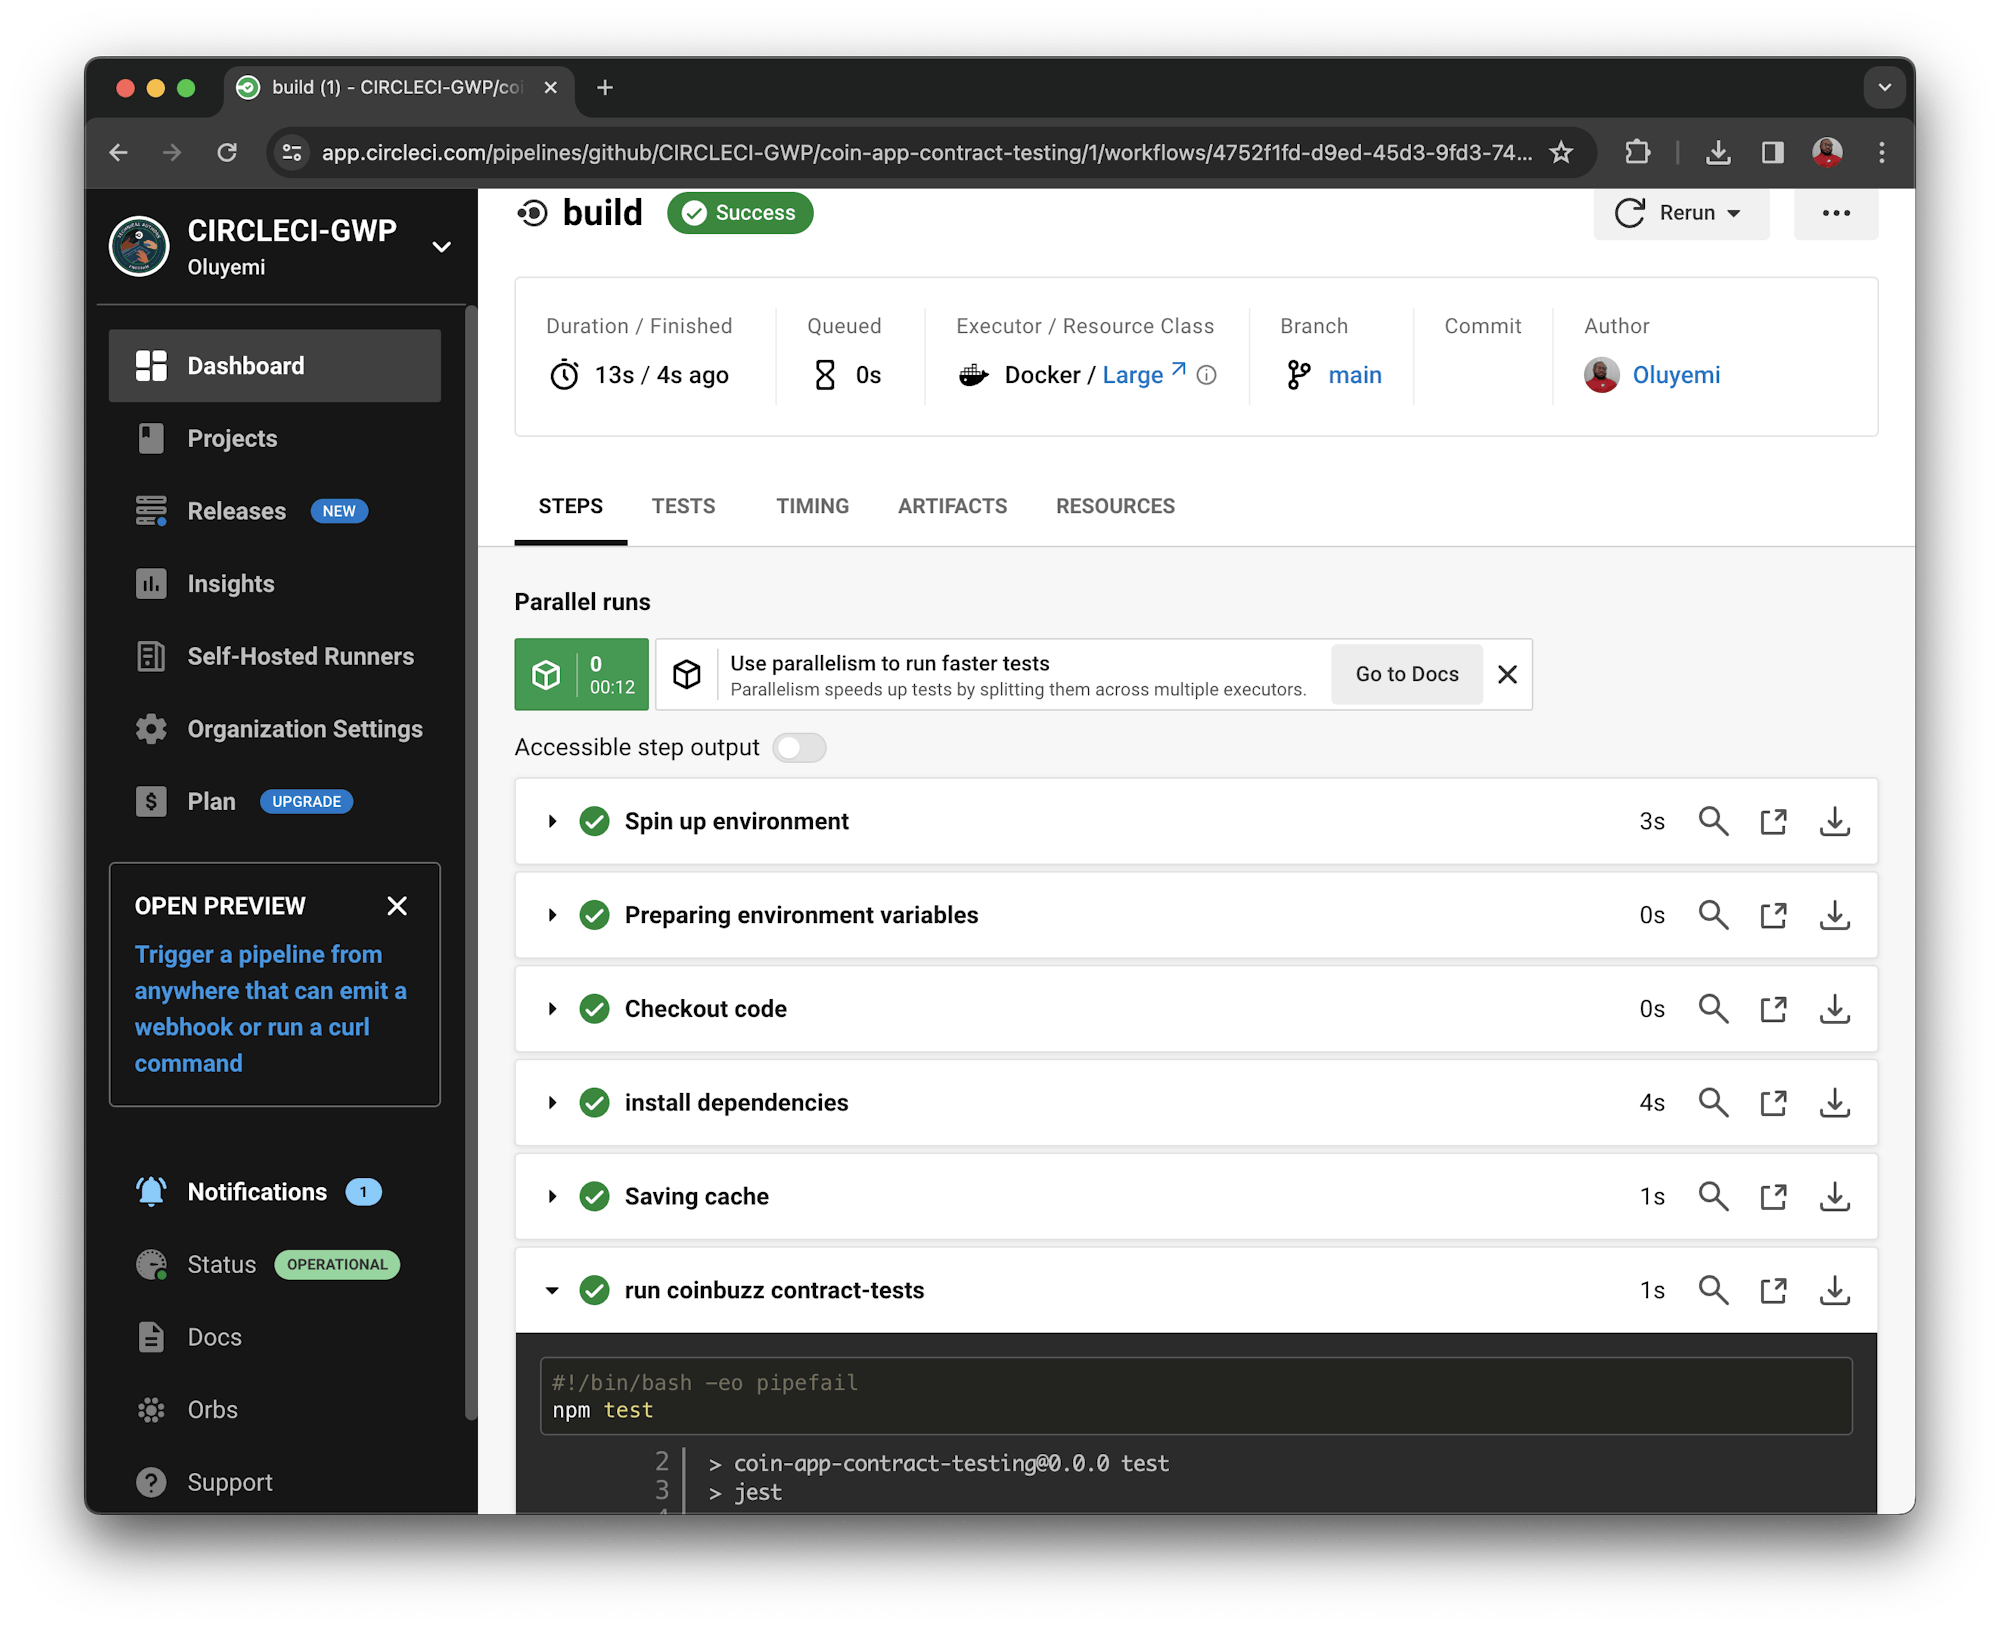
Voila! Your test passes.
We are not done yet, though. You need to verify that the test also handles situations when the contracts are not correct. In a previous contract schema, you used the field symbol: Joi.string().optional() in the currencyObject. You can change the Joi expectation to required() and find out if Joi will create errors. Edit the currencyObject to match this:
const currencyObject = Joi.object({
  code: Joi.string().required(),
  symbol: Joi.string().required(),
  rate: Joi.string().required(),
  description: Joi.string().required(),
  rate_float: Joi.number().required(),
}).required();
After re-running your tests, you are indeed presented with an error.

Joi was able to capture the error, and now expects the symbol object item to be required() and not optional() in the currency object. The response from the API does not have the symbol as part of the response, and Joi rejects the API response. The response does not meet the criteria of the contract.
You have been able to show that your contract schema works. A modification of a response will result in a failure which you will be alerted about.
Change the field symbol: Joi.string().required() in the currencyObject back to optional() to continue the tutorial.
Writing the CI pipeline configuration
In this section, you will automate the test by adding the pipeline configuration for CircleCI. Start by creating a folder named .circleci in the root directory. Inside the folder, create a config.yml file. Now add configuration details:
version: 2.1
jobs:
  build:
    working_directory: ~/repo
    docker:
      - image: cimg/node:21.4.0
    steps:
      - checkout
      - run:
          name: install dependencies
          command: npm install
      - save_cache:
          key: dependency-cache-{{ checksum "package-lock.json" }}
          paths:
            - ./node_modules
      - run:
          name: run coinbuzz contract-tests
          command: npm test
      - store_artifacts:
          path: ~/repo/coinbuzz
In this configuration, CircleCI uses a Node Docker image pulled from the environment. It then updates the npm package manager. Next, if the cache exists, it is restored. Application dependencies are updated only when a change has been detected with save-cache. The Coinbuzz tests are run and cached items are stored in the artifact’s coinbuzz directory.
Setting up a project on CircleCI
If you cloned the sample project repository, it is already initialized and set up in git. It can be helpful to understand how your project is integrated with CircleCI, so, to set up CircleCI, initialize a GitHub repository in your project by running the command:
git init
Next, create a .gitignore file in the root directory. Inside the file, add node_modules to prevent npm-generated modules from being added to your remote repository. Add a commit and then push your project to GitHub.
Log into CircleCI and click Projects. All the repositories associated with your GitHub username or your organization are listed, including the one you want to set up in CircleCI. In this case it is coin-app-contract-testing.

Click the Set Up Project button. You will be prompted about whether you have already defined the configuration file for CircleCI within your project. Enter the branch name (for this tutorial, you are using main). Click Set Up Project to complete the process.
This will run successfully.

Conclusion
In this tutorial, you have created a contract schema for an API response, a method to handle errors in the schema, and a test to verify that the contract schema works. I hope I have been able to demonstrate how easy it is to set up contract tests for APIs or frontend applications that depend on the availability of external services. Now that you can pinpoint a failing service to the accuracy of a changed response object, you can wave goodbye to undetected dependency flakiness.


