Automating Flask deployments with PythonAnywhere

Software Engineer

Now that development teams know about CI/CD, there is no reason for deployments to become a time-consuming and cumbersome process. CI/CD may start with software testing and continuous integration, but adding automated deployments takes your CI/CD practice to the next level.
Continuous deployment slashes the time it takes to release so you can spend more time improving the quality of your applications. In this tutorial, I will guide you through using automated continuous deployments to deploy Flask applications to PythonAnywhere. I want you to feel like a “rock-star” level CI/CD practitioner by the time we wrap up the tutorial.
Prerequisites
Before you start, make sure these items are in place:
- A PythonAnywhere hacker plan
- A CircleCI account
- A GitHub account
- Basic knowledge of CI/CD pipelines
- Knowledge of API documentation with Swagger UI
The sample application I am using for this tutorial is a Flask API. The Flask application exposes a Swagger API that we can use to create and retrieve books. Get the source code of the application by cloning this GitHub repository:
git clone https://github.com/CIRCLECI-GWP/automating-flask-python-anywhere.git
You will use the cloned repository only for PythonAnywhere configuration, which is covered later on in the tutorial.
What is PythonAnywhere?
PythonAnywhere is a hosting platform and an alternative to platforms such as AWS, Azure, Google Cloud, or Heroku. The PythonAnywhere platform provides a cloud-based, easy-to-use tool for development and deployment online.
Automating deployments to PythonAnywhere
Automating continuous deployments to PythonAnywhere offers many benefits for developers:
- Easy and quick to set up
- Built for performance
- Free for open source projects
I have created a flow diagram (using CircleCI as an example) that shows how automating continuous deployments to PythonAnywhere works. The process can be adapted for any CI/CD tool and any other hosting platform.
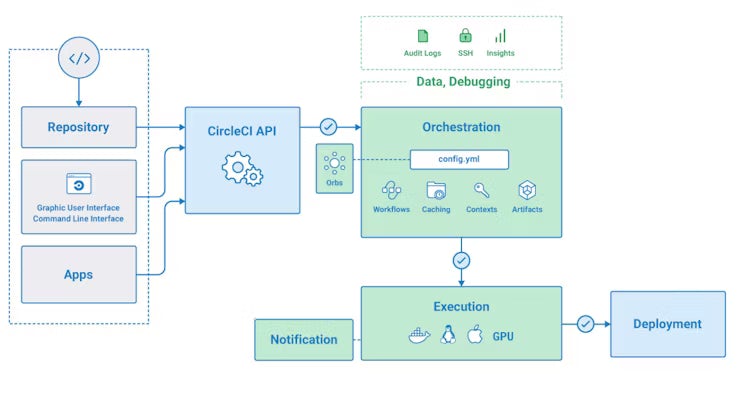
The diagram shows how to use the CircleCI API with the CircleCI web interface and configuration file to configure deployment jobs. The diagram also shows the process by which all the CircleCI steps and services are executed from a high-level view. Take note of the separation of contexts that span from application cloning to preparing the deployment and then deploying the application.
Setting up PythonAnywhere
PythonAnywhere makes it simple to get started and set up. The PythonAnywhere platform:
- Comes with pre-installed Python libraries
- Lets you set up different environments for an application
- Supports scheduling tasks like regular database clean up or using cron jobs for repetitive tasks
Once you log in to your registered PythonAnywhere hacker account, open the web tab and create a new webapp. For this project, use the manual configuration option. This lets you set a virtual environment and install additional libraries that are project specific.

When setup is complete, you will be redirected to your web application’s dashboard. You can use the dashboard to further configure your application using the console interface.

From the console, you can create a virtual environment for your application using the specific python version declaration version: 3.9. Run this command:
mkvirtualenv flask-venv --python=/usr/bin/python3.9
Cloning the application to the PythonAnywhere console
Next, clone the application from GitHub to the PythonAnywhere console. This is an important step because it also sets up the remote push and pull GitHub links that we will later on use to pull changes from GitHub. Run this command on the console:
git clone https://github.com/CIRCLECI-GWP/automating-flask-python-anywhere.git
Installing dependencies
Change directory:
cd automating-flask-python-anywhere
Install pipenv package manager using:
pip install pipenv
Install all dependencies with:
pipenv install
After cloning the Flask application, you need to tell PythonAnywhere where your project is located. To do this, configure the location using the Web tab. Without closing the bash console (on the hamburger menu at the far right), open the Web tab and set the source code path for the project, the virtual environment path, and the static files, including the Swagger UI YAML file.

Set the source code path to:
/home/<username>/<project-name>
After creating the virtual environment, you can open the console with it. For now you can ignore this option.
Note: To get the working directory path, use the bash $pwd command to find the parent directory.
Congratulations! Your Flask project has been set up and successfully hosted on PythonAnywhere. Open the link to your web application to review the default PythonAnywhere screen.

Great work so far, but there are still a few more steps to go.
The page for your application displays PythonAnywhere’s default welcome message. To open your Flask application, you need to make a few changes to the PythonAnywhere’s config file.
Open the WSGI configuration file from the dashboard and modify the configuration.

WSGI (Web Server Gateway Interface) is a Python interface to the web server. It allows you to write Python code that can be run on the server and is used to configure the web server. With WSGI you can forward requests from a web server to the Flask backend and from the web server back to the requestor.
To enable execution of your Flask application, remove the hello world code in the config file.
Also, configure the path to your project directory and the entry point of your application:
import sys

# add your project directory to the sys.path
project_home = '/home/waweru/automating-flask-python-anywhere'
if project_home not in sys.path:
    sys.path = [project_home] + sys.path

# import flask app but need to call it "application" for WSGI to work
from run import app as application
Save the changes and close the file. Next, you need to reload the app and append the suffix api-docs to the URL. That loads your Flask Swagger documentation page.

You have successfully deployed your Flask application to PythonAnywhere.
Next you will need to configure your application to be automatically deployed by CircleCI every time you make deployments to the main branch.
Setting up CI/CD with CircleCI
To set up CI/CD in this project, use ssh to connect to the PythonAnywhere server. This ensures that once CircleCI executes, you can pull the latest changes from the main GitHub branch if the pipeline run was successful.
Note: SSH, also known as Secure Shell or Secure Socket Shell, is a network protocol for operating network services to securely connect over an unsecure network. Applications of SSH include remote command-line login and remote command execution.
The following diagram shows how CI/CD is applied with CircleCI and PythonAnywhere using SSH.
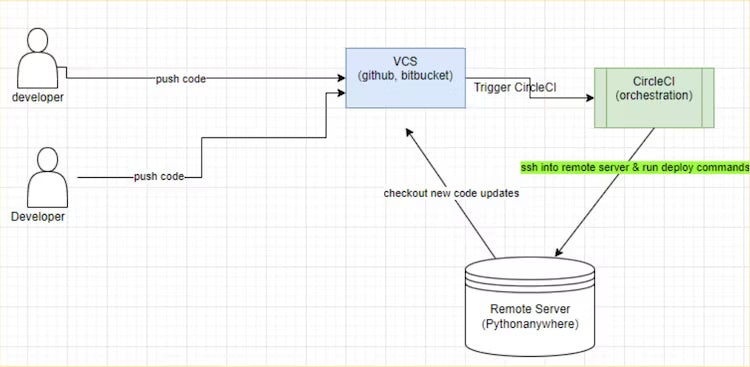
The illustration shows that when you push your code to GitHub, it kick starts a process to deploy the code to PythonAnywhere. Once the deployment is complete, you can then connect to the PythonAnywhere server and pull the latest code from the main branch. Now that you know how it works, your next step is to write a CircleCI configuration file to achieve it.
Setting up CircleCI
First, create a .circleci directory in your root directory and add a config.yml file. The config file will contain the CircleCI configuration for every project. When this has been set up, you can use CircleCI orbs in the configuration to execute your Python API tests.
Your CircleCI configuration file will execute your tests and deploy your application to PythonAnywhere. In the .circleci/config.yml file, enter:
version: 2.1
orbs:
  python: circleci/python@1.2

workflows:
  build-app-with-test:
    jobs:
      - build-and-test
      - deploy:
          requires:
            - build-and-test
jobs:
  build-and-test:
    docker:
      - image: cimg/python:3.9
    steps:
      - checkout
      - run:
          name: Install dependencies
          command: |
            pipenv --three
            pipenv install
      - run:
          name: Run tests
          command: pipenv run pytest
  deploy:
    docker:
      - image: cimg/python:3.9
    steps:
      - checkout
      - run:
          name: Deploy Over SSH
          command: |
            ssh-keyscan -H ssh.pythonanywhere.com >> ~/.ssh/known_hosts
            ssh $SSH_USER@$SSH_HOST "cd automating-flask-python-anywhere; git pull";
In this CircleCI configuration, you are creating two jobs. The first job is a build job responsible for installing the dependencies and running the tests. The deploy job is responsible only for deploying the application to PythonAnywhere. Running the build and test job followed by the deploy job ensures deployment happens only after successful tests. Also, as defined in the configuration, to deploy over SSH using keyscan ssh-keyscan -H ssh.pythonanywhere.com >> ~/.ssh/known_hosts. This fetches the SSH keys for your PythonAnywhere account and adds them to the runners ~/.ssh/known_hosts file of your deploy job.
jobs:
  - build-and-test
  - deploy:
      requires:
        - build-and-test
After the tests pass, you can deploy your application to PythonAnywhere using the deploy job. To allow deployment of the application you need to generate SSH keys in your PythonAnywhere account, and then add that private key to your GitHub account.
At this point, you can push your project to GitHub.
Initializing CircleCI on the dashboard
Next, to set up any project in CircleCI, start on the CircleCI dashboard. Go to the Projects section. All the GitHub repositories associated with your GitHub username or organization are listed. For this tutorial, the repository you want to set up is automating-flask-python-anywhere.

On the Projects dashboard, select the option to set up the selected project. Enter the name of the branch where your configuration file is housed and click Set Up Project. This will trigger your build but it will fail at this time

This is because you are yet to generate SSH keys to connect and deploy your project to PythonAnywhere server. To fix this, you will generate the SSH keys and also create the required environment variables for use on Circle in the next section.
Generating SSH keys
You do not want to always use a password to connect to PythonAnywhere. To allow connection to PythonAnywhere without entering a password every time, you can generate SSH keys on the PythonAnywhere console. From the PythonAnywhere console, run this command:
ssh-keygen -t rsa -b 2048
You will be prompted to enter a passphrase for additional security. You can add this or leave it blank.

Great! You have generated your keys. Now you can use them in CircleCI to automatically connect to PythonAnywhere. I will cover that in the next section.
First though, you need PythonAnywhere to know that your public key is an authorized key. Add the public key to ~/.ssh/authorized_keys in PythonAnywhere’s console using this command:
ssh-copy-id waweru@ssh.pythonanywhere.com
You will be prompted to enter your password. Once authorized, you can connect to PythonAnywhere without having to use a password ever again. Cool right? Test by running this command in the PythonAnywhere console:
ssh -i ~/.ssh/id_rsa_pub waweru@ssh.pythonanywhere.com
This command should log you into the PythonAnywhere server from the console without entering a password. Your next step is adding SSH keys to CircleCI.
Adding SSH keys to CircleCI
Following steps in the previous section you were able to generate both the private and public keys for the PythonAnywhere account. Now you can copy your private key to CircleCI.
To avoid adding overhead to the server, you can just display the private key and then copy it to the clipboard. In the PythonAnywhere console, enter this command:
cat ~/.ssh/id_rsa
Once you have your private key copied to the clipboard, navigate to the CircleCI project settings for your project and add the private key there.

Adding the environment variables
Note that we are using the $SSH_USER and $SSH_HOST variables to do the authentication while at the same time masking the SSH user and hostname. We did this by adding SSH_USER and SSH_HOST to the CircleCI Settings page under the Environment variables. You can read more about adding variables here .
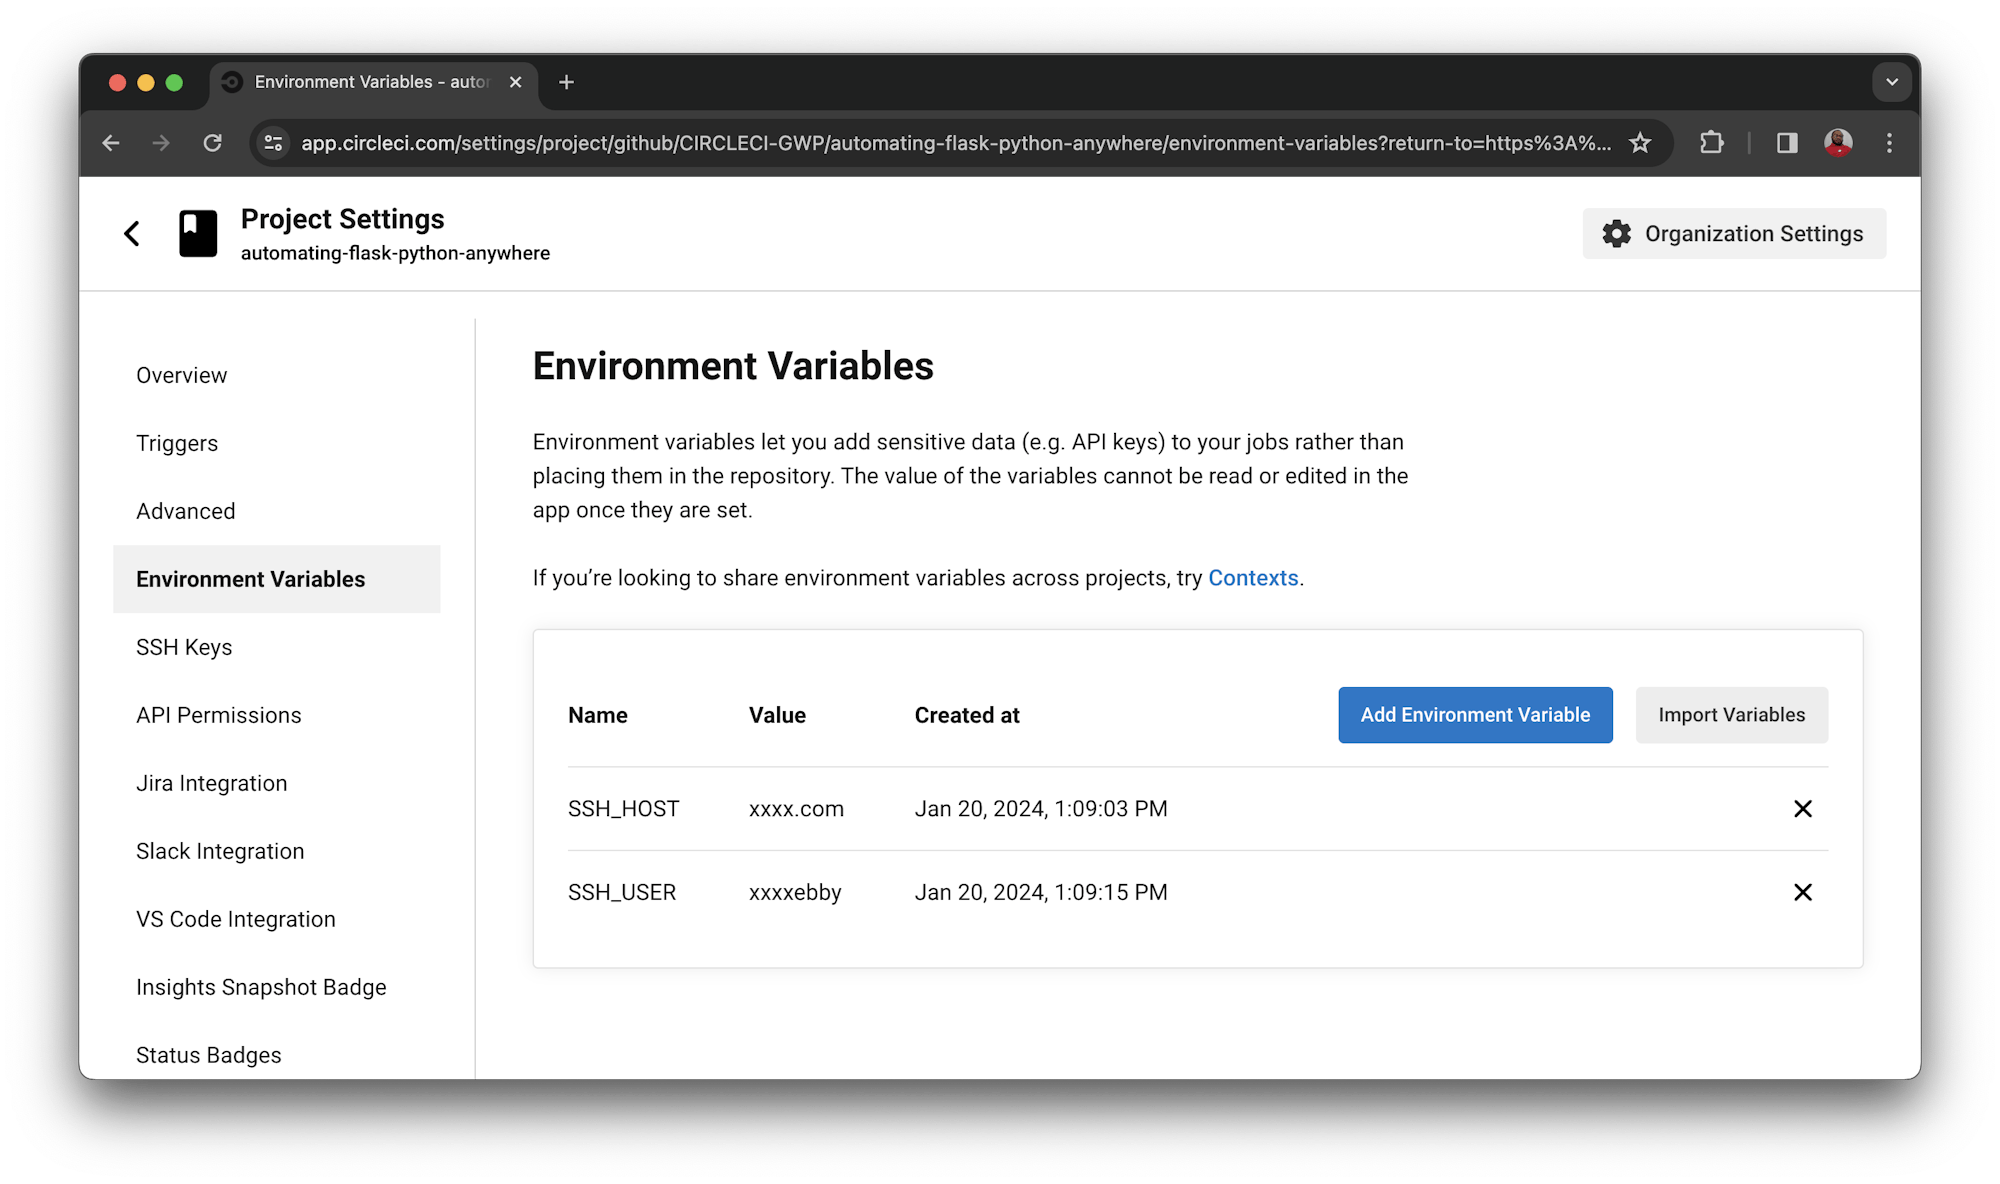
The SSH_HOST to access PythonAnywhere via SSH is ssh.pythonanywhere.com. SSH_USER is the username of your PythonAnywhere account.
Now go ahead and rerun the pipeline, your build should be successful and application deployed to PythonAnywhere using CircleCI.

As described previously, the deploy job is run after the build-and-test job. This is because the deploy job requires the build and test job to pass and will fail if the build-and-test job fails.

Verifying deployment on PythonAnywhere
To verify that your application is successfully deployed to PythonAnywhere, you need to manually reload using the PythonAnywhere dashboard. You can avoid this step by creating a bash script inside the PythonAnywhere account. The script automatically reloads the application after a deployment. Call this script reload.sh, and add the command to either recreate or update the <username>_pythonanywhere_com_wsgi.py file. This command controls reloading the application.
#!/bin/bash
touch var/www/<username>_pythonanywhere_com_wsgi.py
After you add the script to reload.sh in root folder, make it executable using the PythonAnywhere console. In the console, run this command:
chmod +x reload.sh
This command makes the script executable in bash every time changes are detected in PythonAnywhere. Now, every time you start a deploy, the script will be executed and the application will be reloaded. Congratulations on achieving our goal of automating deployments with PythonAnywhere!
Conclusion
Through this tutorial you have been able to learn how to prepare an application for deployment, configure a PythonAnywhere environment, and automate deployment using SSH. This tutorial also explained the importance of SSH keys in deploying to PythonAnywhere. You added to your knowledge of CI/CD practices by setting up your application to deploy if all parameters, including passing tests and CircleCI jobs, are met. And you learned how to do auto-reloads on PythonAnywhere after each deployment.
I hope you enjoyed this tutorial can use it with your team to level up your CI/CD practice. Until next time, keep coding!