Continuous deployment of Gatsby apps to Heroku

Fullstack Developer and Tech Author

The JAMStack is quickly becoming a big deal in the world of web development. JAMStack, which stands for Javascript, APIs, and HTML markup, is a modern architecture for building web applications and one of its major features is that it doesn’t require a database and a web server is optional. The JAMStack architecture is aimed at decoupling the front end and the back end by generating a front end made of HTML, CSS, and Javascript and a back end that is simply a content API returning JSON or XML.
One of the leading JAMStack platforms today is Gatsby.js. Gatsby.js is a free and open-source framework based on React.js that helps developers build high-speed web applications.
In this tutorial, we will be demonstrating how to deploy a Gatsby.js site to the popular Heroku platform by building a continuous integration pipeline for its deployment using CircleCI.
Prerequisites
In order to follow along with this post, you will need a few things in place:
- Node.js >= 10.16 installed on your system (You can confirm this by running the command
node -von your terminal to print out your version of NodeJS installed) - Git installed on your system (You can confirm this by running the command
giton your terminal. This should print out available git commands) - A Heroku account
- A GitHub account
- A CircleCI account
With these, you are ready to follow along.
Creating a Gatsby.js project
To begin, we need to create our Gatsby.js project. In an appropriate location within your system, run the following command to create a new project:
npm gatsby new gatsby-heroku-deploy
The gatsby-heroku-deploy part of this command is the folder name for my project to be scaffolded in. You can use any preferred name.
This command will immediately begin scaffolding a new Gatsby.js project. You might be prompted to select either yarn or npm as your package manager, for this tutorial, go with npm.
Once the scaffolding process is done, go into the root of your project (cd gatsby-heroku-deploy) and run the following command to boot up a server to serve the application in development mode:
npm run develop
This will serve the application at the address http://localhost:8000/ and display the page below.

Great!
We now have a functional Gatsby.js site up and running.
Setting up a Heroku App for Gatsby
To set up a Heroku app for our Gatsby application, we need to log into Heroku and create a new application.

Next, we need to get the name of our application (this will be gatsby-heroku-deploy for the application created above) and the API key for our Heroku account. The API key can be found in the Heroku Account Settings section.
We will need these two values (the app name and API key) later on to create environment variables on our CircleCI project for deployment to Heroku.
The final thing we need to do on our Heroku account is to install some necessary buildpacks. Buildpacks are scripts that run when your application is deployed. We will need two build packs for this exercise:
- heroku/nodejs: Required for all Node.js applications
- heroku/heroku-buildpack-static: The Heroku Buildpack Static package (because Gatsby.js’s build is made up of static files, this will help us serve the static files on the Heroku platform)
Go to your Heroku application’s Settings page and scroll down to Buildpacks (you might already see that the heroku/nodejs buildpack has already been added). Click Add buildpack and you will see a dialog pop up similar to the one below.

For each buildpack (heroku/nodejs and heroku/heroku-buildpack-static) enter the identifier into the text field and click Save Changes.
Note: If the heroku/nodejs has already been added, only add the heroku/heroku-buildpack-static build pack.
After doing this for both buildpacks, you will see the two build packs now listed in Buildpacks.
That completes the set up required for Heroku.
Setting up the Gatsby.js project on CircleCI
Our next task is to get our Gatsby.js project set up on CircleCI. We need to push our code to a GitHub repository on the account you have linked to your CircleCI account.
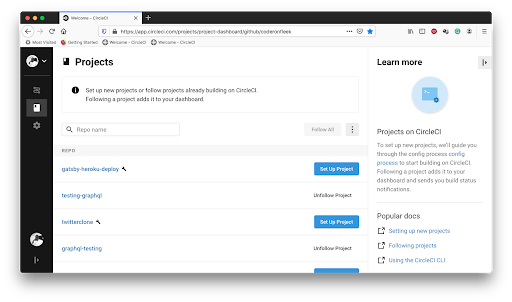
Next, go to the Add Projects page to add the project.

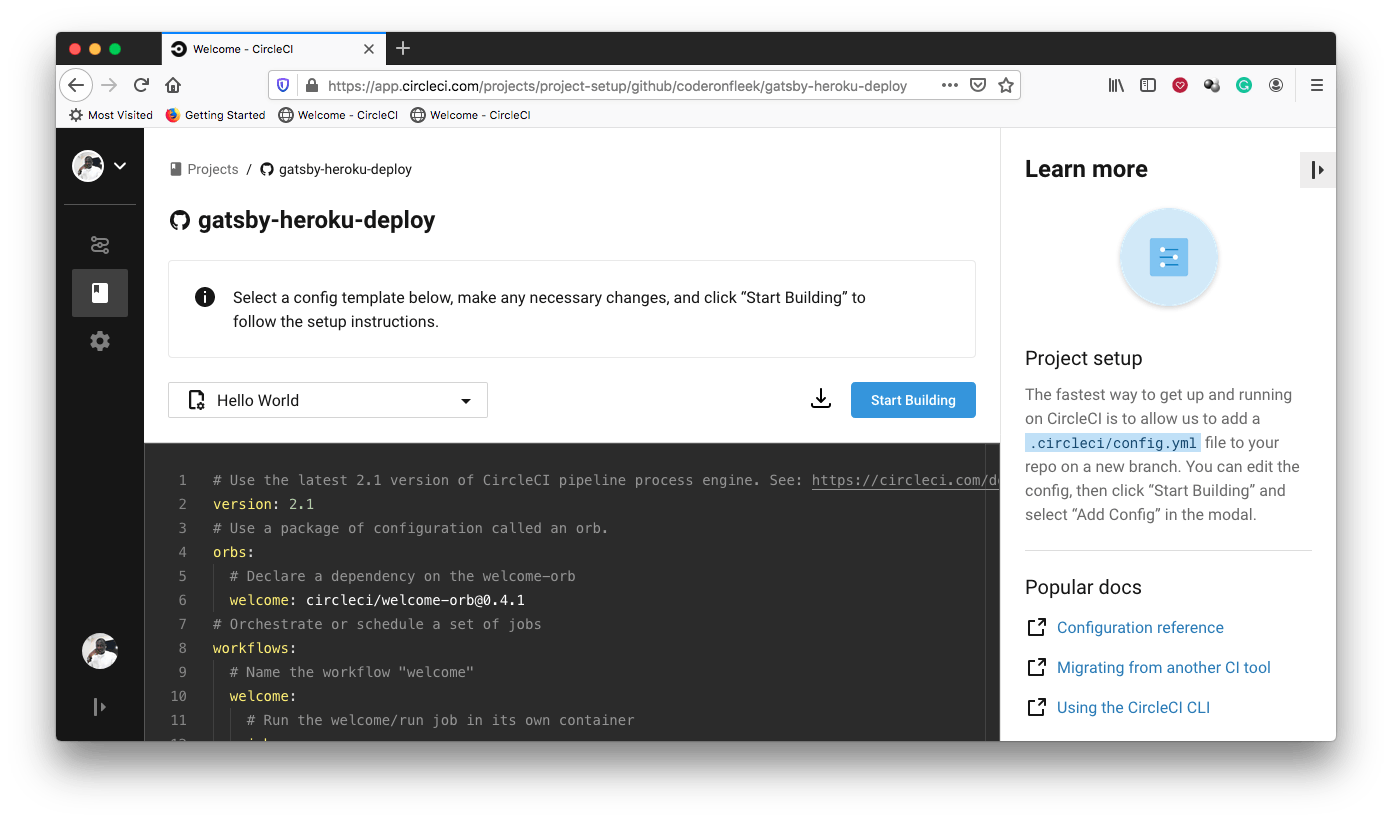
Click Set Up Project to begin setting up the project. This will load the next screen.

On the setup page, click Start Building. Before the build starts, you will get a prompt to either download and use the provided CircleCI configuration file and have it added on a separate branch or set one up manually.

Select Add Manually to proceed. This will prompt another dialog that checks to confirm that you have a configuration file set up to begin building.

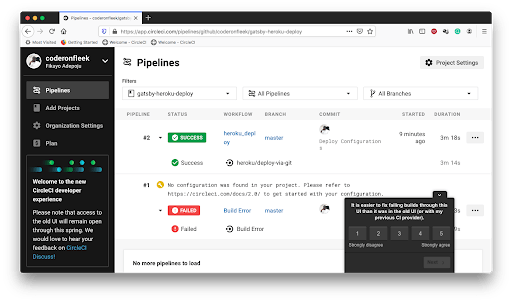
Click Start Building to complete the setup. The build will surely fail because we have not set up our configuration file yet, this we will do later on.
The final thing we need to do on the CircleCI console is to set up environment variables for the project we just added. This will enable it to have authenticated access to our Heroku application for deployments.
Go to your project’s settings by clicking Project Settings on the Pipelines page (make sure your project is the currently selected project).

This will navigate to the project settings page. On this page, click Environment Variables on the side menu.

On this environment variables page, click Add Environment Variable button.

Add the following environment variables:
HEROKU_APP_NAME: This is the name of your Heroku application (in this casegatsby-heroku-deploy)HEROKU_API_KEY: Your Heroku account API key found under the Account tab of your Heroku account in the Account Settings
Once added, you will have everything set up on your CircleCI console for deployment to Heroku.
Deploying the Gatbsy.js site using orbs
Orbs are reusable packages of YAML configuration that condense repeated pieces of config into a single line of code. They enable developers to easily use powerful pipeline functionalities with all the boilerplate abstracted.
In this exercise, we will be using CircleCI’s orb for Heroku to configure our pipeline to deploy our Gatsby.js site to Heroku.
But before that, we need to create a file to instruct our Heroku Buildpack Static package on how to deploy and serve our application.
At the root of your project, create a new file named static.json and enter the following code into it:
{
  "root": "public/",
  "headers": {
    "/**": {
      "Cache-Control": "public, max-age=0, must-revalidate"
    },
    "/**.css": {
      "Cache-Control": "public, max-age=31536000, immutable"
    },
    "/**.js": {
      "Cache-Control": "public, max-age=31536000, immutable"
    },
    "/static/**": {
      "Cache-Control": "public, max-age=31536000, immutable"
    },
    "/icons/*.png": {
      "Cache-Control": "public, max-age=31536000, immutable"
    }
  },
  "https_only": true,
  "error_page": "404.html"
}
The most important configuration parameter here is the root property. When Gatsby.js runs its build script (this is also the script used by Heroku to run the build before deployment), a public folder is generated at the root of the project containing the production version of the application. This production version is what the host serves to users.
Thus, the root property is used to point to this folder so that the host serves the appropriate code. Other parameters in this configuration are simply best-practice configurations for Gatsby.js sites. For example, caching guidelines can be found here.
Good! Now we can write our deployment script.
At the root of your Gatsby.js project, create a folder named .circleci and a file within it with the name config.yml. Inside the config.yml file, enter the following code:
version: 2.1
orbs:
  heroku: circleci/heroku@0.0.10
workflows:
  heroku_deploy:
    jobs:
      - heroku/deploy-via-git
That’s it!
In the configuration above, we pull in the Heroku orb circleci/heroku@0.0.10 which automatically gives us access to a powerful set of Heroku jobs and commands. One of those jobs is the heroku/deploy-via-git which deploys your application straight from your GitHub repo to your Heroku account.
This job already takes care of installing the Heroku CLI, installing project dependencies, running the build script, and deploying the application. It also picks up our environment variables to facilitate a smooth deployment to our Heroku application.
Now, the moment of truth (drum roll). Let’s commit all the changes we have made to our Gatsby.js project and push to our repo to trigger the deployment.

Great!
To see the behind-the-scenes zction of the deployment, you can click into the build.

Now for the final confirmation that the deployment of our Gatsby.js site has been successful, visit the default Heroku address for the site at https://[APP_NAME].herokuapp.com. If you used the same name as I did for this exercise, that will be https://gatsby-heroku-deploy.herokuapp.com/. You will see a screen similar to the one below (this might be different if you are using a different Gatsby.js starter template, learn more about starters here).

Conclusion
In this tutorial, we deployed a Gatsby.js site to Heroku using CircleCI orbs. Now when we push our code, all changes will be deployed automatically. This tutorial has also demonstrated how CircleCI orbs makes deployment easy. Instead of writing many lines of config need to deploy to Heroku, orbs abstract all of that into convenient commands for us to use.
Check the CircleCI orbs registry for orbs that suit your programming language and deployment destination of choice.
Happy coding!


