If you are familiar with Ruby on Rails, you know it’s a web framework with testing practices baked into it. At the company I work for, BridgeU, we strive to protect the features we write as much as possible with a multitude of tests ranging from unit to feature tests. When correctly set up, a test suite will give you a solid sense of trust in your system and will provide guidance whenever you have to refactor parts of the code — an inevitable part of the development lifecycle. However, setting up a thorough and stable test suite requires practice, experience, and a bit of trial and error. The goal of all these tests is to increase the confidence you have in your system, but there is an issue that can plague that sense of reassurance: flaky tests.
Background
If a test passes over and over on your continuous integration (CI) system, everything’s good. If it fails consistently, that’s not bad either — you can spot it, understand where it comes from, and address it. However, if you run into a test that fails sometimes, that can be a real source of frustration. You find yourself hitting rebuild on your CI system a few times before the test actually passes and your code goes live. This might seem harmless, but multiply this scenario by several developers shipping new things multiple times a day and the time waste is significant.
Some time ago, our biggest struggle was with what thoughtbot calls feature tests, which is a kind of acceptance test. These are high-level scenarios that click around the entire application to make sure every piece works together. Maybe it was the sheer amount of moving pieces in these tests, or maybe it was their higher-level focus that made it harder for us to accurately predict the consequences of lower-level changes. The fact is that we found ourselves creating a spreadsheet to record these flaky tests, so we could have an idea of how frequent they were.
The instability of these tests made it difficult to find reproducible cases for them. Moreover, the error information we were getting was simply not informative enough. We started looking for ways of retaining more data about the failures, and that’s when it hit us. If we can’t see the test failing when it happens, let’s take a photo of it! The only thing to figure out was where and how to store these photos on a CI system - but there’s an API for that: CircleCI Artifacts.
It boiled down to this: if a test fails, take a screenshot of the webpage and store it somewhere - that way, we could look into the failure after the test suite ran. With an image of what happened, we could get an idea of where to start looking for the issue. From simple buttons that were no longer there, to background JavaScript requests from other tests lingering and interfering with the current test being run, we were able to fix these flaky tests one by one. In this article, I’ll show you how to set up this screenshot gathering process with CircleCI.
Sample application
Let’s set up a Rails application to see it in action. We’ll use the defaults that make sense to speed up the setup process. If you already have an application that you want to set up screenshot gathering for, you can skip straight to the ‘Save a screenshot’ section. Otherwise, read on.
We’ll assume you have Ruby on Rails installed on your machine, but if you don’t, there are several tutorials (like this one, and this one) that you can follow to get you there. With Rails now installed, you can run the following to get a simple app to try this out:
rails new circle_see_eye --skip-action-mailer --skip-active-storage --skip-javascript --skip-spring
I advise you to go grab a cup of coffee if you run this without the flags — it will take a while. These optional parameters will skip components that we might want for a production application, but which aren’t required for this demo. You can check all the available flags by running rails new – help, if you’re curious about them.
Let’s make sure we set up the database, since Rails comes with SQLite support out of the box:
cd circle_see_eye
bin/rails db:migrate
Note: setting up a Rails 5 app revealed a hiccup on sqlite3 for me, read more here.
The last step for the application setup is to make sure everything is working as expected. Get into the project folder just created and run your server: bin/rails server
And you can see your new Rails app at http://localhost:3000! 🙌

Write a test
At the moment, we have no tests. Since the point of this article is to get a visual on a failing test, let’s create one. If you already have tests you want to get a glimpse into, jump straight to the ‘Save a screenshot’ section.
Rails is structured around the concept of resources, so for this application we’ll use something familiar on CircleCI: builds. Let’s create a Builds controller where we can set an #index action — just a default page for us to load.
bin/rails generate controller Builds index --no-test-framework
Checking Rails routes reveals the page we have access to now and its path:
bin/rails routes
To quickly load the page we created, just run your server again with bin/rails server and go to the path we saw above, http://localhost:3000/builds/index.
We’re now ready to write a test for our feature! However, this is where things split.
System tests vs. integration tests
In its 5.1 version, Rails introduced the concept of system tests, bringing several useful defaults to user interaction testing. We won’t go into details about acceptance testing before and after this release, but let’s just say that with system tests and their defaults, the framework does most of the work for you. Screenshots of failing system tests are enabled out of the box starting from version 5.1, so if you have system tests on, lucky you! However, if like us, you don’t… there’s a bit more setting up to do.
System tests enabled?
If your app has system tests, well done! It makes things easier to set up a test. Let’s once again run one of our magical Rails helpers:
bin/rails generate system_test builds
The test doesn’t do anything yet, all its code is commented out. Let’s change it to something simple but real:
require "application_system_test_case"

class BuildsTest < ApplicationSystemTestCase
  test "visiting the index" do
    visit builds_index_url

    assert_selector "h1", text: "Builds"
  end
end
You can run the test suite (which only has this test for now) with bin/rails test:system. Now that we’ve seen that it runs and passes, let’s make it fail.
Change…
assert_selector "h1", text: "Builds"
… to…
assert_selector "h1", text: "Huzzah!"
Run it again (bin/rails test:system) and wait for it to fail. We now built the right conditions to get our screenshots into CircleCI. Next, let’s get your project onto CircleCI.
No system tests?
If you have an application that started before Rails 5.1, it is quite possible that you don’t have system tests but have some kind of end-to-end test, maybe powered by Selenium. If you do, great, you can probably skip to the next section ‘Get your project onto CircleCI.’ If you don’t, let’s make sure we have one case to run.
Let’s start by installing important gems for this process. Open up your Gemfile and add:
group :test do
  gem 'activesupport-testing-metadata'
  gem 'capybara'
  gem 'webdrivers', '~> 4.0', require: false
end
activesupport-testing-metadata will allow us to tag which tests we want to be running with JavaScript support (so we can take screenshots), Capybara will control those tests with Selenium, and webdrivers is a more recent way of providing a real browser for the test.
With these new gems, we can set up a new helper for these types of tests, let’s call it test/integration_test_helper.rb:
require 'test_helper'

require 'active_support/testing/metadata'
require 'capybara/minitest'
require 'capybara/rails'
require 'webdrivers/geckodriver'

class AcceptanceTest < ActionDispatch::IntegrationTest
  include Capybara::DSL
  include Capybara::Minitest::Assertions

  setup do
    if metadata[:js]
      Capybara.current_driver = :selenium_headless
    end
  end

  teardown do
    if metadata[:js]
      Capybara.use_default_driver
    end
  end
end
Simply put, this file is:
- Creating a new type of test class (
AcceptanceTest) based on Rails’ActionDispatch::IntegrationTest - Including useful Capybara helpers
- Wiring up two hooks for this class,
setupandteardown. They will be responsible for checking the tests attributes and turn the JavaScript-powered driver if needed
With our acceptance test class in place, we’ll create a test that uses it, test/integration/builds_test.rb:
require 'integration_test_helper'

class BuildsTest < AcceptanceTest
  test "can see the builds page", js: true do
    visit builds_index_path

    assert has_content? "Builds#cats"
  end
end
Notice the error we introduced on purpose, to see the test failing: #index → #cats. Now run this test by executing bin/rails test and watch it fail.
Final step on the test setup now, I promise. In order to be at the same level of system tests for the purpose of visually recording failing tests, we need one more thing: to save a screenshot.
The main reason we have set up the metadata gem in our application is twofold:
- To save a screenshot, we need a driver that can run JavaScript, so we need to flag which tests need a different driver;
- We could potentially run every test on a browser, but since booting up these browsers takes longer than using Capybara’s default driver (
rack_test), it is a good move to strategically use another driver on a case-by-case basis.
There’s one last step to take now, to allow our new AcceptanceTest class to record screenshots of failing tests. Let’s edit our integration test helper to look like this:
require 'test_helper'

require 'active_support/testing/metadata'
require 'capybara/minitest'
require 'capybara/rails'
require 'webdrivers/geckodriver'

class AcceptanceTest < ActionDispatch::IntegrationTest
  include Capybara::DSL
  include Capybara::Minitest::Assertions

  setup do
    if metadata[:js]
      Capybara.current_driver = :selenium_headless
    end
  end

  teardown do
    if metadata[:js]
      save_timestamped_screenshot(Capybara.page) unless passed?

      Capybara.use_default_driver
    end
  end

  private

  def save_timestamped_screenshot(page)
    timestamp = Time.zone.now.strftime("%Y_%m_%d-%H_%M_%S")
    filename = "#{method_name}-#{timestamp}.png"
    screenshot_path = Rails.root.join("tmp", "screenshots", filename)

    page.save_screenshot(screenshot_path)
  end
end
The method we added will get the current timestamp, create a path for the image we’re about to save, and save a screenshot of the current page into that path (somewhere inside tmp/screenshots/). This will only be run for tests tagged with js: true and that did not pass. We are now at a good point to look into keeping these screenshots around on CircleCI for later analysis.
Get your project onto CircleCI
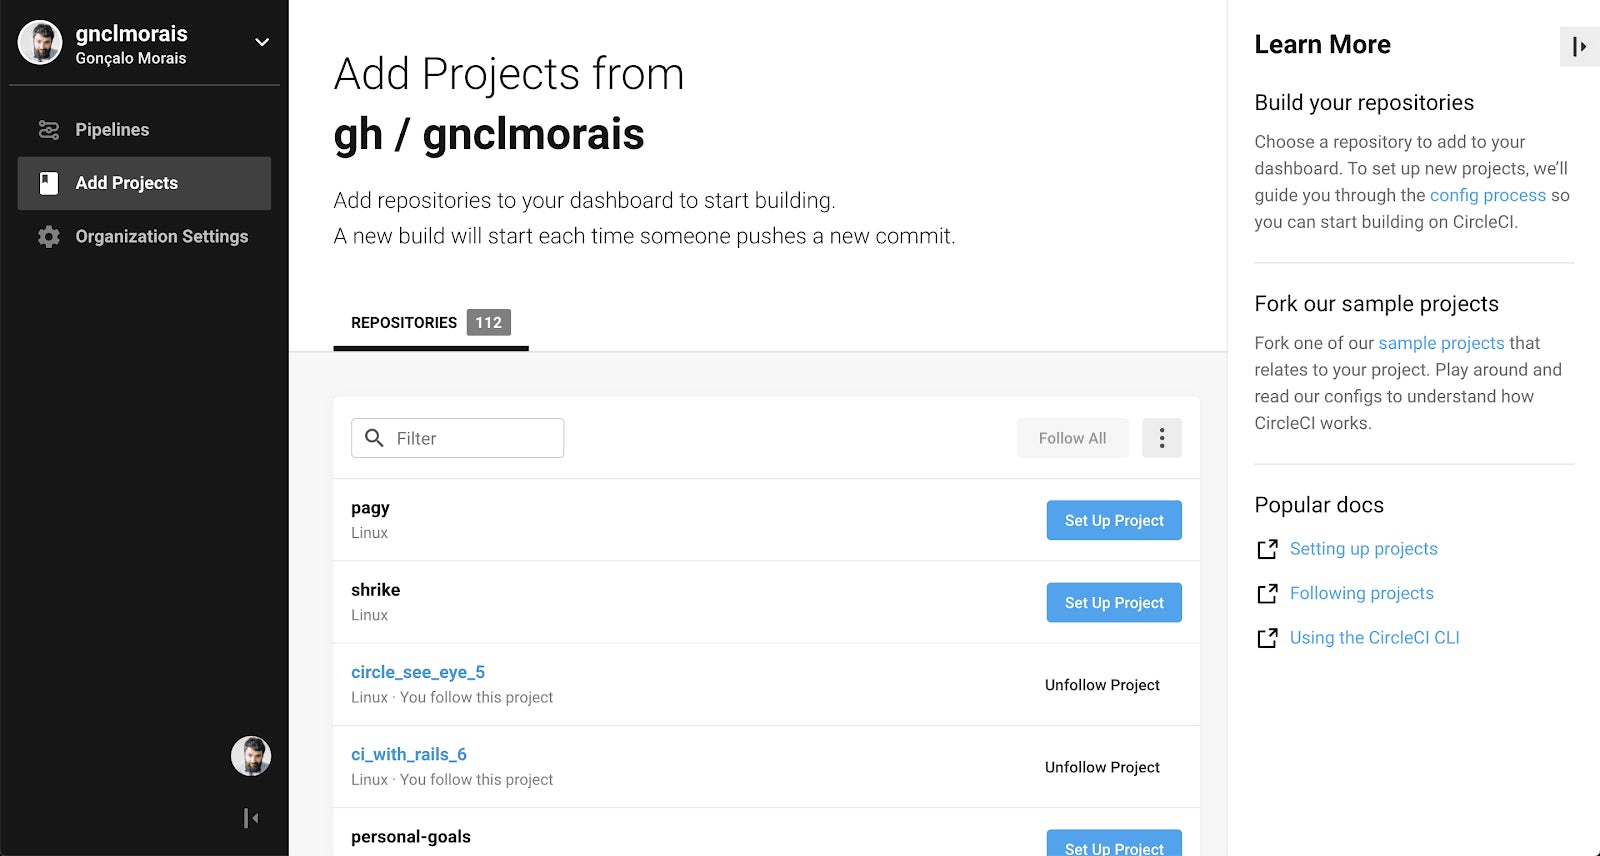
We need one more thing before being able to see anything on CircleCI: a CircleCI config. You can head to the documentation to read more about it, but there’s a useful summary on CircleCI on how to do it as soon as you add a project:

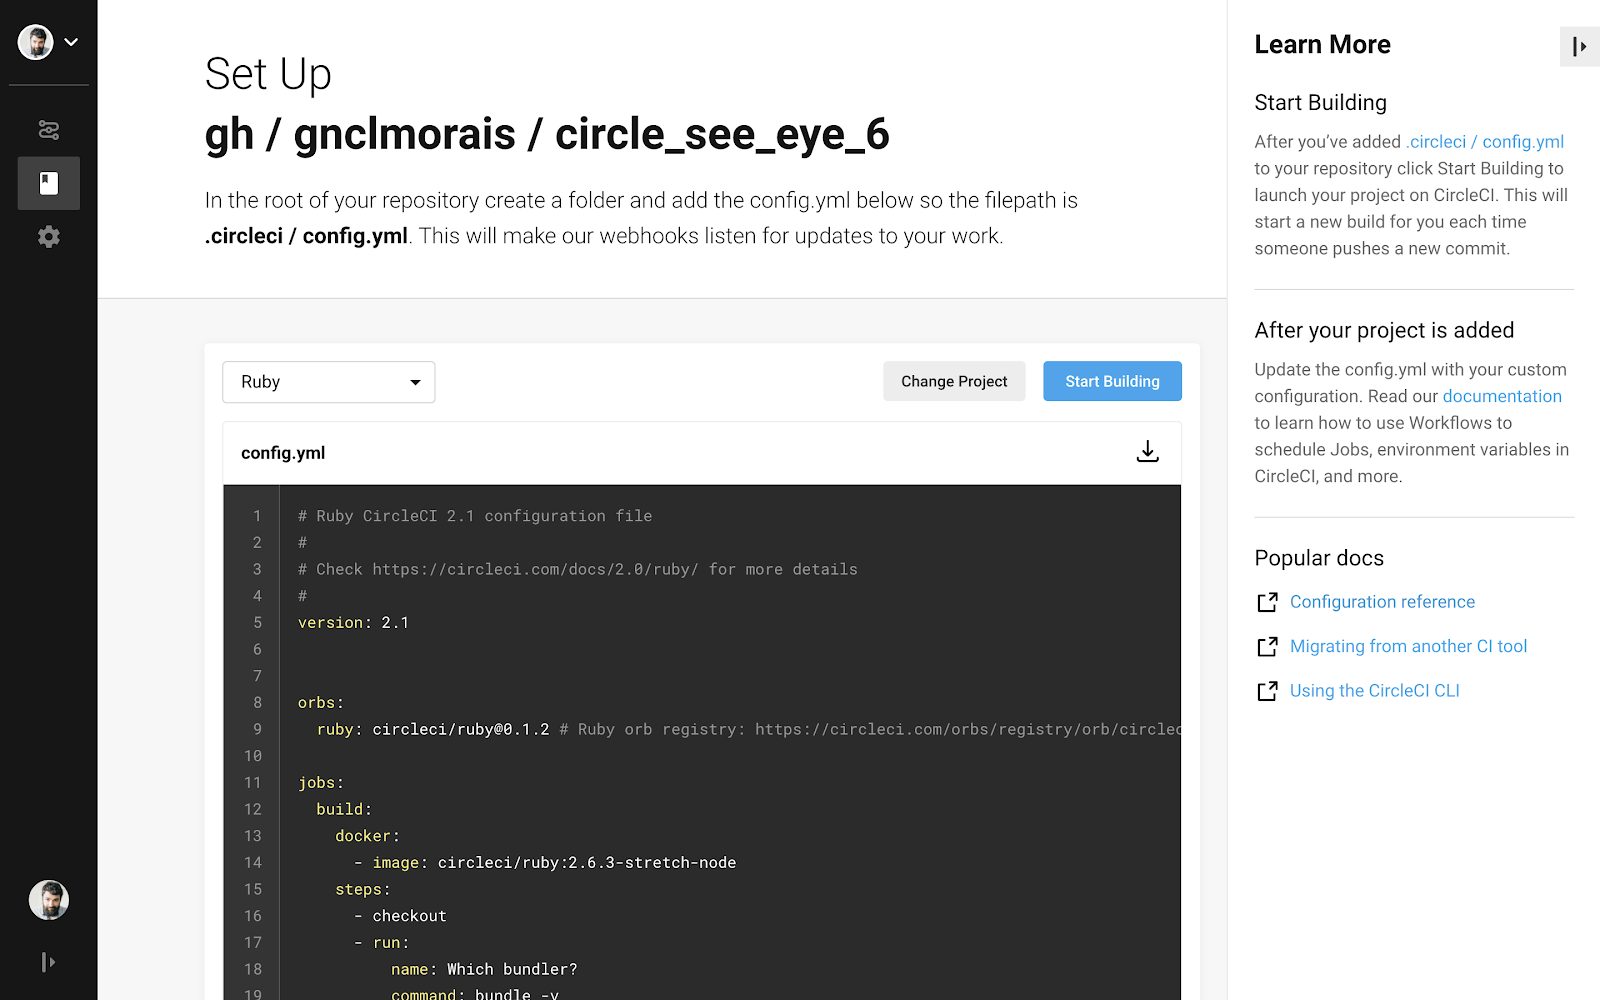
We’re adding our project from a GitHub repository for simplicity’s sake. Just click Set Up Project and you’ll see a simple description of what to do and a sample CircleCI config file to add:

Ok, let’s follow the instructions (add the config file, push to GitHub and press Start Building) and see what we get. Don’t forget to match the Ruby version from your Gemfile to the one on .circleci/config.yml. A functional minimal config for Rails file looks like this, for example:
version: 2.1
orbs:
  ruby: circleci/ruby@0.1.2

jobs:
  build:
    docker:
      - image: circleci/ruby:2.5.3-stretch-node-browsers
    steps:
      - checkout
      - run:
          name: Install dependencies
          command: bundle
      - run:
          name: Database setup
          command: bin/rails db:migrate
      - run:
          name: Run tests
          command: bin/rails test
This first build might take a while, since there’s nothing cached for it yet and all the gems need to be fetched and installed. But now that we have a working pipeline in place, let’s set up a test and catch it failing.
Save a screenshot
Now that we have everything in place and our application has visual tests, let’s tell CircleCI to save them for later analysis. Bare in mind that the hard work is done: your application takes screenshots of failing tests and saves those images. If you have this, it’s now quite simple to save them on CircleCI.
You can read more about it in the documentation, but the key is the concept of Artifacts — they persist after a job is completed. With this in mind, we need to describe in our .circleci/config.yml file what artifacts we’re looking to save.
Open your CircleCI configuration file and add the following as the last item on your steps key:
      - store_artifacts:
          path: tmp/screenshots
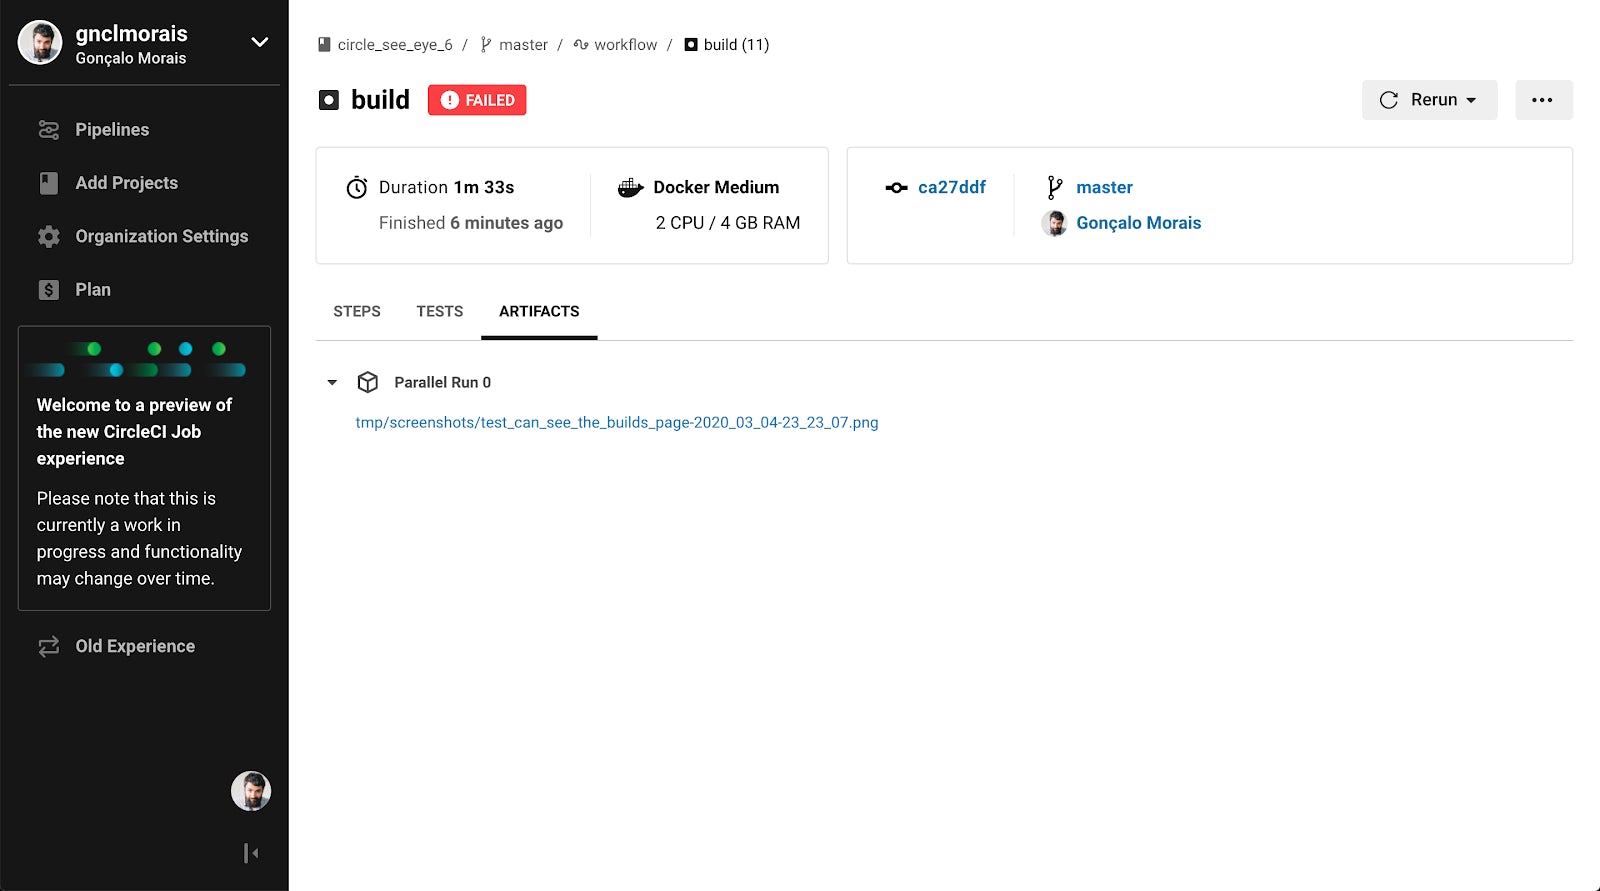
From now on, whenever your test suite runs on CircleCI and a visual test fails, Rails will take a screenshot of the failure and CircleCI will keep it around for later investigation. Here’s what you’ll find in the interface, with our screenshot available:

Conclusion
Flaky tests are a nuisance, but there are tools you can put in place to help you get rid of them. With the right frame of mind, they’ll teach you to avoid problematic situations and help you to set up more robust test case scenarios. At BridgeU, taking screenshots of these issues helped us to identify when certain tests interfered with each other and our testing practices improved because of it.
Furthermore, why only take screenshots when your tests fail? Maybe you can use this technique to automatically grab updated snapshots of your product and help you keep documentation or marketing material up to date. Your imagination is the limit for all the automation possibilities this technique brings!


