

Progressive web applications (PWAs) continue to gain widespread attention and acceptance among development teams. A key factor in this popularity is that the native-like attributes of PWAs make them highly compatible with web browsers. Of course, one consideration is that these applications must be hosted securely. PWA features will not work on a non-secure URL (one that does not use the secure https:// protocol).
In this tutorial, you will learn how to create an automated deployment pipeline that deploys a PWA to a secure URL on Firebase. You can also read Continuous integration for progressive web apps to learn how to automate the testing process for your PWAs.
Prerequisites
To follow this post, a few things are required:
- Basic knowledge of JavaScript
- Node.js installed on your system
- An HTTP Server Module installed globally on your system (
npm install -g http-server) - A Firebase account
- A CircleCI account
- A GitHub account
Our tutorials are platform-agnostic, but use CircleCI as an example. If you don’t have a CircleCI account, sign up for a free one here.
Setting up the demo application
The first task is to create a demo application to deploy to Firebase. Create a directory for the project and go into the root of the directory:
mkdir my-pwa-firebase
cd my-pwa-firebase
Next, create the application home page. Create a file named index.html at the root of the project and paste this code into it:
<!DOCTYPE html>
<html lang="en">
<head>
<meta charset="UTF-8" />
<meta name="viewport" content="width=device-width, initial-scale=1.0" />
<link rel="manifest" href="manifest.json" />
<meta name="theme-color" content="#db4938" />
<link rel="stylesheet" type="text/css" href="styles.css" media="all" />
<title>DogVille</title>
</head>
<body>
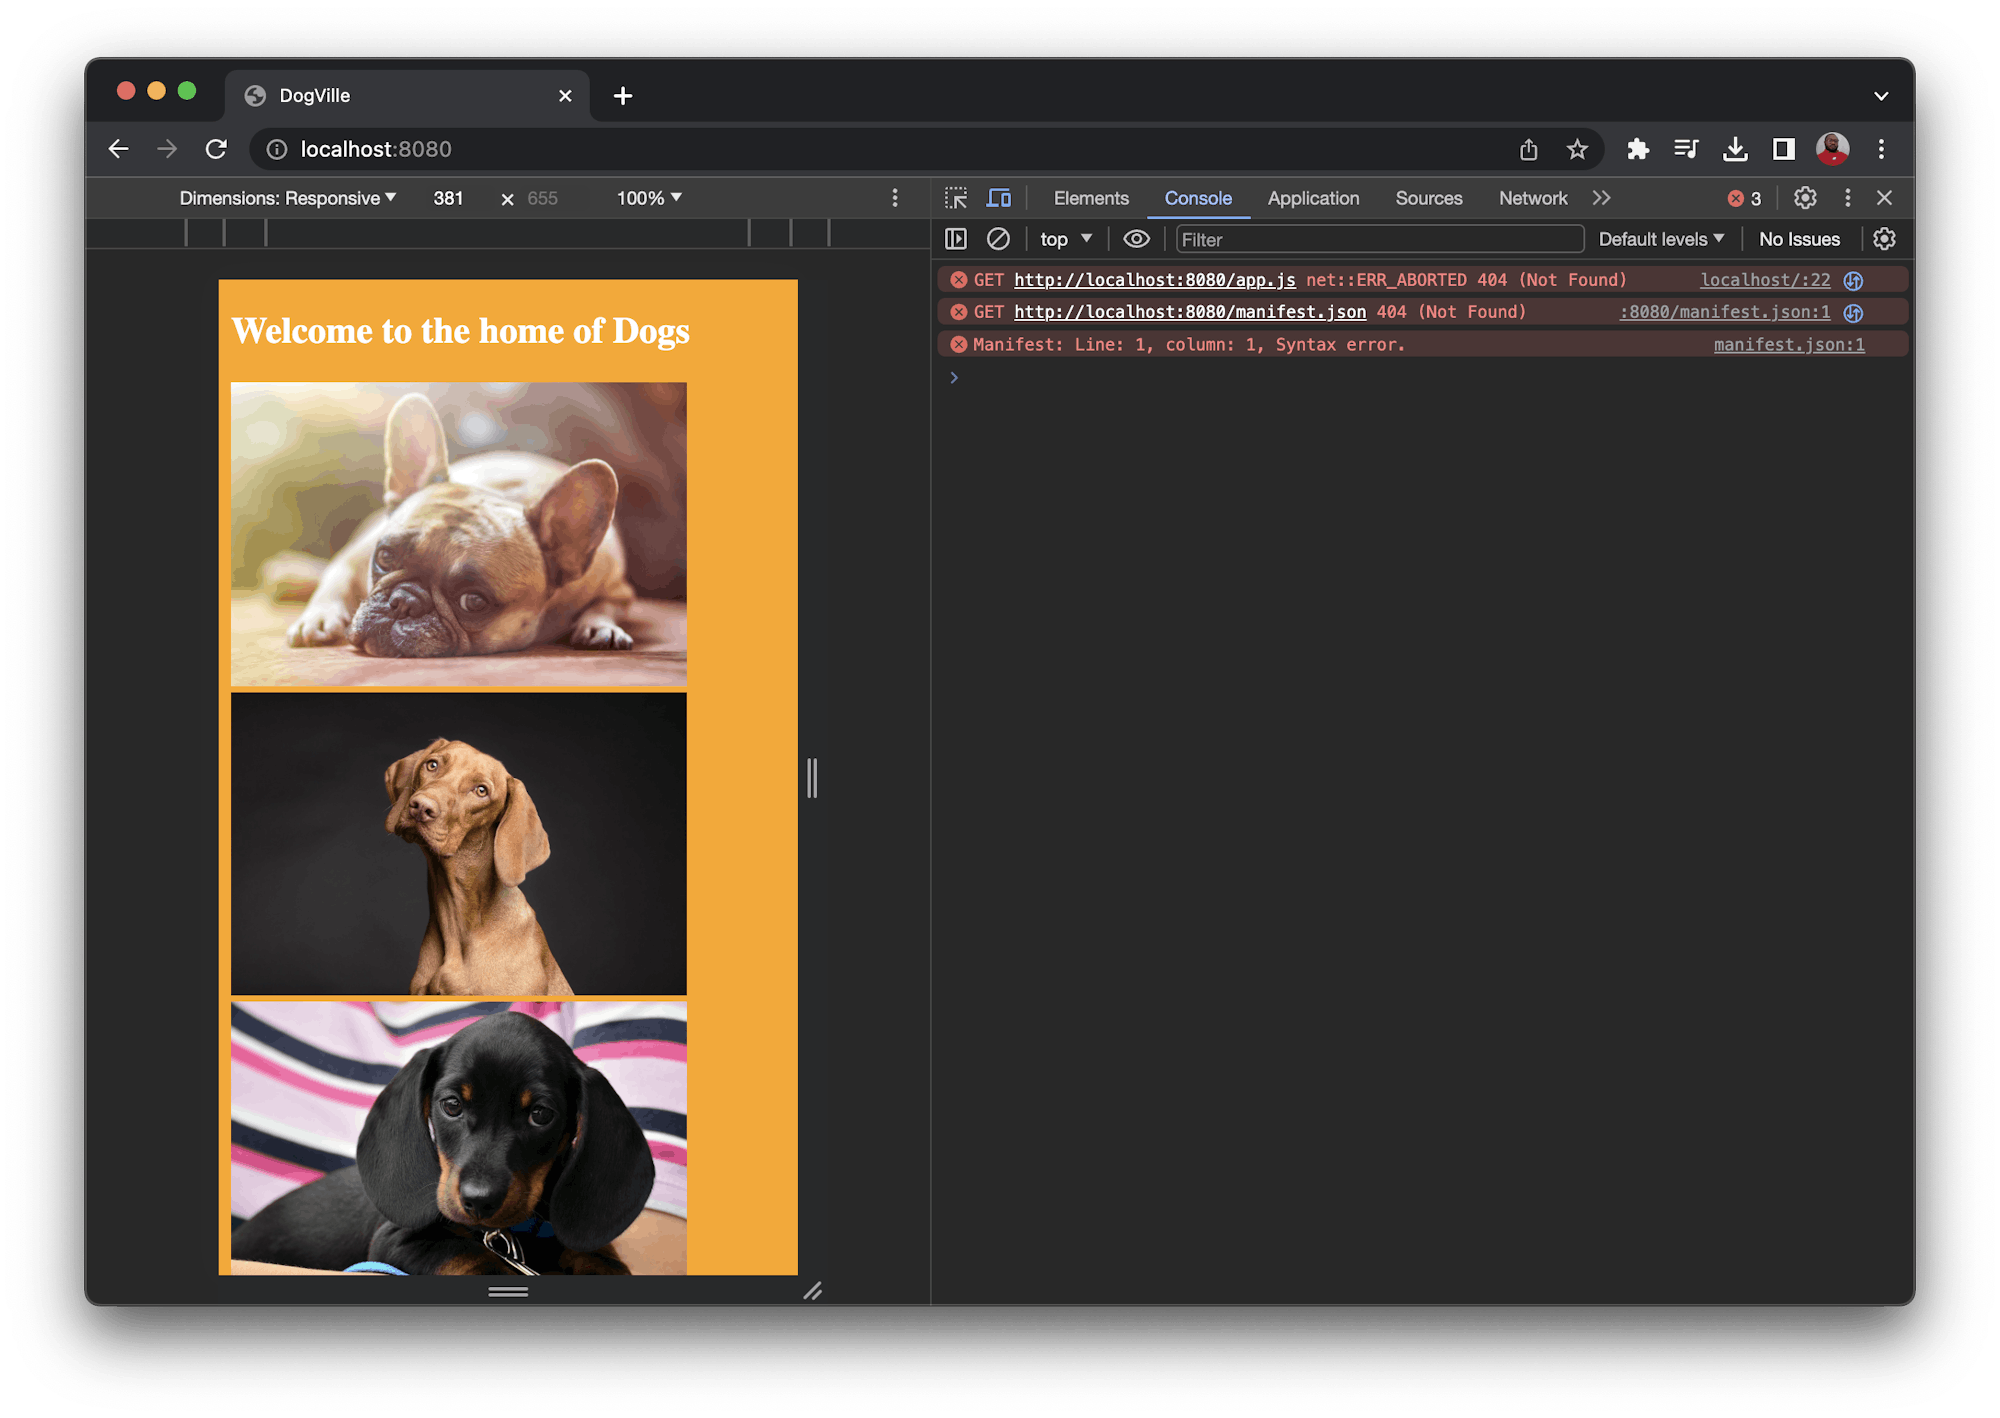
<h2>Welcome to the home of Dogs</h2>
<div class="dog-list">
<div class="dog-pic"><img width="300px" src="images/dog1.jpg" /></div>
<div class="dog-pic"><img width="300px" src="images/dog2.jpg" /></div>
<div class="dog-pic"><img width="300px" src="images/dog3.jpg" /></div>
<div class="dog-pic"><img width="300px" src="images/dog4.jpg" /></div>
</div>
<script src="app.js"></script>
</body>
</html>
This homepage links to three files:
manifest.jsonsets up the Add to Home Screen PWA feature.styles.cssapplies some basic styling to the page.app.jsloads in the service worker.
You haven’t created the service worker yet, but I will cover that shortly. In the body of the page, a title reads Welcome to the home of Dogs, and below it, there is a list of dog pictures. This is a dog site (apologies to the cat lovers).
The dog images are contained in an images folder at the root of the project. I have referenced the dog pictures in index.html according to the filenames used in images. Create this folder now. You can download dog pictures for free on Pixabay and rename them.
Add styles by creating the file styles.css at the root of your project. Paste this code into it:
body {
  background-color: orange;
}

h2 {
  color: white;
}
This file gives your page background color and makes the title text white.
Now you need to invoke the global http-server module to spin up a local server to serve your app. At the root of the project, run:
http-server
Load the URL in your browser. Your dogs will likely be different from the ones I chose.
Adding a service worker
Now, let’s add the juice of PWAs, the service worker. Create a serviceworker.js file at the root of your project and paste this code into it:
var cacheName = "sw-v1";
var filesToCache = [
  "./",
  "./index.html",
  "./styles.css",
  "./app.js",
  "./images/dog1.jpg",
  "./images/dog2.jpg",
  "./images/dog3.jpg",
  "./images/dog4.jpg",
];

self.addEventListener("install", function (e) {
  console.log("<ServiceWorker> ---- Install v1");
  e.waitUntil(
    caches.open(cacheName).then(function (cache) {
      console.log("<ServiceWorker> --- Caching app shell");
      return cache.addAll(filesToCache);
    })
  );
});

self.addEventListener("activate", (event) => {
  event.waitUntil(self.clients.claim());
});

self.addEventListener("fetch", function (event) {
  event.respondWith(
    caches.match(event.request).then(function (response) {
      if (response) {
        return response;
      }
      return fetch(event.request);
    })
  );
});
The service worker file caches all static files, including the project root and your images. The file then listens for the install event to install the service worker. It creates a cache for these files using the specified cacheName as the identifier.
The file listens for the activate event to ensure that any new service worker that has been installed is the one serving your cache and not an old version.
Finally, it listens to the fetch event to intercept any requests and check whether the requested resource is already in your cache. If it is, the cached version is served. If not, a new request fetches the resource.
Load your service worker file into your application. Create an app.js file at the root of the project and paste this code into it:
if ("serviceWorker" in navigator) {
  window.addEventListener("load", function () {
    navigator.serviceWorker.register("./serviceworker.js").then(
      function (registration) {
        console.log("Hurray! Service workers with scope: ", registration.scope);
      },
      function (err) {
        console.log("Oops! ServiceWorker registration failed: ", err);
      }
    );
  });
}
Make sure that your app is still running, then do a hard reload on the browser tab where the application is loaded (Ctrl + Shift + R). Check the browser console to review the console log messages you wrote to confirm the installation of the service worker. The messages are displayed in your console.
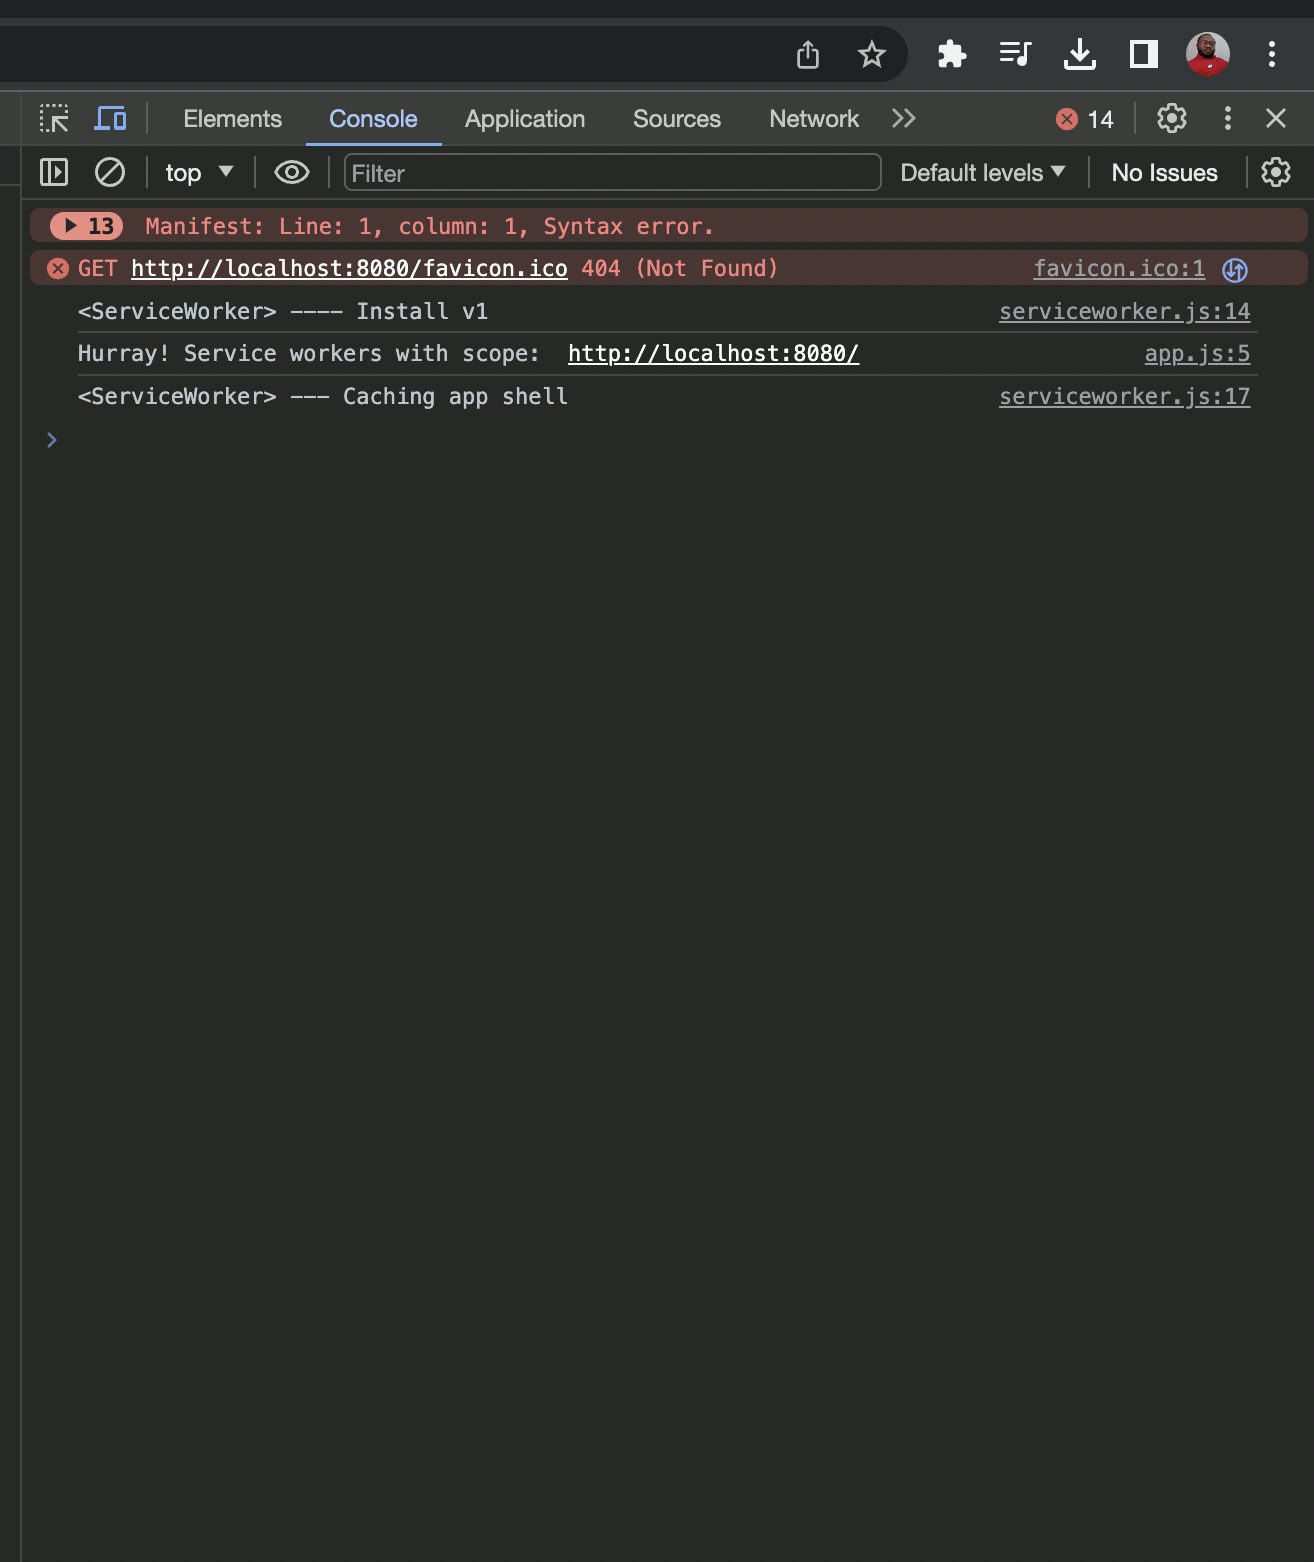
To confirm that you now have offline capabilities with your service worker installed, shut down the http-server service by pressing Ctrl + C. Refresh the application on the browser.
You would usually be presented with the offline page at this point because the application is no longer running. With the magic that is a service worker, you can still see your application home page. Also notice that all dog pictures are loading offline.
Great!
Adding a manifest file
Let’s wrap up our demo application by creating our manifest.json file at the root of the project. You can generate a simple manifest.json file with icons using the free Web App Manifest Generator tool.
Here is the code in my manifest.json file.
Note: I have removed some icons in this example.
{
  "name": "my-dogsite-pwa",
  "short_name": "my-dogsite-pwa",
  "theme_color": "#000000",
  "background_color": "#ffffff",
  "display": "standalone",
  "orientation": "portrait",
  "scope": "/index.html",
  "start_url": "/index.html",
  "icons": [
    {
      "src": "icons/icon-128x128.png",
      "sizes": "128x128",
      "type": "image/png"
    },
    {
      "src": "icons/icon-144x144.png",
      "sizes": "144x144",
      "type": "image/png"
    },
    {
      "src": "icons/icon-152x152.png",
      "sizes": "152x152",
      "type": "image/png"
    },
    {
      "src": "icons/icon-192x192.png",
      "sizes": "192x192",
      "type": "image/png"
    },
    {
      "src": "icons/icon-512x512.png",
      "sizes": "512x512",
      "type": "image/png"
    }
  ]
}
In this file, the name of the application, the short name , the preferred orientation, the theme_color for the app bar, and the background_color for the splash screen are defined.
Note: It is a best practice to add the short_name, an optional field that specifies the name that will be displayed in the app launcher or a new tab page. Otherwise, the name will be used, and it will be truncated if it is more than 12 characters long.
The icons array is also added with a collection of icon object definitions that point to the icons you will be using for your PWA. Remember to create the icons folder and fill it with the icons named in the manifest file.
Setting up deployment to Firebase
Now that your PWA is complete, you can prepare it for deployment to Firebase. To check that you have Firebase tools installed, run this command:
firebase
This returns a list of Firebase commands to your CLI. If it doesn’t, run this command to get it installed:
npm install -g firebase-tools
If your firebase-tools is less than version 8, you will need to install the latest version. To check your firebase-tools version, run:
firebase --version
To set up Firebase hosting, you need to create a Firebase project. Go to your Firebase console and create a new Firebase project.
Click Add Project Enter the name of your project in the page that pops up.
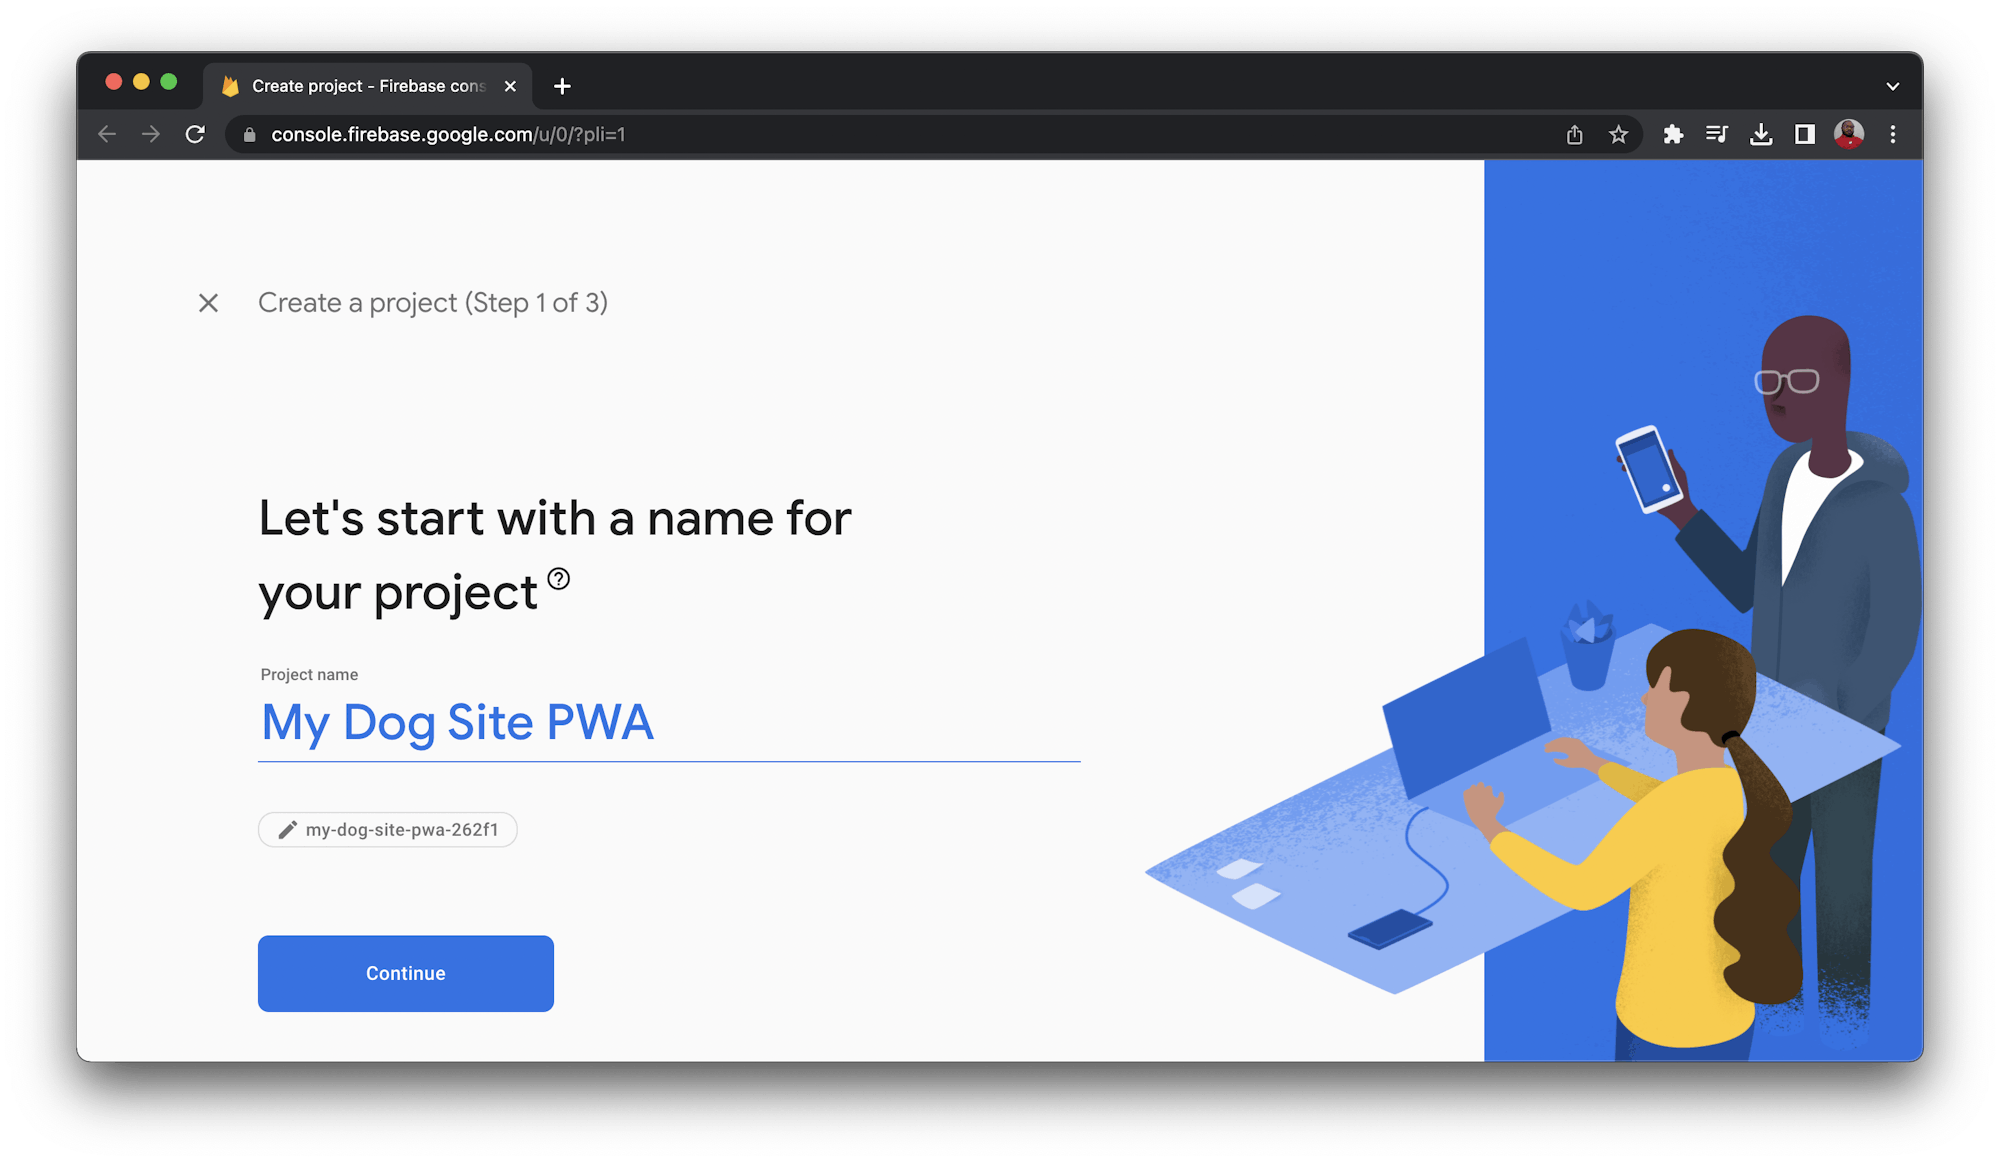
Click Continue. The next page prompts you about adding Google Analytics. Toggle the button to turn off Google Analytics for this project. This is a demo project, so you won’t be needing analytics.
Click Create Project. Wait for Firebase to complete setting up your project, then click Continue to go to your project dashboard.
Your next step is to set up the PWA to be hosted on Firebase.
To initialize the Firebase setup process, go to the root of your project and run:
firebase init
The first prompt is:
? Which Firebase features do you want to set up for this directory? Press Space to select features, then Enter to confirm your choices.
Use the arrow keys to go to Hosting option and press the spacebar to select. Press Enter to go to the next prompt. You can use an existing project or create a new one. Select Use an existing project and press Enter. This selection prompts the CLI tool to load your Firebase projects so you can select one. Select the project you just created on the Firebase console.
Press Enter to confirm your selection.
The next prompt asks for the project folder and suggests the folder public. For this project, everything is taking place at the root, so just type / and press Enter.
The next prompt is ? Configure as a single-page app (rewrite all urls to /index.html)?. Your entire application resides within index.html, so type y and press Enter. The answer to this prompt is how Firebase Hosting distinguishes between single-page apps and traditional multi-page apps, which are handled differently.
Next, you will be prompted about setting up automatic builds and deploys with GitHub. You will be using CircleCi for this tutorial, so type No. Next, the set-up process detects that you already have an index.html file and asks if it should be overwritten. Type N for this and press Enter. This completes the setup.
You will now have a .firebaserc file that sets the project id for this application, a firebase.json file containing default settings and details about the options selected during the set-up process. There is alsoa standard .gitignore file for Firebase.
You will have a similar output to this printed in your terminal:
     ######## #### ########  ######## ########     ###     ######  ########
     ##        ##  ##     ## ##       ##     ##  ##   ##  ##       ##
     ######    ##  ########  ######   ########  #########  ######  ######
     ##        ##  ##    ##  ##       ##     ## ##     ##       ## ##
     ##       #### ##     ## ######## ########  ##     ##  ######  ########

You're about to initialize a Firebase project in this directory:

  /Users/yemiwebby/tutorial/circleci/my-pwa-firebase

? Which Firebase features do you want to set up for this directory? Press Space to select features, then Enter to confirm your choices. Hosting: Configure files for
Firebase Hosting and (optionally) set up GitHub Action deploys

=== Project Setup

First, let's associate this project directory with a Firebase project.
You can create multiple project aliases by running firebase use --add,
but for now we'll just set up a default project.

? Please select an option: Use an existing project
? Select a default Firebase project for this directory: my-dog-site-pwa-262f1 (My Dog Site PWA)
i  Using project my-dog-site-pwa-262f1 (My Dog Site PWA)

=== Hosting Setup

Your public directory is the folder (relative to your project directory) that
will contain Hosting assets to be uploaded with firebase deploy. If you
have a build process for your assets, use your build's output directory.

? What do you want to use as your public directory? /
? Configure as a single-page app (rewrite all urls to /index.html)? Yes
? Set up automatic builds and deploys with GitHub? No
? File //index.html already exists. Overwrite? No
i  Skipping write of //index.html

i  Writing configuration info to firebase.json...
i  Writing project information to .firebaserc...
i  Writing gitignore file to .gitignore...

✔  Firebase initialization complete!
Building the CD pipeline with CircleCI
Setting up an automated deployment pipeline requires these steps:
- Create your pipeline configuration file.
- Generate a private key for a service account on Google. (This is required to deploy the application to Firebase.)
- Push your project to a remote repository connected to your CircleCI account.
Scaffold a quick package.json file by running:
npm init -y
Next, create a .circleci folder and create a config.yml file within it. Use this content:
version: 2.1
orbs:
  browser-tools: circleci/browser-tools@1.4.6
jobs:
  build:
    working_directory: ~/repo
    docker:
      - image: cimg/node:lts-browsers
    steps:
      - browser-tools/install-chrome
      - browser-tools/install-chromedriver
      - run:
          command: |
            google-chrome --version
            chromedriver --version
          name: Check install
      - checkout
      - restore_cache:
          keys:
            - v1-dependencies-{{ checksum "package.json" }}
            - v1-dependencies-
      - run: npm install
      - run: npm install --save-dev firebase-tools
      - save_cache:
          key: v1-npm-deps-{{ checksum "package-lock.json" }}
          paths:
            - ./node_modules
      - run:
          name: "Generate Service Account Authentication"
          command: 'echo "$GOOGLE_APPLICATION_CREDENTIALS_BASE_64" | base64 --decode > $GOOGLE_APPLICATION_CREDENTIALS'
      - run:
          name: "Deploy app to Firebase Hosting"
          command: "./node_modules/.bin/firebase deploy --non-interactive"
      - run:
          name: "Remove credentials file"
          command: "rm $GOOGLE_APPLICATION_CREDENTIALS"
This configuration specifies all the required tools to install and run the test for your application on CircleCI. The config installs the Firebase tool with npm install --save-dev firebase-tools and sets up a command to deploy your application to Firebase when it detects that the tests are successful.
Deployment to Firebase requires authentication from a service account with appropriate privileges on the project. The credentials required for this authentication are provided in a JSON file - the name of which is saved in the GOOGLE_APPLICATION_CREDENTIALS variable.
To get this JSON file, open your Firebase project console and select the Service accounts tab. Click the Generate new private key button to download the JSON file.
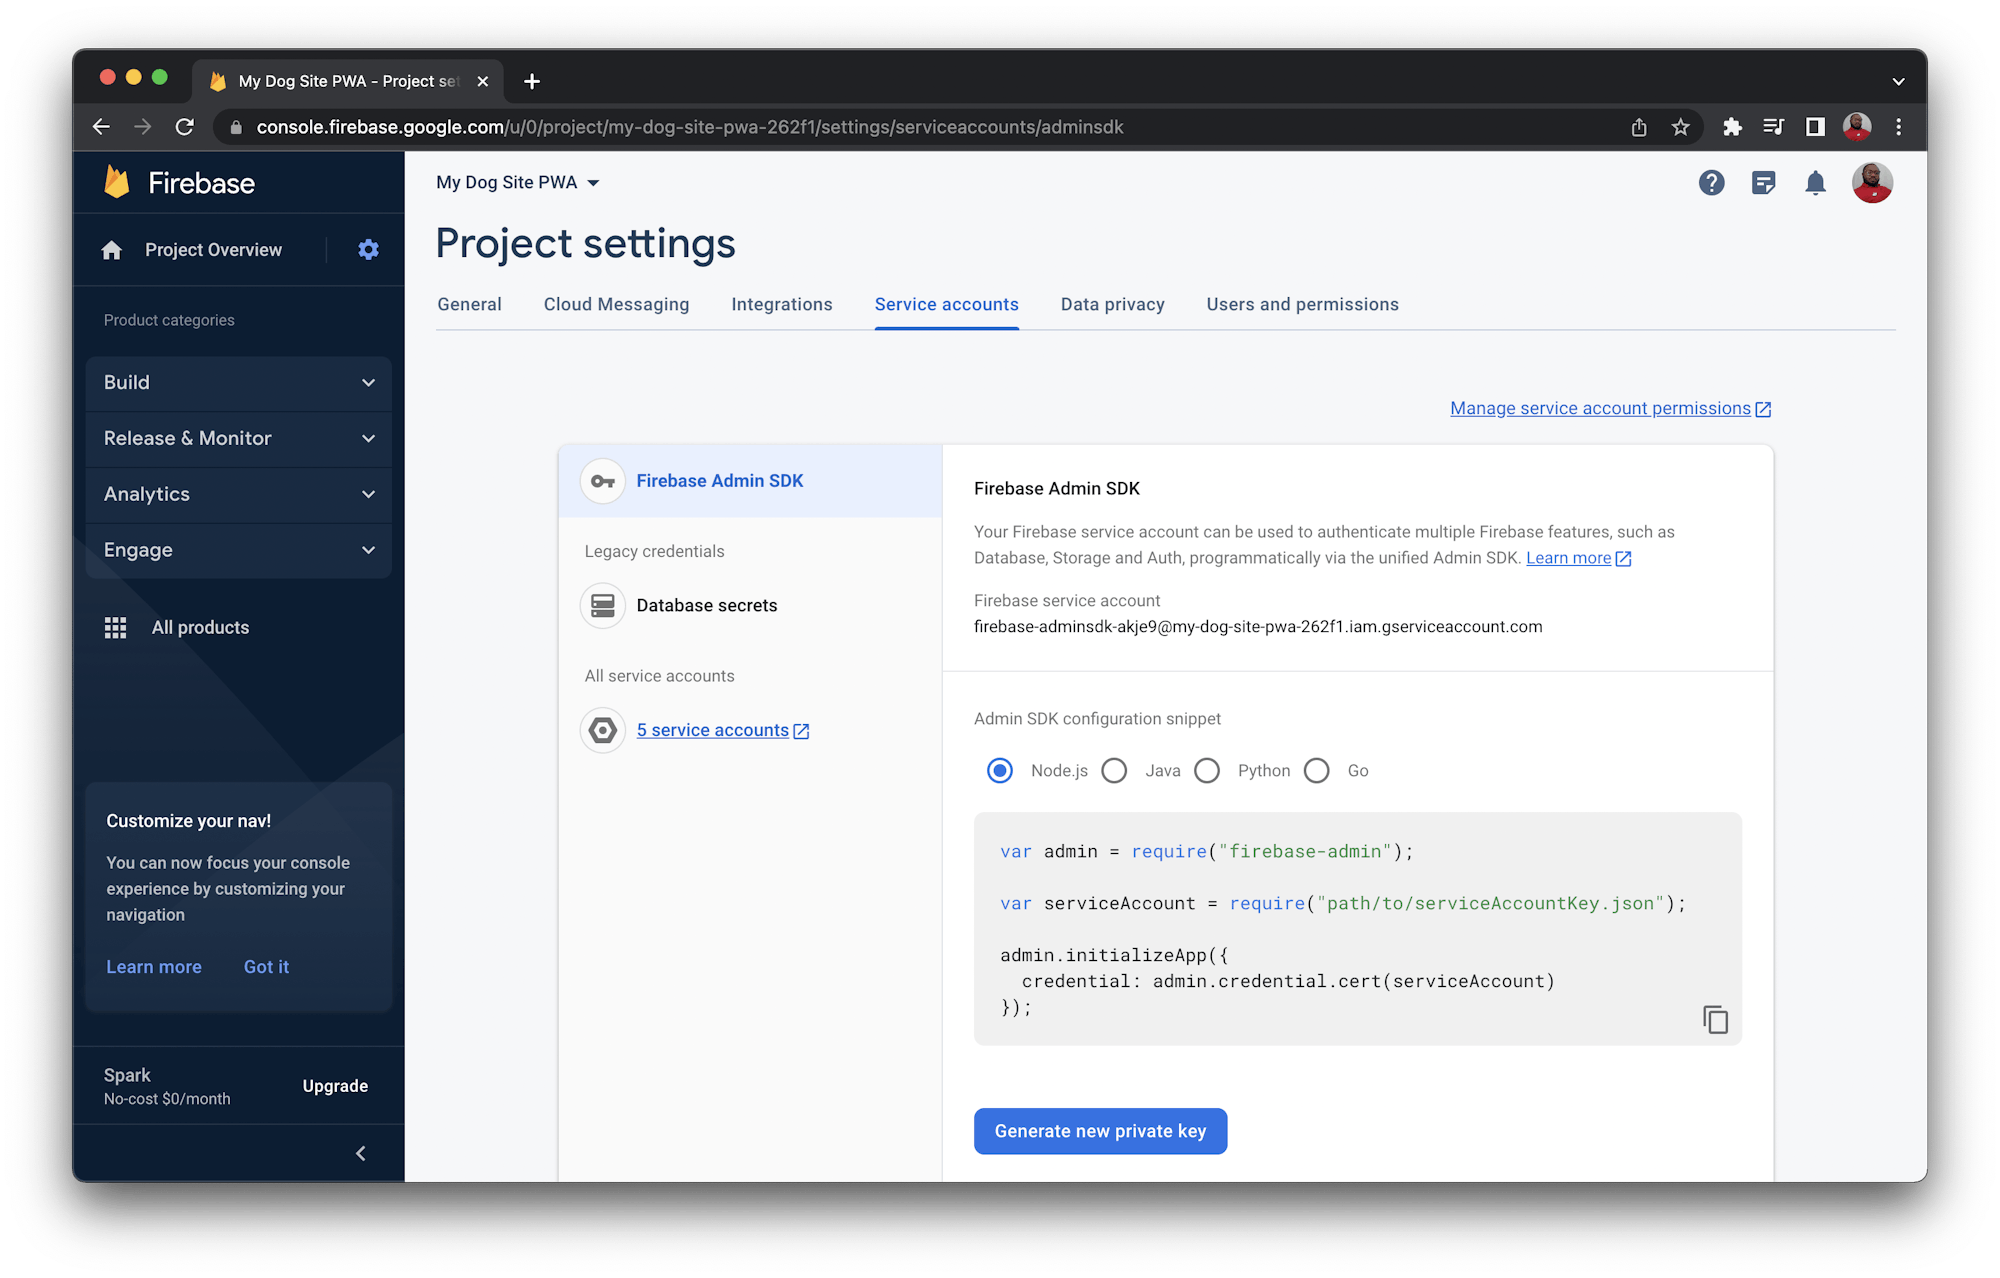
Note: Using the default service account is not recommended, because it is highly privileged. When authenticating a service account in a non-demo situation, make sure to follow the principle of least privilege.
The JSON file you just downloaded will need to be base64 encoded to get the string value of GOOGLE_APPLICATION_CREDENTIALS_BASE_64. Run this command:
base64 -i <</path/to/json/file>>
Replace <</path/to/json/file>> with the path to the JSON file you downloaded earlier.
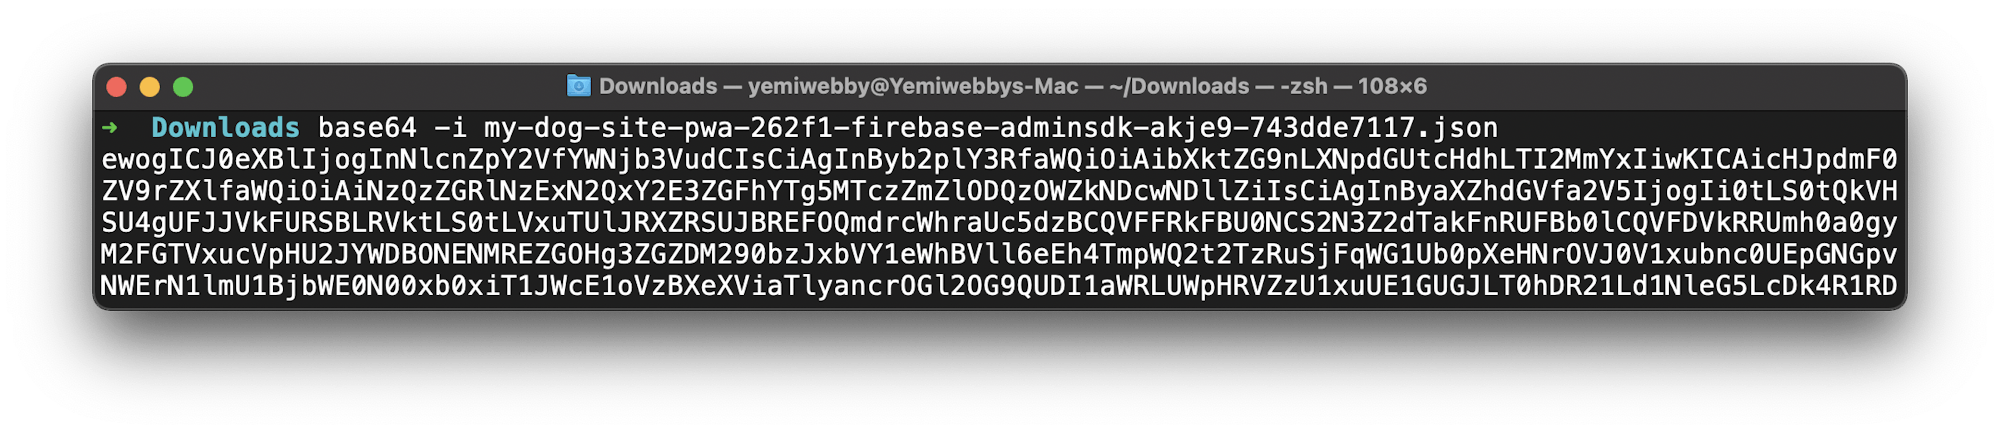
Copy the output of the command and save it somewhere convenient. You will need it later on CircleCI.
When CircleCI is deploying your application to Firebase, the GOOGLE_APPLICATION_CREDENTIALS_BASE_64 variable will be decoded to a file with the name GOOGLE_APPLICATION_CREDENTIALS. This file will then be used by Firebase to authenticate and deploy the changes.
The next step is to set up a repository on GitHub and link the project to CircleCI. Review Pushing a project to GitHub for instructions.
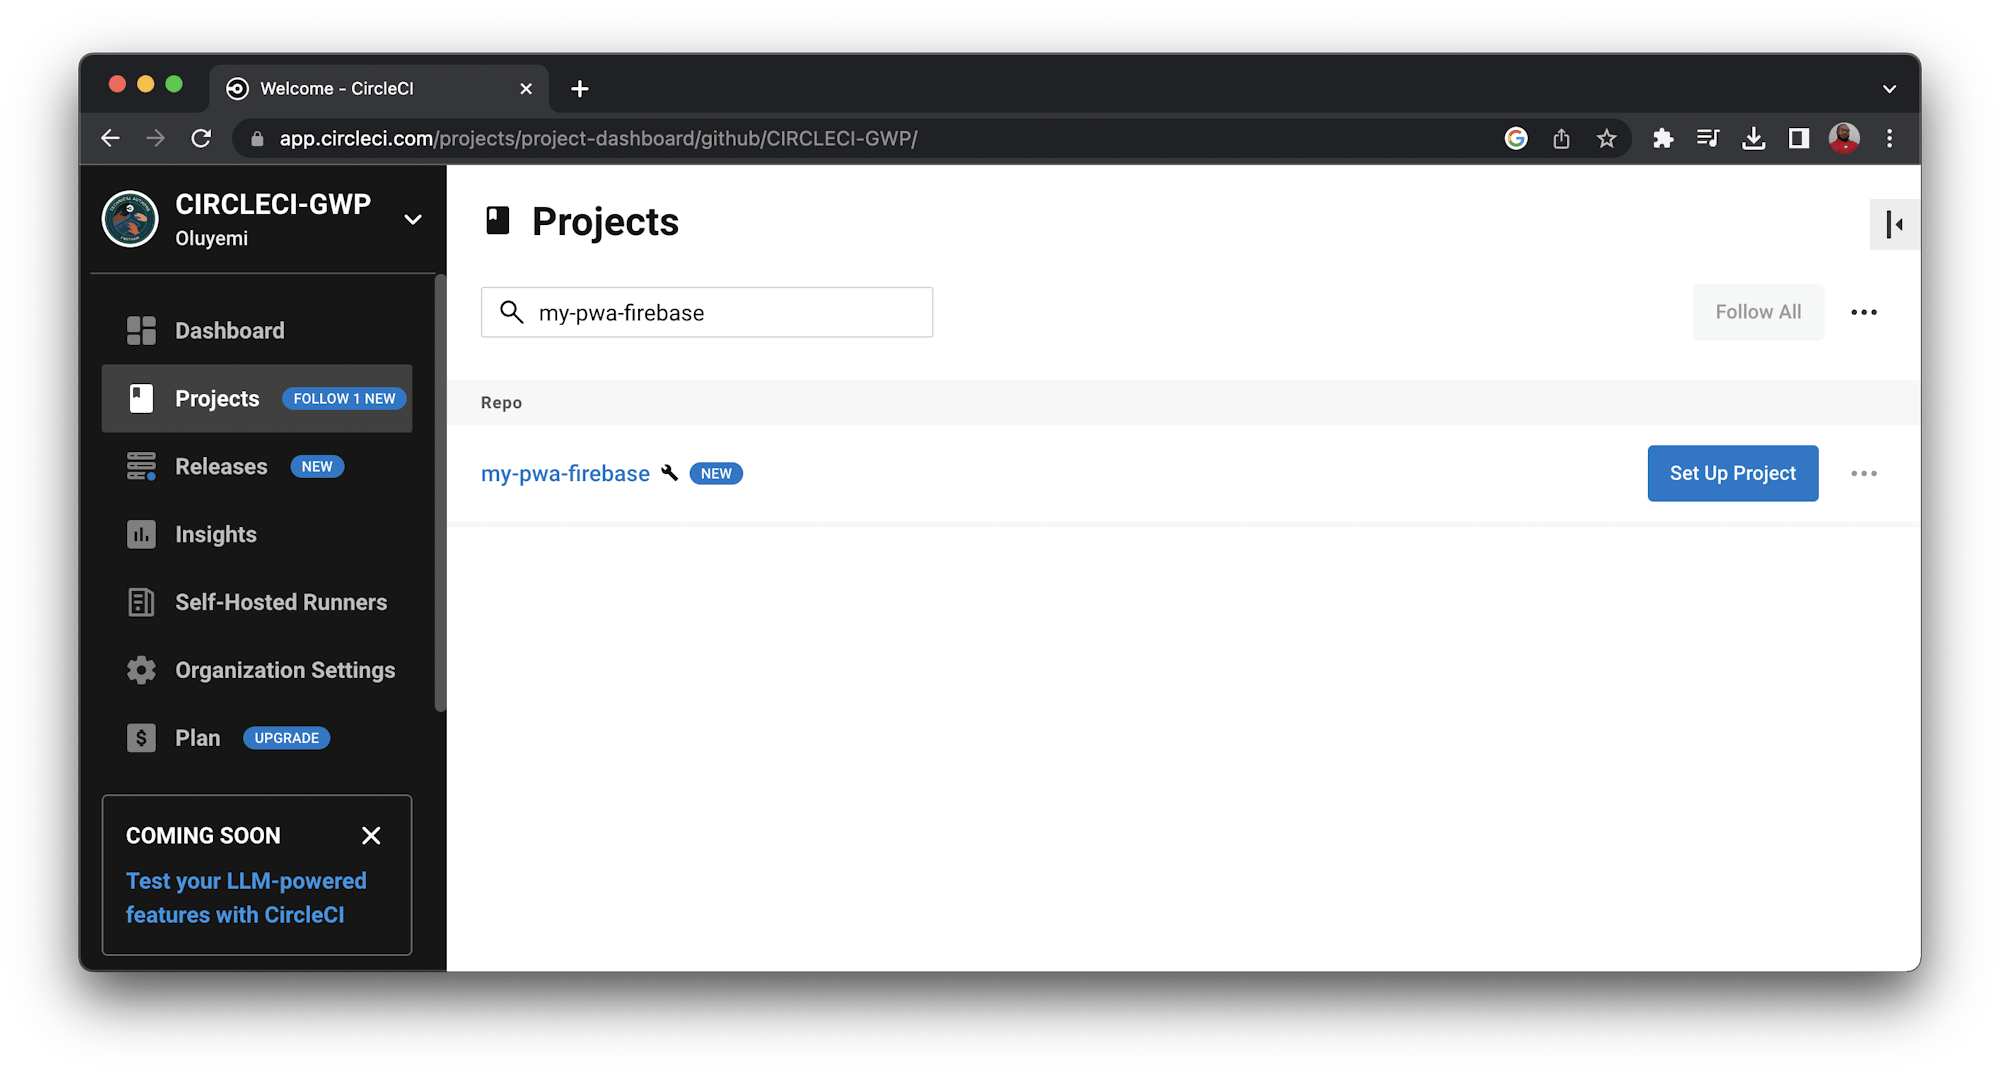
Log into your CircleCI account. If you signed up with your GitHub account, all your repositories will be available on your project’s dashboard.
Next to your my-pwa-firebase project, click Set Up Project.
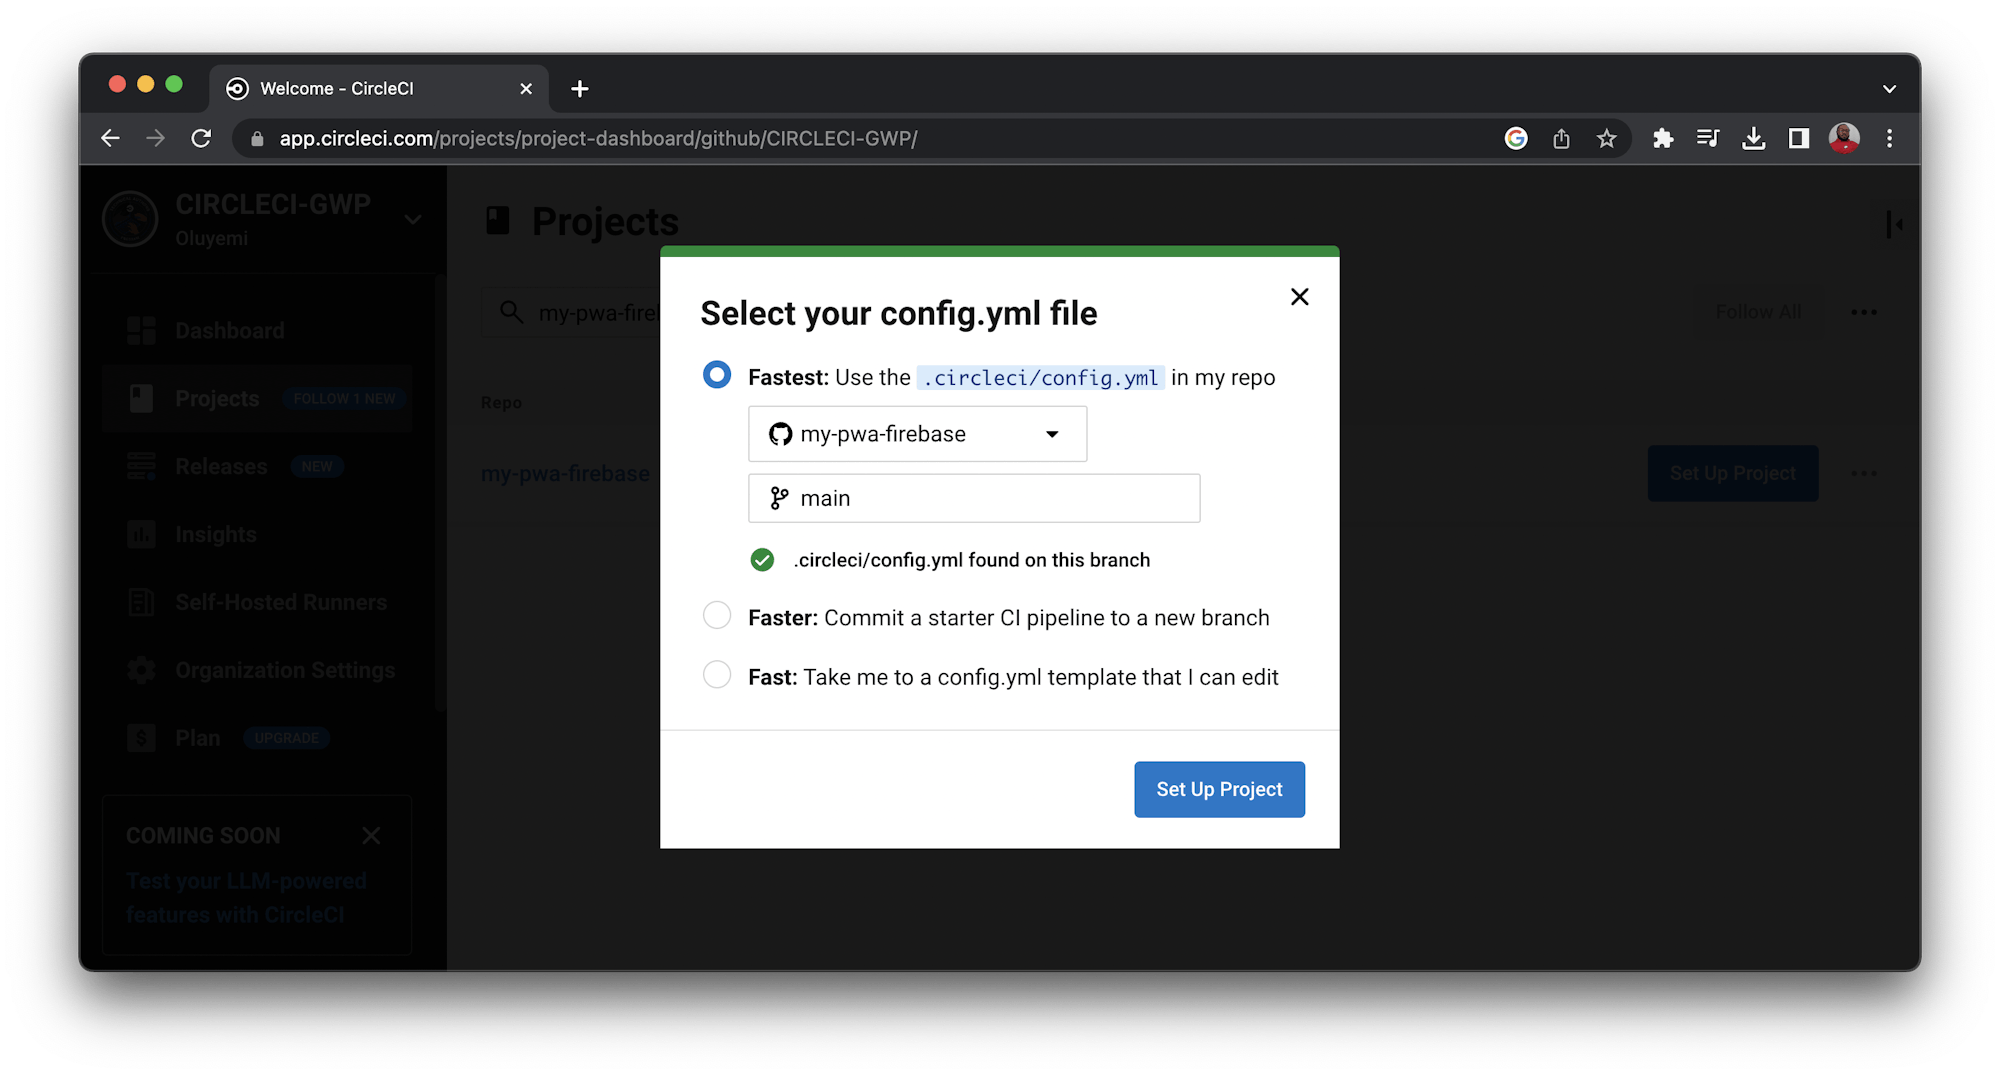
You will be prompted to either write a new configuration file or use the existing one. Select the existing one and enter the name of the branch where your code is housed on GitHub. Click Let’s Go.
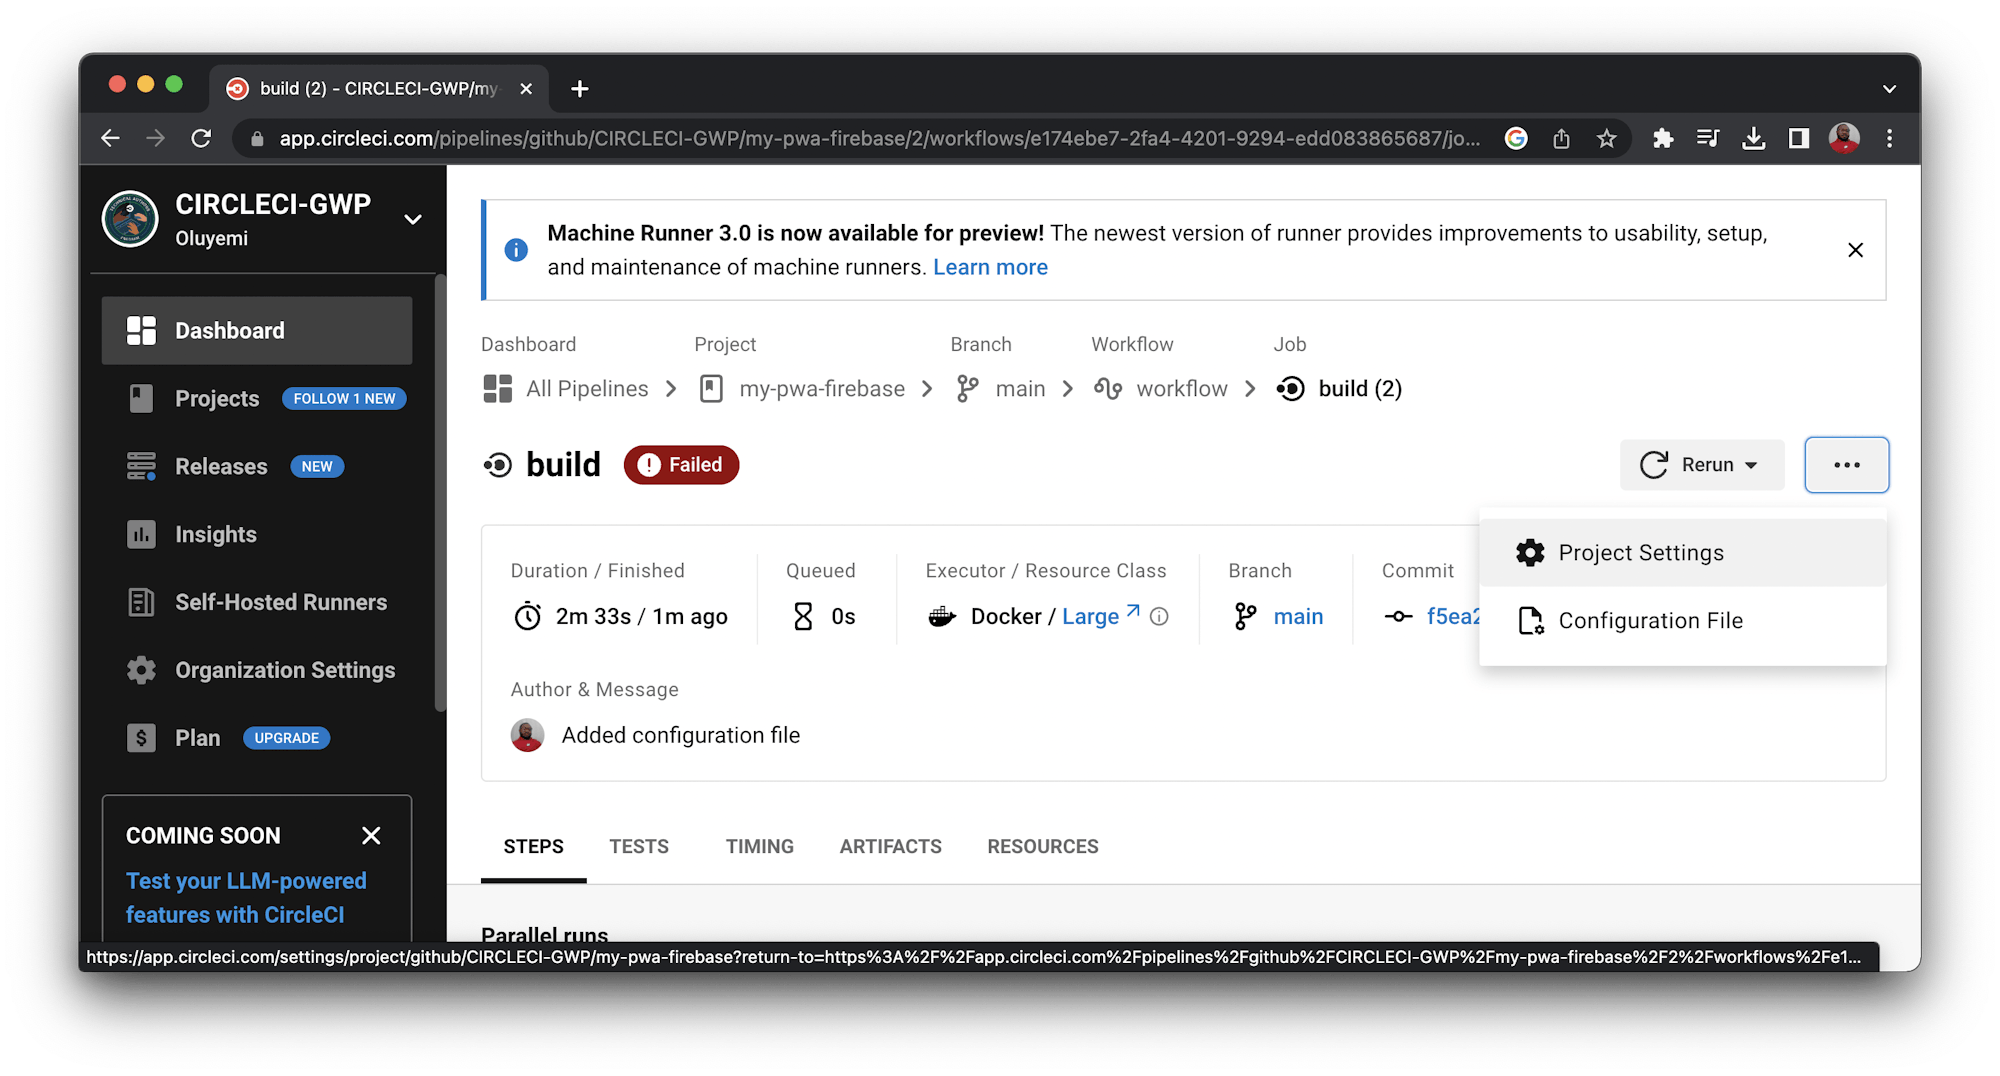
Your first workflow will start running, but the build will fail. This is expected, because you have not yet created the GOOGLE_APPLICATION_CREDENTIALS_BASE_64 and GOOGLE_APPLICATION_CREDENTIALS environment variables.
To add them, click Project Settings.
Click Environment Variables on the left sidebar and create these variables:
GOOGLE_APPLICATION_CREDENTIALS_BASE_64is the value of the base64 encoded JSON you generated from the terminal earlier.GOOGLE_APPLICATION_CREDENTIALSis the name of your credentials file; for example, credentials.json. Whatever name you choose must have the .json extension.
Go back to the dashboard. Click Rerun Workflow from Failed.
Your build should finish successfully.
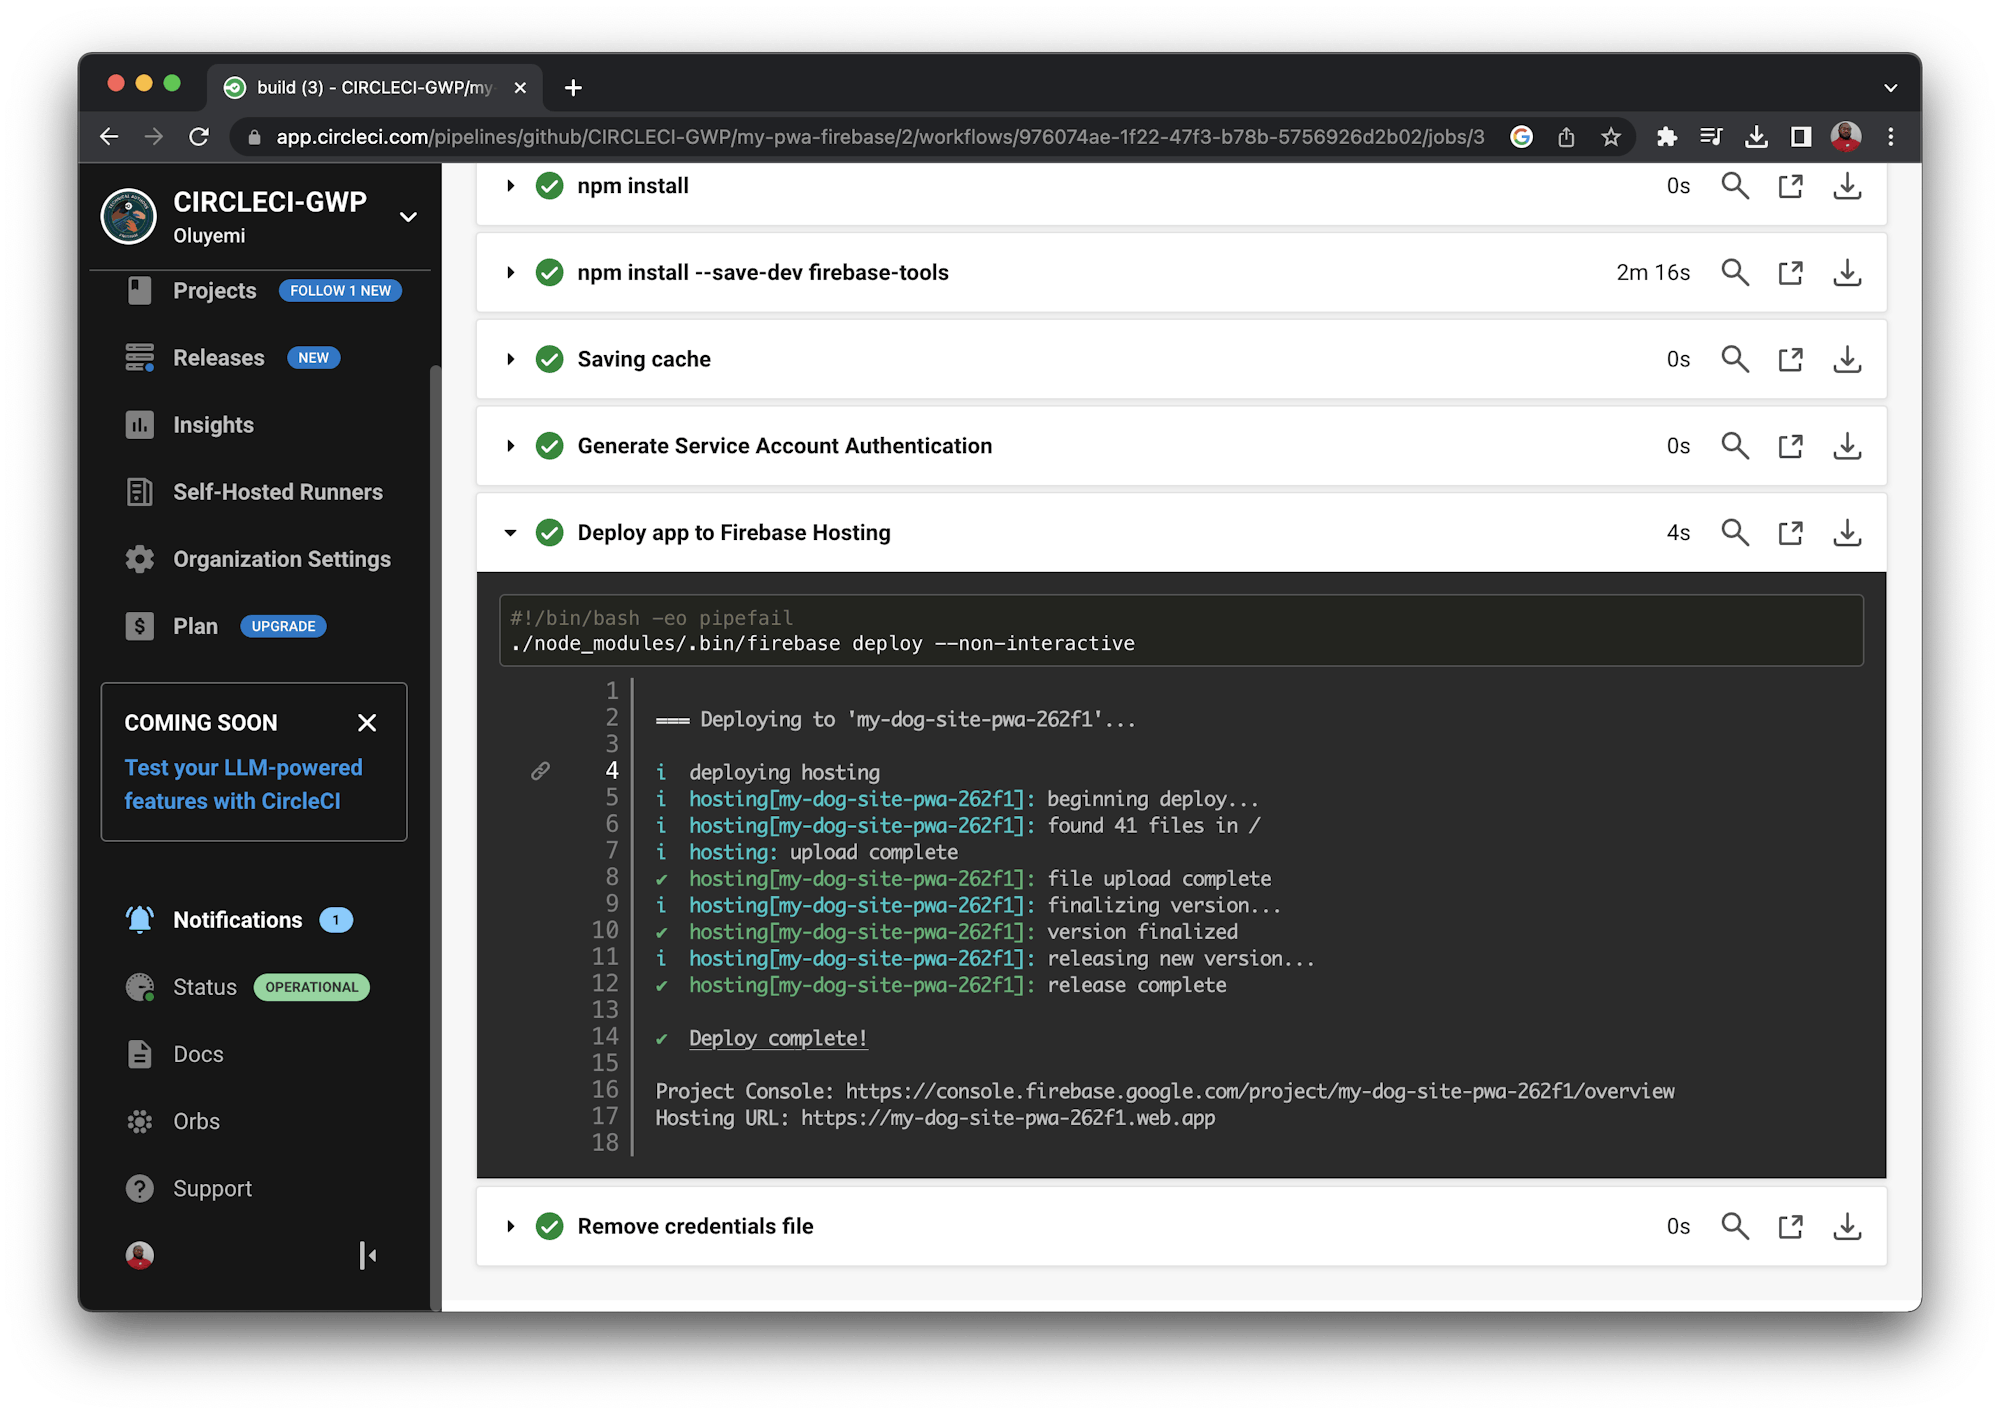
Go to the hosting URL shown in the last step. For me the URL is: https://my-dog-site-pwa-262f1.web.app/.
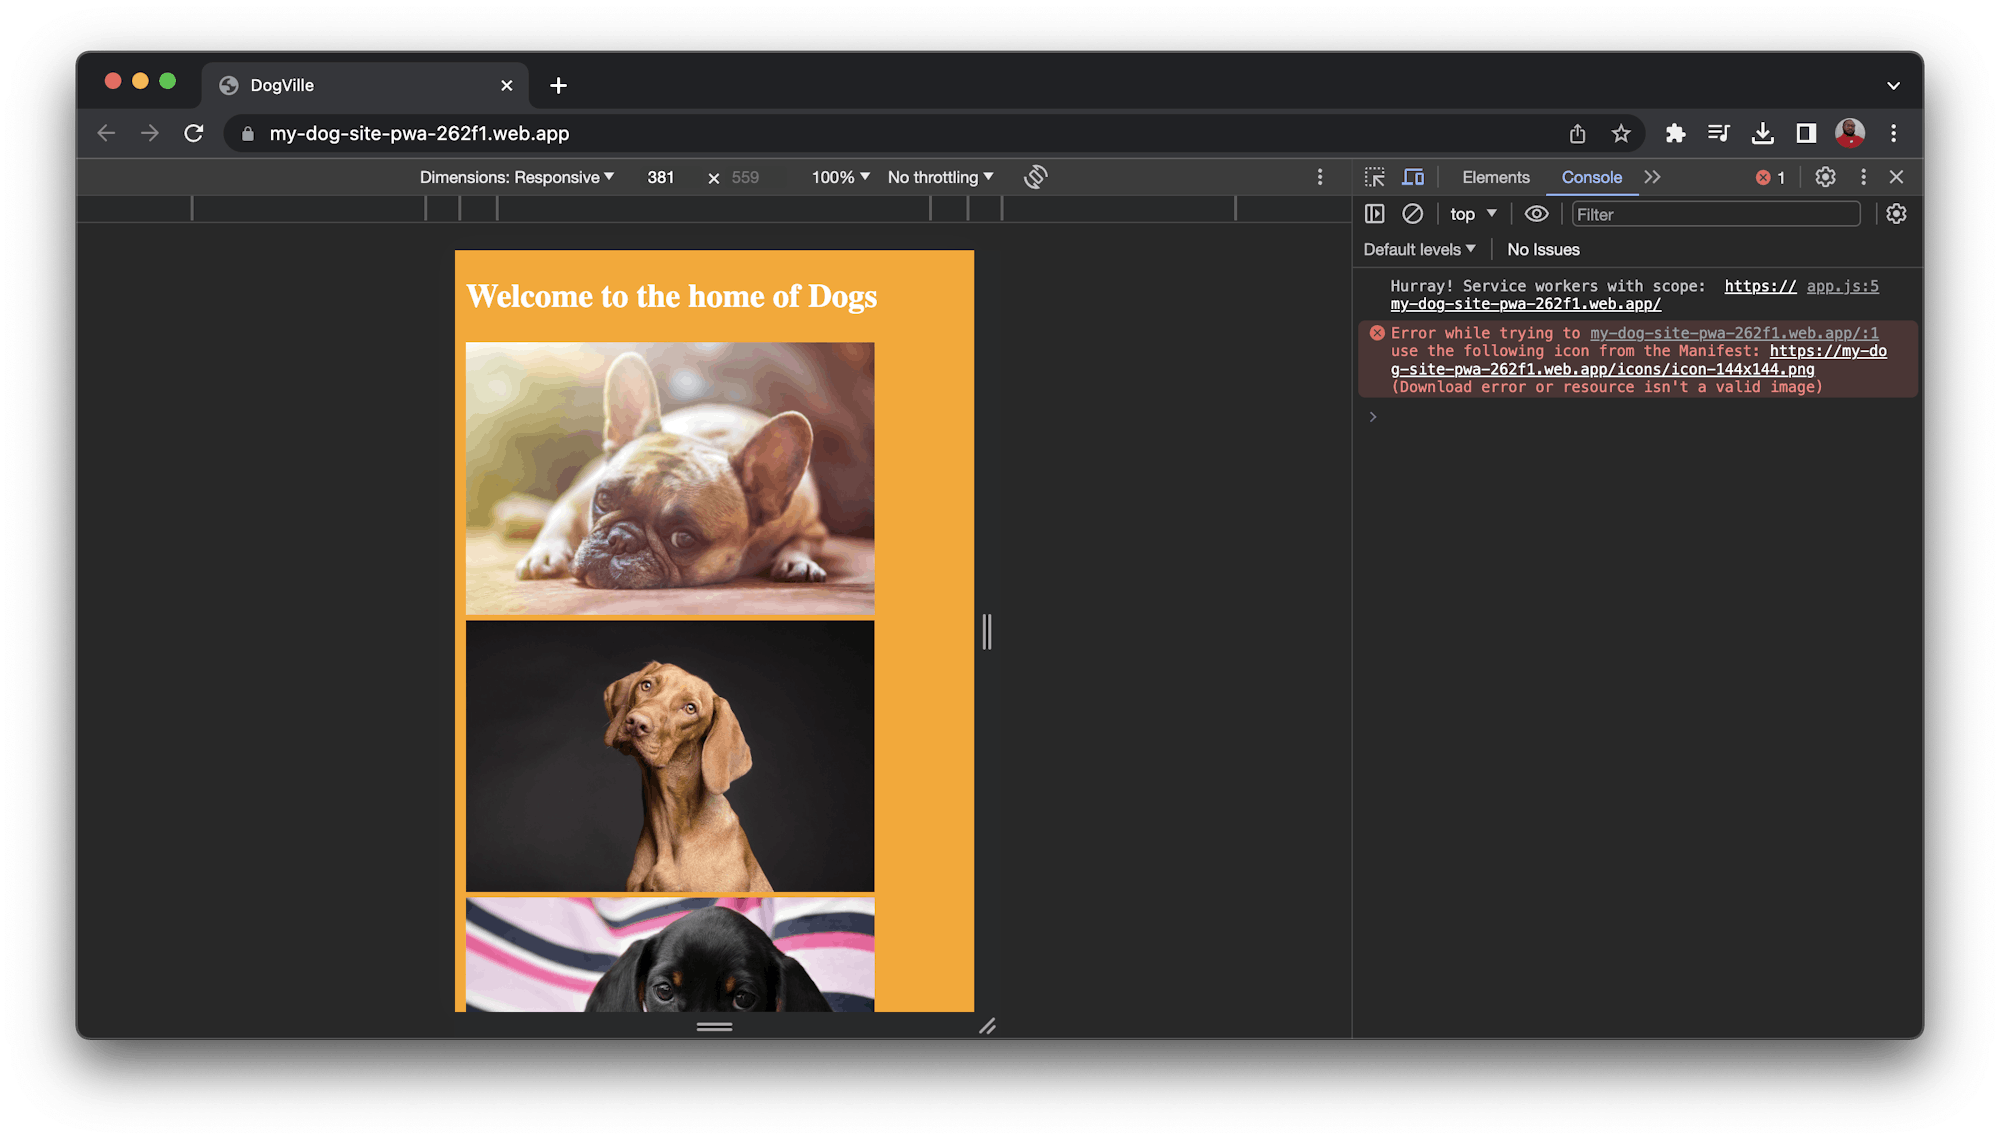
The address bar loads your Firebase URL, and the page displays console messages indicating that your service worker is installed. If you turn off your network and refresh this page, the application with all the dog pictures and styling, loads instead of the usual offline screen.
Conclusion
Setting up SSL certificates for https:// URLs is not a task most developers enjoy, and that may make them reluctant to develop PWAs. However, by following this tutorial, you have learned how to set up an automated continuous deployment pipeline for secured hosting of PWAs with CircleCI and Firebase.
Happy Coding!
Fikayo Adepoju is a LinkedIn Learning (Lynda.com) Author, Full-stack developer, technical writer, and tech content creator proficient in Web and Mobile technologies and DevOps with over 10 years experience developing scalable distributed applications. With over 40 articles written for CircleCI, Twilio, Auth0, and The New Stack blogs, and also on his personal Medium page, he loves to share his knowledge to as many developers as would benefit from it. You can also check out his video courses on Udemy.