CircleCI’s self-hosted runner overview
Introduction
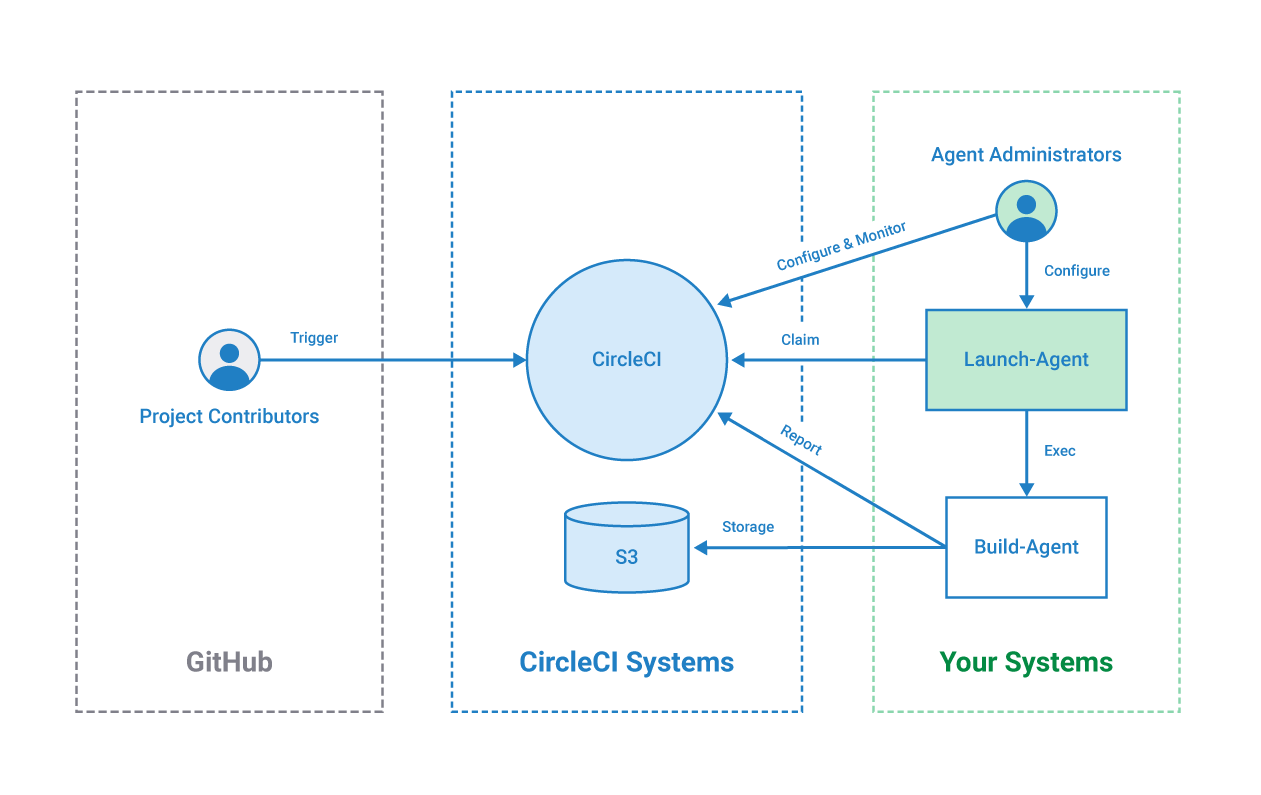
CircleCI’s self-hosted runner enables you to use your own infrastructure for running jobs. This means you will be able to build and test on a wider variety of architectures, as well as have additional control over the environment.
You have the option of installing your self-hosted runner in a Kubernetes cluster using a container runner, or within a machine execution environment using a machine runner. The diagrams below illustrate how CircleCI’s container runner and machine runner extend our existing systems.
Launch Agent 1.1 Deprecated
Launch Agent 1.1 has been deprecated. Machine Runner 3.0 is the recommended replacement. Launch Agent 1.1 will cease to be supported as of July 31, 2024.
CircleCI’s self-hosted runner operation
Once a CircleCI’s self-hosted runner is installed, the self-hosted runner polls circleci.com for work, runs jobs, and returns status, logs, and artifacts to CircleCI.
CircleCI runner use cases
There are two key use cases CircleCI aims to meet with self-hosted runners:
-
Privileged access and controls - CircleCI understands that some customers require running jobs on on-premises or limited-access infrastructure due to stricter isolation requirements. Some things the self-hosted runner enables are:
-
IP restrictions - Self-hosted runners can have static IP addresses that you can control
-
Identity Access Management (IAM) permissions - If you set up self-hosted runners in AWS, they can be assigned IAM permissions
-
Monitor the operating system
-
Connect to private networks
-
-
Unique compute requirements - Customers who need to run jobs on an environment or architecture that CircleCI does not offer as a resource class can use the self-hosted runner to fill that need.
Choosing a runner execution environment
CircleCI offers two types of self-hosted runners: container and machine.
Container runner
CircleCI’s self-hosted runner has historically executed each job using a one-to-one mapping between the CI job and a machine environment (virtual or physical) that has the self-hosted runner binary installed on it. Exclusively running jobs in this manner sacrifices several benefits of a container-based solution that are afforded on CircleCI’s cloud platform when using the Docker executor:
-
The ability to seamlessly use custom Docker images during job execution
-
Access to a consistent, clean containerized build environment with every job
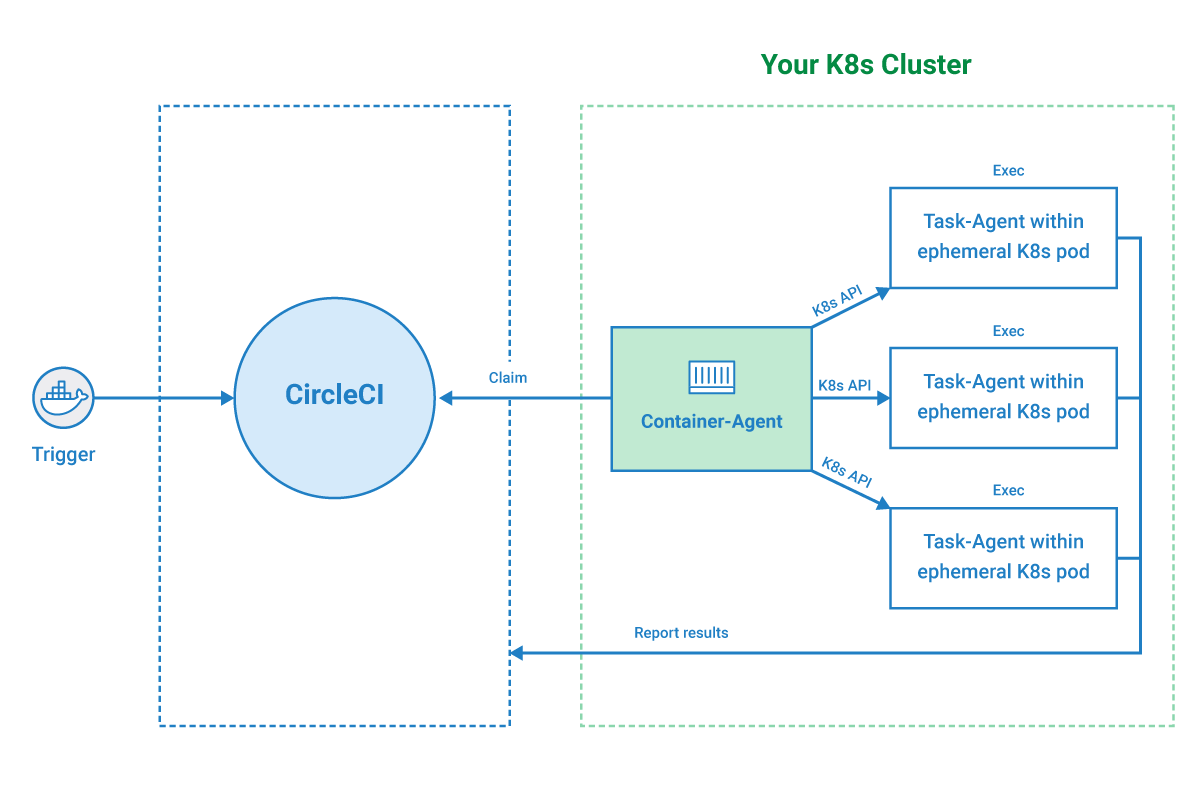
Container runner is installed in a Kubernetes (k8s) cluster which enables you to run containerized jobs on self-hosted compute, similar to how jobs use the native Docker executor to run on CircleCI’s cloud platform. This solution allows you to run hundreds of jobs at once, scaling pods effectively to meet compute demands.
After installation of the container-agent, the container runner will claim your containerized jobs, schedule them within an ephemeral pod, and execute the work within a container-based execution environment.
Container runner allows you to use CircleCI’s convenience images as well as custom Docker images.
Container runner is a complement to the machine runner, not a replacement.
Machine runner
Machine runner is installed either in a virtual machine, or natively on a physical machine. Each machine runner job executes in the same environment (virtual or physical) where the self-hosted runner binary is installed. CircleCI’s machine runner can be installed on Linux, Windows, or macOS. Machine runner should be used if you are not running containerized CI jobs. Visit the Docker to machine page for more examples on when to use a machine execution environment.
If you do not use Kubernetes but still want to run your CI job in a container on a self-hosted runner, you can install the machine runner in Docker.
Machine runner is not compatible with CircleCI’s convenience images or custom Docker images.
Getting started
To get started with CircleCI’s self-hosted runners:
-
Provide your own platform to deploy your CircleCI’s self-hosted runners (see the following Available self-hosted runner platforms section for supported platforms).
-
You will need at least one credit on your account to use runners. Runner execution itself does not require credits but one credit is required in case your jobs use storage or networking. For more information, see the Persisting data overview.
-
For container runner installation, visit the Container runner page.
-
For machine runner, visit the installation guide for your desired platform:
Available self-hosted runner platforms
Supported level platforms ensure that CircleCI’s self-hosted runners are both built and tested on their respective systems.
With a supported platform, users receive the following:
-
Documentation and best practices
-
Support: CircleCI customer engineers will assist customers to resolve issues within their usual Advanced Service Level Agreements (SLAs)
Supported CircleCI’s self-hosted runners are available on the following platforms:
Container and machine self-hosted runners:
-
Ubuntu 18.04 or later (x86_64, ARM64)
Container runners:
-
Kubernetes (x86_64, ARM64)
Machine runners:
-
macOS X 11.2+ (Intel, Apple M1)
-
Windows Server 2019, 2016 (x86_64)
-
Linux distributions - RHEL8, SUSE, Debian, etc (x86_64, ARM64, s390x, ppc64le)
CircleCI sometimes offers a preview level platform when a new platform for self-hosted runner is in active development. If there is a platform in a preview level, this section will be updated with information and limitations for that platform.
Limitations
Almost all standard CircleCI features are available for use with self-hosted runner jobs, however, a few features are not yet supported.
-
The following built-in environment variables are not populated within runner executors:
-
CIRCLE_PREVIOUS_BUILD_NUM -
All deprecated cloud environment variables
-
-
Docker layer caching
-
For limitations relating to container runner, visit the Container runner page.