Deploy and re-evaluate LLM-powered apps with LangSmith and CircleCI

Senior Technical Content Marketing Manager

In part 1 of this tutorial, we showed you how to build a large language model (LLM) application that uses retrieval-augmented generation (RAG) to query your own documentation and then test it using a CircleCI continuous integration (CI) pipeline.
In this follow-up tutorial, we’ll show you how to build the continuous delivery (CD) portion of the pipeline to help bring your LLM-powered apps safely into production. The pipeline will run a scheduled set of nightly evaluations on your LLM application, wait for a human to review the results of your automated evaluations, and then deploy the application to your production environment. This way, you can ship regular updates to your application, with deeper visibility into model performance and better responsiveness to user needs.
Sample code: You can follow along with this tutorial by forking the example repository and cloning it to your local machine using Git.
What we’re building: an LLM deployment platform
The first part of this tutorial demonstrated how to build an application that answers questions about LangSmith’s documentation. This application relies on OpenAI large language model APIs managed with wrappers from LangChain, a popular open-source framework for building language model-powered applications.
The tutorial also covered how to implement a unit-testing suite with deterministic tests to confirm that the model was nominally functional by asking its name and having it perform basic arithmetic. It also contained nondeterministic unit tests implemented with LLM evaluators (separate LLMs that assess and score generated content for qualities like relevance, coherency, and adherence to guidelines).
To build on this functionality, we’ll show you how to build a simple continuous delivery pipeline to perform extensive nightly integration tests on the main branch and deploy the application to production.

However, to keep this tutorial focused on the practical aspects of CI/CD, there are some simplifications and assumptions:
- The CI test suite from part 1 is re-used for this CD test suite: Generally, a CD test suite should be more robust than just unit tests. However, we’re using the same tests in this tutorial so we can focus on implementing the pipeline.
- The LLM application is minimal, for demonstration purposes: The example application only accepts POST requests with inputs to the language model in JSON format and returns the output from the language model.
- The CircleCI pipeline will run on a self-hosted runner: We’ll keep things simple here by deploying the application as a Python Flask server to a self-hosted runner through CircleCI and then interacting with that server through
curlcommands.
Creating the CircleCI deployment pipeline
These steps use the same example repository and configuration file as part 1 of this tutorial. To successfully run your pipeline, you will need to uncomment the run-nightly-tests and deploy jobs along with the deployment-tests workflow in the provided .circleci/config.yml file.
The example LLM deployment method is adapted from the LangChain documentation.
Running the Python Flask application locally
If you’re not following from part 1, you should check the prerequisites listed there and follow the included steps to create the required .env file. You can then spin up the server locally with the following commands:
source ./tools/install-venv.sh  # install and enter the Python virtual env
flask --app rag/app run &       # spin up the Flask server
Note: The & will instantiate the server as a background process. To stop the server, you will need to bring the process back to the foreground with the Linux fg command and then press Ctrl+C. As another option, you could open two separate terminals: one for spinning up the server and one for issuing commands.
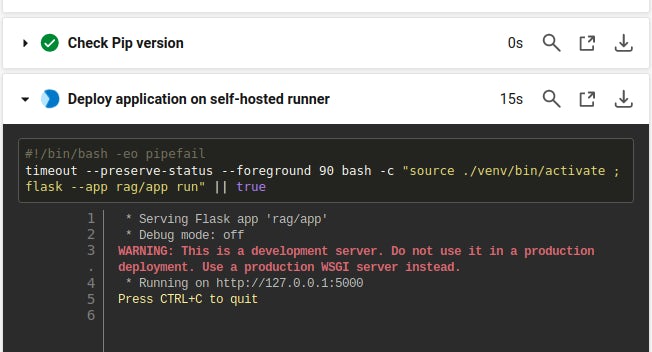
Once the server has spun up successfully, you should see something like this:

Take note of the port that the Flask server is listening to. In this case, the server is on localhost with port 5000. After the server is spun up, you should be able to interact with it by sending curl commands to the host and port using the following template:
curl -X POST -H "Content-Type: application/json" -d '{"message": "What is LangSmith?"}' http://localhost:5000
Note: Be sure to adjust the port number to the port number that your Flask server is listening to.
The server should send the input to the documentation_chain object and then return the answer in JSON format.

You can adjust the message field in the JSON request to ask the LLM different questions. For a production environment, you would most likely build on this with a web-based graphical interface to make it more user-friendly.
Building the test suite
To keep this tutorial focused on the CI/CD aspect of LLMOps, you can just reuse the unit tests introduced in the first part of this tutorial. In production scenarios, though, you will want to define your own tests for your use case, as every ML deployment is highly specialized.
| Test name | Test type | What it does |
|---|---|---|
test_name |
deterministic | Asks the LLM what its name is and checks that the string bob appears in the answer. |
test_basic_arithmetic |
deterministic | Asks the LLM what 5 + 7 is and checks that the string 12 appears in the answer |
test_llm_evaluators |
non-deterministic | Asks the LLM questions in the example list of tuples, then uses an LLM evaluator available in LangSmith to judge whether the actual output was close enough to the desired output |
Setting up the CircleCI deployment pipeline
Following from the previous tutorial, you will already have set up a CircleCI account, forked the example repository, and added it as a CircleCI project with the included .circleci/config.yml configuration file.
Defining workflows
In the .circleci/config.yml file, there is a workflow called deployment-tests that consists of three jobs: run-nightly-tests, hold, and deploy. This workflow has been commented out to avoid confusion in the first part of this tutorial. To use this workflow in your pipeline, make sure you first remove the comments.
Note that the config file is supplying the run-nightly-tests and deploy jobs with the same rag-context context that it supplied to the run-unit-tests job in part 1 of this tutorial.
To run the multiple jobs contained in one workflow in series rather than parallel, supply the requires flag so that each job will wait for the previous one to succeed before executing. If certain jobs can be done in parallel, then these flags can be omitted.
Rather than being triggered whenever the main branch is updated, this workflow is executed on a schedule, defined in cron syntax.
 deployment-tests:
    # Trigger on a schedule or when retrain branch is updated
    triggers:
      - schedule:
          cron: "0 0 * * *" # Daily at midnight
          filters:
            branches:
              only:
                - main
    jobs:
      - run-nightly-tests:
          context: rag-context  # This contains environment variables
      - hold: # A job that will require manual approval in the CircleCI web application.
          requires:
            - run-nightly-tests
          type: approval # This key-value pair will set your workflow to a status of "On Hold"
      - deploy:
          context: rag-context  # This contains environment variables
          requires:
            - hold
Note: If you authorized your CircleCI account via our GitHub App, the scheduled workflows functionality is not currently supported for your account type. This feature is on our roadmap for a future release. In the meantime, your test suite will still trigger when a change is made to your main branch.
Adding jobs
The run-nightly-tests job is identical to the run-unit-tests job from the previous tutorial as we are using the same test suite for simplicity. You will need to remove the comments in the config file for this job to run.
 run-nightly-tests:
    machine: # executor type
      # for a full list of Linux VM execution environments, see
      # https://circleci.com/developer/images?imageType=machine
      image: ubuntu-2204:2023.07.2
    steps:
      - checkout  	# Check out the code in the project directory
      - install-venv
      - check-python  # Invoke command "check-python" after entering venv
      - run:
        command: source ./venv/bin/activate && pytest -s
        name: Run nightly tests
To start experimenting with your own tests, copy the example rag/test_rag.py file to a new file named rag/nightly_tests.py and tweak the existing tests or add your own. Then change the pytest command above to the command shown below:
source ./venv/bin/activate && pytest -s -k rag/nightly_tests.py
The hold job does not need to be defined — it’s a built-in job that is available in every CircleCI workflow. This job pauses the workflow after a certain job has been run and requires manual approval before continuing. This is especially useful when deploying LLM-powered applications because many language model tests are non-deterministic and will often need to be reviewed by a human.
Being able to automate the majority of an LLM workflow, only pausing for the specific tasks that require human approval, greatly speeds up LLM training, testing, and deployment workflows while ensuring the accuracy and quality of results. After the nightly tests have run and the LangSmith output has been verified, the pipeline will continue to the deployment phase. This keeps important decisions in human hands while automating all the steps prior to and after this decision.
The deploy job spins up a Python Flask server. This job uses a self-hosted machine runner rather than one of CircleCI’s cloud-hosted execution environments. This grants you full control over the execution environment, which can be useful in applications that require access to on-site compute assets or confidential data. Be sure to remove the comments from this job to run it in your pipeline.
  deploy:
    # For running on CircleCI's self-hosted runners
    machine: true
    resource_class: user/sample-project # TODO replace “user/sample-project” with your own self-hosted runner resource class details
    steps:
      - checkout
      - install-venv
      - check-python  # Invoke command "check-python" after entering venv
      - run:
        command: timeout --preserve-status --foreground 90 bash -c "source ./venv/bin/activate ; flask --app rag/app run" || true  # Run the server for 90 seconds to test
        name: Deploy application on self-hosted runner
It only takes five minutes to set up a self-hosted runner in CircleCI. To use this runner in a job, add its resource_class information to the .circleci/config.yml file. You should deploy this self-hosted runner to a system that you can log into, so that you can access your Flask server from localhost.
This is just to illustrate the simplest version of the workflow. In a production environment, you would likely want to deploy either to your own web infrastructure or to a hosted cloud service like Google Cloud Run or AWS ECS.
Putting it all together - a complete CI/CD pipeline for LangChain LLMs
This workflow will be run on the cron schedule defined in your workflow trigger. When the workflow has reached the hold job, it will pause awaiting approval. From here, you can look at the link in the logs to the LangSmith non-deterministic results and decide if the responses from the model were good enough to deploy the application.

Once approved, the workflow will continue and deploy the application to your production environment (in this case, the self-hosted machine runner).

After the deploy job runs, your Flask server will continue running as a long-lived process on your self-hosted runner. You can then interact with the deployed application using the curl command shown earlier.
curl -X POST -H "Content-Type: application/json" -d '{"message": "What is LangSmith?"}' http://localhost:5000

For demonstration purposes (and so you don’t have to set up a deployment server just to run this example), the Flask server will be launched on the machine runner, then the job will complete after 90 seconds so the workflow completes successfully. This way, you have enough time to issue the curl commands from before to confirm it is working properly.

Re-evaluating your LLM models
At this point, you’ve learned how to add a CI/CD workflow to your LLM-powered application development cycle. You can automatically build, test, evaluate, and deploy LLM-powered applications with every change to your application code or model prompts, shortening your development cycles for LLM-powered applications.
However, it’s important to remember that the behavior of AI models is far less predictable than that of traditional software and can evolve over time. Therefore, it’s impossible to have perfect test coverage even if you verify the outputs of many, many prompts to the model. It is almost a guarantee that your real-world users will prompt the model in a way that you don’t expect and get results that you don’t expect. To have a more stable and useful application, you want to minimize surprises like this.
This is why it’s a good idea to monitor how your users interact with your application under real-world conditions and bring those prompts and responses into your test suite. It’s not reasonable to do this for every prompt, but allowing LangSmith to store prompt data based on a random sample of users can be very enlightening.
You can do this by selectively instantiating the LangSmith client in your production application, as shown at the top of each unit test in rag/rag_test.py.
# Instantiate LangSmith client
client = Client()
Automate building, training, and evaluating LLM applications with CircleCI
LLM-powered applications are an exciting new frontier in software development, allowing you to provide more personalized, engaging, and user-centric experiences. But bringing these applications into production can be difficult and time consuming, often requiring extensive manual intervention.
By integrating LLM evaluations into your CI/CD pipeline, you not only save time and resources but also mitigate the inherent risks associated with manual evaluations and deployments.
To get started building your automated LLM evaluation and deployment pipeline, sign up for a free CircleCI account and take advantage of up to 6000 build minutes per month.

