Deploy a serverless workload on Kubernetes using Knative and ArgoCD

Software Engineer

This tutorial covers:
- Setting up Knative and ArgoCD
- Monitoring and accessing a sample application
- Creating a pipeline to continuously deploy your serverless workload on a Kubernetes cluster
Containers and microservices have revolutionized the way applications are deployed on the cloud. Since its launch in 2014, Kubernetes has become a standard tool for container orchestration. It provides a set of primitives to run resilient, distributed applications.
One of the key difficulties that developers face is being able to focus more on the details of the code than the infrastructure for it. The serverless approach to computing can be an effective way to solve this problem.
Serverless allows running event-driven functions by abstracting the underlying infrastructure. Compared to traditional Platform as a Service (PaaS), serverless allows your dev team to focus on the functionality of the service. Infrastructure issues, such as scaling and fault tolerance, are no longer a roadblock.
Knative is an open-source enterprise-level solution to build serverless and event-driven applications. Its components can be used to build and deploy serverless applications on Kubernetes. Originally developed by Google, Knative now has contributors from IBM, Red Hat, and VMWare.
ArgoCD is a Kubernetes-native continuous deployment (CD) tool. It deploys code changes directly to Kubernetes resources by pulling them from Git repositories. ArgoCD follows the GitOps pattern, unlike some external CD solutions, which can support only push-based deployments. This tool gives developers the ability to control application updates and infrastructure setup from an unified platform.
In this tutorial, you will learn how to deploy a Node.js application as a serverless workload with Knative on Azure Kubernetes Service (AKS) using CircleCI and ArgoCD. You will be creating a continous integration pipeline with CircleCI orbs, which are reusable packages of YAML configuration that condense repeated pieces of config into a single line of code. The pipeline is triggered when you push the code in the GitHub repository. The result is an automated pipeline that triggers ArgoCD to deploy the latest version of the application on the Kubernetes cluster.
Prerequisites
To follow along with this tutorial, you will need:
- Docker Hub account
- GitHub account
- Microsoft Azure account
- CircleCI account
- Kubectl installed on your system
- ArgoCD CLI installed on your system
- Azure CLI installed on your system
- Node.js installed on your system
- Docker Engine installed on your system
After you have these items in place you are ready to go to the next section.
Cloning the Node.js application
In this tutorial, our main focus is on deploying the application on Kubernetes. To save time, you can directly clone the Node.js application to your GitHub and continue with the rest of the process.
To clone the project, run:
git clone https://github.com/CIRCLECI-GWP/nodejs-knative-argocd.git
There are 2 branches in this repository:
- The
mainbranch contains only the Node.js application code. - The
circleci-project-setupbranch contains the application code, along with all YAML files that you will create in this tutorial.
Check out to the main branch.
The Node.js application lives in the app.js file:
const express = require("express");
const path = require("path");
const morgan = require("morgan");
const bodyParser = require("body-parser");
/* eslint-disable no-console */
const port = process.env.PORT || 1337;
const app = express();
app.use(morgan("dev"));
app.use(bodyParser.json());
app.use(bodyParser.urlencoded({ extended: "true" }));
app.use(bodyParser.json({ type: "application/vnd.api+json" }));
app.use(express.static(path.join(__dirname, "./")));
app.get("*", (req, res) => {
  res.sendFile(path.join(__dirname, "./index.html"));
});
app.listen(port, (err) => {
  if (err) {
    console.log(err);
  } else {
    console.log(`App at: http://localhost:${port}`);
  }
});
module.exports = app;
The key takeaway from this code is the port number where the application will be running. In this case, it is 1337.
You can run the application locally by first installing the dependencies. In the project’s root, type:
npm install
Then run the application with the command:
node app.js
The application should now be up and running at the address http://localhost:1337.
Containerizing the Node.js application
The first step for deploying an application to Kubernetes is containerizing it. Containerizing applications that use Docker as the container runtime tool require you to create a Dockerfile. A Dockerfile is a text document that contains all the commands a user could call on the command line to assemble an image.
Create a new file in the root directory of the project and name it Dockerfile. Copy this content to the file:
# Set the base image to use for subsequent instructions
FROM node:alpine
# Set the working directory for any subsequent ADD, COPY, CMD, ENTRYPOINT,
# or RUN instructions that follow it in the Dockerfile
WORKDIR /usr/src/app
# Copy files or folders from source to the dest path in the image's filesystem.
COPY package.json /usr/src/app/
COPY . /usr/src/app/
# Execute any commands on top of the current image as a new layer and commit the results.
RUN npm install --production
# Define the network ports that this container will listen to at runtime.
EXPOSE 1337
# Configure the container to be run as an executable.
ENTRYPOINT ["npm", "start"]
If you have Docker installed, you can build and run the container locally for testing. Later in this tutorial you will learn how to automate this process using CircleCI orbs.
To build and tag the container, you can type:
docker build -t nodejs-knative-argocd:latest .
Confirm that the image was successfully created by running this command from your terminal:
docker images
Then run the container with the command:
docker run -it -p 1337:1337 nodejs-knative-argocd:latest
The application should now be up and running at the address http://127.0.0.1:1337.
Commit and push the changes to your GitHub repository.
Configuring Knative Service manifests
In Knative, Services are used to deploy an application. To create an application using Knative, you must create a YAML file that defines a Service. This YAML file specifies metadata about the application, points to the hosted image of the app, and allows the Service to be configured.
Create a directory named knative in the root directory of the project. Then, create a new file in the new directory and name it service.yaml.
The contents of the service.yaml are:
apiVersion: serving.knative.dev/v1
kind: Service
metadata:
  creationTimestamp: null
  name: nodejs-knative-argocd
spec:
  template:
    metadata:
      creationTimestamp: null
      name: nodejs-knative-argocd
    spec:
      containerConcurrency: 0
      containers:
        - image: docker.io/avik6028/nodejs-knative-argocd:latest
          name: user-container
          ports:
            - containerPort: 1337
              protocol: TCP
          readinessProbe:
            successThreshold: 1
            tcpSocket:
              port: 0
          resources: {}
      enableServiceLinks: false
      timeoutSeconds: 300
status: {}
The key takeaway from this code block is the spec.template.metadata.name and spec.template.spec.containers[0].image. These denote the name of the template and the container image that will be pulled and deployed with Knative on the Kubernetes cluster. These values will be updated with the latest container image information during the continuous integration process.
Commit and push these files into the main branch of the GitHub repository you cloned earlier.
Launching the Azure Kubernetes Service (AKS) cluster
In this tutorial, you will be learning to deploy the application on AKS cluster. To create the AKS cluster, you should have a Microsoft Azure account and the Azure CLI installed on your computer. Connect the CLI to your Azure account.
Now you can launch an AKS cluster with the help of Azure CLI.
Create a Resource Group using this command:
az group create --name NodeRG --location eastus
Launch a two-node cluster:
az aks create --resource-group NodeRG --name NodeCluster --node-count 2 --enable-addons http_application_routing
Note: If you generated any SSH keys in your system previously, you need to add the optional parameter --generate-ssh-keys to the command. This parameter will auto-generate SSH public and private key files if they are missing. The keys will be stored in the ~/.ssh directory.
The AKS cluster will take 10 to 15 minutes to launch.
Installing Knative in the Kubernetes cluster
Once the cluster is up and running, you need to install Knative inside the cluster to use it for deploying your serverless workload.
To install the application, use the Azure CLI once again.
Configure kubectl to connect to AKS using this command:
az aks get-credentials --resource-group NodeRG --name NodeCluster
To install the Knative core components and custom resources, execute these commands:
kubectl apply -f https://github.com/knative/serving/releases/download/knative-v1.7.1/serving-crds.yaml
kubectl apply -f https://github.com/knative/serving/releases/download/knative-v1.7.1/serving-core.yaml
Knative also requires a networking layer for exposing its services externally. You need to install Kourier, a lightweight Knative Serving ingress.
kubectl apply -f https://github.com/knative/net-kourier/releases/download/knative-v1.7.0/kourier.yaml
Configure Knative Serving to use Kourier by default by running:
kubectl patch configmap/config-network \
  --namespace knative-serving \
  --type merge \
  --patch '{"data":{"ingress-class":"kourier.ingress.networking.knative.dev"}}'
You can configure DNS so you do not need to run curl commands with a host header. Knative provides a Kubernetes Job called default-domain that configures Knative Serving to use sslip.io as the default DNS suffix.
kubectl apply -f https://github.com/knative/serving/releases/download/knative-v1.7.1/serving-default-domain.yaml
Once you execute the commands, Knative will be installed in knative-serving namespace. To get all the resources into the namespace:
kubectl get all --namespace knative-serving
Installing ArgoCD in the AKS cluster
Once the cluster is up and running, you need to install ArgoCD inside the cluster to use it for deploying your application.
To install ArgoCD, enter:
kubectl create namespace argocd
kubectl apply -n argocd -f https://raw.githubusercontent.com/argoproj/argo-cd/stable/manifests/install.yaml
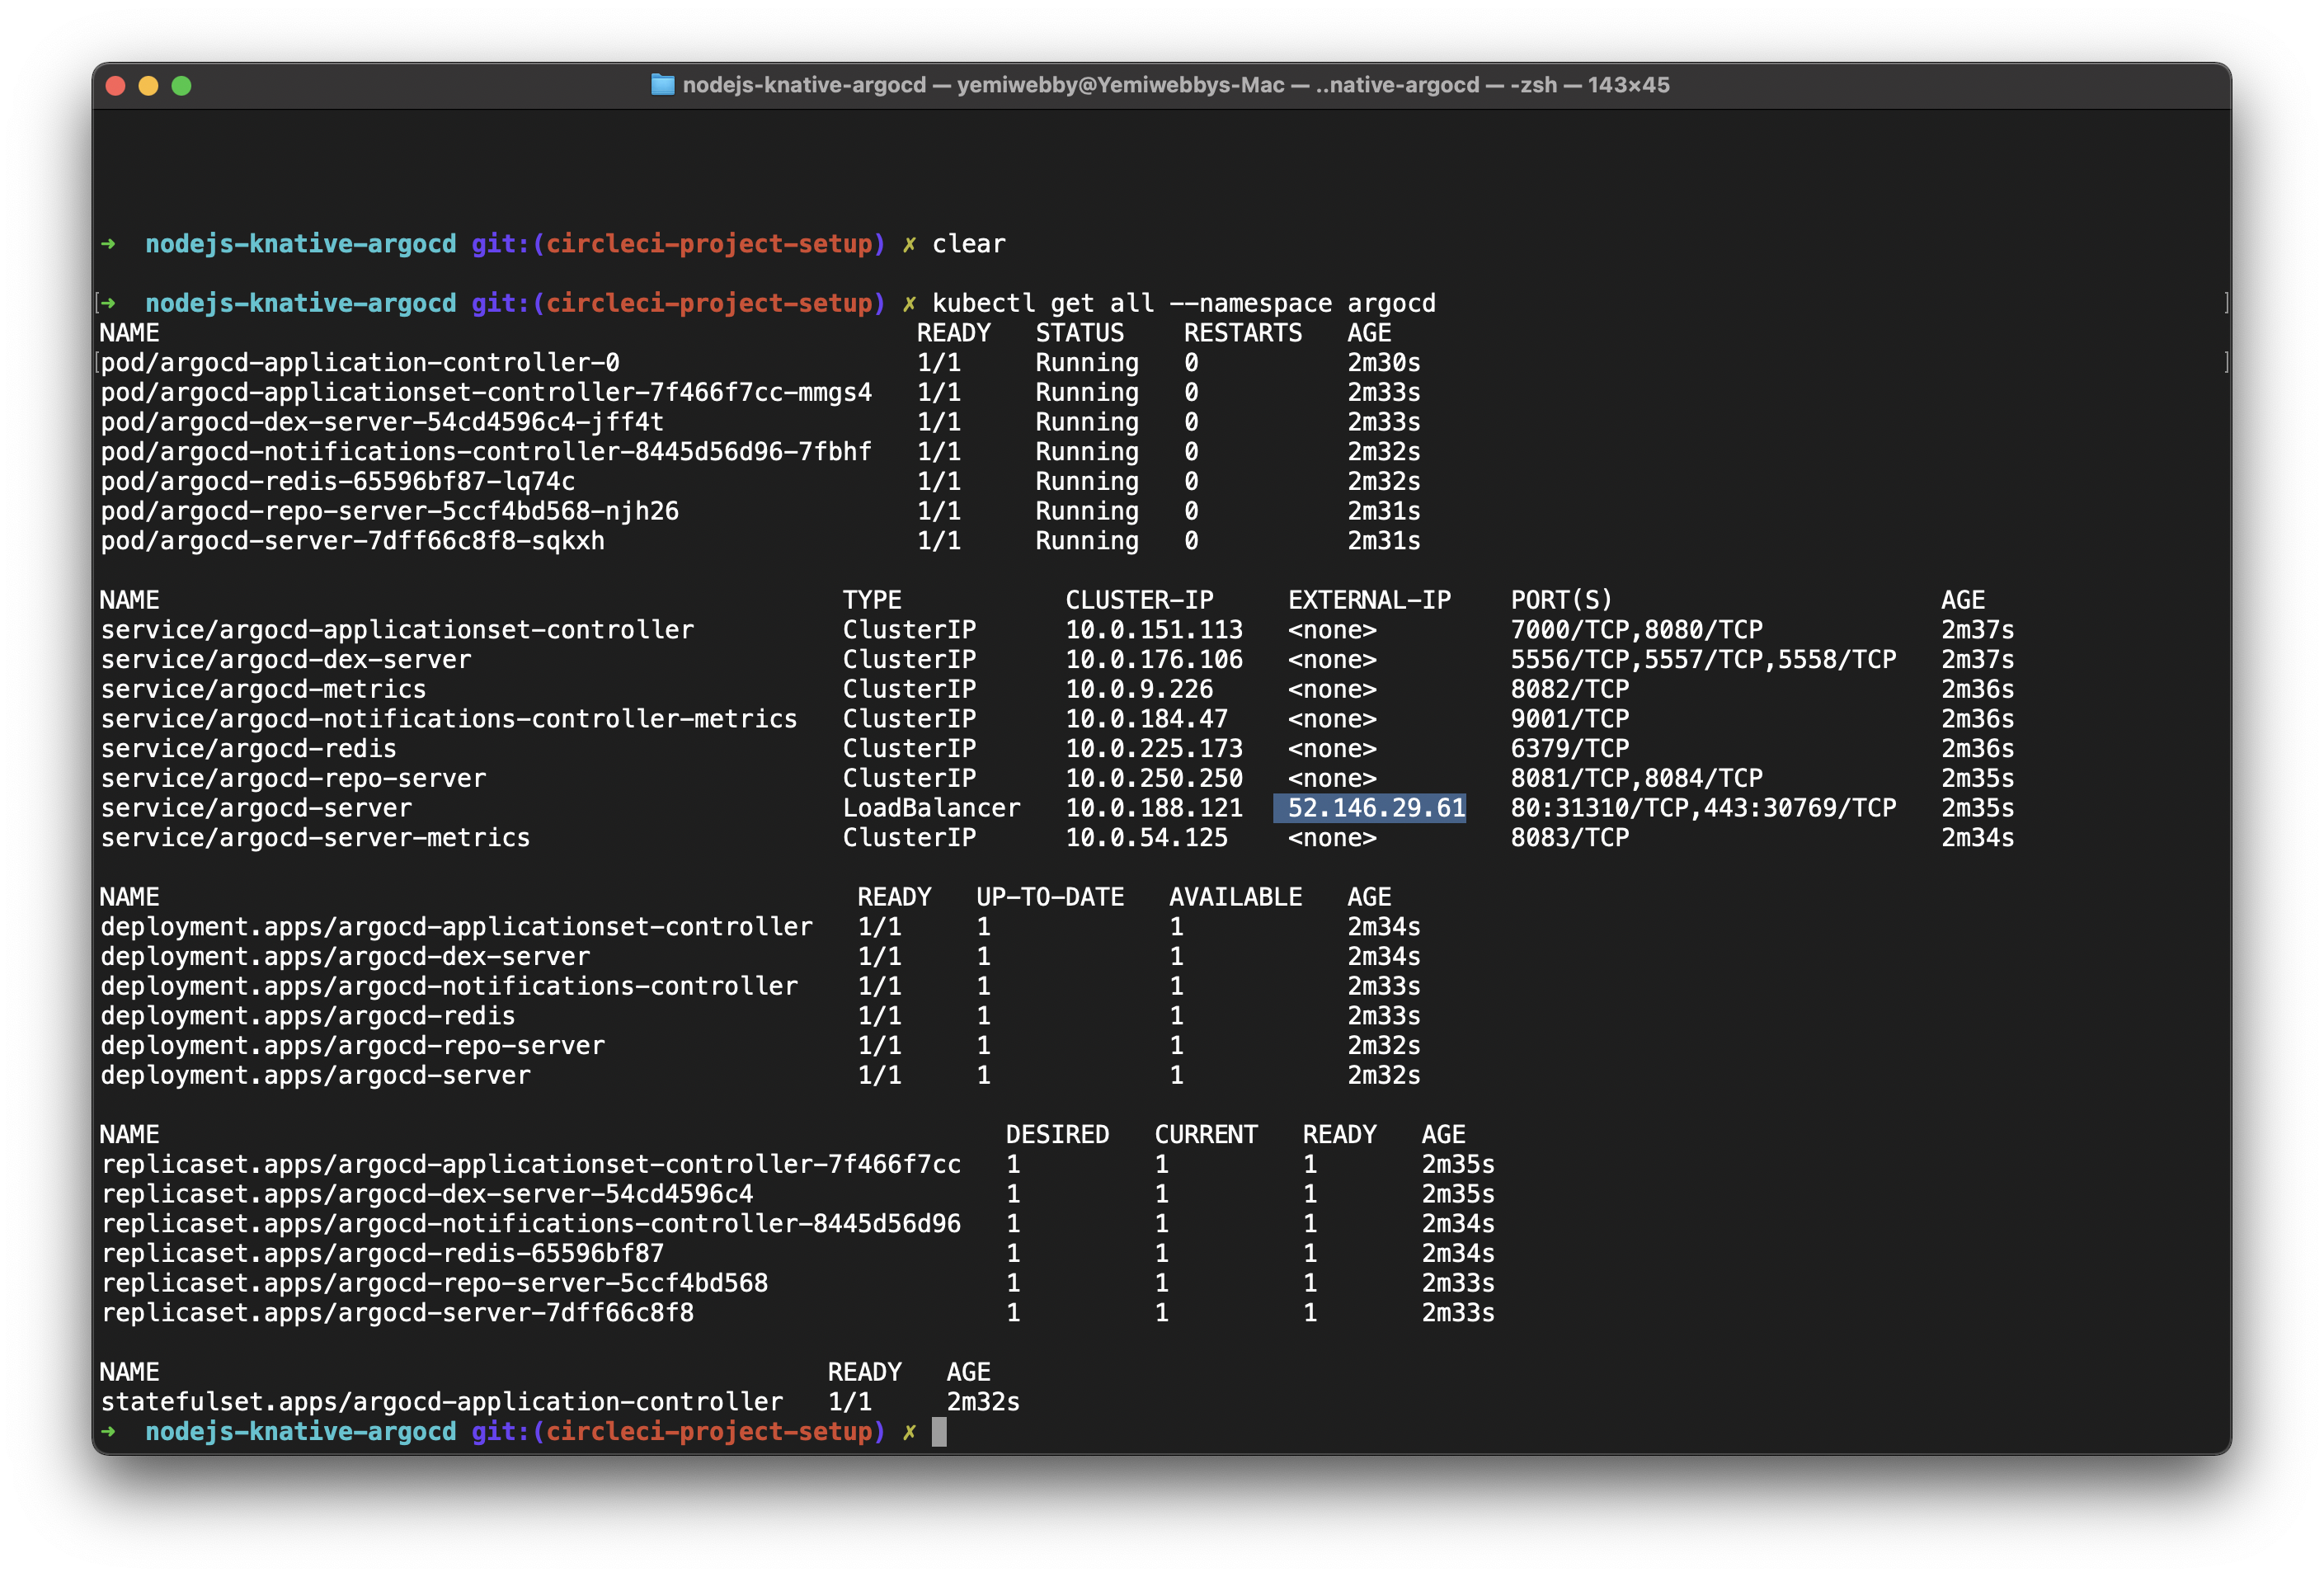
When you execute these commands, ArgoCD will be installed in ‘argocd’ namespace. To get all the resources into the namespace:
kubectl get all --namespace argocd
Exposing the ArgoCD API server
By default, the ArgoCD API server is not exposed with an external IP. Because you will accessing the application from the internet during this tutorial, you need to expose the ArgoCD server with an external IP via Service Type Load Balancer.
Change the argocd-server service type to LoadBalancer:
kubectl patch svc argocd-server -n argocd -p '{"spec": {"type": "LoadBalancer"}}'
Note: You can also use Kubectl port forwarding to connect to the API server without exposing the service. Use this command: kubectl port-forward svc/argocd-server -n argocd 8080:443
You can now access the API server using https://localhost:8080.
Accessing the ArgoCD web portal
Once you have exposed the ArgoCD API server with an external IP, you can access the portal with the external IP Address that was generated.
Because you installed ArgoCD in the argocd namespace, use this command to get all the resources for the namespace:
kubectl get all --namespace argocd
Copy the External-IP corresponding to service/argocd-server.
You can access the application at http://<EXTERNAL-IP>.
I used http://52.146.29.61/.
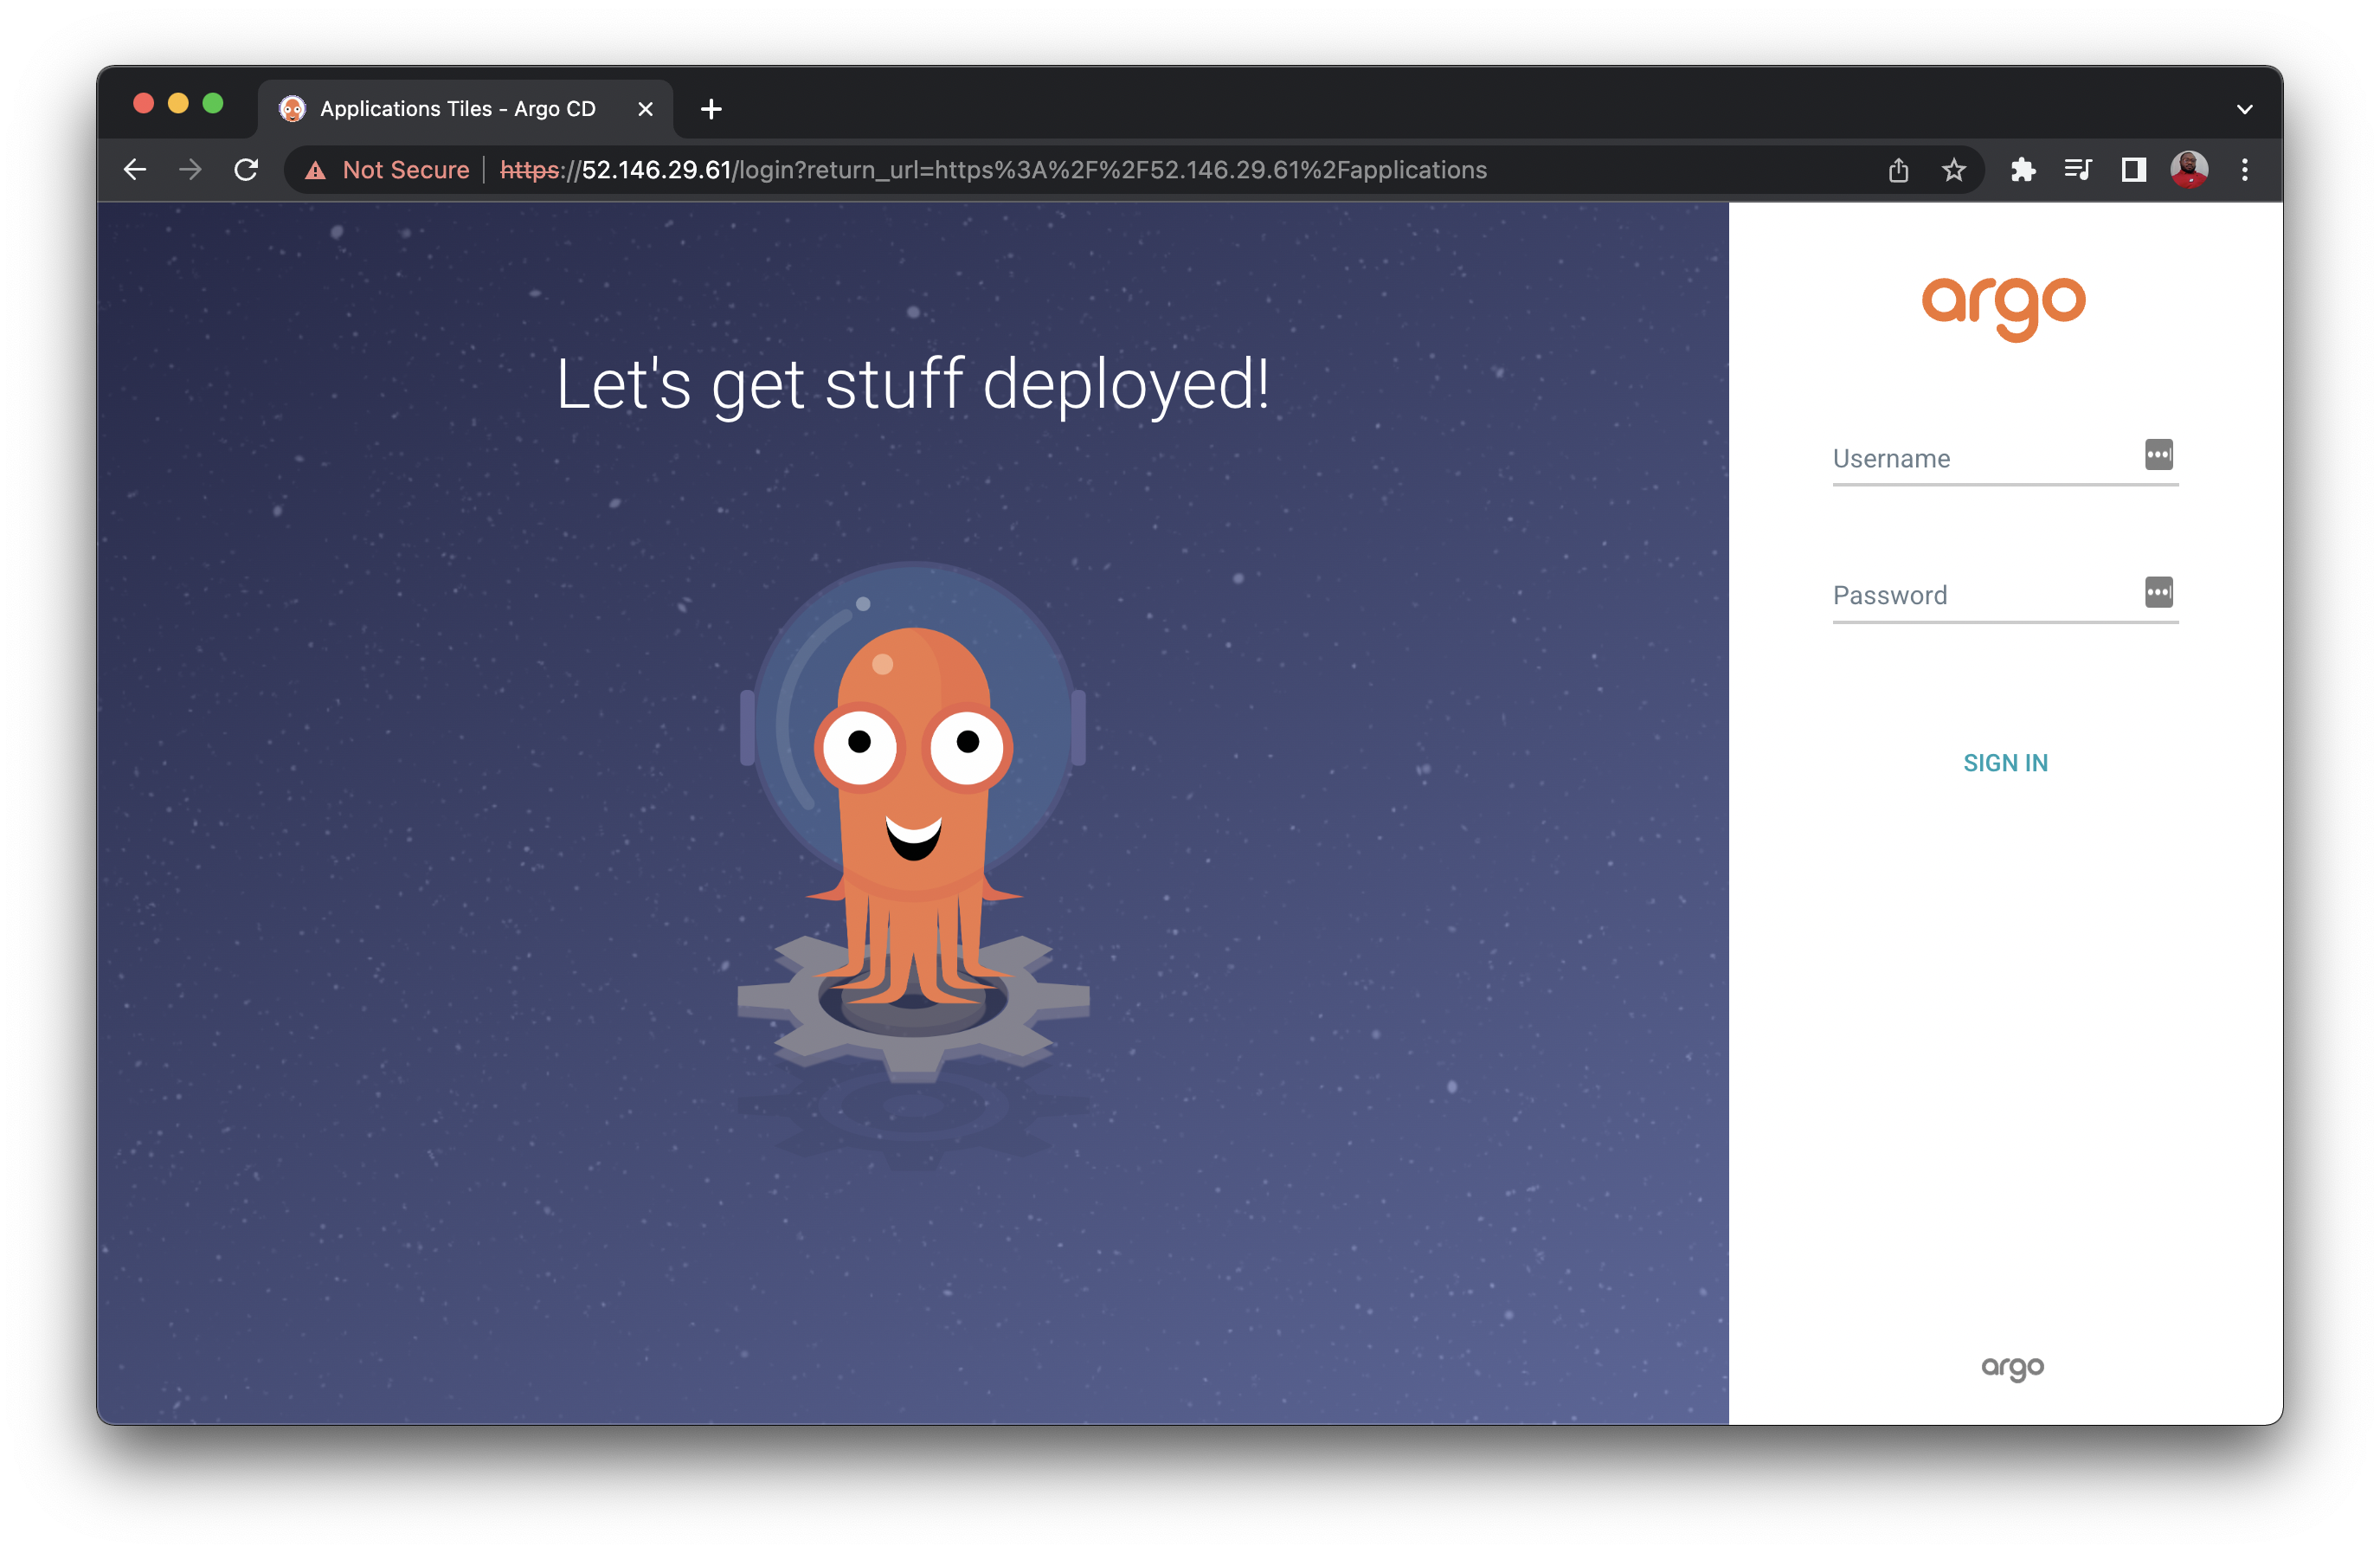
To log into the portal, you will need the username and password. The username is set as admin by default.
To fetch the password, execute this command:
kubectl -n argocd get secret argocd-initial-admin-secret -o jsonpath="{.data.password}" | base64 -d; echo
Use this username-password combination to log into the ArgoCD portal.
Configuring Kubernetes manifests for ArgoCD
To configure ArgoCD to deploy your application on Kubernetes, you will have to setup ArgoCD to connect the Git Repository and Kubernetes in a declarative way using YAML for configuration.
Apart from this method, you can also set up ArgoCD from the Web Portal or using the ArgoCD CLI. But since in this article, we are trying to follow the GitOps principles which states that the Git repository should act as sole source of truth, the declarative method via YAML files serves best.
One of the key features and capabilities of ArgoCD is to sync via manual or automatic policy for deployment of applications to a Kubernetes cluster.
To get started, create a directory named argocd in the root directory of the project. Create a new file in the new directory and name it as config.yaml.
Manual Sync Policy
As the name suggests, through this policy, you will be able to manually synchronize your application via the CI/CD pipelines. Whenever a code change is made, the CI/CD pipeline is triggered, and calls the ArgoCD server APIs to start the sync process based on the changes you will commit. For communicating with the ArgoCD server APIs, you can use the ArgoCD CLI. You can also use one of the SDKs available for various programming languages.
For setting up the Manual Sync policy for ArgoCD, paste this in the config.yaml:
apiVersion: argoproj.io/v1alpha1
kind: Application
metadata:
  name: nodejs-knative-argocd
  namespace: argocd
spec:
  destination:
    namespace: nodejs
    server: 'https://kubernetes.default.svc'
  source:
    path: knative
    repoURL: 'https://github.com/CIRCLECI-GWP/nodejs-knative-argocd'
    targetRevision: circleci-project-setup
  project: default
Automated Sync policy
ArgoCD has the ability to automatically sync an application when it detects differences between the desired manifests in Git, and the live state in the cluster.
A benefit of automatic sync is that CI/CD pipelines no longer need direct access to the ArgoCD API server to perform the deployment. Instead, the pipeline makes a commit and push to the Git repository with the changes to the manifests in the tracking Git repo.
If you want to set to the Automated Sync policy, you need to paste this in the config.yaml.
apiVersion: argoproj.io/v1alpha1
kind: Application
metadata:
  name: nodejs-knative-argocd
  namespace: argocd
spec:
  destination:
    namespace: nodejs
    server: 'https://kubernetes.default.svc'
  source:
    path: knative
    repoURL: 'https://github.com/CIRCLECI-GWP/nodejs-knative-argocd'
    targetRevision: circleci-project-setup
  project: default
  syncPolicy:
    automated:
      prune: false
      selfHeal: false
Commit and push these files into the main branch of the GitHub repository you had cloned earlier.
Creating the continuous integration pipeline
The objective of this tutorial is to show how you can deploy serverless workload with Knative on Kubernetes through continuous integration (CI) via CircleCI and continous deployment (CD) via ArgoCD.
To create the CI pipeline, we will be using CircleCI integrated with your GitHub account. CircleCI configuration lives in the .circleci directory in the project’s root folder in the form of config.yml file, i.e., the path to the configuration is .circleci/config.yml.
The contents of config.yml are:
version: 2.1

orbs:
  docker: circleci/docker@2.1.1
  azure-aks: circleci/azure-aks@0.3.0
  kubernetes: circleci/kubernetes@1.3.0

jobs:
  argocd-manual-sync:
    docker:
      - image: cimg/base:stable
    parameters:
      server:
        description: |
          Server IP of of ArgoCD
        type: string
      username:
        description: |
          Username for ArgoCD
        type: string
      password:
        description: |
          Password for ArgoCD
        type: string
    steps:
      - run:
          name: Install ArgoCD CLI
          command: |
            URL=https://<< parameters.server >>/download/argocd-linux-amd64
            [ -w /usr/local/bin ] && SUDO="" || SUDO=sudo
            $SUDO curl --insecure -sSL -o /usr/local/bin/argocd $URL
            $SUDO chmod +x /usr/local/bin/argocd
      - run:
          name: ArgoCD CLI login
          command: argocd login << parameters.server >> --insecure --username << parameters.username >> --password << parameters.password >>
      - run:
          name: Manual sync
          command: argocd app sync $APP_NAME
      - run:
          name: Wait for application to reach a synced and healthy state
          command: argocd app wait $APP_NAME

  argocd-configure:
    docker:
      - image: cimg/base:stable
    parameters:
      cluster-name:
        description: |
          Name of the AKS cluster
        type: string
      resource-group:
        description: |
          Resource group that the cluster is in
        type: string
    steps:
      - checkout
      - run:
          name: Pull Updated code from repo
          command: git pull origin $CIRCLE_BRANCH
      - azure-aks/update-kubeconfig-with-credentials:
          cluster-name: << parameters.cluster-name >>
          install-kubectl: true
          perform-login: true
          resource-group: << parameters.resource-group >>
      - kubernetes/create-or-update-resource:
          resource-file-path: argocd/config.yaml

  bump-docker-tag:
    docker:
      - image: cimg/base:stable
    steps:
      - run:
          name: Install yq - portable yaml processor
          command: |
            URL=https://github.com/mikefarah/yq/releases/download/3.3.4/yq_linux_amd64
            [ -w /usr/local/bin ] && SUDO="" || SUDO=sudo
            $SUDO wget $URL
            $SUDO mv ./yq_linux_amd64 /usr/local/bin/yq
            $SUDO chmod +x /usr/local/bin/yq
      - checkout
      - run:
          name: Update Knative Service manifest
          command: |
            yq w -i knative/service.yaml spec.template.metadata.name "$APP_NAME-$CIRCLE_BUILD_NUM"
            yq w -i knative/service.yaml spec.template.spec.containers[0].image "docker.io/$DOCKER_LOGIN/$APP_NAME:$CIRCLE_SHA1"
      - add_ssh_keys:
          fingerprints:
            - "$SSH_FINGERPRINT"
      - run:
          name: Commit & Push to GitHub
          command: |
            git config user.email "$GITHUB_EMAIL"
            git config user.name "CircleCI User"
            git checkout $CIRCLE_BRANCH
            git commit -am "Bumps docker tag [skip ci]"
            git push origin $CIRCLE_BRANCH

workflows:
  Deploy-App-on-AKS:
    jobs:
      - docker/publish:
          image: $DOCKER_LOGIN/$APP_NAME
          tag: $CIRCLE_SHA1,latest
      - bump-docker-tag:
          requires:
            - docker/publish
      - argocd-configure:
          cluster-name: $CLUSTER_NAME
          resource-group: $RESOURCE_GROUP
          requires:
            - bump-docker-tag
# Paste the following only when you opt for the ArgoCD manual-sync-policy:
      - argocd-manual-sync:
          server: $ARGOCD_SERVER
          username: $ARGOCD_USERNAME
          password: $ARGOCD_PASSWORD
          requires:
            - argocd-configure
The CI workflow consists of 3 jobs:
- The
docker/publishjob builds and pushes the container to Dockerhub - The
bump-docker-tagjob updates the Knative Service YAML with the latest container image tag - The
argocd-configurejob pplies the ArgoCD Configuration on the AKS cluster - The
argocd-manual-syncjob is needed only when you will be opting for themanual-sync-policy. Forautomatic-sync, you can omit this job from the file.
In this workflow, we have extensively used CircleCI orbs, which are open-source, shareable packages of parameterizable reusable configuration elements, including jobs, commands, and executors. The orbs have been either used directly or are used in creating custom jobs.
Commit and push the changes to your GitHub repository.
Setting up the project on CircleCI
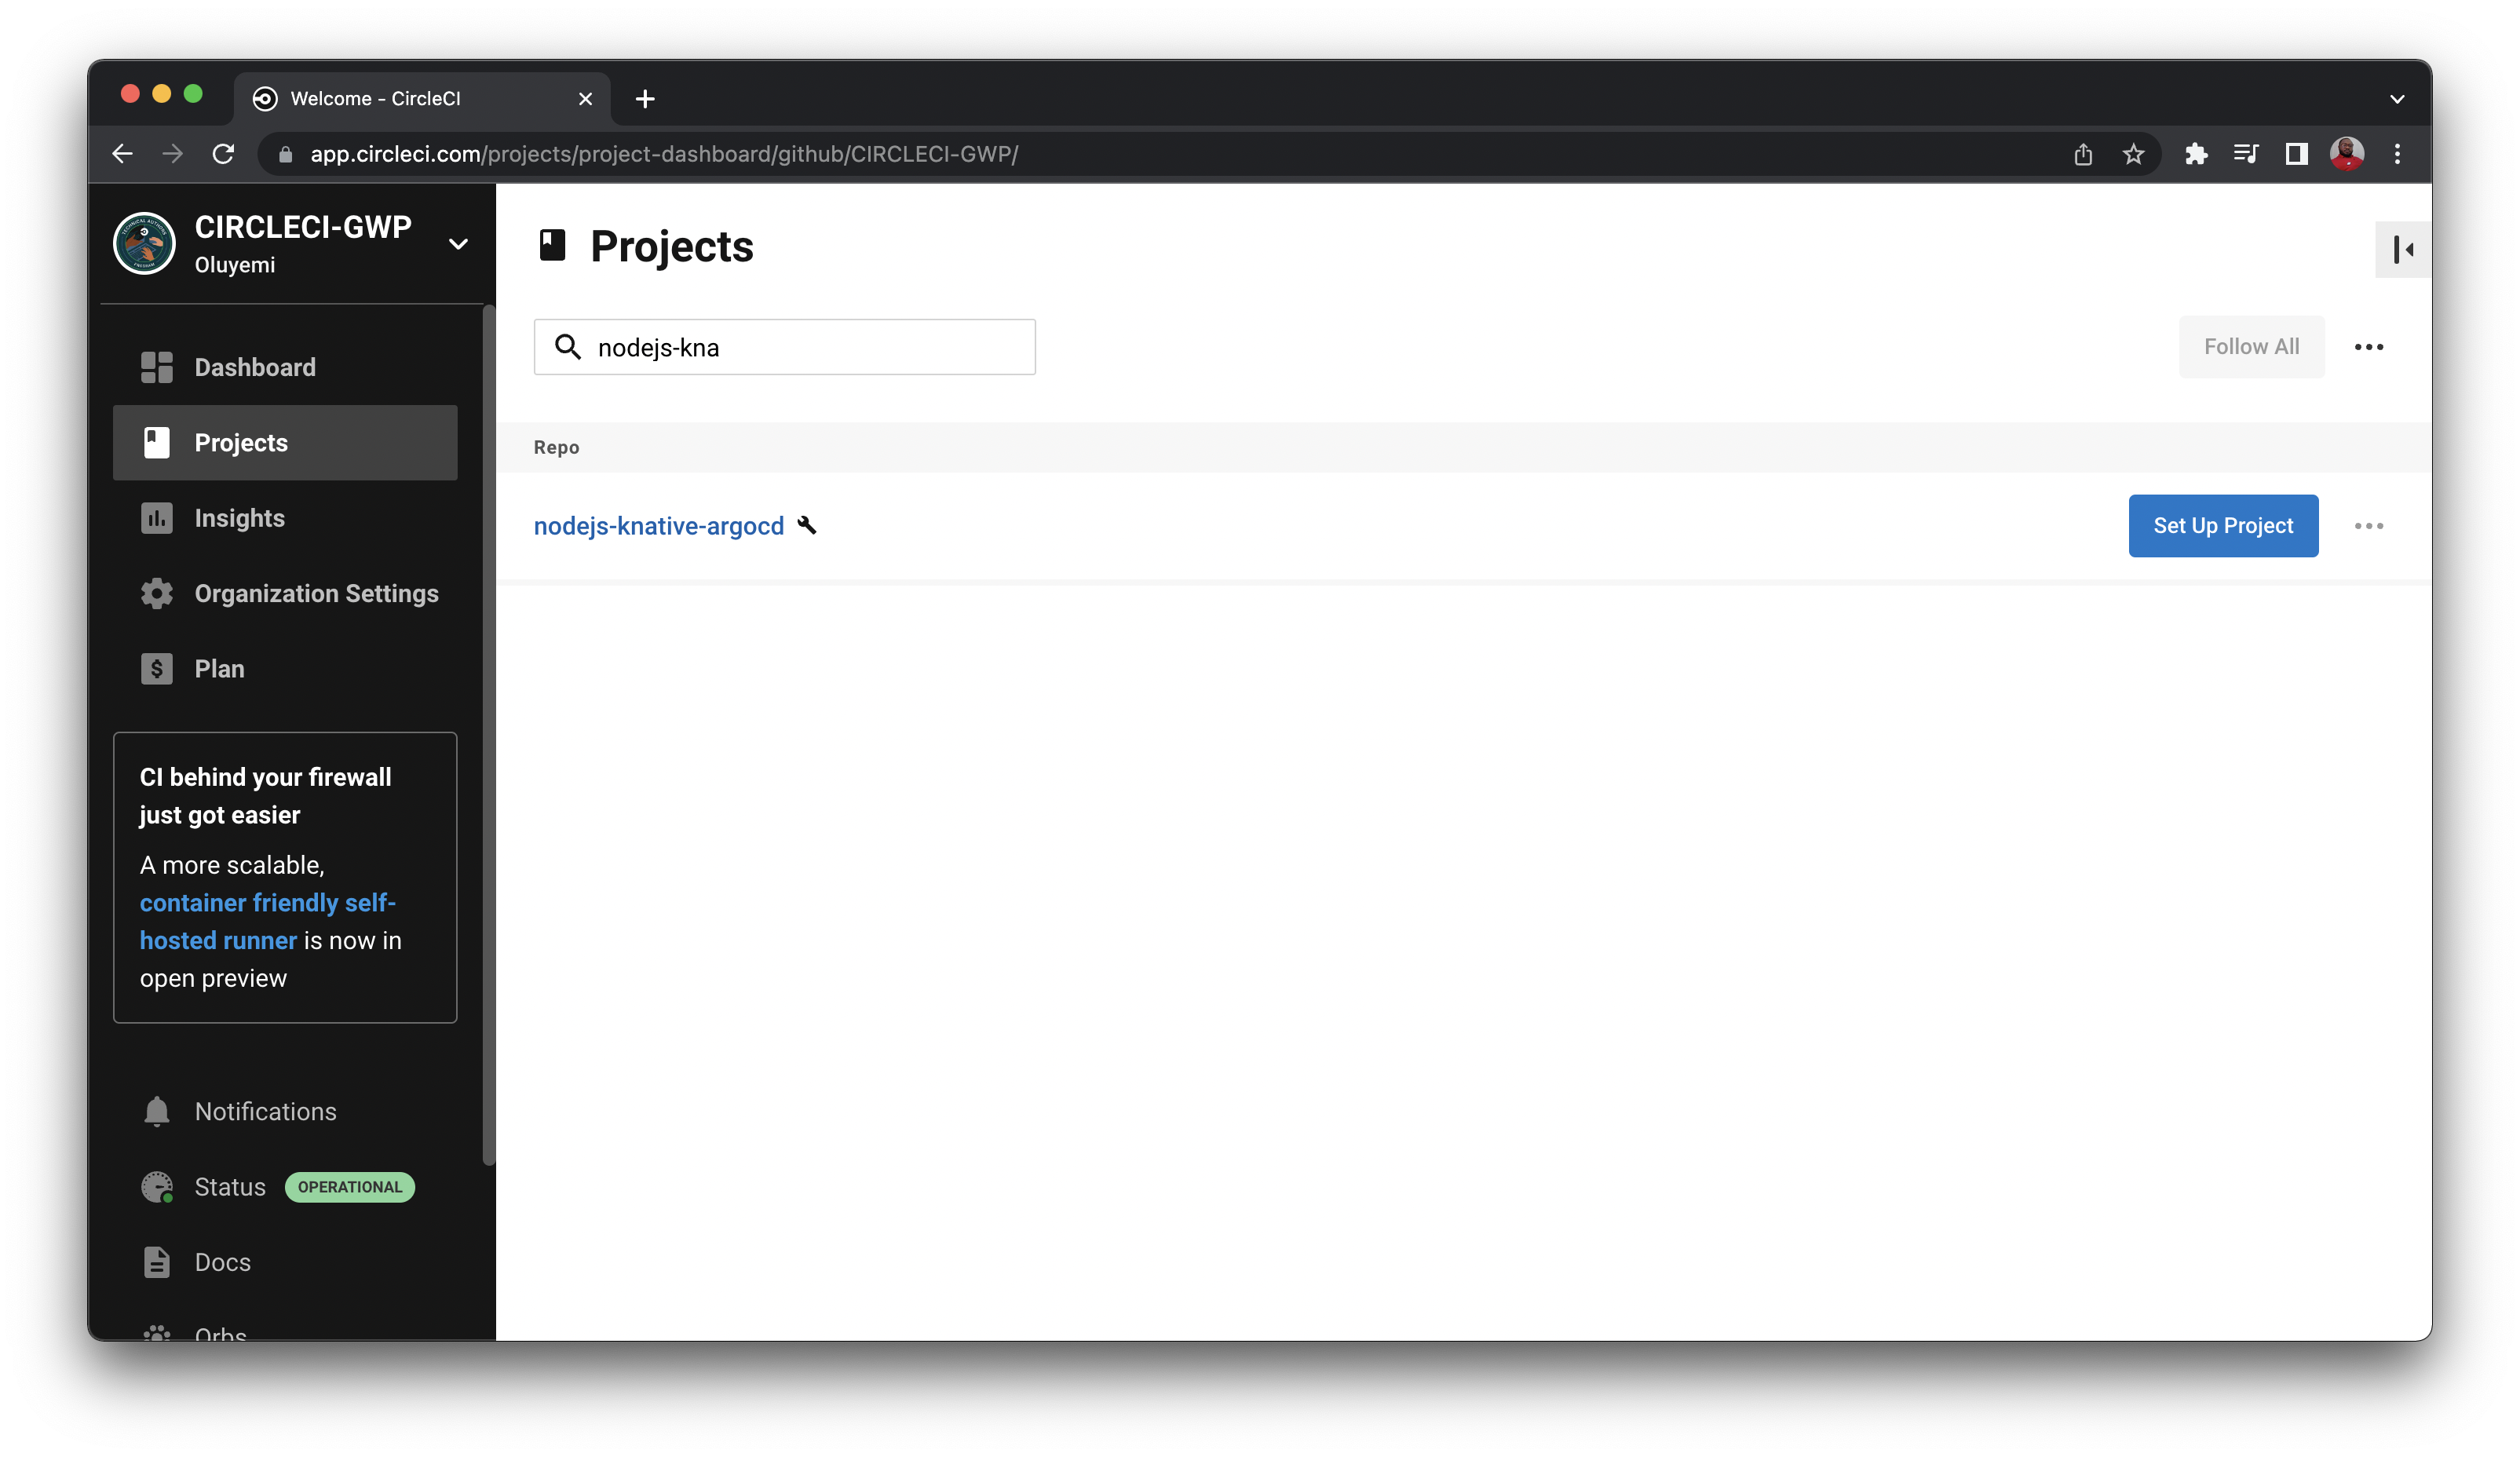
The next step to deploying your application to AKS is connecting the application in our GitHub repository to CircleCI.
Go to your CircleCI dashboard and select the Projects tab on the left panel. Now, you have to click on the Set Up Project button corresponding to the GitHub repository which contains the code (nodejs-knative-argocd).
On the Select your config.yml file screen, select the Fastest option and type main as the branch name. CircleCI will automatically locate the config.yml file. Click Set Up Project.
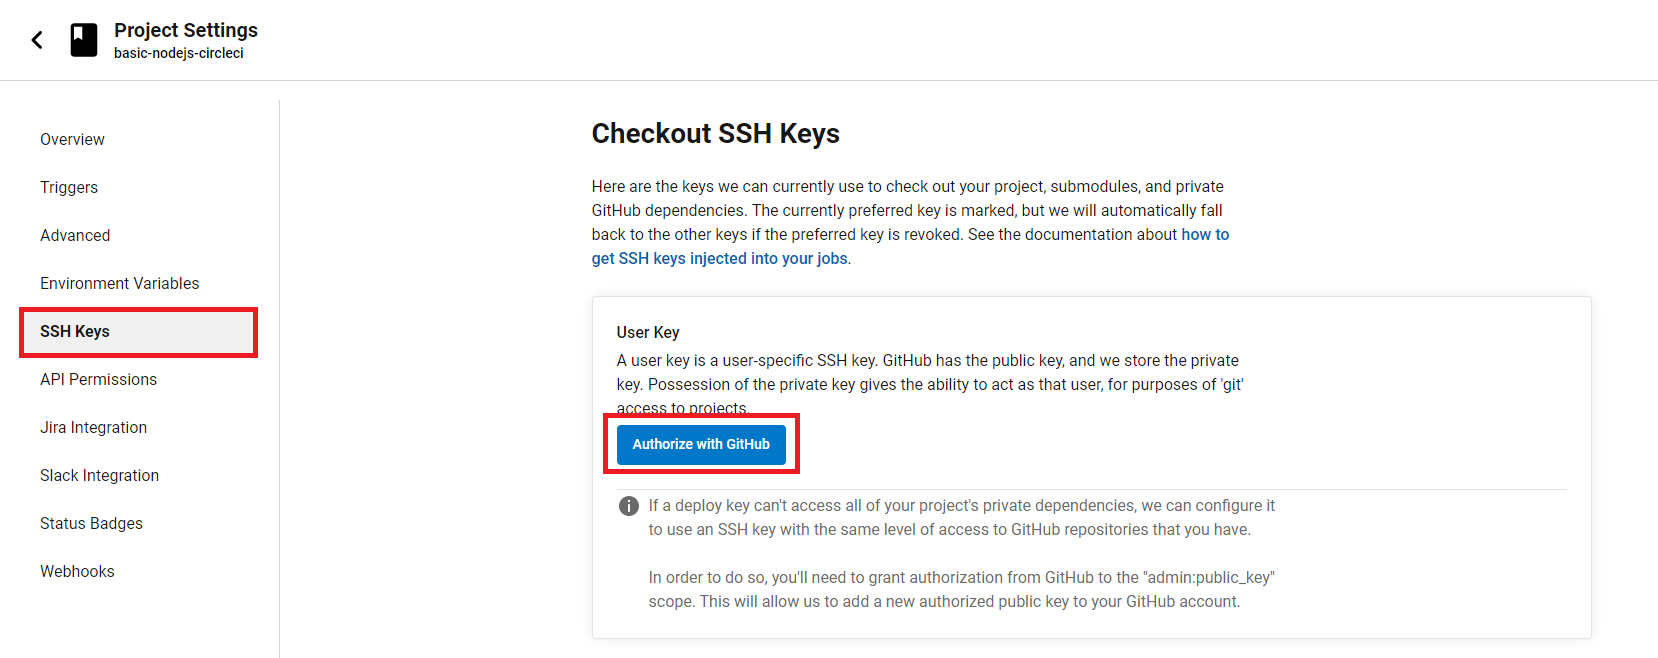
The workflow will start running automatically. But after sometime, it will display the status as Failed. This is because you have to set up a User Key and configure the Environment Variables from Project Settings in CircleCI.
To set up the User Key, select the SSH Keys option from the left panel of the Project Settings. Under the User Key section, click Authorize with GitHub. The User Key is needed by CircleCI to push changes to your GitHub account on behalf of the repository owner, during the execution of the workflow.
To configure the Environment Variables, select the Environment Variables option from the left panel of the Project Settings. Select the Add Environment Variable option. On the next screen, type the environment variable and the value you want it to be assigned to.
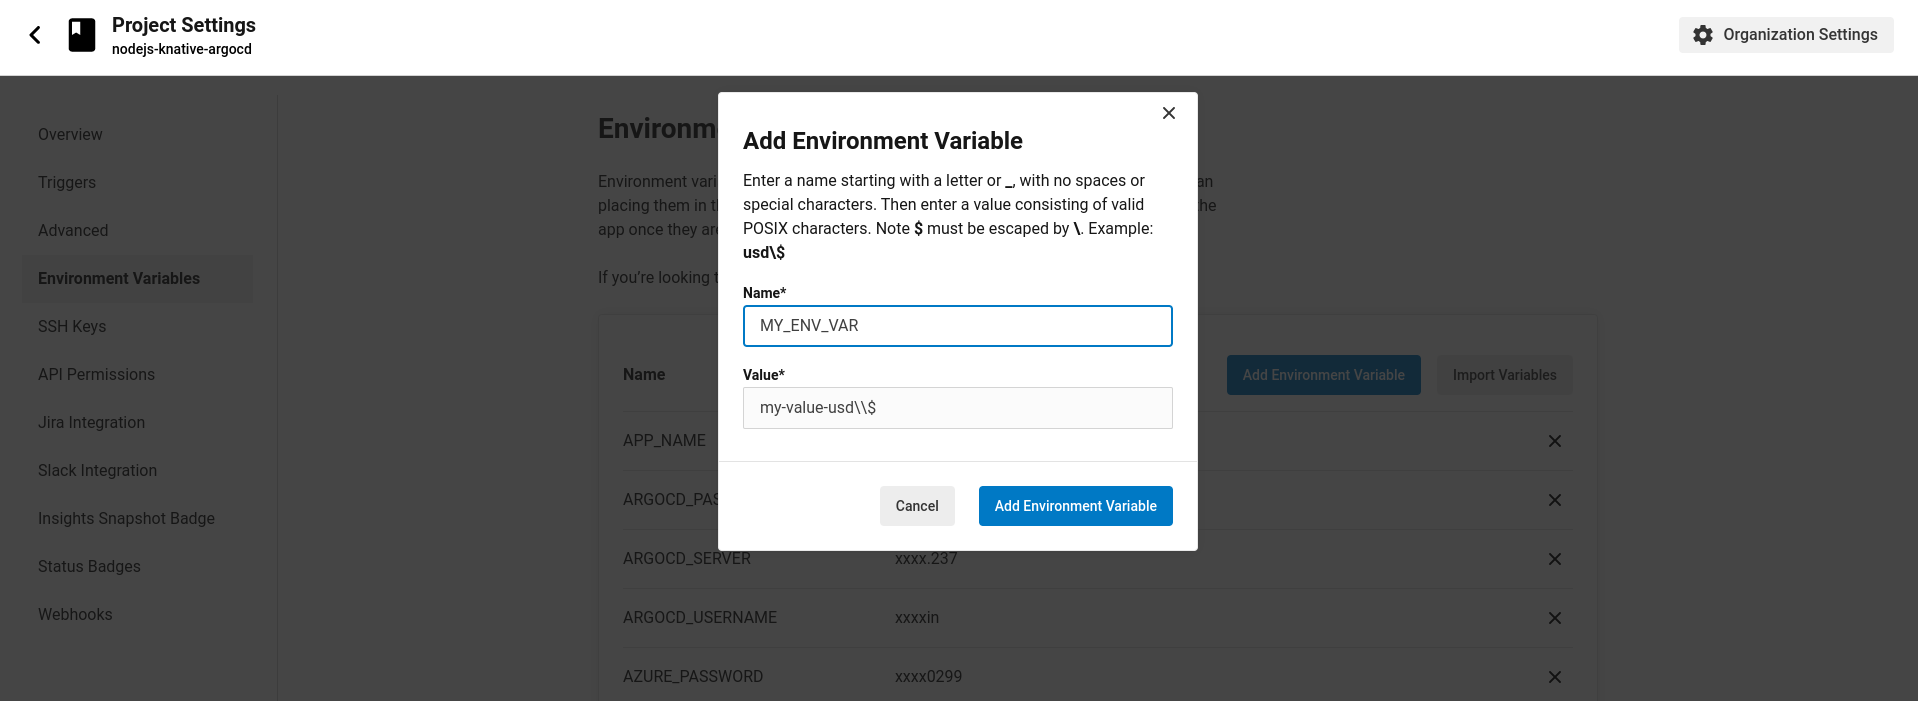
The Environment Variables used in the file are listed below:
APP_NAME: Container Image Name (nodejs-knative-argocd)ARGOCD_PASSWORD: ArgoCD portal passwordARGOCD_SERVER: ArgoCD Server IP AddressARGOCD_USERNAME: ArgoCD portal username (admin)AZURE_PASSWORD: Azure Account PasswordAZURE_USERNAME: Azure Account UsernameCLUSTER_NAME: AKS Cluster Name (NodeCluster)DOCKER_LOGIN: Dockerhub UsernameDOCKER_PASSWORD: Dockerhub PasswordGITHUB_EMAIL: GitHub Account Email AddressRESOURCE_GROUP: AKS Resource Group (NodeRG)SSH_FINGERPRINT: SSH Fingerprint of User Key used for pushing the updated Docker tag to GitHub
To locate the SSH Fingerprint, go to Project Settings and select SSH Keys from the sidebar. Scroll down to the User Key section and copy the key.
Re-run the workflow. This time the status will show Success.
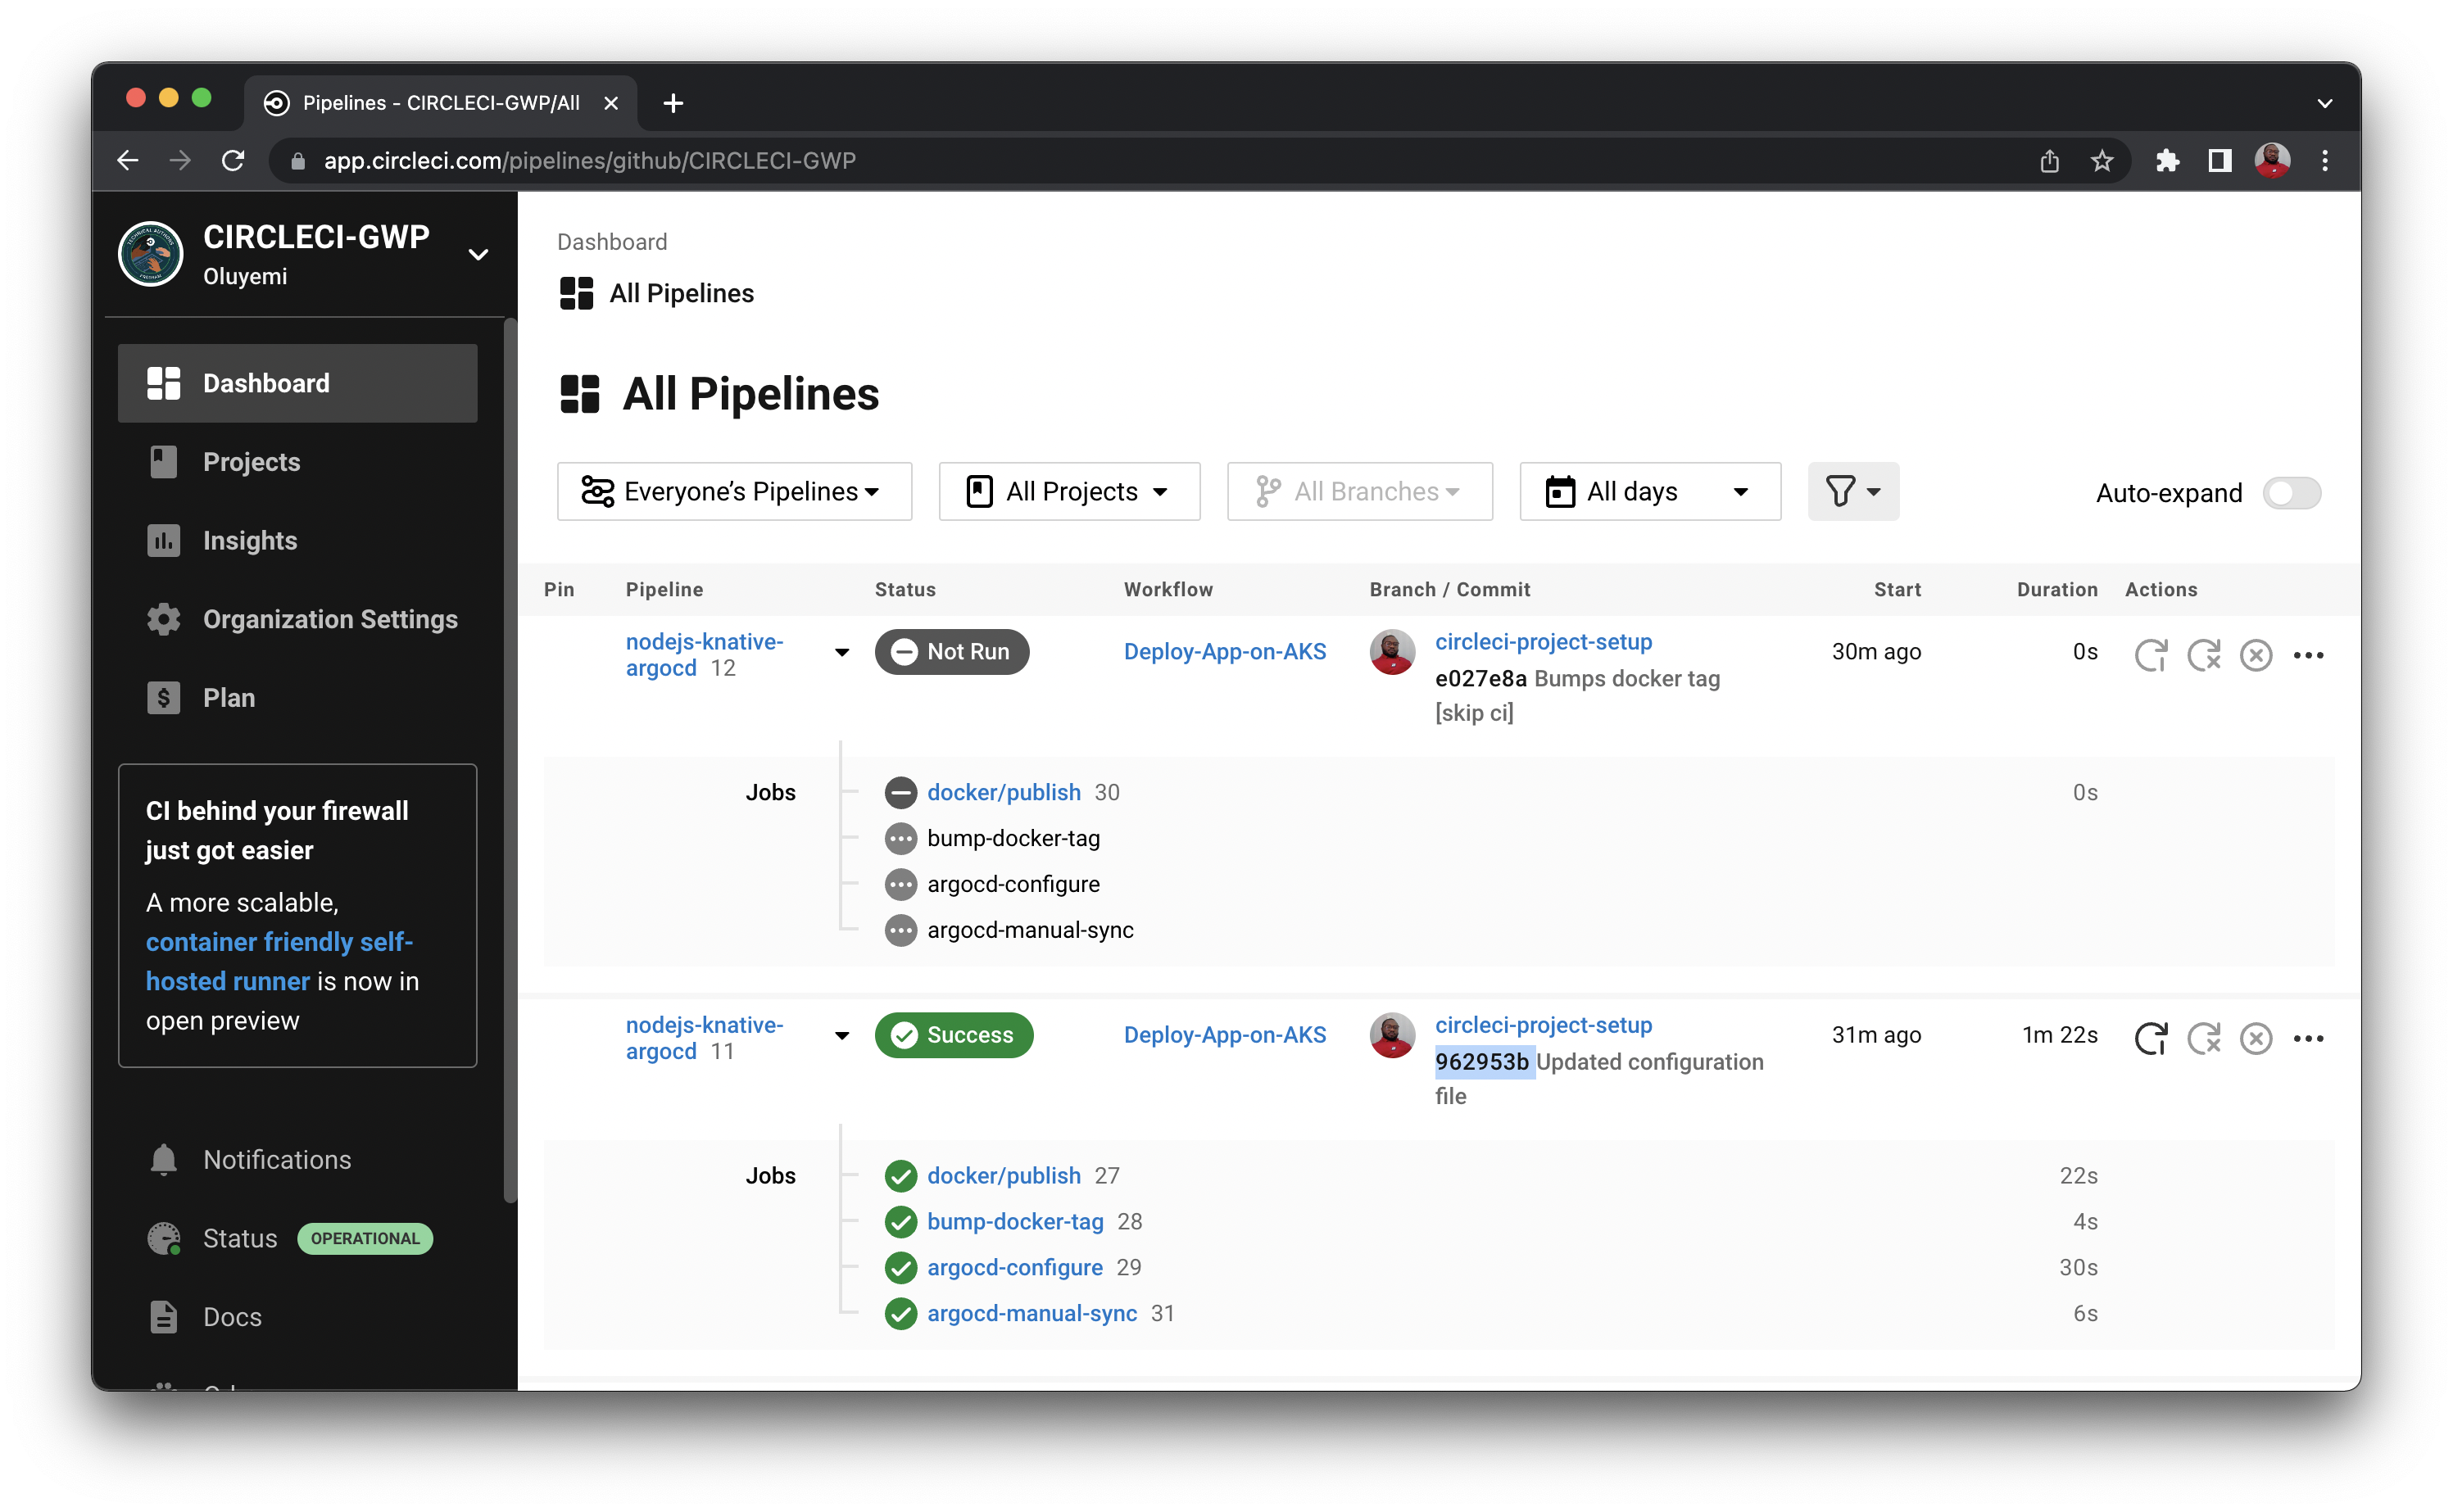
You will also find another pipeline with the status as Not Run. That is because you have explicitly instructed CircleCI to skip the pipeline by including [skip ci] in the commit message. When CircleCI commits the updated configuration files to GitHub, [skip ci] prevents a self-triggering loop of the workflow.
Monitoring the application on ArgoCD Dashboard
A status that shows Success when the workflow is re-run means that the application has been deployed on the AKS cluster.
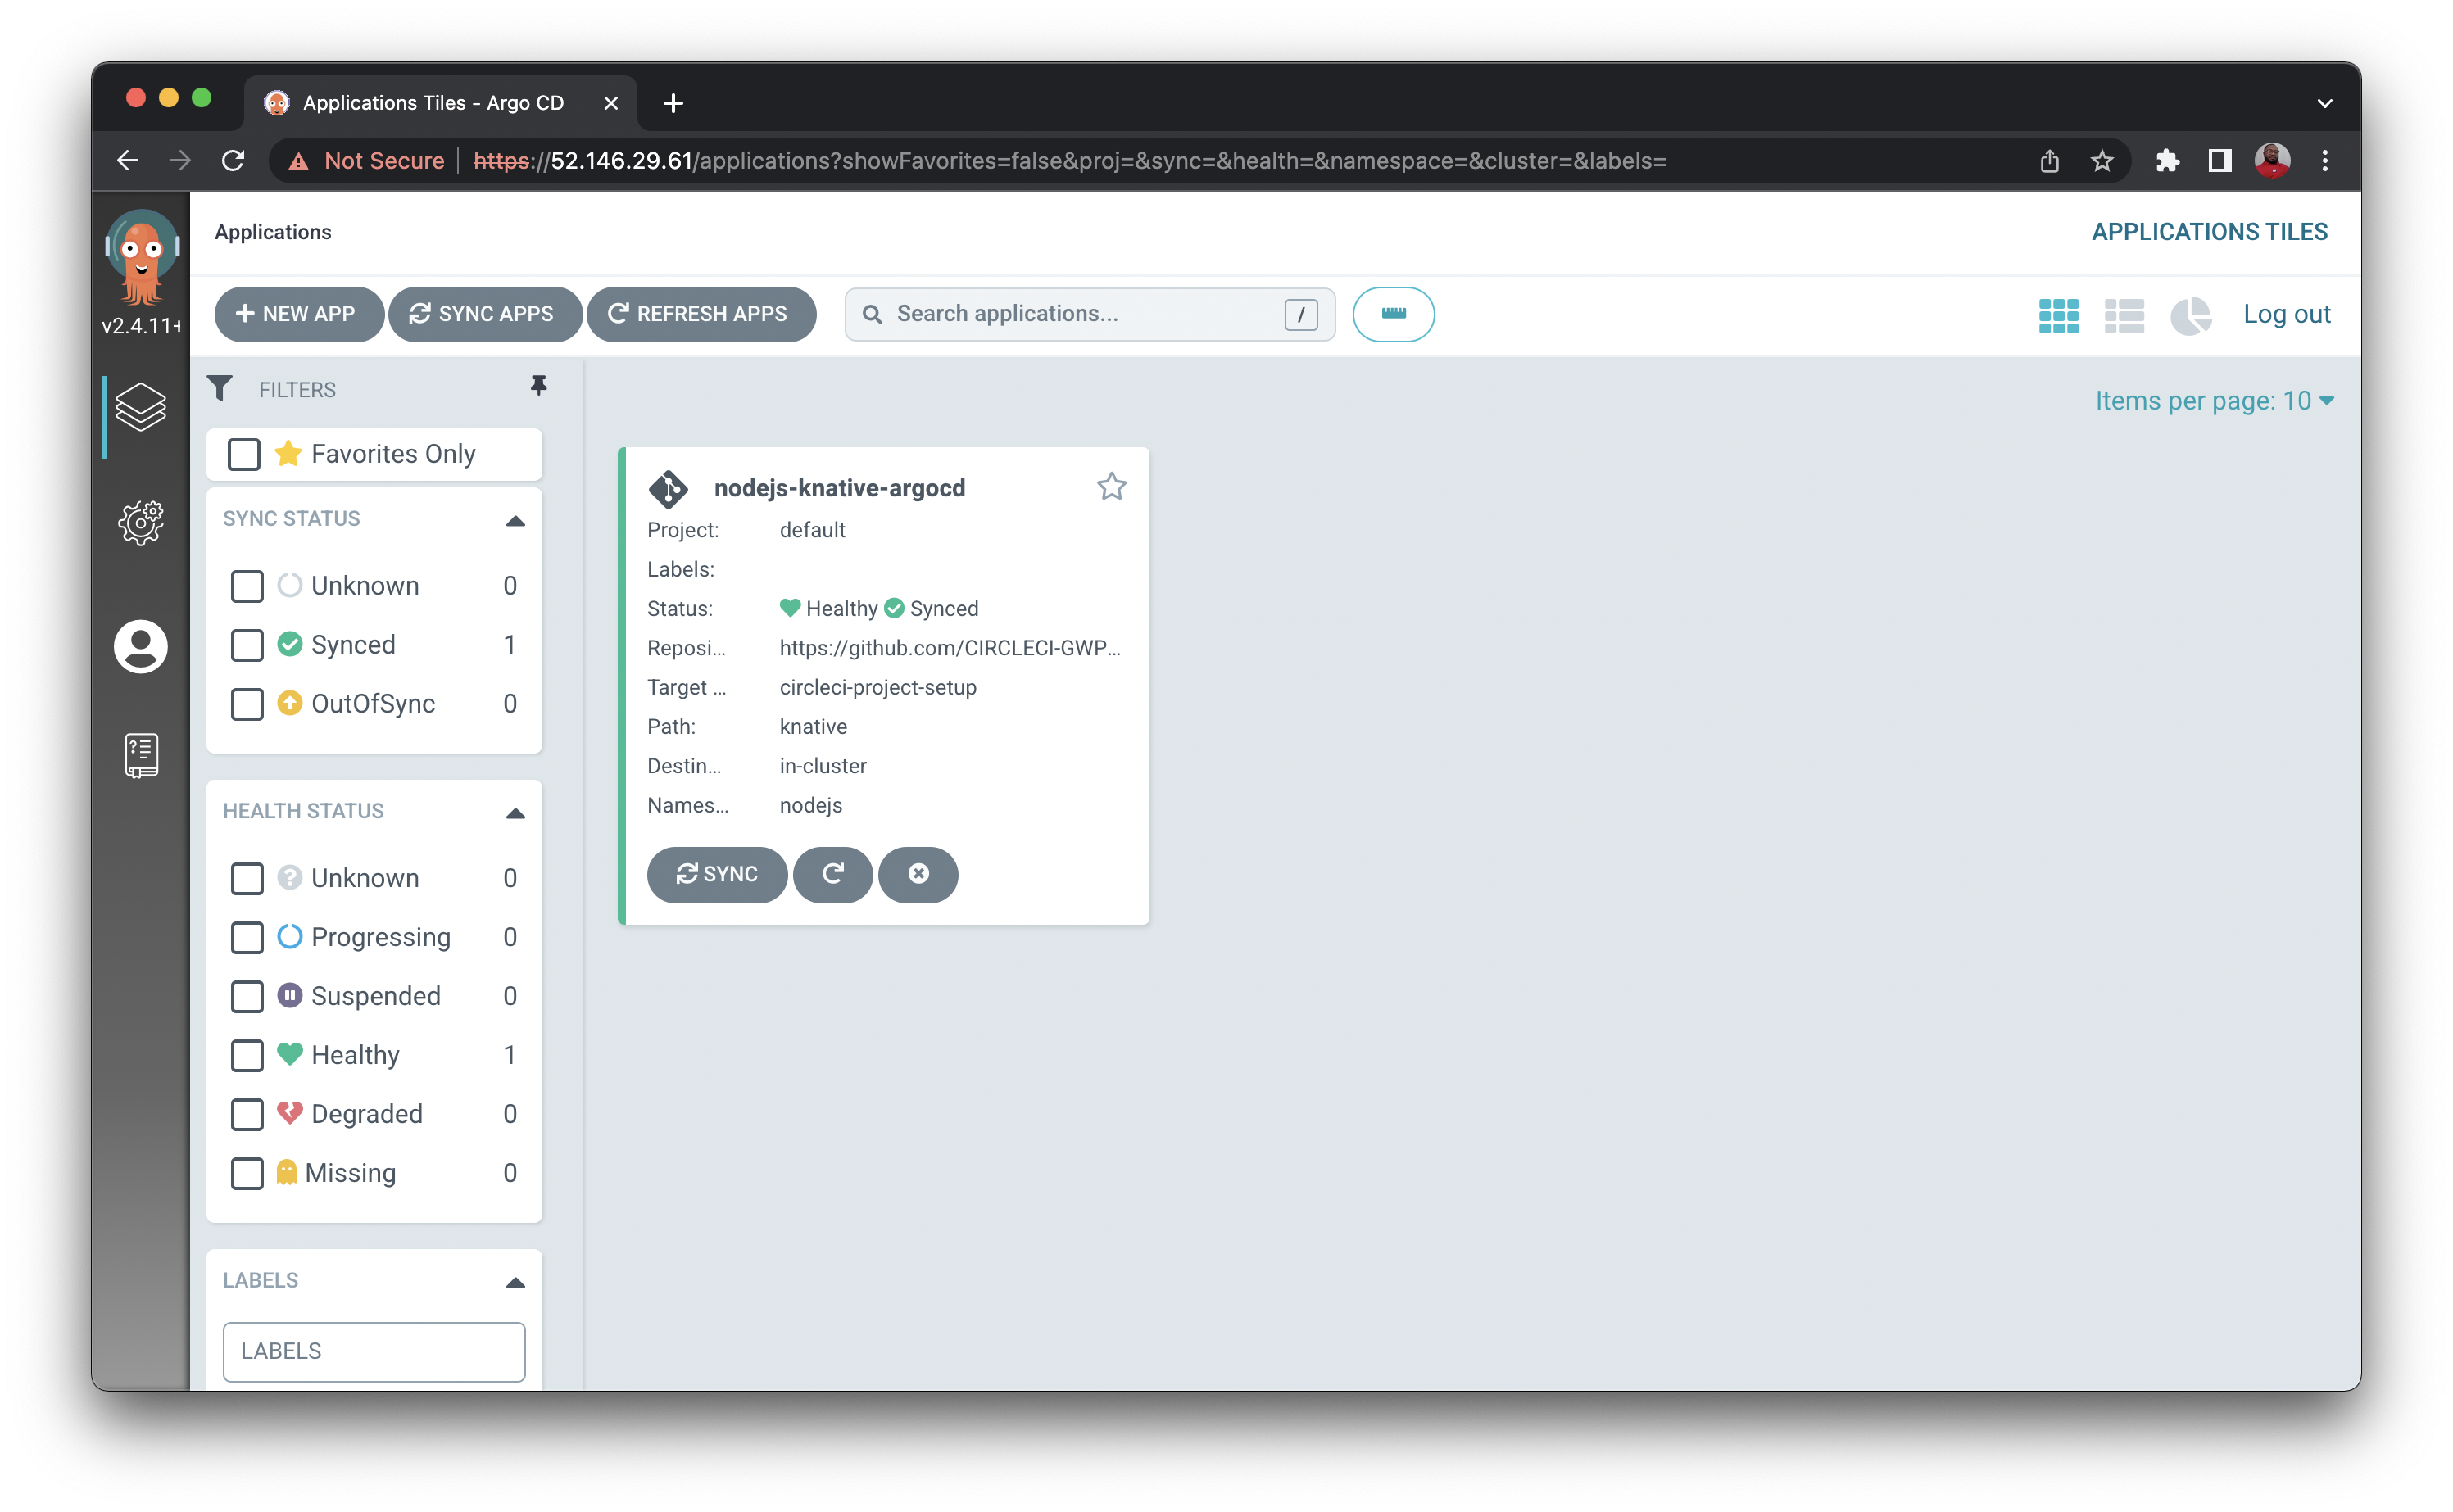
To observe and monitor the resources that are currently running on the AKS Cluster, log in to the ArgoCD Web Portal.
Earlier in this tutorial, you learned how to fetch the ArgoCD Server IP, username, and password for logging in to the portal. After logging in, you be on the Applications page.
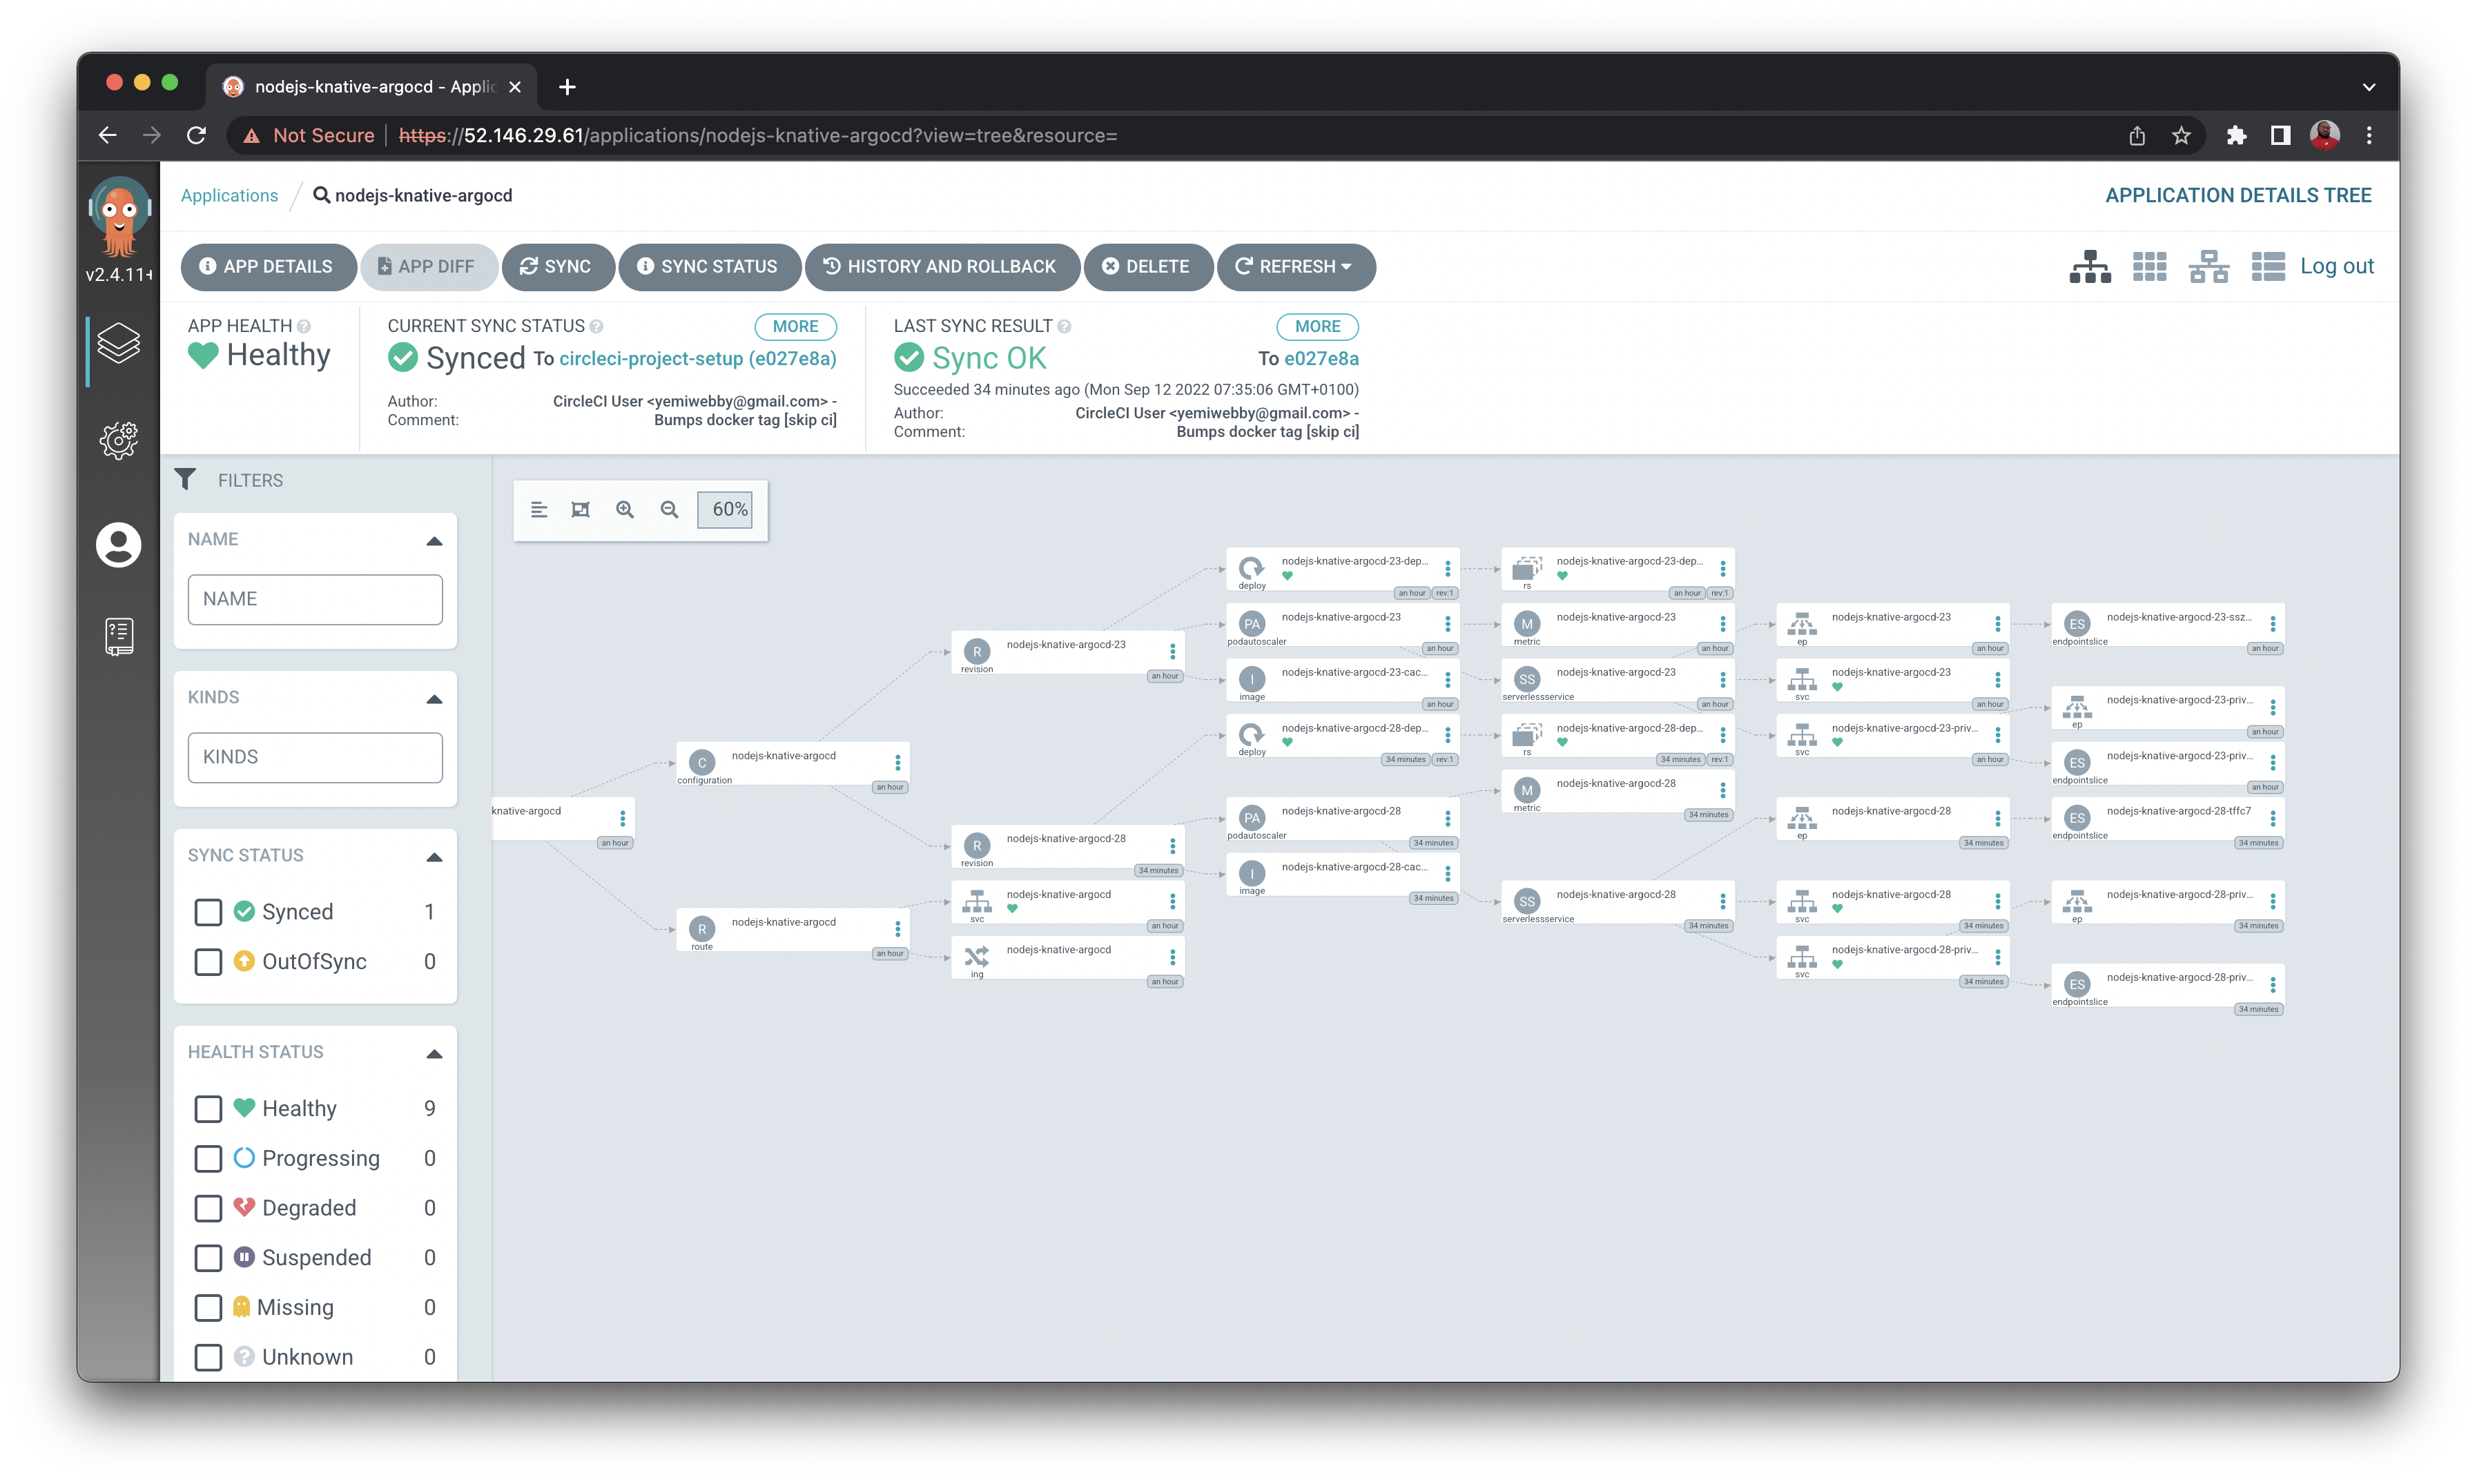
Click the application name. You will be redirected to a page with the tree view of all resources running on the AKS Cluster and their real-time status.
Accessing the application on AKS
To access the application, you will need the DNS name of the route created by the Knative Service.
You created all the resources in the nodejs namespace. To get all the resources in that namespace, use this command:
kubectl get all --namespace nodejs
Copy the URL for service.serving.knative.dev/nodejs-knative-argocd.
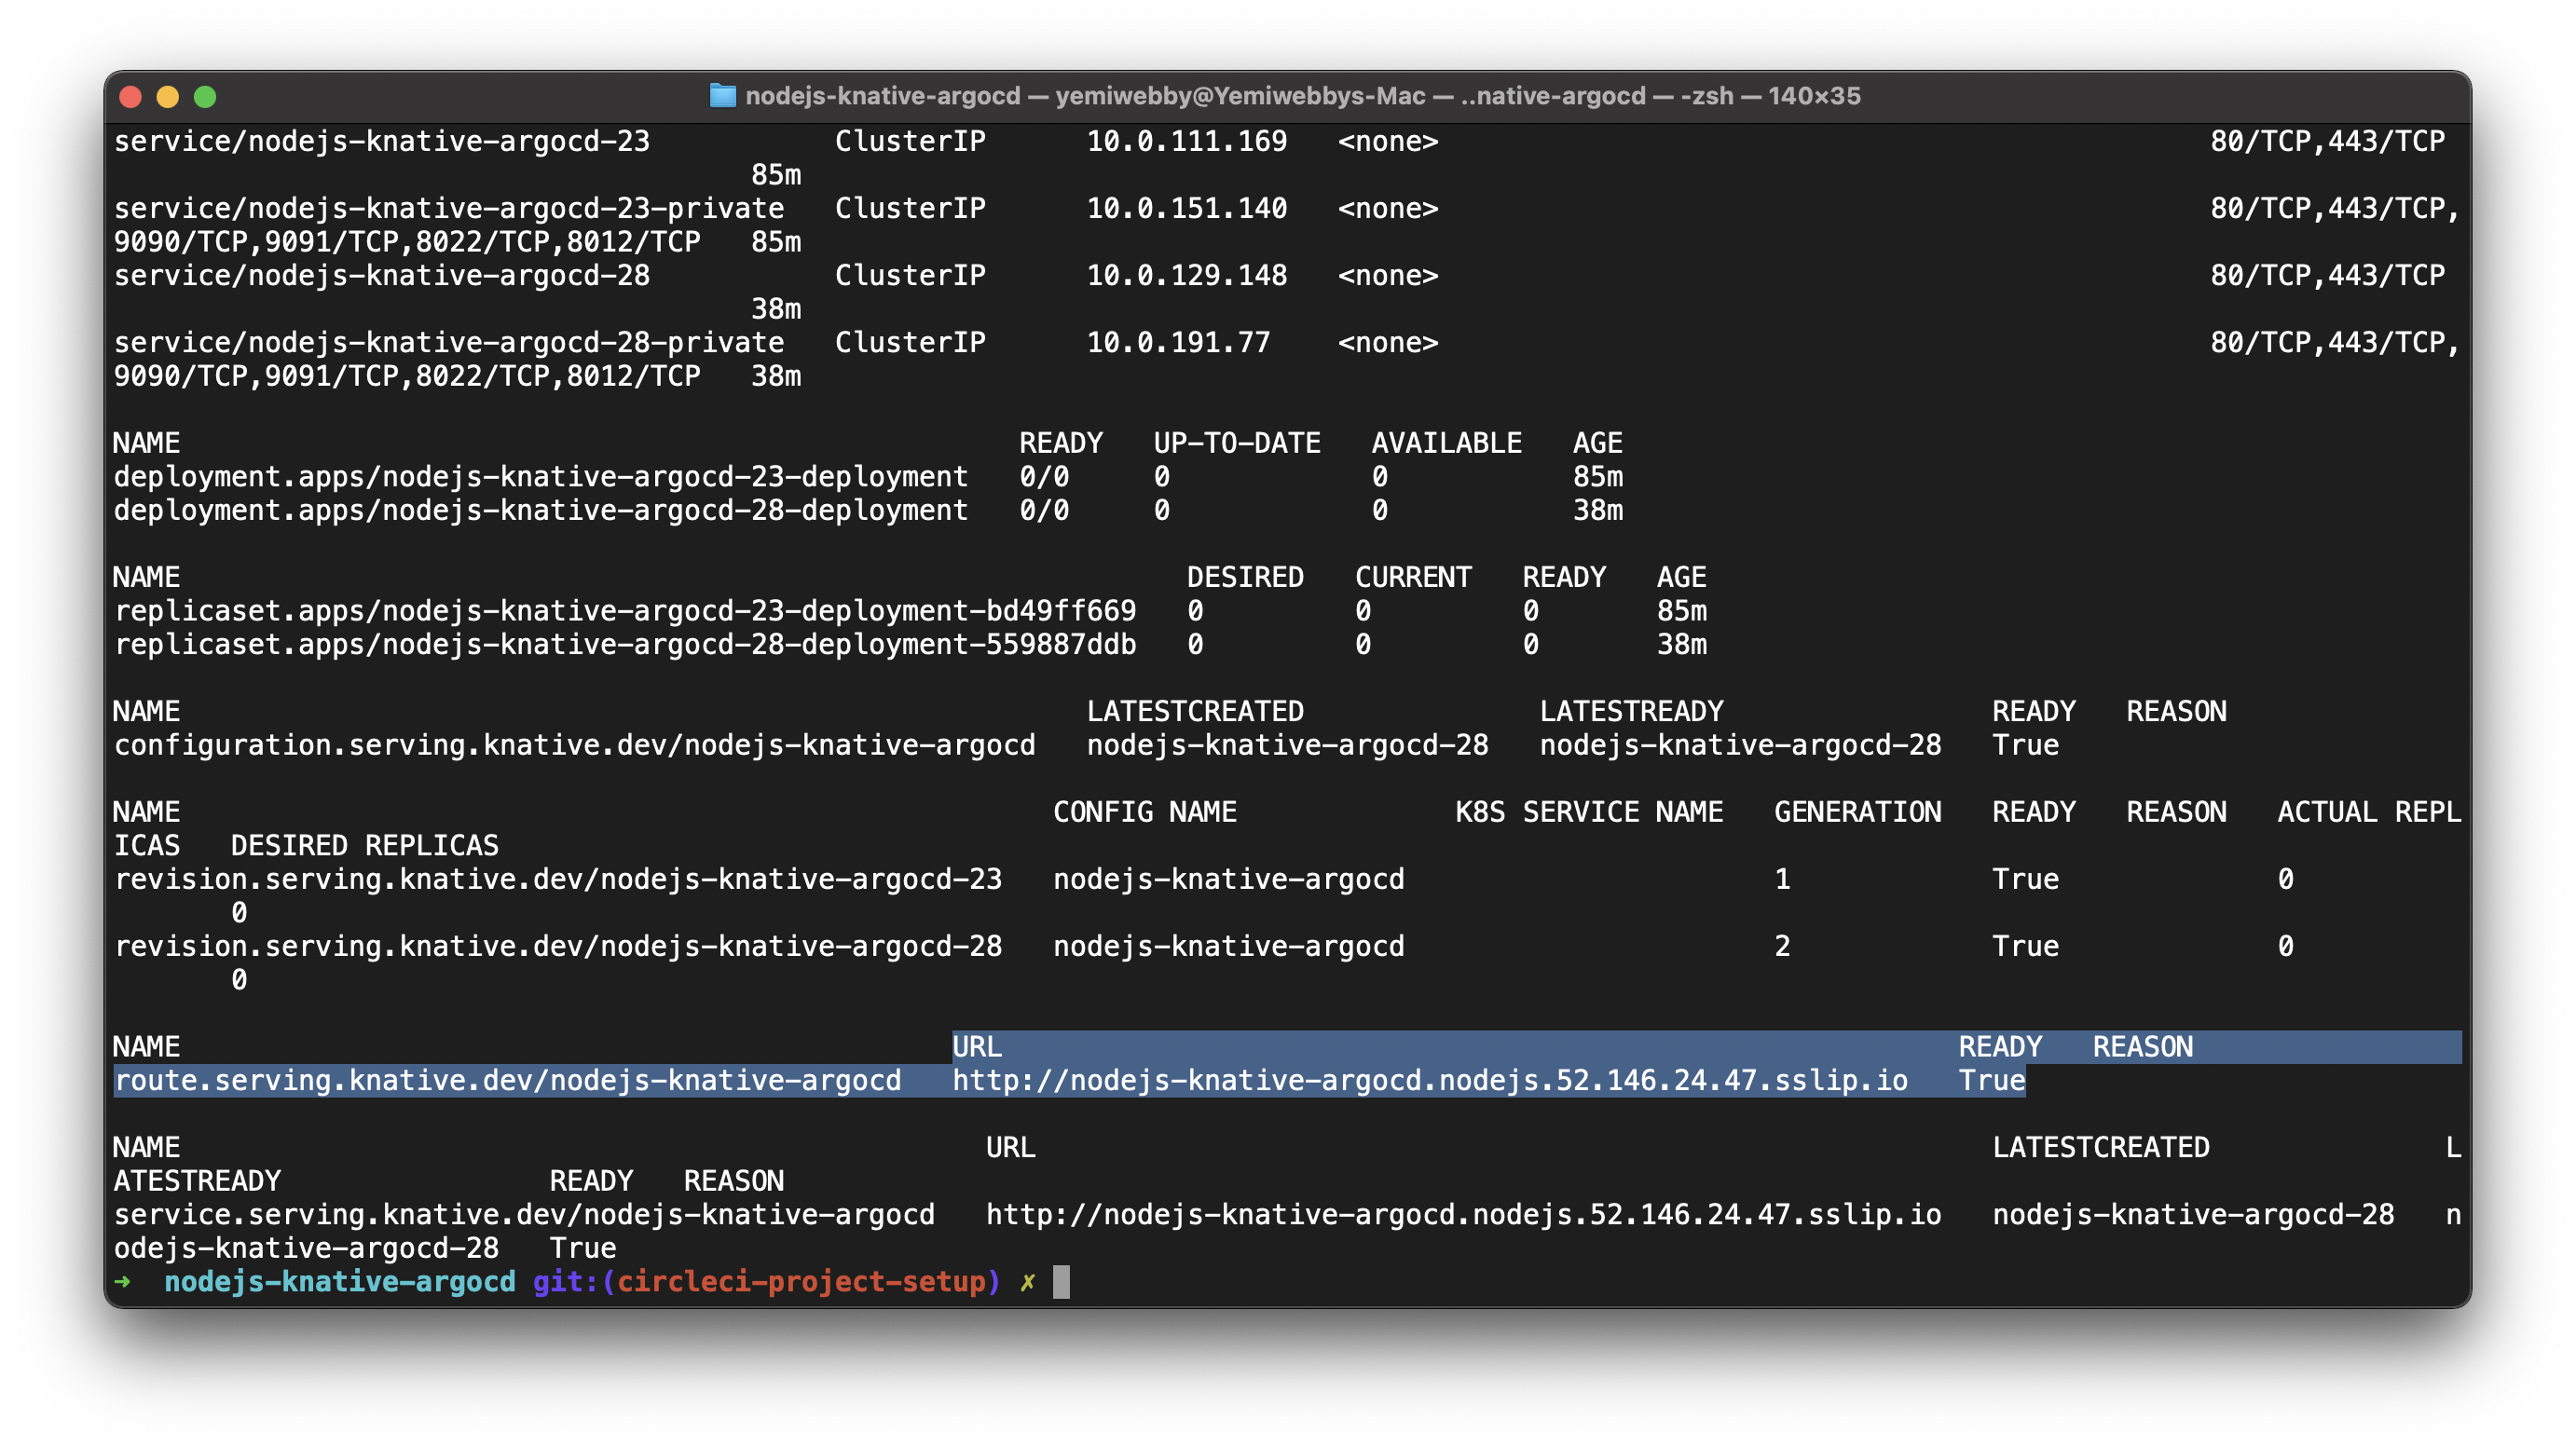
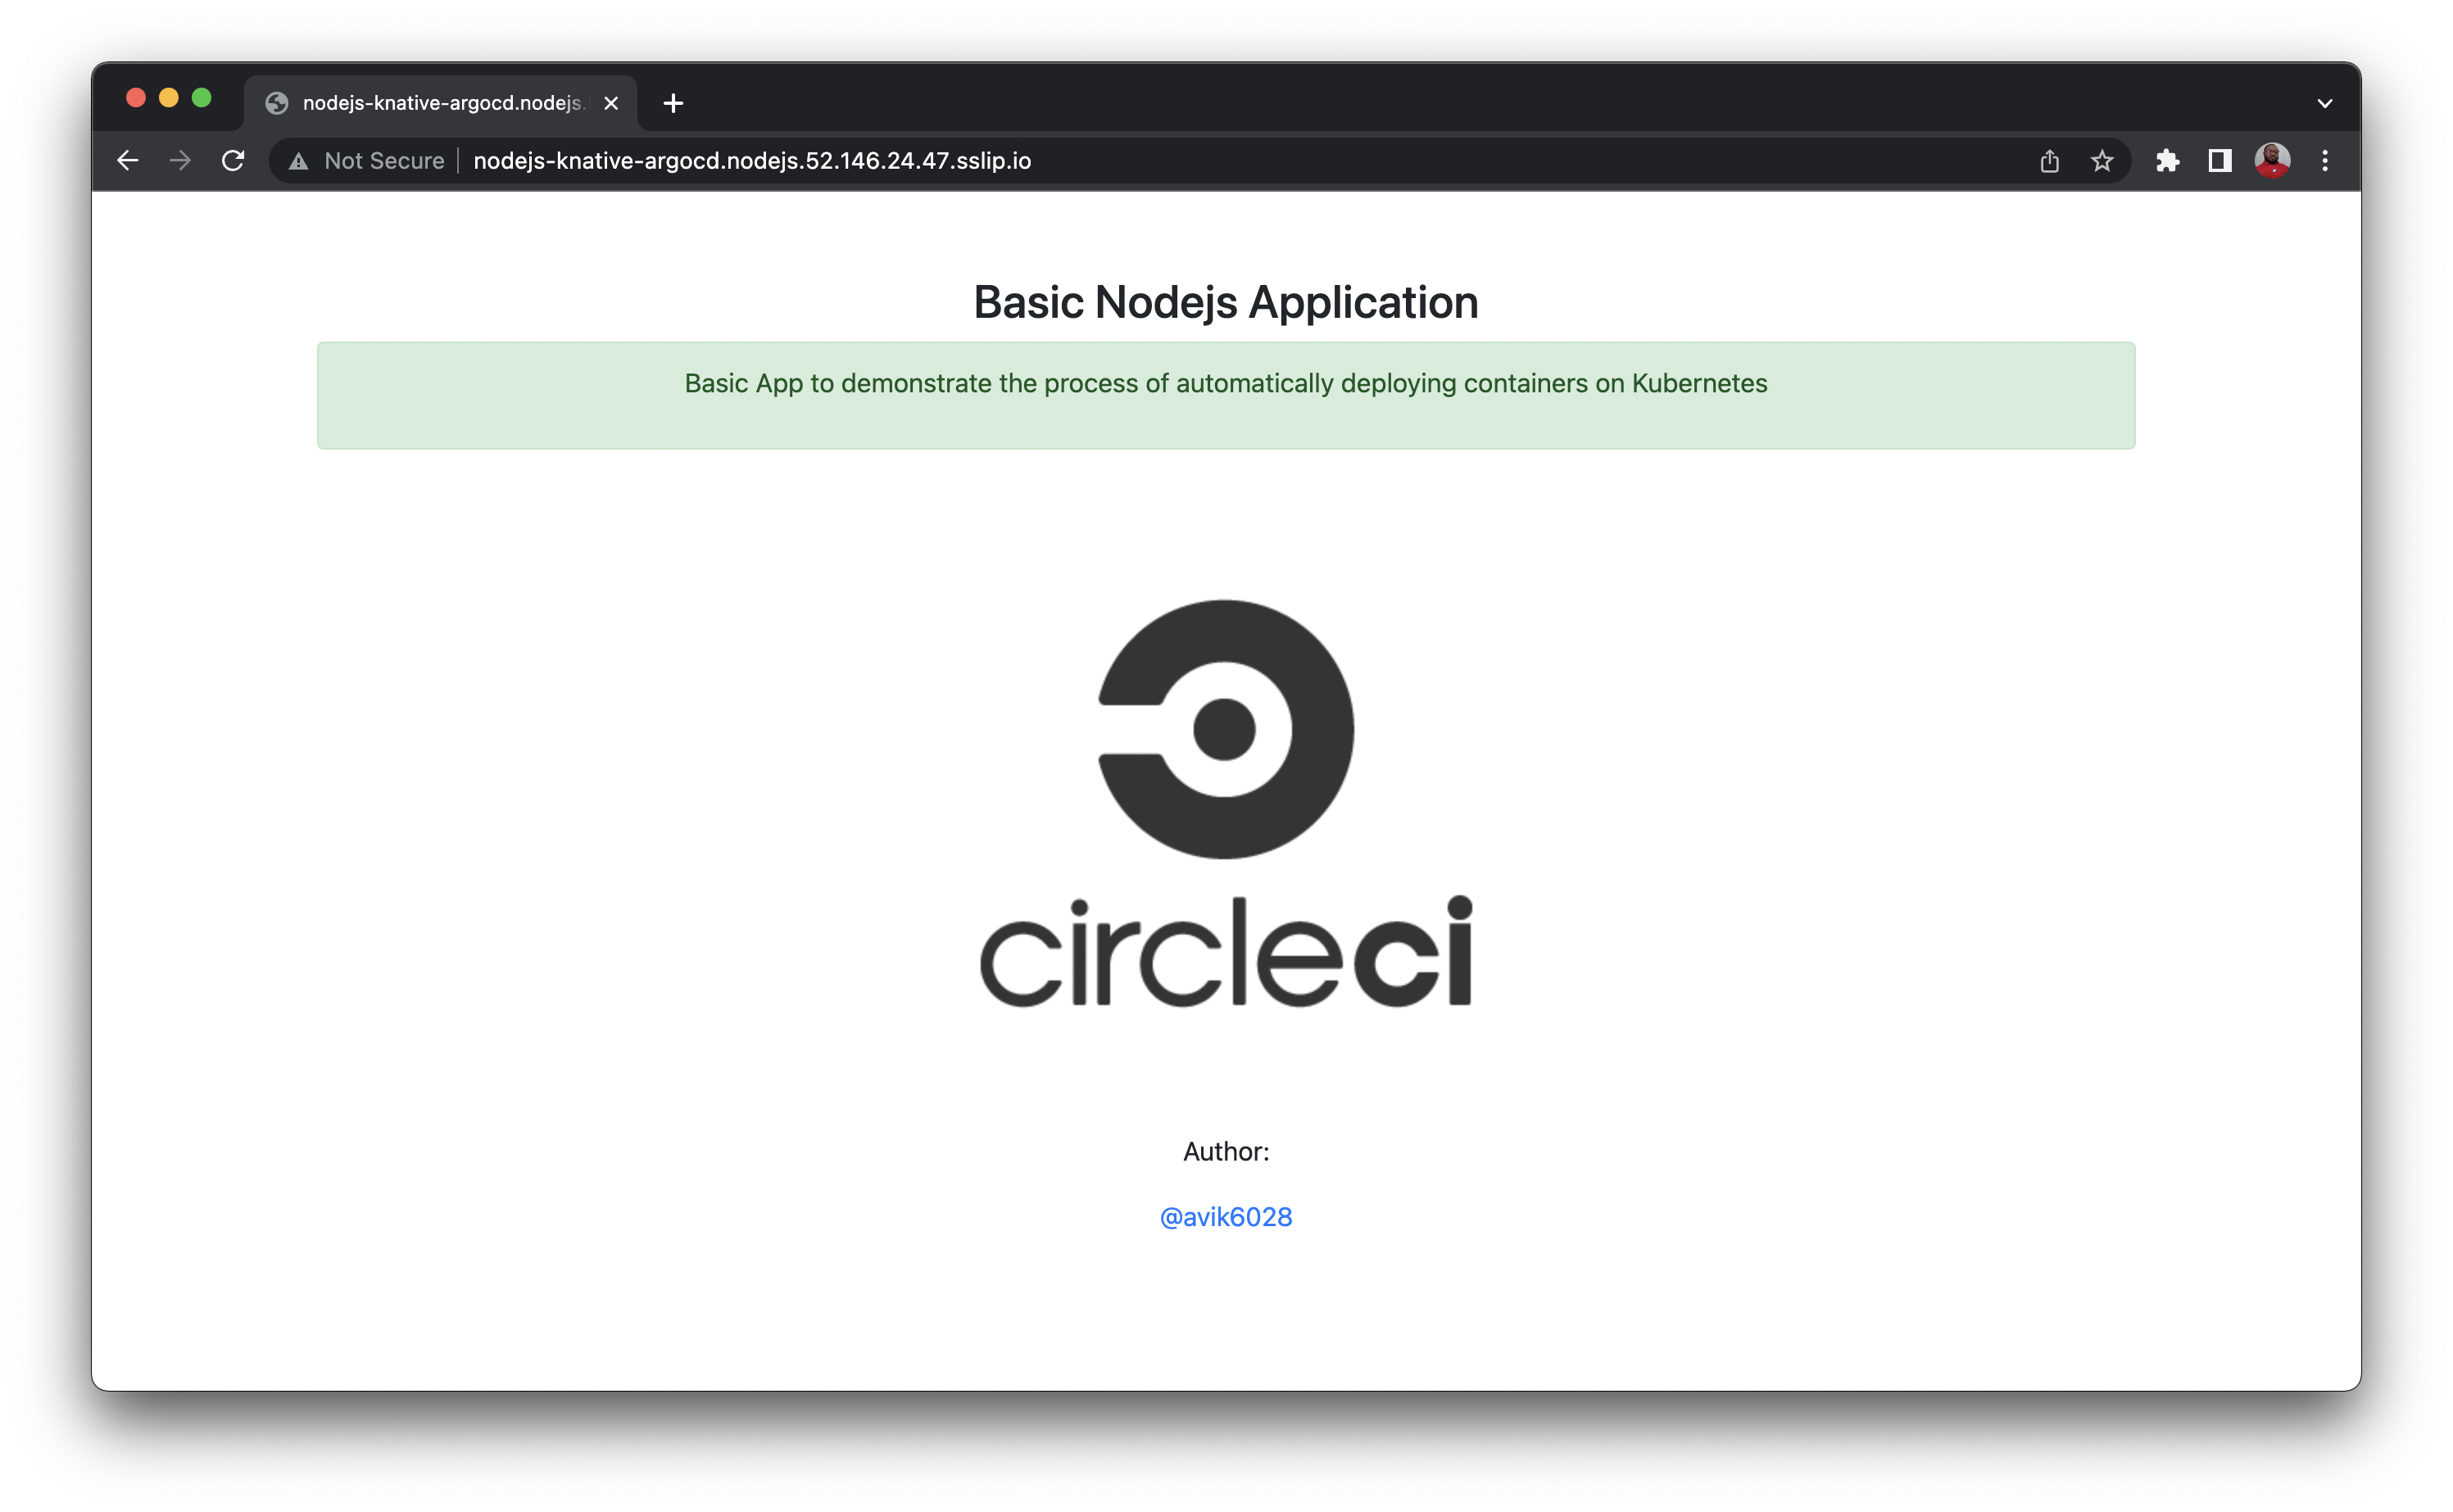
Use this URL to access the application. For me, the URL is
http://nodejs-knative-argocd.nodejs.52.146.24.47.sslip.io/.
Conclusion
And that is the end of the tutorial. By following this guide, you learned how to develop an automated CI pipeline for deploying your serverless workload continuously on a Kubernetes cluster following GitOps practices with Knative and ArgoCD. Once the pipeline is properly configured, any changes made to the application code will be instantly reflected on the workload URL. There is no further need for configuring and deploying applications on Kubernetes manually. You can change the values of the environment variables to use the CircleCI configuration file for similar applications.
The complete source code for this tutorial can also be found here on GitHub.


