

Schedule triggers
| This feature is not supported for GitLab pipelines. |
Schedule triggers allow you to trigger pipeline runs periodically based on a schedule. Schedule triggers retain all the features of pipelines:
-
Control the actor (yourself, or the scheduling system) associated with the pipeline, which can enable the use of Restricted Contexts.
-
Use Dynamic Configuration via setup workflows.
-
Modify the schedule without having to edit
.circleci/config.yml. -
Take advantage of Auto-Cancelling (only applicable to GitHub OAuth and Bitbucket Cloud pipelines. GitHub App schedule triggers are never auto-cancelled by design)
-
Specify Pipeline Parameters associated with a schedule.
-
Manage common schedules, for example, across workflows.
Configure schedule triggers from or in the web app, or via the API.
| A schedule trigger can only be configured for one branch. If you need to schedule for two branches, you would need to set up two schedules. |
Introduction
Schedule triggers allow you to trigger pipeline runs periodically based on a schedule. Schedules can range from daily, weekly, monthly, or on a very specific timetable. To set up basic schedule triggers, you do not need any extra configuration in your .circleci/config.yml file. However, more advanced usage of the feature will require extra .circleci/config.yml configuration (for example, workflow filtering, or using parameters).
Pipeline parameters are typed pipeline variables in the form of a string, integer, or boolean. Adding a parameter to a schedule trigger can be done in the web app in the triggers form while setting up a schedule. Any parameters set up in this manner must be added to your configuration file using the parameters key.
Schedule triggers are set to run by an "actor", either the CircleCI scheduling system, or a specific user (for example, yourself). The scheduling actor is important to consider if making use of restricted contexts in workflows. If the user (actor) running the workflow does not have access to the context, the workflow will fail with the Unauthorized status. Using the Scheduling system to be the actor will not count towards your organization’s active user quota.
| Schedule times are interpreted in Coordinated Universal Time (UTC). |
You can find a basic how-to guide on the Set a Nightly Schedule Trigger page, and more advanced examples on the Schedule Pipelines With Multiple Workflows pages.
| Schedule triggers are the new name for what was previously known as "scheduled pipelines". |
Get started with schedule triggers
To get started with schedule triggers, you have the option of using the API, or using the CircleCI web app. In each section, select the tab for the pipeline type you are using.
Set up in the web app
-
GitHub App, GitHub App Server, and Cursor Origin
-
GitHub OAuth and Bitbucket Cloud
-
In the CircleCI web app, select your org from the org cards on your user homepage.
-
Select Projects from the sidebar and locate your project from the list. You can use the search to help.
-
Select the ellipsis

 next to your project and select Project Settings.
You can also access project settings from each project overview page using the Settings button. -
Select Project Setup in the sidebar.
-
Locate your pipeline and select Schedule +.
-
Complete the schedule trigger form:
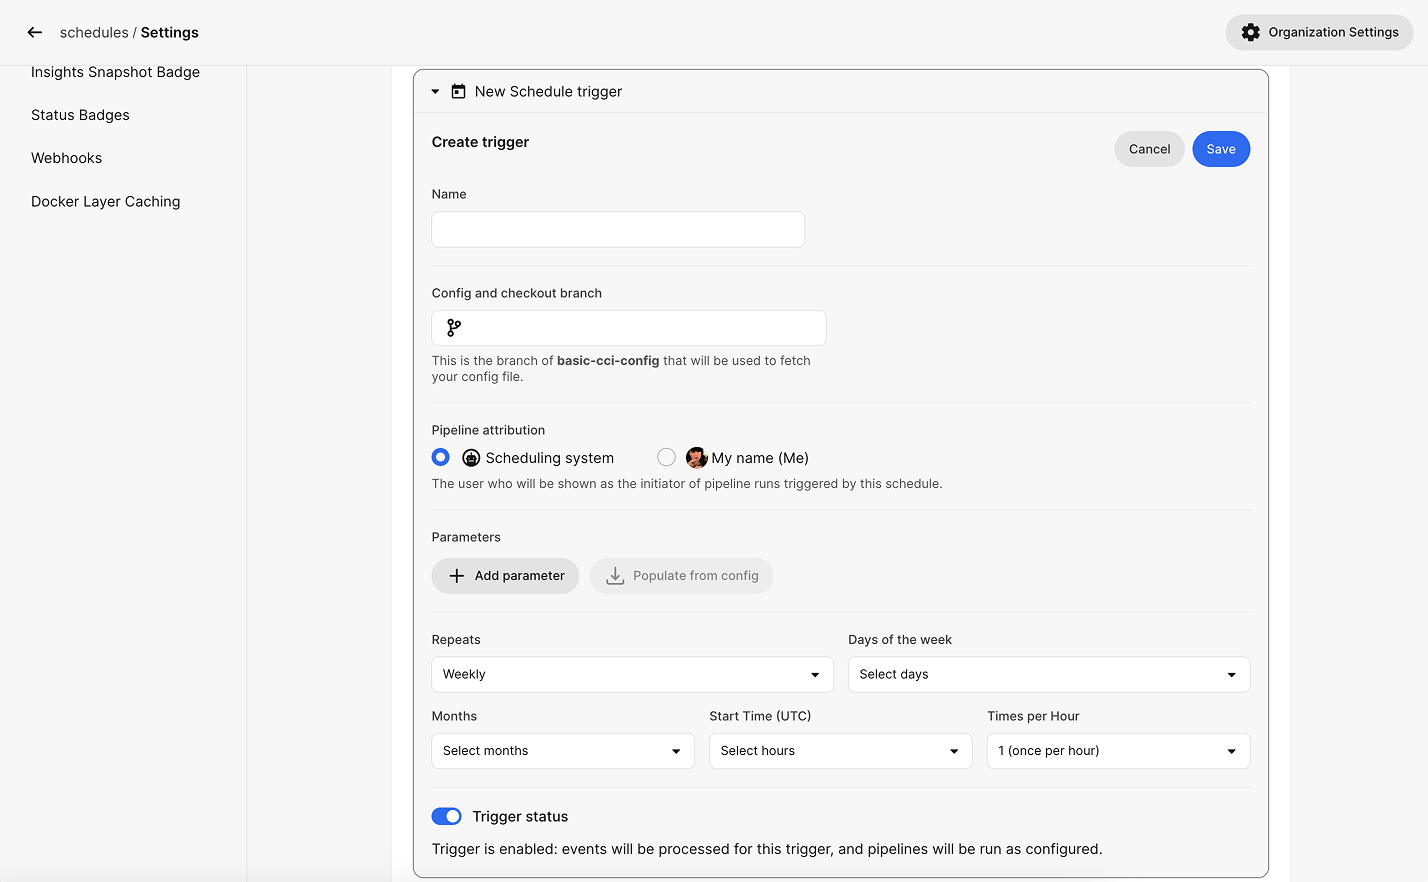 Figure 1. Screenshot showing the schedule trigger form
-
Give your trigger a descriptive name.
-
Enter a Config branch. CircleCI fetches your config file from this branch.
-
Enter a Checkout branch. CircleCI checks out your code from this branch.
-
Under Pipeline attribution, select the actor to initiate the trigger. You can choose yourself, or the scheduling system if you want the trigger to be independent from individual users. If your project requires the use of environment variables stored in restricted contexts, you must assign someone who has access to those contexts.
-
Optionally, select Add parameter to enter pipeline parameters to set when triggering the pipeline. If you enter any new pipeline parameters make sure to also add them to your config file. You can select Populate from config to automatically populate the parameters fields from your config file.
-
Enter a Schedule (cron expression). Schedules must run at least 5 minutes apart. The start time can be offset by up to 10 minutes, but stays consistent across all runs.
-
-
Make sure Trigger status is enabled, then select Save.
-
In the CircleCI web app, select your org from the org cards on your user homepage.
-
Select Projects from the sidebar and locate your project from the list. You can use the search to help.
-
Select the ellipsis
next to your project and select Project Settings.You can also access project settings from each project overview page using the Settings button. -
Select Triggers in the sidebar.
-
Select Add Trigger.
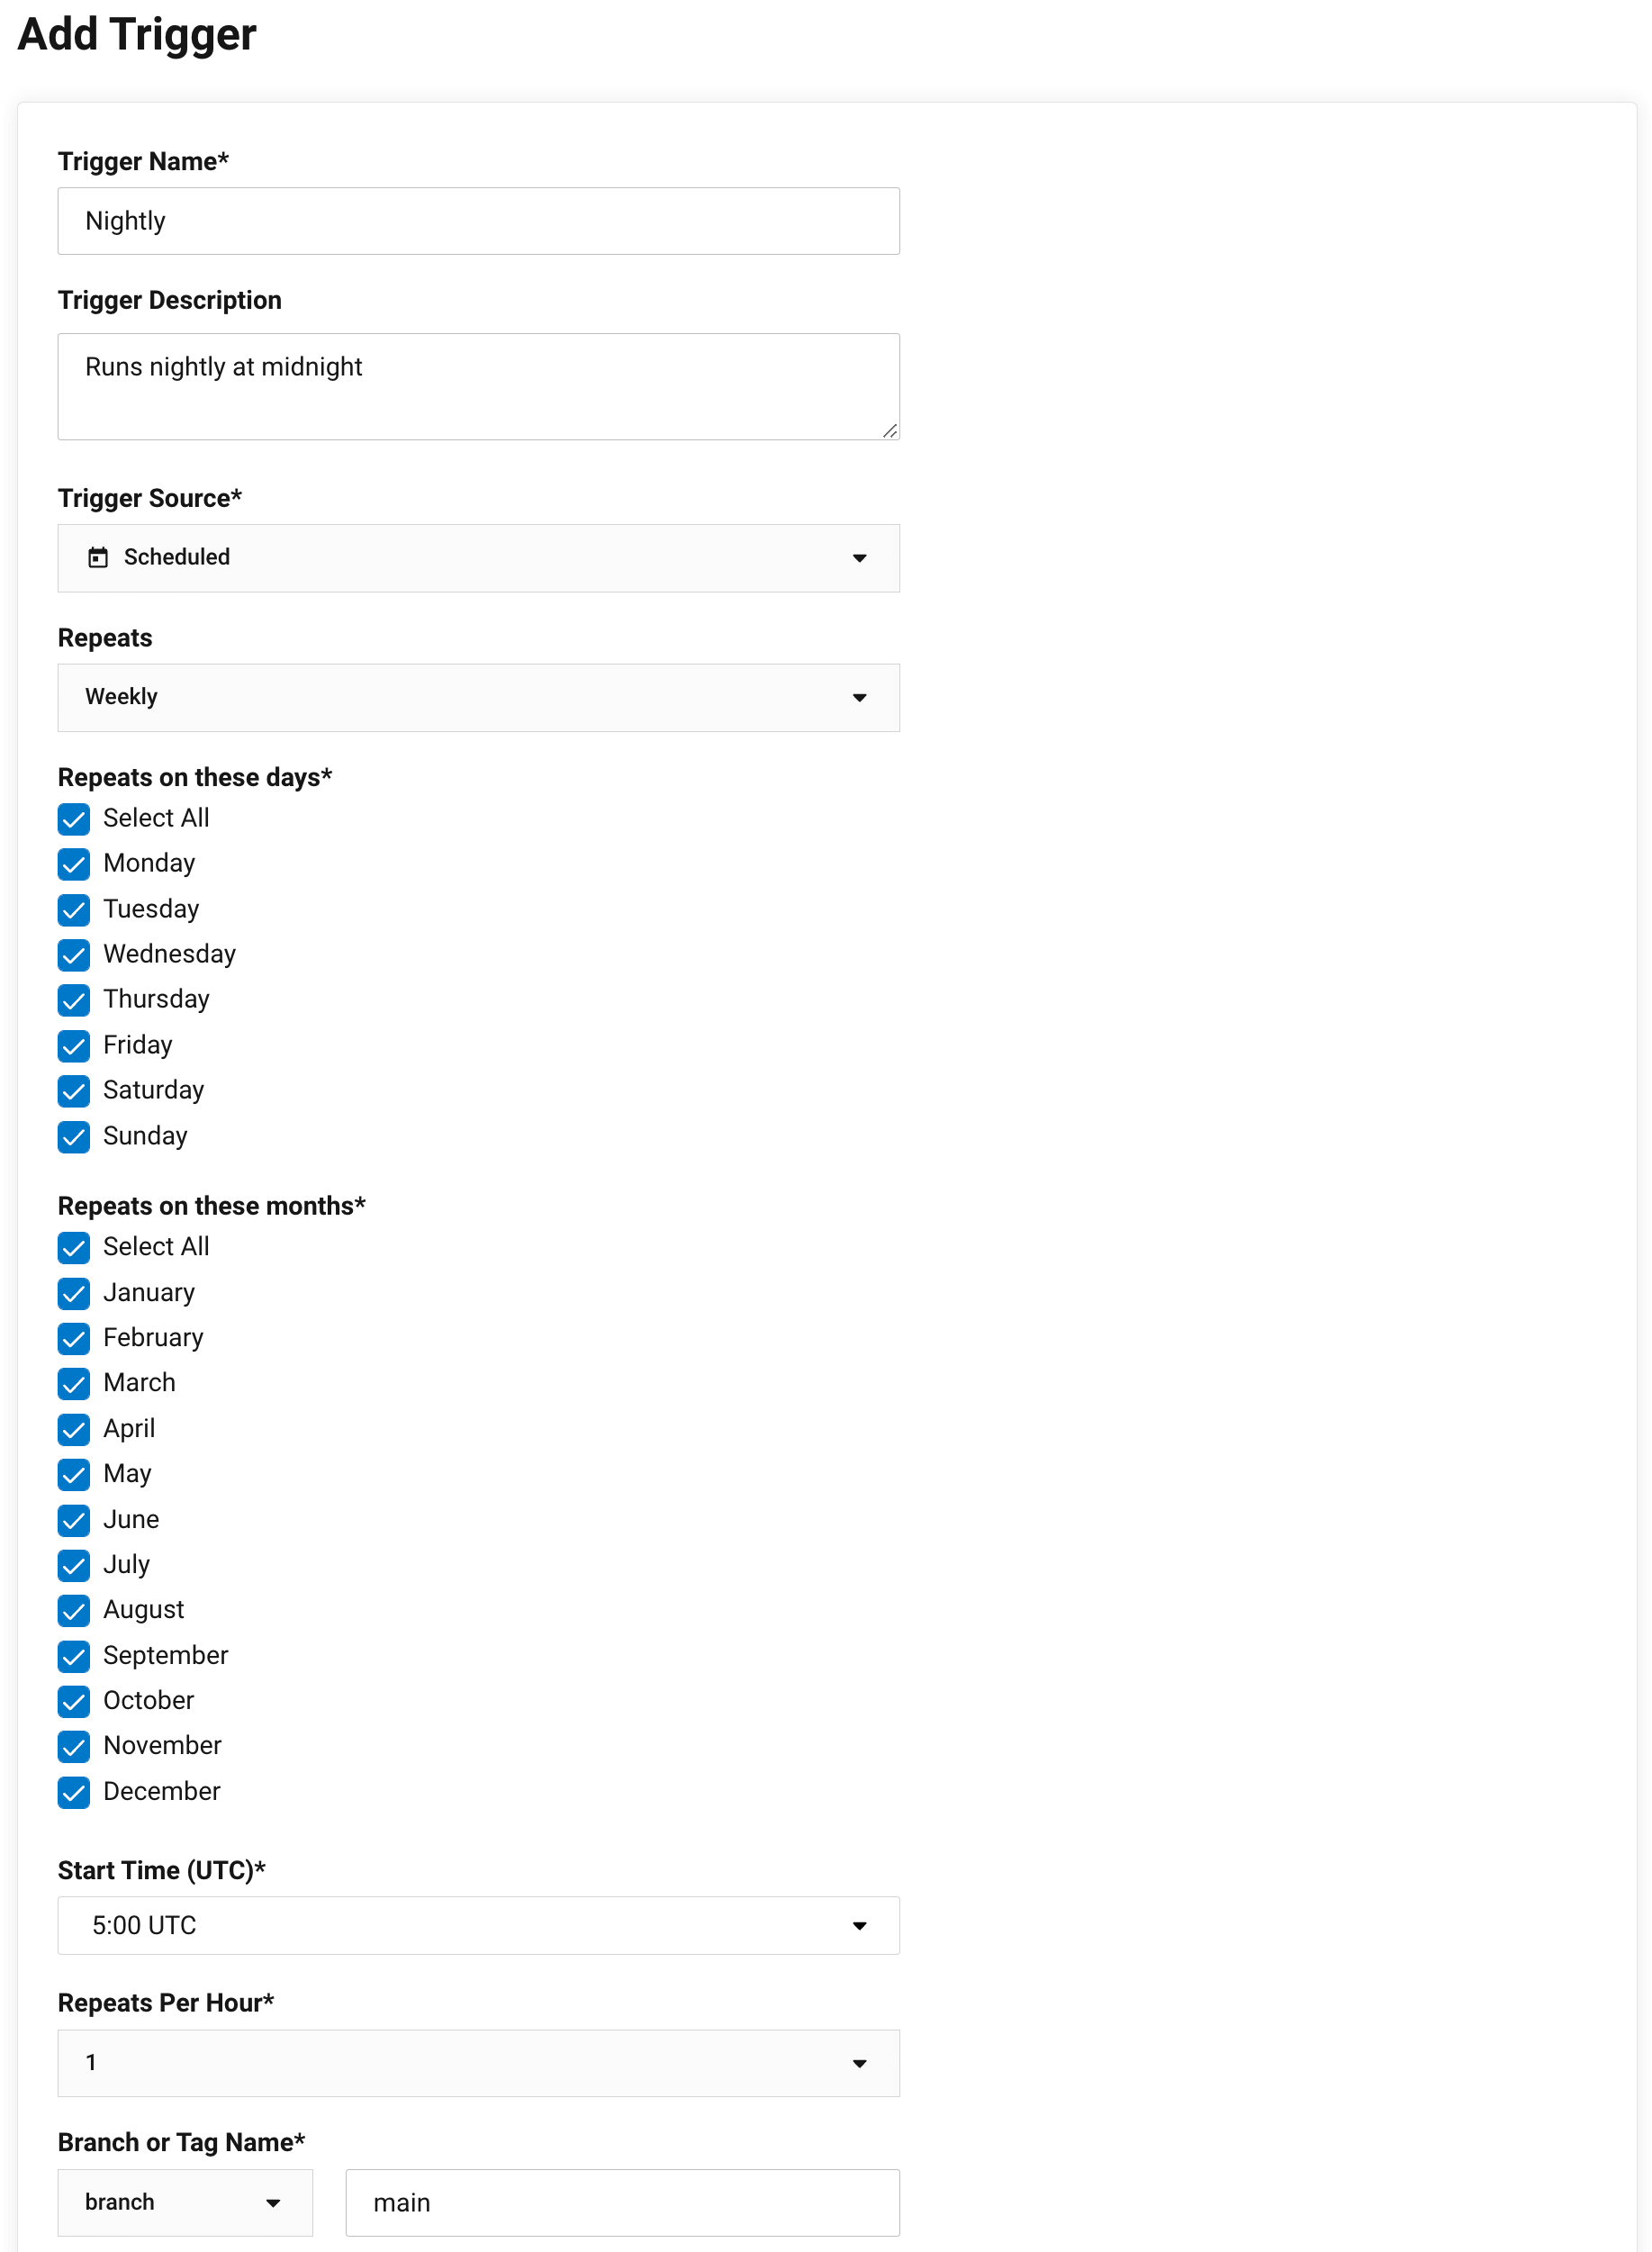 Figure 2. Screenshot showing the schedule trigger form
-
Give your trigger a descriptive name.
-
Enter an optional trigger description.
-
Select the pipeline to run.
-
Select a release frequency (weekly/monthly, which days/months/time etc.).
-
Enter a branch or tag name to determine when to trigger the pipeline.
-
Optionally, enter pipeline parameters. If you declare pipeline parameters in the form, you need to make sure they are configured in your project’s
.circleci/config.yml. See the Pipeline Values and Parameters page for more information. -
Select an actor to initiate the trigger.
-
-
Define the new schedule by filling out the form, then select Save Trigger.
If you would like to manage common schedules for multiple workflows, you will need to manually set this in your .circleci/config.yml file. See the Schedule Pipelines With Multiple Workflows page for examples.
Use the API
If your project has no scheduled workflows, and you would like to try out schedule triggers, select the tab for your pipeline type:
-
GitHub App, GitHub App Server, and Cursor Origin
-
GitHub OAuth and Bitbucket Cloud
-
Have your CircleCI personal API token ready, or create a new token by following the steps on the Managing API Tokens page. Set it as an environment variable:
$ export CIRCLE_TOKEN=<YOUR_API_TOKEN> -
List your organizations:
$ curl -g https://circleci.com/api/v3/orgs \
  --header "Authorization: Bearer $CIRCLE_TOKEN"
Locate your organization in the response and copy its
idvalue. -
Find your project ID. Replace
<ORG_ID>with your organization ID:$ curl -g "https://circleci.com/api/v3/projects?filter[org_id]=<ORG_ID>" \ --header "Authorization: Bearer $CIRCLE_TOKEN"Locate your project in the response and copy its
idvalue. -
Get your pipeline definition ID. Replace
<PROJECT_ID>with your project ID:$ curl -g "https://circleci.com/api/v3/pipelines?filter[project_id]=<PROJECT_ID>" \ --header "Authorization: Bearer $CIRCLE_TOKEN"Locate your pipeline in the response and copy its
idvalue. -
Create a new schedule trigger. Replace
<PIPELINE_ID>with your pipeline definition ID, and updateconfig.refandcheckout.refwith your target branch:curl --request POST \ --url https://circleci.com/api/v3/triggers \ --header "Authorization: Bearer $CIRCLE_TOKEN" \ --header "Content-Type: application/json" \ --data '{ "data": { "attributes": { "config": { "ref": "main" }, "checkout": { "ref": "main" }, "event": { "type": "schedule", "schedule": { "name": "nightly-build", "cron_expression": "<CRON_EXPRESSION>", "attribution_actor": "current" } }, "parameters": { "<key>": "<value>" } }, "references": { "pipeline": { "id": "<PIPELINE_ID>" } } } }'A successful call returns a
201 Createdresponse:{ "data": { "id": "<TRIGGER_ID>", "attributes": { "is_disabled": false, "created_at": "2026-10-01T11:39:37.619Z", "event": { "type": "schedule", "schedule": { "name": "nightly-build", "cron_expression": "0 2 * * *", "attribution_actor": { "id": "<YOUR_USER_ID>" } } }, "config": { "ref": "main" }, "checkout": { "ref": "main" } }, "references": { "project": { "id": "<PROJECT_ID>" }, "pipeline": { "id": "<PIPELINE_ID>" } } } }
All the following fields must be present. The API returns a 400 if any are missing:
-
config.ref: The branch to use as the config source. -
checkout.ref: The branch to check out. -
schedule.name: A unique name for the schedule. -
schedule.cron_expression: A 5-field cron expression. The API rejects a wildcard in the minute field, such as* * * * *. When listing multiple minute values using comma-separated syntax (such as10,20,30), each value must be at least five minutes apart. -
schedule.attribution_actor: Use"current"to attribute pipeline runs to the token owner, or"system"for the scheduling system. The API rejects user UUIDs.
Optional fields:
-
attributes.is_disabled: Set totrueto create the schedule in a disabled state. -
attributes.parameters: Key-value pairs of pipeline parameters to pass when the schedule triggers. Values can be strings, integers, or booleans.
For additional information, refer to the API v3 Triggers Reference.
-
Have your CircleCI token ready, or create a new token by following the steps on the Managing API Tokens page.
-
Create a new schedule using the API v2 Create Schedule endpoint. Replace
<project-slug>with your project slug:curl --request POST "https://circleci.com/api/v2/project/<project-slug>/schedule" \ --header "Circle-Token: $CIRCLE_TOKEN" \ --header "Content-Type: application/json" \ --data '{ "name": "my schedule name", "description": "some description", "attribution-actor": "system", "parameters": { "branch": "main" }, "timetable": { "per-hour": 3, "hours-of-day": [1,15], "days-of-week": ["MON", "WED"] } }'
To find your project slug, see Find a Project Slug.
For additional information, refer to the Schedule section under the API v2 Reference.
Also see the Getting Started With the API section of the API Developer’s Guide for more guidance on making requests.
View your schedule triggers
To view your schedule triggers in the web app:
-
For GitHub App, GitHub App Server, and Cursor Origin pipelines, go to .
-
For GitHub OAuth and Bitbucket Cloud pipelines, go to .
You can also list your schedule triggers using the API. For GitHub App, GitHub App Server, and Cursor Origin pipelines, use API v3. Replace <PROJECT_ID> with your project ID:
$ curl -g --url "https://circleci.com/api/v3/triggers?filter[project_id]=<PROJECT_ID>" \
  --header "Authorization: Bearer $CIRCLE_TOKEN"
For GitHub OAuth and Bitbucket Cloud pipelines, use API v2. Replace <project-slug> with your project slug:
$ curl --location --request GET "https://circleci.com/api/v2/project/<project-slug>/schedule" \
  --header "Circle-Token: $CIRCLE_TOKEN"
Migrate scheduled workflows to schedule triggers
If you have existing scheduled workflows you need to migrate to schedule triggers, use the Schedule Triggers Migration guide.
Troubleshooting
Schedule trigger runs later than expected
A schedule trigger does not always start a run at the exact scheduled time. CircleCI applies a random delay of up to 10 minutes to the scheduled time (this delay can be up to one hour for schedule triggers created before September 29, 2025). After the first run, the delay is constant for all subsequent runs.
For example, with a schedule for 08:00 UTC, the trigger may start the first run at 08:07 UTC. Subsequent runs also start at 08:07 UTC.