

Publish to PyPI using OIDC trusted publishing Preview
| Publishing to PyPI with trusted publishing is currently in preview. |
Follow this how-to guide to configure CircleCI to publish to the Python Package Index (PyPI) using trusted publishing. Trusted publishing uses OpenID Connect (OIDC) to exchange a short-lived CircleCI token for a PyPI API token at publish time. No long-lived PYPI_API_TOKEN exists to store, rotate, or leak.
For a functional example you can clone and adapt, see the CircleCI sign and publish examples.
Introduction
Trusted publishing is the recommended way to publish to PyPI from CircleCI. Compared to using a long-lived API token stored in an environment variable, trusted publishing offers the following benefits:
-
Removes the need to create, store, and rotate a publish token.
-
Issues a short-lived API token that is valid only for the duration of the publishing job.
-
Lets you scope publishing to a specific organization, project, pipeline definition, and (optionally) context.
| PyPI also supports a pending publisher for projects that do not exist yet. Unlike some registries, you do not need to publish a first release manually before configuring trusted publishing. See Step 2. |
Prerequisites
-
A CircleCI Cloud account integrated with a supported VCS. See Sign up and Try CircleCI for more information.
-
A project on CircleCI that builds your Python package.
-
A PyPI account with two-factor authentication enabled.
-
Owner access to the PyPI project, or permission to create a pending publisher for a new project name.
-
Twine version 6.1.0 or later, and Python 3.9 or later, in the Docker image (or executor) used by your publishing job. From version 6.1.0, Twine has built-in support for trusted publishing and detects CircleCI OIDC credentials automatically.
1. Gather the data you need
You need CircleCI identifiers to configure your project as a trusted publisher. These are:
-
Organization ID
-
Project ID
-
Pipeline definition ID
-
Context ID (optional)
-
VCS origin (optional)
-
VCS ref (optional)
Collect these before you visit PyPI.
1.1 Organization ID (required)
You need your CircleCI organization ID, in UUID format. You can find your org ID in , or follow these steps:
-
In the CircleCI web app, select your org from the org cards on your user homepage.
-
Select Org from the sidebar to open your organization settings page.
-
Select the Copy icon next to the organization ID to copy it to your clipboard.
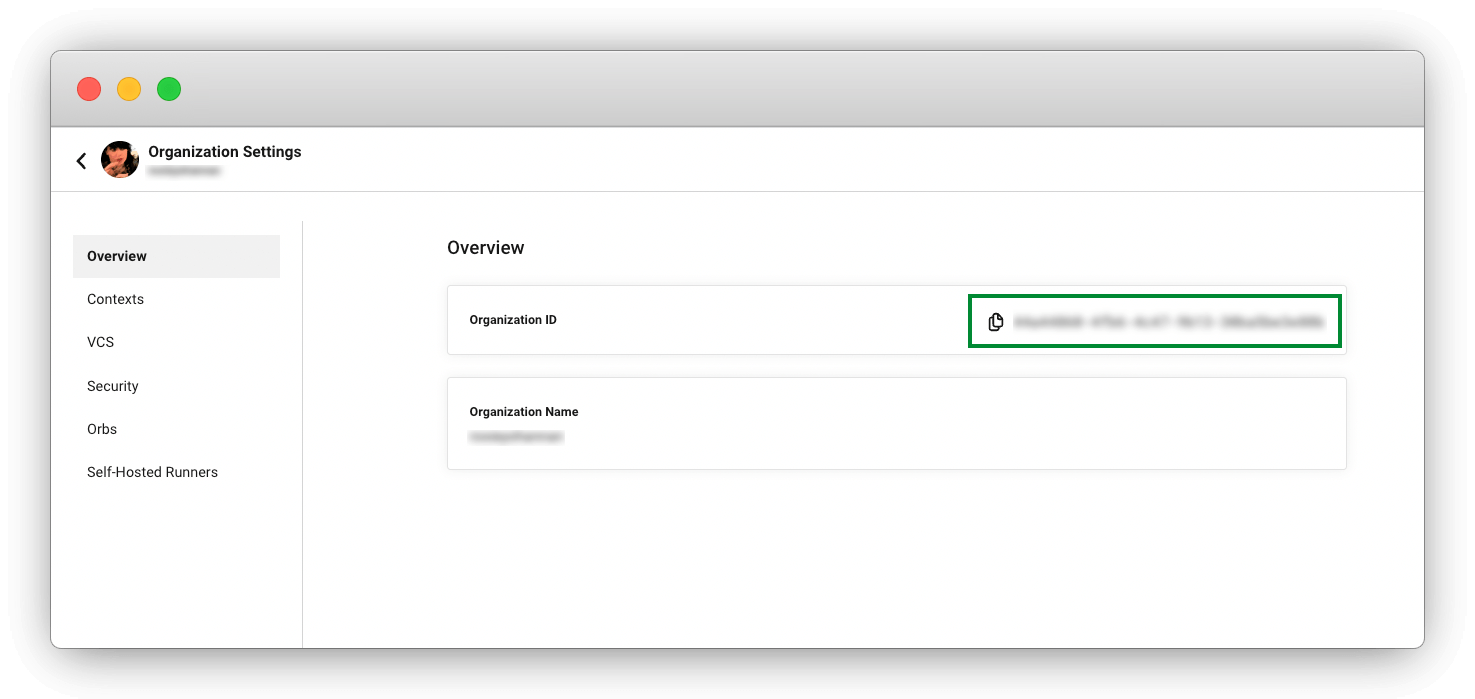 Figure 1. Organization ID available in organization settings
1.2 Project ID (required)
You need your CircleCI project ID, in UUID format. You can find your project ID in , or follow these steps:
-
In the CircleCI web app, select your org from the org cards on your user homepage.
-
Select Projects from the sidebar and locate your project from the list. You can use the search to help.
-
Select the ellipsis

 next to your project and select Project Settings.
You can also access project settings from each project overview page using the Settings button. -
Select the Copy icon next to the project ID to copy it to your clipboard.
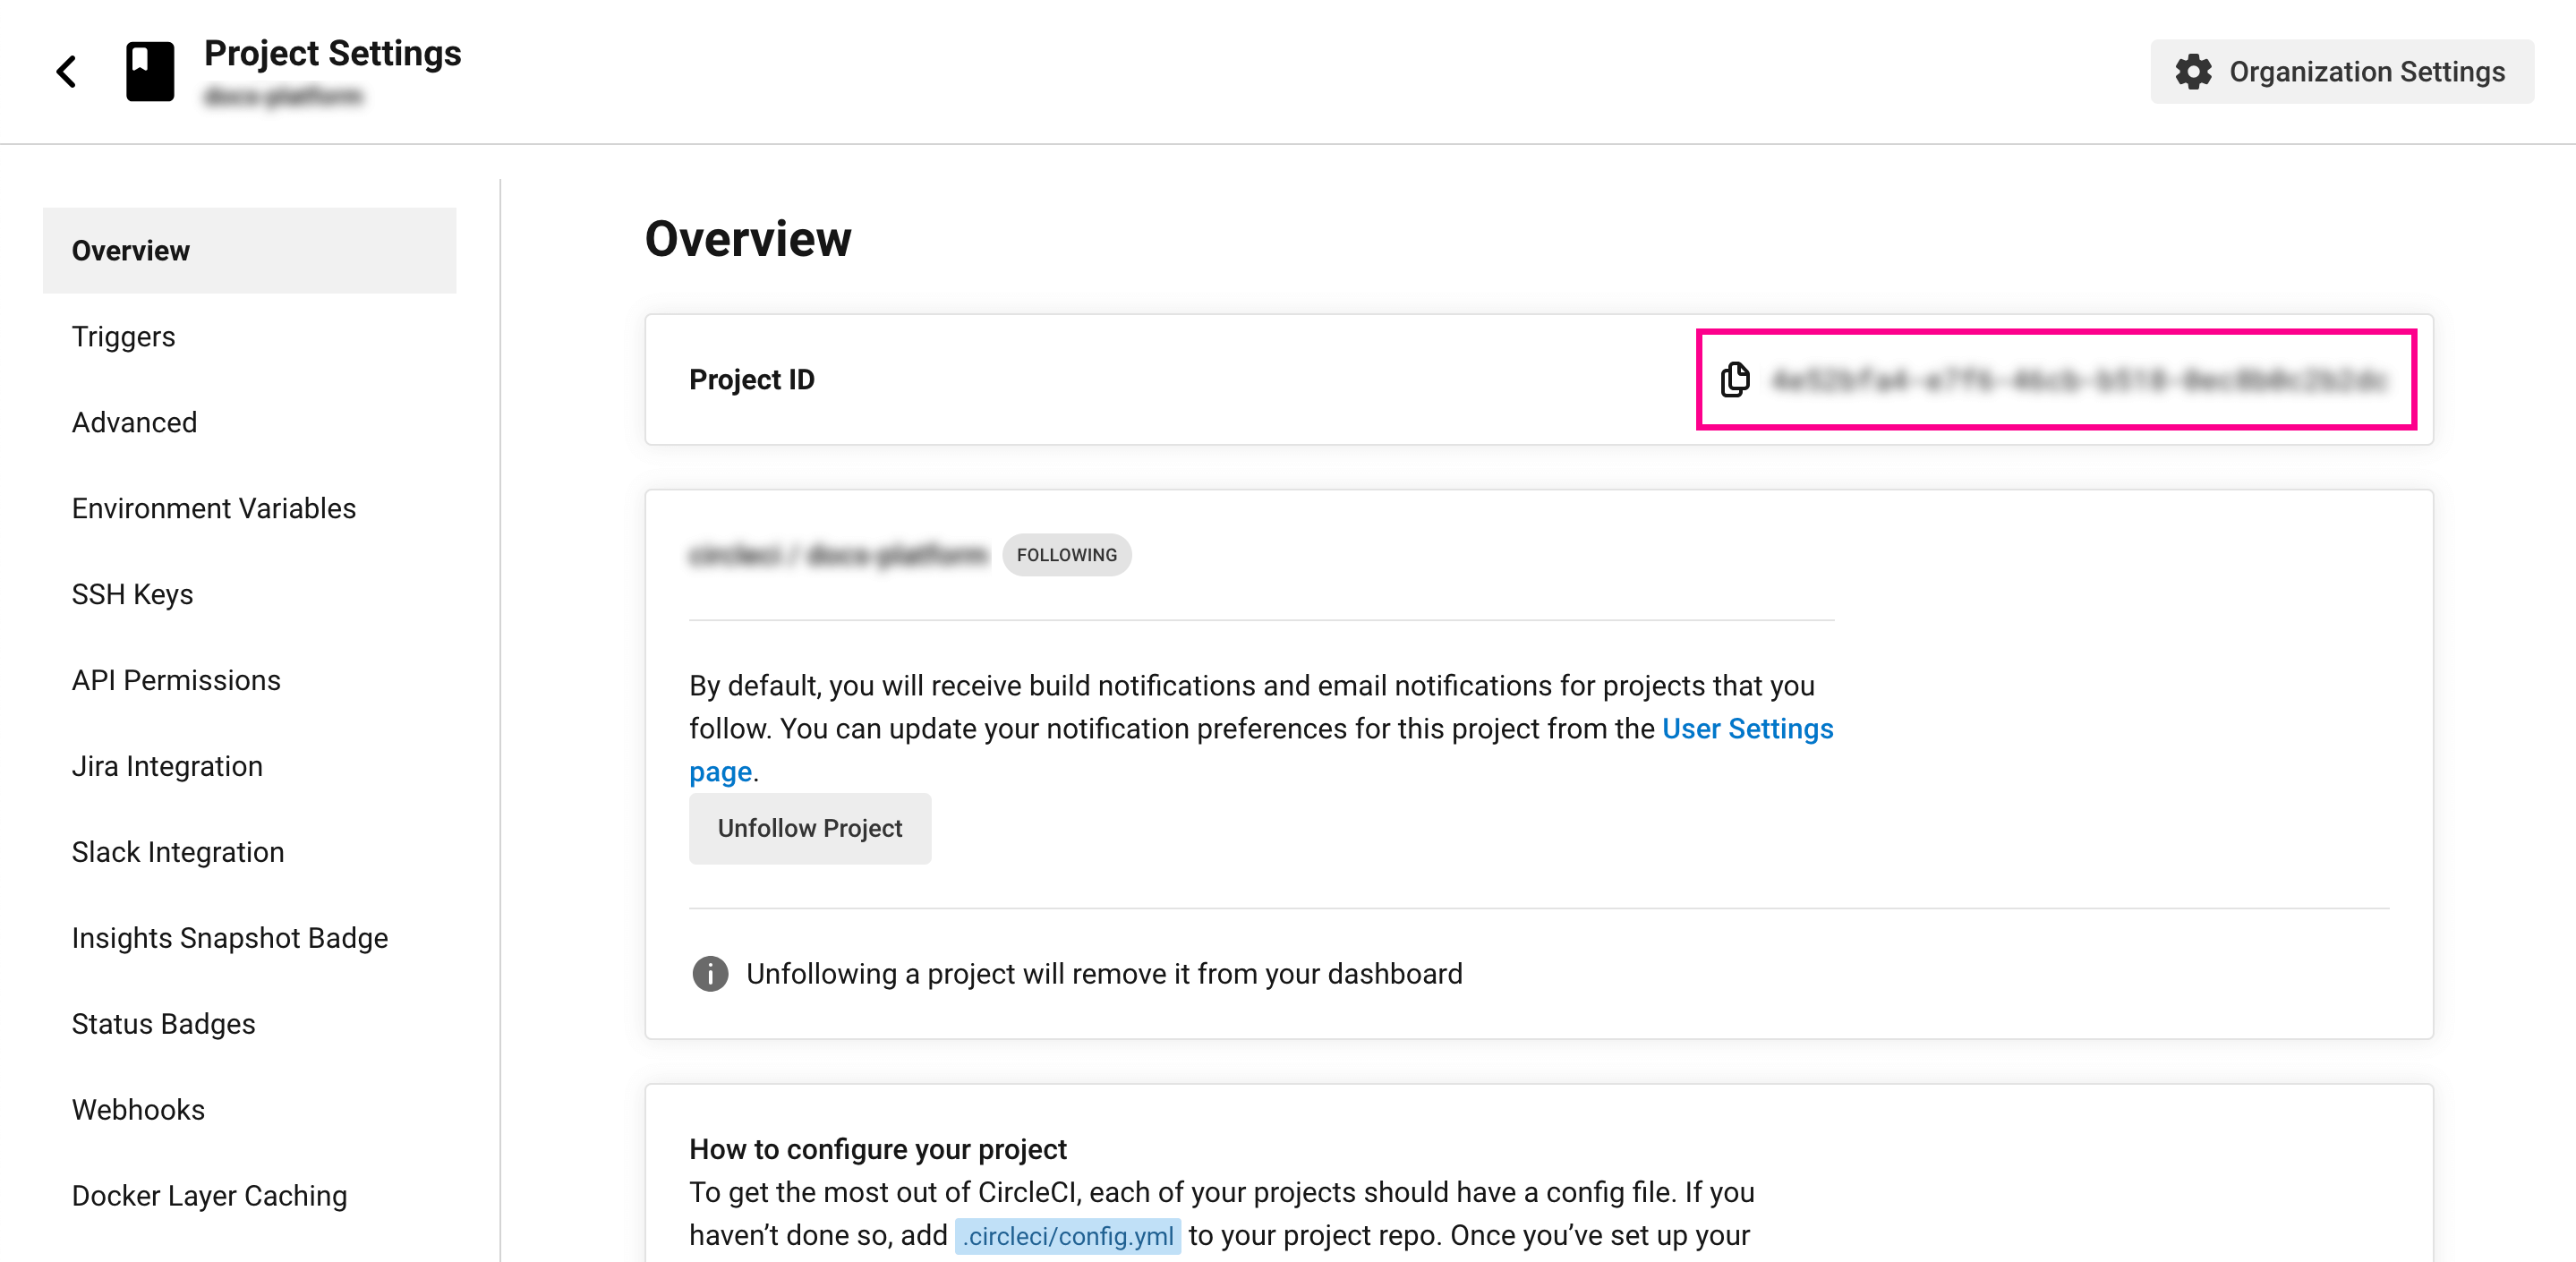 Figure 2. Project ID available in project settings overview
1.3 Pipeline definition ID (required)
You need your pipeline definition ID, in UUID format. You can find your pipeline definition ID in , where you will find details of all pipelines that have been set up for your project. Follow these steps to find your pipeline definition IDs:
-
In the CircleCI web app, select your org from the org cards on your user homepage.
-
Select Projects from the sidebar and locate your project from the list. You can use the search to help.
-
Select the ellipsis
next to your project and select Project Settings.You can also access project settings from each project overview page using the Settings button. -
Select Project Setup from the menu, or if you are using Bitbucket Cloud, select Pipelines from the menu.
-
Locate the pipeline you want to find the definition ID for.
-
Select the Copy icon next to the pipeline definition ID to copy it to your clipboard. If you are using Bitbucket Cloud, the user interface is different to the one shown in the image.
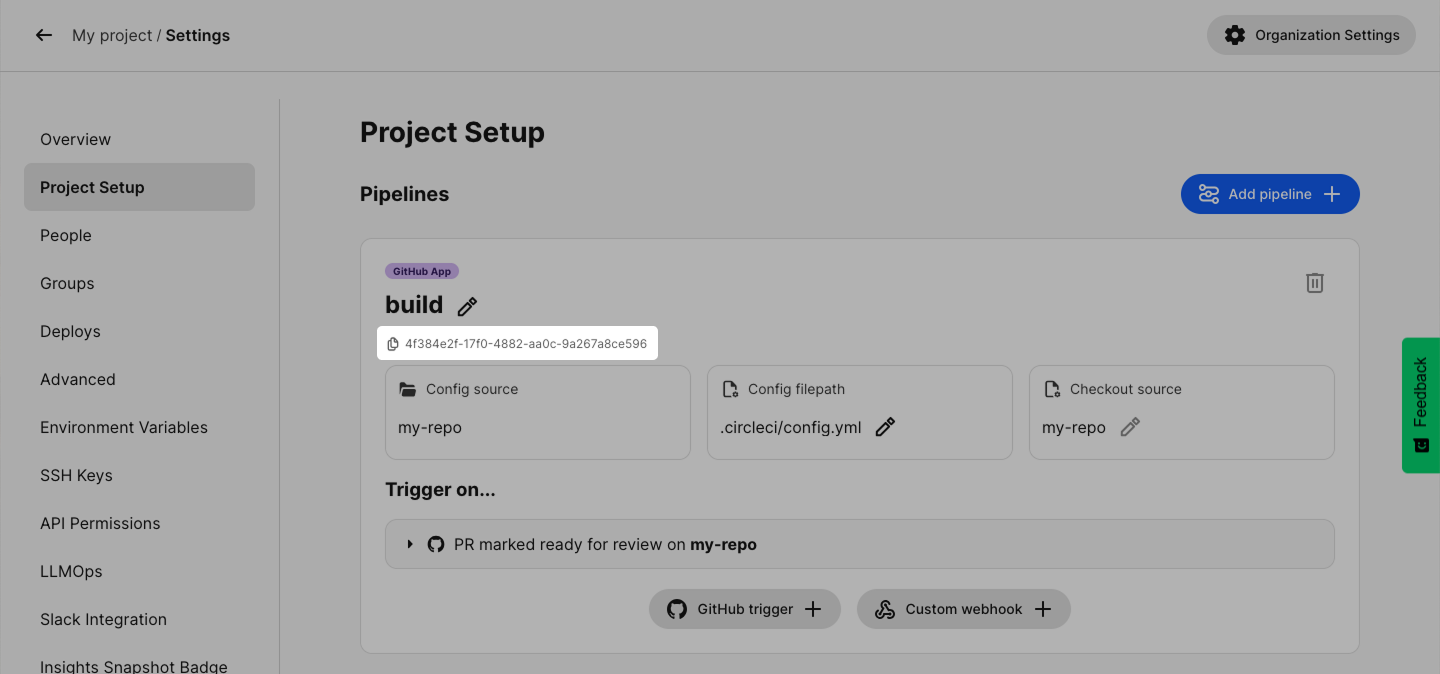 Figure 3. Pipeline definition ID on the Project Setup page
1.4 Context ID (optional)
If you intend to restrict publishing to a CircleCI context (recommended, see Step 3), get the UUID for the context now. To find a context ID, follow these steps:
-
In the CircleCI web app, select your org from the org cards on your user homepage.
-
Select Org from the sidebar to open your organization settings page.
-
Select Contexts from the menu.
-
Select the context you want to find the ID for.
-
Select the Copy icon next to the context ID to copy it to your clipboard.
Gather context ID the context you want to restrict publishing to.
1.5 VCS origin and VCS ref (optional)
Using VCS origin and VCS ref, you can create trusted publishers that can only publish from specific branches. This can be useful if you have branch protections that control who can merge and therefore trigger pipelines. One example is to have a trusted publisher bound to a main branch for production releases, and to a staging branch for generating pre-releases.
- VCS origin
-
You need the version control system origin URL for your project, for example
github.com/myorg/myrepoorgitlab.com/mylab/myproject. - VCS ref
-
The reference to the change that triggered the pipeline, for example,
refs/heads/main.
| VCS origin and VCS ref info is not available for pipelines triggered via Custom Webhooks. |
2. Set up the trusted publisher on PyPI
You can configure a trusted publisher for an existing project, or create a pending publisher for a project name that has not been published yet.
For an existing project:
-
Sign in to PyPI and navigate to Your projects.
-
Select Manage for the project you want to add Trusted Publishing to.
-
Select Publishing to begin the process.
-
Fill in the fields with the values you collected in the previous step:
-
Organization ID
-
Project ID
-
Pipeline Definition ID
-
Context ID (optional)
-
VCS origin (optional)
-
VCS ref (optional)
-
-
Save the publisher.
To publish a project name that does not exist yet, create a pending publisher instead from the Publishing page, then publish your first release through the workflow.
3. Lock it down with restricted contexts
Using restricted contexts allows you to control who can run pipelines that publish. You can also add information about your source repo and branch.
This step is optional but recommended. If you do not want context-based restrictions, skip to Step 4.
You can further restrict who and what can run the publishing job by attaching the job to a CircleCI Context and applying restrictions to that context. If you do this, remember to record the context’s UUID under Context ID when you configure the trusted publisher on PyPI (see Step 2). Three types of restrictions are available, as described in the following sections.
- Security group restrictions
-
Security Group Restrictions limit job execution to members of a specific group. Anyone outside the group who attempts to run the job fails. Use a security group restriction when you want only a small set of people to be able to publish.
- Project restrictions
-
Project Restrictions limit a context to one or more specific projects. With a project restriction in place, a job in any other project that tries to use the context will fail. Use a project restriction to ensure the publishing context can only be used by the project that owns your PyPI package.
- Expression restrictions
-
Expression Restrictions are more powerful. The most common use is restricting a context to a specific branch. For example:
pipeline.git.branch == "main"This causes any job on a different branch that tries to use the context to fail.
SSH rerun restrictions
PyPI rejects any OIDC token whose
ssh_rerunclaim istrue. As defense in depth, you can also add the following expression restriction to your publishing context so that the job cannot be re-run with SSH at all:not job.ssh.enabledYou can combine expressions to restrict the context to a specific branch and disallow SSH reruns in a single rule:
pipeline.git.branch == "main" and not job.ssh.enabled
4. Configure your CircleCI pipeline
Add a publishing job to your .circleci/config.yml. From version 6.1.0, Twine handles the following steps:
-
Detects it is running on CircleCI.
-
Retrieves an OIDC token for the
pypiaudience. -
Exchanges it with PyPI for a short-lived API token.
-
Uploads your distributions.
In the examples below, the job is attached to the context from Step 3 (here named trusted-publishing-guard) and the workflow filters to the main branch only. If you skipped Step 3, remove the context: block from the workflow.
-
Automatic (recommended)
-
Manual exchange (fallback)
With Twine 6.1.0 or later, run twine upload and let Twine handle the OIDC exchange for you.
version: 2.1

jobs:
  publish:
    docker:
      - image: cimg/python:3.12
    steps:
      - checkout
      - run:
          name: Build distributions
          command: |
            python -m pip install --upgrade build twine
            python -m build
      - run:
          name: Publish to PyPI
          command: |
            # twine detects the CircleCI OIDC credentials and performs the
            # trusted publishing exchange automatically. No token is needed.
            twine upload dist/*

workflows:
  publish:
    jobs:
      - publish:
          context:
            - trusted-publishing-guard
          filters: pipeline.git.branch == "main" # only run the publish job on the main branch
If you cannot use Twine 6.1.0 or later, retrieve the OIDC token and exchange it for a short-lived API token yourself.
version: 2.1

jobs:
  publish:
    docker:
      - image: cimg/python:3.12
    steps:
      - checkout
      - run:
          name: Build distributions
          command: |
            python -m pip install --upgrade build twine
            python -m build
      - run:
          name: Publish to PyPI
          command: |
            # Retrieve a CircleCI OIDC token for the PyPI audience
            PYPI_ID_TOKEN=$(circleci run oidc get --claims '{"aud": "pypi"}')
            # Exchange the OIDC token for a short-lived PyPI API token
            API_TOKEN=$(curl -s -X POST https://pypi.org/_/oidc/mint-token \
              -d "{\"token\": \"${PYPI_ID_TOKEN}\"}" | jq -r '.token')
            # Upload using the minted token
            twine upload --non-interactive \
              --username __token__ --password "${API_TOKEN}" dist/*

workflows:
  publish:
    jobs:
      - publish:
          context:
            - trusted-publishing-guard
          filters: pipeline.git.branch == "main" # only run the publish job on the main branch
For background on OIDC tokens in CircleCI, see Use OpenID Connect Tokens in Jobs.
5. Publish a new version
With the workflow above, every merge to main publishes a new version. Bump the version in your pyproject.toml (or setup.py) on a feature branch, open a pull request, and merge to main. CircleCI runs the publishing workflow on the merge commit, and twine exchanges the OIDC token for a short-lived API token to upload the package.
PyPI does not allow re-uploading a version that already exists. Make sure each merge to main carries a new version number.
|
Notes
-
You can test the full flow against TestPyPI before publishing to production PyPI. Configure a separate trusted publisher on TestPyPI and point
twineat it withtwine upload --repository testpypi dist/*. If you use the manual exchange, use thetestpypiaudience and thehttps://test.pypi.org/_/oidc/mint-tokenendpoint instead. -
Pull requests from forks do not have access to CircleCI secrets, including OIDC tokens. A fork cannot trigger a publish.
Track your deployments with deploy markers
Deploy markers provide a way to track and manage your PyPI package publications in the CircleCI web app. When you add deploy markers to your deployment job, you can view a timeline of all deployments, track their status, and enable rollback and deploy pipelines.
You have two options for setting up deploy markers:
-
In-app setup: Use the guided setup in the CircleCI web app when configuring a Rollback Pipeline or Deploy Pipeline. The setup walks you through adding deploy markers to your configuration. If you are using GitHub and have the CircleCI GitHub App installed, you can use AI to generate the deploy marker configuration automatically.
-
Manual setup: Add deploy marker commands directly to your
.circleci/config.ymlfile by following the Configure Deploy Markers guide.
Both approaches enable you to track deployment history and manage rollbacks directly from the CircleCI web app.
Feedback
If you have questions or feedback, drop by the CircleCI Discuss forum or the CircleCI Discord community.